


If you’re looking for a cute baking idea that will bring smiles to every face, Reindeer Snickerdoodles are the perfect treat to make. These soft, chewy cookies combine the rich flavor of creamy peanut butter with a delightful touch of chocolate and candy details that turn each cookie into an adorable reindeer face.
The process is easy, fun, and ideal for anyone who enjoys creative home baking. Whether you’re preparing them for family, friends, or a casual get-together, these peanut butter-based Reindeer Snickerdoodles are a sweet way to add charm to your dessert table. With just a few simple ingredients and a bit of creativity, you can make these cookies look like they came straight out of a bakery. Let’s explore how to make them step by step, with helpful tips to get perfect results every time.
Preparing the Perfect Peanut Butter Cookie Base
Choosing the Right Ingredients
The secret to irresistibly soft Reindeer Snickerdoodles starts with high-quality ingredients. Use creamy peanut butter such as Jif Creamy Peanut Butter—avoid natural varieties that separate, as they can affect texture. Make sure your unsalted butter is softened to room temperature before mixing, ensuring the dough blends smoothly. Always pack your brown sugar tightly when measuring, as it helps retain moisture and adds a deeper caramel flavor. Use Simply Organic Pure Madagascar Vanilla Extract, a version that’s free from alcohol, for the best aroma.
Each ingredient plays a key role: the brown sugar provides chewiness, butter adds richness, and peanut butter gives a nutty base that complements the cinnamon-sugar coating of a traditional snickerdoodle. You’ll also need an egg, milk, all-purpose flour, baking soda, and a pinch of salt to create a balanced dough that holds its shape during baking.
Mixing for Texture and Flavor
Start by creaming together the butter, brown sugar, and white sugar in a large mixing bowl using a stand or electric mixer. Beat until fluffy—about one minute—before adding peanut butter, milk, vanilla, and egg. Continue mixing until light and smooth. This aeration step is essential for achieving a soft texture. Next, sift together the flour, baking soda, and salt before gradually incorporating them into the wet mixture. Use a spatula to scrape down the sides of the bowl to ensure an even blend. The dough should be slightly firm yet pliable.
Avoid overmixing, which can make cookies dense and tough. Once the dough is ready, refrigerate it for 15 minutes. Chilling helps the butter firm up, preventing cookies from spreading too much in the oven. You’ll know the dough is ready when it feels cool and easy to scoop.
Expert Tips for Success
- Temperature matters: Always use room-temperature butter and egg for a consistent texture.
- Avoid natural peanut butter: Its oils can cause uneven baking and dryness.
- Refrigerate the dough: It’s the best way to ensure thick, bakery-style cookies that hold their shape.
Reindeer Snickerdoodles are all about balance each bite should deliver the perfect blend of soft peanut butter and light crunch from the edges. Once your dough is chilled, you’re ready to shape your adorable cookies.
Print
Reindeer Snickerdoodles
- Total Time: 25 minutes
- Yield: 26 cookies
- Diet: Vegetarian
Description
Soft, chewy, and delightfully cute Reindeer Snickerdoodles made with creamy peanut butter, brown sugar, and fun candy decorations. Perfect for family baking or gifting.
Ingredients
3/4 cup packed brown sugar
1/4 cup granulated sugar
1/2 cup unsalted butter, softened
3/4 cup creamy peanut butter (such as Jif Creamy Peanut Butter)
1 tablespoon milk
1 1/2 teaspoons Simply Organic Pure Madagascar Vanilla Extract
1 whole egg
1 3/4 cups all-purpose flour
1/2 teaspoon baking soda
1/8 teaspoon salt
52 mini pretzels
26 red M&Ms
52 chocolate chips
Instructions
1. In a large mixing bowl, cream together the butter, brown sugar, and granulated sugar using a stand or electric mixer until fluffy, about 1 minute.
2. Add the peanut butter, milk, vanilla extract, and egg. Beat until light and smooth.
3. In a separate bowl, whisk together the flour, baking soda, and salt. Gradually add to the wet mixture until a soft dough forms.
4. Refrigerate the dough for 15 minutes to firm up.
5. Preheat oven to 350°F and line baking sheets with parchment paper.
6. Use a mini ice cream scoop or two tablespoons to form 26 dough balls. Shape each into an upside-down triangle and place on the cookie sheet.
7. Lightly press the tops with your palm, then press two mini pretzels into the top corners for antlers and one red M&M on the lower point for the nose.
8. Bake for 10 minutes, until edges are lightly golden.
9. Remove from the oven and immediately press two chocolate chips into each cookie to form eyes.
10. Let the cookies rest on the baking sheet for 5 minutes before transferring to a cooling rack.
11. Cool completely before storing or serving.
Notes
Store cookies in an airtight container for 3–5 days at room temperature or freeze for up to 4 months.
Use creamy peanut butter only; natural varieties may cause separation.
Room-temperature butter and egg ensure a smooth, even dough.
If using salted butter, omit the additional salt.
For a nut-free option, substitute sunflower seed butter or cookie butter.
Freeze unbaked dough balls for quick baking later; add 1–2 minutes to bake time.
To keep cookies soft longer, place a slice of white bread in the storage container.
- Prep Time: 15 minutes
- Cook Time: 10 minutes
- Category: Dessert, Holiday Cookies
- Method: Baking
- Cuisine: American
Shaping and Decorating Your Reindeer Snickerdoodles
Forming the Cookie Shapes
Before shaping, preheat your oven to 350°F and prepare baking sheets lined with parchment paper. Use a mini ice cream scoop or two tablespoons to portion out 26 dough balls. Roll each ball between your palms until smooth, then gently flatten into an upside-down triangle. This will serve as the base shape for your reindeer face.
Once shaped, place the cookies about two inches apart on the baking sheet to allow even spreading. Gently press the top of each triangle to slightly flatten it—this creates a smooth canvas for your decorations later.
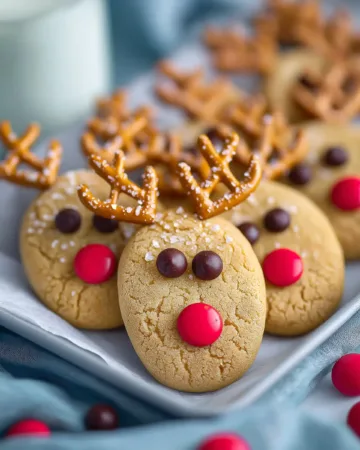
Creating the Adorable Reindeer Faces
Now comes the fun part—decorating! Each cookie transforms into a reindeer with just a few simple additions. Place two mini pretzels at the top corners of the triangle to form the antlers. Press a red M&M at the tip for the nose, creating that signature playful look. The candy color adds charm and contrast against the golden-brown cookie.
Once baked for about 10 minutes, remove the cookies and immediately press two chocolate chips near the center for the eyes. The residual heat helps them melt slightly and adhere perfectly without losing shape. Let the cookies cool on the tray for five minutes before transferring them to a wire rack.
Decoration Tips
- Don’t overcrowd your pan—cookies need space to expand slightly without merging.
- Work quickly when adding chocolate chips for the eyes; cookies set fast as they cool.
- For variation, you can use mini candy-coated chocolates for colorful eyes or swap M&Ms with red candy buttons for a softer finish.
Each reindeer cookie ends up with its own personality, making this baking experience not only delicious but creatively satisfying.
Baking, Cooling, and Storing the Cookies
Baking to Perfection
Baking time determines texture, so keep an eye on the clock. Bake the cookies for 10 minutes, rotating the tray halfway through for even browning. The edges should appear slightly golden while the centers remain soft. Avoid overbaking, as these cookies continue to set while cooling.
When done, let them rest on the baking sheet for five minutes before moving to a cooling rack. This short rest allows the cookies to firm up enough to handle without breaking.
Storage and Freshness Tips
Store your Reindeer Snickerdoodles in an airtight container at room temperature for up to five days. For longer storage, freeze them in layers separated by parchment paper for up to four months. When ready to enjoy, allow the cookies to thaw at room temperature for 15–20 minutes.
For a fresher taste, you can also freeze unbaked cookie dough balls. When ready to bake, simply place them on a tray and bake directly from frozen—just add one or two extra minutes to the baking time.
Notes for Consistency
- Always cool completely before storing to avoid condensation inside the container.
- For added softness after a few days, place a slice of white bread in the container; it keeps moisture balanced.
- Avoid refrigerating baked cookies, as it can dry them out.
Proper storage ensures your cute peanut butter cookies maintain their irresistible chew and appearance, even days after baking.
Creative Variations and Pro Baking Tips
Flavor Twists and Fun Additions
While the traditional Reindeer Snickerdoodle combines peanut butter with chocolate, there’s room for customization. Try rolling the dough balls in cinnamon sugar before shaping for a spiced snickerdoodle touch. You can also drizzle melted chocolate over cooled cookies for an extra decorative flair.
For a nut-free version, substitute sunflower seed butter or cookie butter—both maintain a similar creamy texture. If you prefer a richer chocolate profile, mix in mini chocolate chips directly into the dough before baking.
Expert Baking Tricks for a Professional Finish
- Uniform Size: Use a cookie scoop for evenly baked cookies.
- Baking Sheets: Light-colored sheets help prevent overbrowning.
- Cooling Process: Always cool on a rack to preserve crisp edges.
- Dough Chilling: Longer chilling (up to 1 hour) enhances flavor and shape retention.
- Perfect Shine: Gently brush the cookies with a tiny bit of melted butter right after baking for a soft sheen.
Serving Suggestions
Reindeer Snickerdoodles pair beautifully with warm milk, hot cocoa, or coffee. Their adorable look makes them ideal for sharing with friends or gifting in clear treat bags tied with a ribbon. Each cookie tells a story of creativity and sweetness, perfect for all occasions.
Conclusion
Reindeer Snickerdoodles are more than just cookies—they’re a delightful combination of taste, creativity, and fun. The soft, chewy texture of peanut butter pairs wonderfully with the playful chocolate and candy decorations that form each cute reindeer face. With simple ingredients, an easy step-by-step process, and room for creative touches, this recipe turns ordinary baking into an enjoyable experience.
The cookies are versatile enough for any occasion, whether you’re hosting a small gathering, making gifts, or simply craving something homemade. Stored properly, they stay fresh and flavorful for days, ready to bring joy with every bite. With these simple steps, tips, and variations, anyone can bake charming Reindeer Snickerdoodles that taste as good as they look.