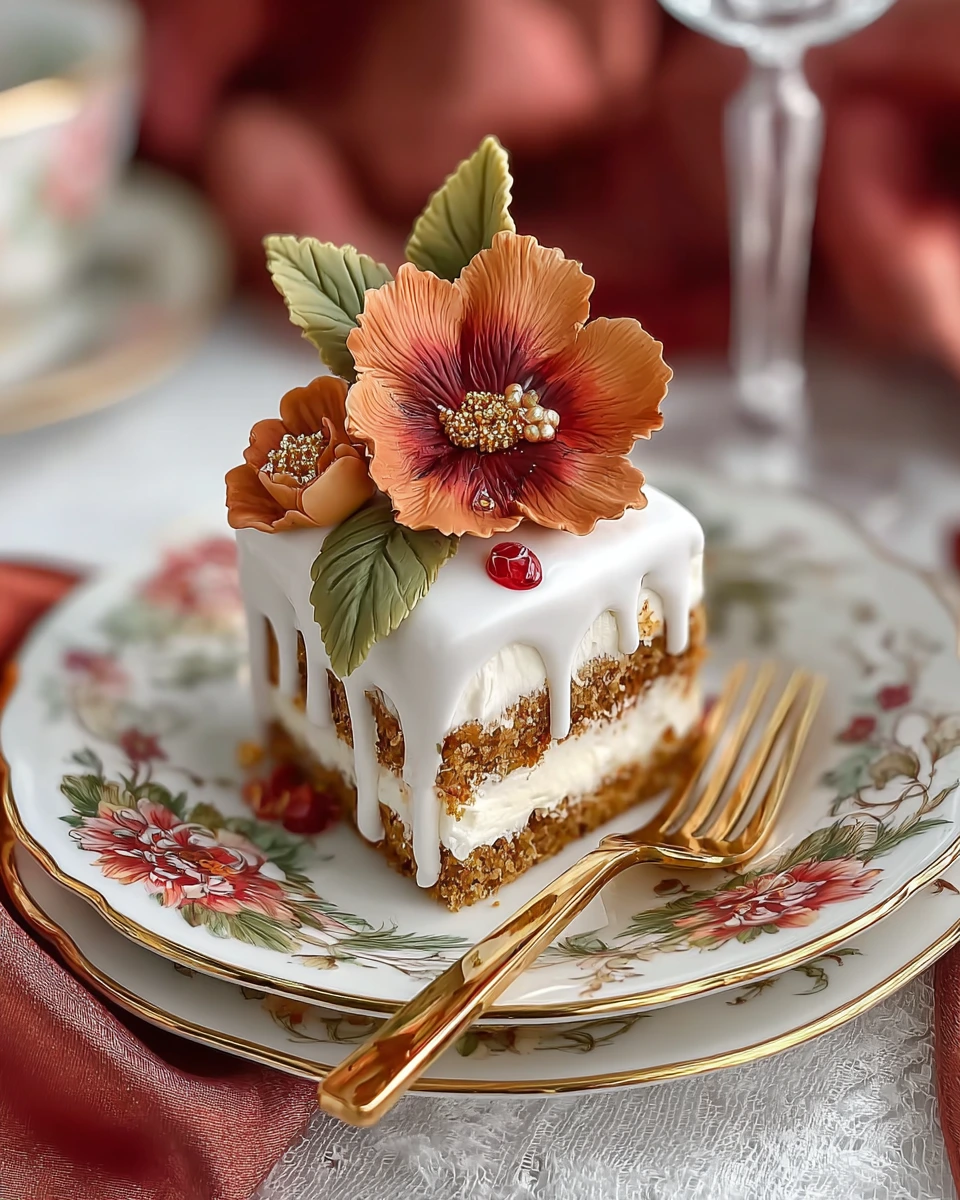
Pumpkin Cranberry Mini Cakes are a perfect blend of warm fall spices, tangy cranberry filling, and velvety cream cheese, all topped with an elegant marzipan finish. These small but flavorful desserts are ideal for Thanksgiving tables, holiday gatherings, or anytime you want to wow your guests with a seasonal treat.
This article will walk you through everything you need to know to make these beautiful mini cakes at home, including how to prep the pumpkin sponge, make the fillings, assemble the layers, and finish with a stunning glaze and marzipan decorations. Whether you’re a seasoned baker or trying something new, this step-by-step breakdown will guide you toward creating picture-perfect and delicious results.
Making the Perfect Pumpkin Sponge Base
Mixing the Dry and Wet Ingredients Just Right
The texture of these mini cakes depends on a well-balanced sponge base. To get started, gather all-purpose flour, baking powder, baking soda, cinnamon, and a pinch of salt. Sift them together to create an evenly mixed dry base. This helps in even rising and consistent flavor.
In a stand mixer or with a hand mixer, beat eggs with granulated sugar until the mixture becomes thick and pale. This step is critical because it adds volume and creates the airy structure needed for a light sponge. Once that’s done, blend in the canned pumpkin until the mixture is smooth and fully combined.
Now fold in the dry ingredients gently to preserve the fluffiness. Avoid overmixing, as it can make the sponge dense. Spread the batter into a well-greased 15×10 jelly-roll pan lined with parchment paper.
Baking and Prepping for Layering
Preheat your oven to 375°F. Bake the sponge for 12 to 14 minutes or until the surface springs back when lightly touched. If you’re using a dark pan, check for doneness a minute earlier.
Once baked, flip the sponge onto a sugared parchment sheet and peel off the lining. Let it cool completely before handling further. Repeat the same process again so you have two full sponge sheets ready. These will later be layered with cranberry and cream cheese fillings.
The key here is patience – allow the sponge layers to cool down and firm up slightly before you begin assembling. Properly cooled sponge is easier to cut, stack, and handle without cracking or tearing.
Crafting the Cranberry Filling and Building Flavor Depth
Blending Whole Cranberries for a Bold, Tangy Core
The cranberry filling in this Pumpkin Cranberry Mini Cakes Recipe brings a vibrant contrast to the sweet pumpkin sponge. Start by placing a full can (14 oz.) of organic whole cranberry sauce into a saucepan. Add a quarter cup of granulated sugar and gently stir over medium heat until it begins to steam. This allows the sugar to dissolve and brings out the natural tartness of the cranberries.
Next, stir in freshly grated orange zest from a large navel orange. The citrus zest enhances the fruitiness and adds a bright, fragrant layer that lifts the overall flavor.
Once the mixture is warm and combined, use an immersion blender to puree it until smooth. If you don’t have one, let it cool slightly and blend in a standard blender, then return the mixture to the pan to finish. This step ensures your filling is velvety and spreads easily between layers.
Thickening and Chilling the Filling for Structure
In a small bowl, mix two tablespoons of cold water with one tablespoon of cornstarch to make a slurry. Pour this mixture into the warm cranberry puree while whisking steadily. Keep the mixture on the heat and continue stirring until it thickens to a jam-like consistency. This should take about 3 to 5 minutes.
Once thickened, remove from heat and let it cool. For an optional citrus twist, stir in a tablespoon of orange liqueur, or skip it to keep the recipe non-alcoholic. Place the cranberry filling in the refrigerator until it’s completely cooled and set.
A properly thickened filling ensures the cake layers stay intact and don’t become soggy. It’s important for both flavor balance and texture stability. With the cranberry layer chilling, it’s time to move on to the luxurious cream cheese filling, the creamy heart of this recipe
Whipping the Cream Cheese Filling to Perfection
Combining Key Ingredients for a Smooth, Fluffy Texture
The cream cheese filling brings a rich and slightly tangy contrast to the tart cranberry and spiced pumpkin. It’s essential to begin with room-temperature ingredients to avoid a lumpy texture.
In a mixing bowl, combine one 8 oz. package of softened cream cheese, 6 tablespoons of butter, and 1 teaspoon of vanilla extract. Beat the mixture until smooth and fully blended. Slowly sift in one cup of powdered sugar while mixing on low speed, then increase to medium-high until the mixture becomes fluffy and creamy.
Scrape down the sides of the bowl and mix again to ensure every bit is incorporated. The final result should be light, airy, and spreadable—firm enough to hold its shape between the cake layers, but soft enough to blend harmoniously with the other textures.
Balancing Sweetness and Richness for Flavor Harmony
While the cream cheese filling is indulgent, it’s not overpowering. The vanilla adds warmth, while the butter boosts the mouthfeel. This layer provides a mellow counterpoint to the tart cranberry and spicy pumpkin.
You can refrigerate the filling for a short time if it feels too soft for spreading. Just don’t let it harden, or it will be difficult to work with during assembly. Now that both fillings are ready, it’s time to bring all the components together.
Assembling the Pumpkin Cranberry Mini Cakes
Layering the Cake for Perfect Flavor Stacking
With all three components ready—the pumpkin sponge, cranberry filling, and cream cheese filling—it’s time to assemble the mini cakes. Start by taking one of your pumpkin sponge sheets and slicing it into three equal 10×5-inch sections using a long serrated knife. Work gently to keep the edges clean and the layers intact.
Place the first sponge layer on a flat surface. Spread a generous layer of the chilled cranberry filling over it, smoothing with an offset spatula to ensure even coverage. Top this with the second sponge layer and press down lightly to secure it.
Now spread the cream cheese filling evenly across the top of the second sponge. Again, use a spatula for smoothness and precision. Finally, add the third sponge section on top to complete the cake stack. Refrigerate for about 25 minutes until firm. This step helps lock in the layers and makes the cake easier to glaze and cut.
Repeat the same process with your second pumpkin sponge sheet so you end up with two fully assembled cakes, each ready for decorating and portioning.
Prepping for Decoration with Marzipan and Glaze
Once chilled, brush the top of each cake with a light mist of water. Then roll out a sheet of marzipan to just under 1/4 inch thick. Place it over the top layer of the cake and trim the edges carefully so the marzipan fits perfectly on top. Refrigerate again for about 15 minutes to firm it all up.
Using a serrated knife, score the marzipan lengthwise down the middle and then every 2 inches crosswise. This should give you 10 evenly sized mini cakes per sheet. Cut each piece slowly with a gentle sawing motion to avoid tearing the layers.
You now have 20 mini cakes ready for their final glaze and decorative touches.
Decorating with Glaze and Marzipan Flowers
Preparing a Thick Vanilla Glaze for a Smooth Finish
The glaze adds a beautiful finish that not only tastes delicious but also locks in moisture. In a small bowl, combine 2 cups of powdered sugar, 3 to 4 tablespoons of milk or cream, and 1 teaspoon of vanilla extract. Whisk the mixture until it forms a thick, smooth ribbon that holds briefly before sinking back into the bowl.
This glaze should be thick enough to sit on top of each mini cake and slowly cascade down the sides. If it’s too thin, it’ll soak in and disappear. If too thick, it won’t spread nicely. Adjust with small amounts of liquid as needed.
Spoon the glaze over each mini cake one at a time. Use the back of the spoon to gently push the glaze toward the edges, letting it drip naturally. Once glazed, allow the cakes to sit at room temperature for about an hour so the icing sets and becomes firm to the touch.
Creating and Applying Marzipan Flowers and Leaves
For the decorative topping, color two small balls of marzipan—one with copper brown gel food color and the other with moss green. Knead until the colors are evenly distributed and the marzipan is pliable. If it becomes sticky, add a touch of powdered sugar to stabilize the texture.
Roll out the colored marzipan and use a small flower plunger cutter to create blossoms from the copper batch. Gently shape each one using a fluted, pointed star fondant tool for added detail. From the green marzipan, cut out leaf shapes with a leaf plunger cutter. For realism, use a leaf veiner tool to emboss texture onto each leaf.
Once the glaze is set, arrange a flower and a leaf on top of each cake. Use a tiny dab of glaze or a bit of water to secure the decorations in place. Finish with a single gold sugar pearl in the center of each flower, using food-safe tweezers for precision.
These tiny, hand-crafted decorations make the cakes look professional, seasonal, and celebration-ready. Keep the cakes stored in a tall pan or cake box loosely covered with plastic wrap. Avoid airtight containers to prevent glaze from wrinkling.
Conclusion: Bringing It All Together for a Stunning Dessert Display
The Pumpkin Cranberry Mini Cakes Recipe is more than just a dessert—it’s a labor of love layered with seasonal flavor, festive color, and elegant design. From the soft, spiced pumpkin sponge to the tangy cranberry filling and the silky cream cheese layer, each bite delivers a balanced mix of textures and tastes that scream fall in the most delightful way.
These mini cakes are ideal for celebrations, family gatherings, or even as edible gifts. While the process involves multiple steps, breaking it up over a couple of days makes it totally manageable. The visual payoff is undeniable—golden cakes topped with delicate marzipan flowers and a glossy glaze finish that sparkles with handcrafted charm.