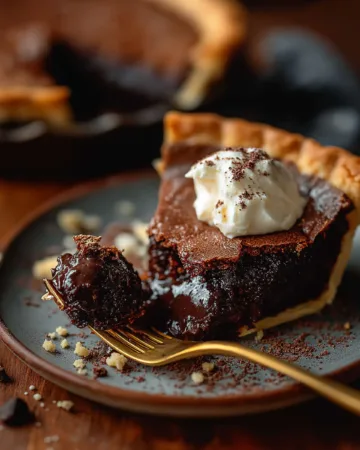


There’s something universally irresistible about a molten chocolate dessert, and when it’s transformed into a pie, it becomes a showstopper. This Molten Chocolate Crackle Pie is a rich, gooey, deeply chocolatey treat with a crisp crust and an oozing center that feels both nostalgic and indulgent.
It’s the perfect fusion of a classic chocolate lava cake and a flaky, buttery pie. Whether you’re baking for a special gathering, holiday table, or simply craving a homemade dessert that delivers pure satisfaction, this pie is designed to impress.
In this article, we’ll break down exactly how to make a flawless molten chocolate crackle pie. From prepping your pie crust and creating the luscious chocolate filling to mastering the bake time for that ideal gooey texture, we’ve got every step covered.
We’ll also explore tips for flavor enhancements, ideal pairings, and how to perfect the hazelnut whipped cream topping. If you’re ready to elevate your dessert game, let’s dive into Part 1.
Crafting the Perfect Chocolate Pie Crust
Choosing the Right Crust for Molten Chocolate Crackle Pie
The crust acts as the structural base of the molten chocolate crackle pie, providing both texture and a mild buttery flavor that balances the intense chocolate filling. For this recipe, a homemade pie crust is highly recommended.
Using all-purpose flour, chilled butter, a bit of sugar, and ice water ensures the crust is flaky yet sturdy enough to hold the molten center.
To prepare your homemade crust:
- Start with 1¼ cups all-purpose flour, 1 tbsp sugar, and ½ tsp salt.
- Add ½ cup cold unsalted butter, cut into small cubes, and use a pastry cutter to blend until crumbly.
- Add 3–5 tbsp ice water, 1 tbsp at a time, mixing just until dough forms.
- Flatten into a disc, wrap in plastic, and chill for at least 30 minutes before rolling.
Once chilled, roll out your dough into a 12-inch round and fit it into a deep 9-inch pie plate. Crimp the edges or shape them as desired, then refrigerate while preparing the filling.
Blind Baking the Crust for Optimal Texture
Blind baking is essential in this recipe. It keeps the crust from getting soggy due to the moist chocolate filling and ensures it stays crispy along the edges. Here’s how:
- After fitting the crust into the pie plate, prick the bottom lightly with a fork to prevent bubbling.
- Brush the edge with a beaten egg to enhance browning and, optionally, sprinkle vanilla sugar or coarse sugar for a slight crunch.
- Line the crust with parchment paper and fill it with pie weights, dried beans, or uncooked rice.
- Freeze for 10 to 15 minutes to prevent shrinking during baking.
- Bake at 375°F for 20 minutes until the crust is set, remove the weights, and continue baking for 5 more minutes until golden.
Blind baking helps develop that buttery crunch and elevates the overall mouthfeel of the pie. Once done, reduce the oven temperature to 350°F in preparation for the filling.
Print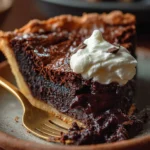
Molten Chocolate Crackle Pie
- Total Time: 110 mins
- Yield: 8 servings
Description
A showstopping dessert with a crisp, buttery crust and a rich, gooey chocolate center. This Molten Chocolate Crackle Pie is perfect for gatherings or any time you need an indulgent treat. Serve warm with hazelnut whipped cream for an unforgettable bite.
Ingredients
Pie Crust:
1 pie crust round (homemade or store-bought)
1 egg, beaten (for brushing)
Vanilla sugar or coarse sugar, for sprinkling (optional)
Filling:
4 large eggs
1 ½ cups granulated sugar
½ cup unsweetened cocoa powder
2 tsp instant coffee granules
½ tsp kosher salt
10 tbsp salted butter, melted
2 tsp vanilla extract
½ cup semi-sweet chocolate chips or chunks
Hazelnut Whipped Cream:
1 cup heavy cream
1 tbsp real maple syrup
2 tsp vanilla extract
(Optional: ½ tsp hazelnut extract or syrup)
Instructions
1. Position a rack in the lower third of the oven. Preheat to 375°F.
2. Fit the pie crust into a deep 9-inch pie plate. Brush the edge with beaten egg and sprinkle with vanilla or coarse sugar if desired. Prick the bottom lightly with a fork. Line with parchment and fill with pie weights. Freeze for 10-15 minutes.
3. Bake until the crust is set, about 20 minutes. Remove weights and bake 5 more minutes until golden. Remove from oven and reduce oven temperature to 350°F.
4. In a bowl, whisk eggs and sugar until combined. Add cocoa powder, instant coffee, and salt. Whisk in melted butter and vanilla. Fold in chocolate chips.
5. Pour filling into the baked crust. Bake for 45-55 minutes until puffed but still wiggly in the center.
6. Let cool 20-30 minutes for a warm, molten center, or cool completely and chill for a firmer texture.
7. To make whipped cream: Whip heavy cream with maple syrup and vanilla (and hazelnut extract if using) until fluffy. Serve generous dollops on each slice.
8.
Notes
You can use a homemade or store-bought pie crust.
For extra crunch, sprinkle vanilla sugar on the crust edge before baking.
Add hazelnut extract or syrup to whipped cream for an extra flavor boost.
Store leftovers in the refrigerator for up to 4 days. Reheat gently for a molten center.
- Prep Time: 20 mins
- Cook Time: 75 mins
- Category: Dessert
- Method: Baking
- Cuisine: American
Building the Decadent Chocolate Filling
Ingredients That Elevate the Molten Texture
The filling is where the Molten Chocolate Crackle Pie truly shines. Its rich, fudgy interior comes from a balanced combination of pantry staples like eggs, sugar, cocoa, and butter. But what sets it apart is the clever use of instant coffee granules and semi-sweet chocolate chunks, which deepen the flavor and create a luxurious texture that’s simultaneously creamy, crackly, and gooey.
You’ll need the following:
- 4 large eggs
- 1½ cups granulated sugar
- ½ cup unsweetened cocoa powder
- 2 tsp instant coffee granules
- ½ tsp kosher salt
- 10 tbsp melted salted butter
- 2 tsp vanilla extract
- ½ cup semi-sweet chocolate chips or chunks
Each ingredient plays a vital role. The eggs provide structure and richness, while the sugar brings sweetness and helps form the crusty top. Cocoa powder adds intense chocolate flavor, and the coffee enhances it subtly without tasting like coffee. Melted butter lends smoothness, and vanilla adds warmth and depth. Finally, the chocolate chips create irresistible melty pockets that stay molten even after baking.
Mixing Techniques for a Crackly Top and Gooey Center
The key to achieving that iconic crackled top with a molten middle lies in how you combine the ingredients. Here’s how to get it right:
- Whisk the eggs and sugar thoroughly until pale and well combined. This step is crucial because it introduces air into the mixture, helping form the crispy, crackled surface as it bakes.
- Add the dry ingredients—cocoa powder, instant coffee, and salt—and whisk until smooth.
- Slowly whisk in the melted butter while continuing to mix. This ensures a glossy batter with the right consistency.
- Stir in the vanilla extract, then gently fold in the semi-sweet chocolate chunks.
Pour this luscious mixture into the pre-baked crust while still warm. The chocolate chunks will partially melt into the filling, enhancing the gooey interior.
This pie doesn’t require overmixing, which could deflate the air and affect the texture. Keep it gentle but consistent, and always mix by hand or with a whisk for the best results.
Perfecting the Bake for That Signature Molten Center
Mastering the Baking Time and Temperature
Baking is where the magic of the Molten Chocolate Crackle Pie comes to life. Getting that delicate balance between a crisp, crackled top and a soft, molten center is all about timing and temperature control.
After pouring the rich chocolate mixture into your pre-baked crust, you’ll bake the pie at 350°F for 45 to 55 minutes. But here’s where attention is critical. The pie should appear puffed on top, slightly domed, and dry to the touch. However, when gently jiggled, the center should still wiggle slightly, indicating it’s gooey and not overbaked.
Here are key tips:
- At 45 minutes: You’ll likely have a molten center and a crackled top. Ideal for those who love a more lava-cake-like texture.
- At 50–55 minutes: The center will be more set, delivering a firmer slice with less gooeyness but still rich and moist inside.
The residual heat will continue cooking the pie even after it’s out of the oven, so don’t worry if it looks slightly underdone at first.
Cooling and Serving Techniques for Best Texture
How you cool and serve the pie affects texture and flavor. Cooling allows the chocolate to settle and the filling to thicken just enough to hold together when sliced.
- Let the pie cool for 20 to 30 minutes at room temperature before serving. This rest period is essential for achieving the perfect fork-cut slice with a warm, gooey center.
- For a chilled dessert, allow the pie to cool completely, then refrigerate for at least 2 hours. This firms up the filling and transforms the texture into something akin to a rich brownie tart.
Serve the pie warm with a dollop of whipped cream for a decadent, melt-in-your-mouth experience. Or serve it cold for a dense, chocolate truffle-like finish. Either way, the texture is luscious, and the flavor is deep and luxurious.
Whipping Up the Perfect Hazelnut Cream Topping
Creating Fluffy, Flavored Whipped Cream from Scratch
No Molten Chocolate Crackle Pie is complete without a cloud of homemade whipped cream. While store-bought versions offer convenience, whipping your own cream from scratch adds an unmistakable freshness and customization you can’t beat. For this pie, we’re adding subtle flavor enhancements to complement the deep chocolate filling.
To make the whipped topping, you’ll need:
- 1 cup heavy cream
- 1 tbsp real maple syrup
- 2 tsp vanilla extract
Using a handheld electric mixer or stand mixer with the whisk attachment, whip the cold heavy cream on medium-high speed until it begins to thicken. Once soft peaks form, add the vanilla and maple syrup. Continue whipping just until stiff peaks hold.
The result is a light, pillowy cream with delicate maple sweetness and rich vanilla undertones that perfectly cut through the intensity of the chocolate.
Enhancing Flavor with Optional Add-Ins
To elevate this whipped topping further, consider flavoring it with a hint of hazelnut essence. While the original recipe suggests hazelnut liquor (optional), those avoiding alcohol can substitute it with a small dash of hazelnut extract or hazelnut syrup, which adds depth without overwhelming sweetness.
Here’s how to adapt:
- Add ½ tsp hazelnut extract to the cream during whipping.
- Or drizzle in 1 tsp hazelnut syrup in place of maple for a nutty twist.
This subtle enhancement transforms a classic topping into a gourmet pairing that harmonizes beautifully with the molten chocolate, especially when served warm.
Whether you dollop it generously or pipe it in decorative swirls, the hazelnut whipped cream adds the perfect finishing touch—creamy, airy, and slightly nutty.
Storage, Reheating, and Make-Ahead Tips
How to Store Leftovers Without Compromising Texture
If you’re lucky enough to have leftover Molten Chocolate Crackle Pie, proper storage is essential to preserve both its rich flavor and unique texture. Because of the pie’s moist filling and flaky crust, storing it correctly helps retain that perfect balance between gooey center and crisp edge.
Here’s what to do:
- Cool the pie completely before storing to prevent condensation, which can make the crust soggy.
- Wrap the pie dish tightly with plastic wrap or aluminum foil, or transfer slices to an airtight container.
- Store in the refrigerator for up to 4 days.
The pie will firm up slightly in the fridge, which can make it easier to cut clean slices. However, the chilled texture will be denser and more truffle-like. If you prefer a warm, molten center, reheating is your best bet.
Best Practices for Reheating While Preserving Molten Quality
Reheating chocolate pie can be tricky if you want to maintain that signature molten core without overcooking the edges. Here’s how to do it right:
For Individual Slices:
- Microwave on medium power for 15 to 20 seconds. This gently warms the filling without drying out the crust.
- Let the slice sit for a minute before serving to allow heat to distribute evenly.
For the Whole Pie:
- Preheat your oven to 300°F.
- Cover the pie loosely with foil to prevent further browning.
- Reheat for 10 to 12 minutes, then check the center with a gentle press. If it jiggles slightly, it’s perfect.
Avoid using high heat, which can cause the pie to overbake and lose that gooey texture you worked so hard to create.
Make-Ahead Tips for Stress-Free Entertaining
Planning ahead? This pie is a great make-ahead dessert. Here’s how to prep it in advance:
- Bake the crust and prepare the filling a day before. Store the filling in the fridge, then pour it into the crust and bake fresh before serving.
- Or fully bake the pie, cool it, and refrigerate it a day in advance. On the day of serving, reheat gently and top with freshly whipped cream.
- You can also make the whipped cream a few hours ahead and refrigerate it. Just give it a quick whisk before serving to restore volume.
This flexibility makes Molten Chocolate Crackle Pie a perfect choice for dinner parties, holidays, and special occasions when oven space and time are limited.
Flavor Twists and Creative Variations
Customizing the Chocolate Base with Flavor Additions
While the classic Molten Chocolate Crackle Pie is already packed with rich cocoa flavor and melt-in-your-mouth texture, it’s incredibly versatile and welcomes creative flair. By adding just a few tweaks to the filling, you can make it uniquely your own.
Here are a few flavor-enhancing options:
- Orange Zest: Add 1 tsp of finely grated orange zest to the filling for a citrusy brightness that cuts through the richness.
- Cinnamon or Cardamom: Stir in ½ tsp of ground cinnamon or a pinch of cardamom for warm, spiced undertones.
- Sea Salt Sprinkle: After baking, sprinkle a bit of flaky sea salt on top. This balances the sweetness and adds a gourmet finish.
If you’re feeling adventurous, combining two of these options, such as orange zest and sea salt, can result in a complex, bakery-worthy flavor profile.
Ingredient Swaps for Dietary Preferences
Whether you’re accommodating guests or personal preferences, this pie is easy to adapt:
- Gluten-Free Crust: Use a gluten-free pie crust or a nut-based crust made from almond flour and coconut oil.
- Dairy-Free Filling: Swap the butter for plant-based margarine or coconut oil, and use dairy-free chocolate chips. The filling stays just as indulgent.
- Refined Sugar Alternatives: Replace granulated sugar with coconut sugar or maple sugar. While this may slightly change the texture, the pie will retain its deep chocolatey flavor.
These variations allow more people to enjoy this dessert without sacrificing taste or the signature molten texture.
Creative Presentation Ideas for Special Occasions
Want to elevate the look of your pie for a celebration or dinner party? Consider these simple but stunning presentation upgrades:
- Mini Molten Pies: Divide the filling into small tart pans or ramekins and adjust the baking time accordingly. These make for charming, individual servings.
- Decorative Toppings: Dust the pie with cocoa powder or powdered sugar using a fine sieve for a professional touch. You can also add edible flowers or chocolate curls for visual appeal.
- Whipped Cream Rosettes: Use a piping bag with a star tip to add elegant swirls of hazelnut whipped cream around the edge.
From holidays to birthdays to cozy nights in, this dessert can be styled to fit any mood or occasion.
Conclusion
The Molten Chocolate Crackle Pie is more than just a dessert, it’s an experience. With its crisp, buttery crust, rich molten center, and a crackled top that gives way to creamy decadence, it strikes the perfect balance between elegance and indulgence. Whether you serve it warm with a billowy dollop of hazelnut whipped cream or chilled for a denser bite, it never fails to satisfy a chocolate craving at its core.
Its flexibility in preparation, make-ahead ease, and endless room for personalization make it ideal for both novice bakers and seasoned dessert lovers. From flavor variations to dietary swaps, it adapts effortlessly to your table and tastes.
Once you master the timing and techniques, this pie will quickly become your go-to chocolate showpiece—ready to wow guests or reward yourself with a well-deserved treat.