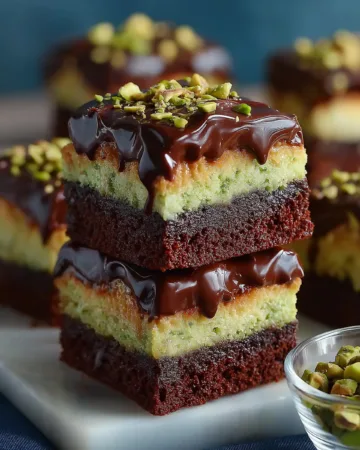


When East meets West in the kitchen, magic happens. That’s exactly what you get with Dubai Pistachio Kunafa Brownies—a rich, fudgy brownie base layered with a buttery kunafa-pistachio filling and topped with smooth melted chocolate.
This luxurious dessert combines the beloved nuttiness of pistachios and the crisp texture of kunafa with the classic depth of a traditional brownie, resulting in a showstopping treat that’s as indulgent as it is unique.
Whether you’re planning a festive gathering or craving something exceptional, this dessert captures the best of both worlds. In this article, we’ll guide you through everything you need to know—from ingredients and techniques to tips that guarantee perfection every time.
Choosing Quality Ingredients for the Perfect Flavor and Texture
Best Type of Butter and Why It Matters
Butter is the base of any good brownie. In this recipe, unsalted butter is preferred because it gives you full control over the salt level. Use high-quality butter with a high-fat content to ensure your brownie batter turns out rich and moist.
Picking the Right Pistachio Spread
Pistachio spread is the heart of the kunafa layer. Look for one that contains a high percentage of pistachios and minimal added sugar or palm oil. A spread with a natural, pourable consistency will blend well with the crispy kunafa and offer a deep, nutty taste.
Selecting the Perfect Kunafa Pastry
Kunafa dough is a shredded phyllo pastry that delivers a crunchy texture once roasted. For this recipe, opt for fresh or frozen kunafa dough typically available in Middle Eastern or Mediterranean grocery stores. Avoid pre-sweetened versions or ones that are already baked.
Best Chocolate for the Topping
A layer of dark or semi-sweet chocolate balances the sweetness of the kunafa-pistachio mix. Use a high-cocoa content chocolate for a smooth, slightly bitter finish. Avoid milk chocolate to prevent the dessert from becoming overly sweet.
Cocoa Powder: Dutch-Processed or Natural?
Both types can work, but Dutch-processed cocoa provides a smoother, more chocolatey finish and less acidity. Pair it with baking powder, as this recipe does, for the best results.
By starting with high-quality, well-chosen ingredients, your Dubai Pistachio Kunafa Brownies will deliver a texture and flavor profile that feels elevated and gourmet, yet still cozy and familiar.
Print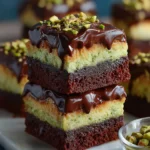
Dubai Pistachio Kunafa Brownies
- Total Time: 50 minutes
- Yield: 9 servings
- Diet: Vegetarian
Description
A luxurious fusion dessert combining fudgy chocolate brownies with a buttery roasted kunafa and pistachio layer, topped with melted dark chocolate. Perfect for celebrations or elegant snacking.
Ingredients
For the Brownie
1/2 cup (120g) softened unsalted butter
1 cup (180g) light brown sugar
2 large eggs
1 tsp vanilla extract
1/3 cup (40g) cocoa powder
1/2 tsp (2g) baking powder
1/2 cup (60g) all-purpose flour
Pinch of salt
For the Pistachio Kunafa and Chocolate Layer
3/4 cup (200g) pistachio spread
1 cup (90g) kunafa pastry, shredded
1 tbsp butter or ghee (for roasting kunafa)
1 cup (180g) semi-sweet or dark chocolate
Slivered pistachios (for garnish)
Instructions
1. Preheat oven to 180ºC/350ºF. Line a 7-inch square baking pan with parchment paper or grease it.
2. In a mixing bowl, beat softened butter and light brown sugar until pale and fluffy.
3. Add eggs one at a time, beating well. Mix in vanilla extract.
4. Sift in cocoa powder, baking powder, flour, and salt. Fold gently with a spatula until no flour streaks remain.
5. Pour batter into the prepared pan and bake for 20–25 minutes, or until a toothpick comes out with moist crumbs. Let cool completely.
6. Shred kunafa dough into 1–2 cm pieces. Toast in a pan with butter or ghee over medium heat until golden. Let cool.
7. If thick, microwave pistachio spread for 30 seconds to loosen. Mix with cooled kunafa in a bowl until fully combined.
8. Spread pistachio-kunafa layer evenly over the cooled brownie.
9. Melt chocolate in a microwave-safe bowl in 15–30 second intervals, stirring between each.
10. Pour melted chocolate over the pistachio layer and smooth evenly.
11. Garnish with slivered pistachios. Chill in fridge for 5–10 minutes to set chocolate.
12. Slice into 9 squares and serve.
Notes
Use more or less pistachio spread and kunafa depending on your preferred creaminess or crunch.
Store in an airtight container in the refrigerator for up to 4 days.
Let sit at room temperature before serving for best texture.
- Prep Time: 30 minutes
- Cook Time: 20 minutes
- Category: Desserts
- Method: Baking
- Cuisine: Fusion, Middle Eastern
How to Make Fudgy Brownies That Form the Perfect Base
Creaming the Butter and Sugar to Perfection
The first step in achieving that ideal brownie texture is properly creaming the butter and sugar. Use softened unsalted butter and light brown sugar for depth of flavor and added moisture. Whip them together with an electric beater for a few minutes until the mixture becomes light and fluffy. This process incorporates air, giving your brownies a soft yet dense bite.
Incorporating the Eggs and Vanilla
Add two large eggs, one at a time, continuing to beat until the mixture thickens slightly. This not only builds structure but also ensures that the brownies don’t turn out cakey. A teaspoon of vanilla extract enhances the richness of the cocoa and adds warmth to the overall flavor.
Sifting and Folding the Dry Ingredients
Once your wet ingredients are well mixed, sift in cocoa powder, baking powder, flour, and a pinch of salt. Sifting prevents clumps, making the batter smooth and lump-free. Use a spatula to gently fold in the dry ingredients, mixing just until there are no visible streaks of flour left. Overmixing at this stage can make the brownies tough, so fold carefully.
Baking at the Right Temperature and Time
Pour the batter into a lined or greased 7-inch square pan. Bake at 180°C (350°F) for 20 to 25 minutes on a lower rack in your oven. The key is not to overbake—check doneness by inserting a toothpick. If it comes out with a few moist crumbs, your brownies are ready. Overbaking will lead to dryness, so stay vigilant during the last few minutes.
Cooling Before Layering
Once baked, allow the brownie layer to cool completely before adding any toppings. This ensures the layers don’t melt into one another and that the structure remains clean and crisp.
The brownie forms the solid foundation of your dessert, so mastering this step is crucial. With a dense yet soft texture, these brownies are built to support the creamy pistachio-kunafa layer and glossy chocolate topping, delivering a satisfying bite every time.
Creating the Irresistible Pistachio Kunafa Layer
Shredding and Toasting the Kunafa for Crunch
Start by shredding kunafa pastry into small pieces—around 1 to 2 centimeters long. This can be done with scissors or a quick blitz in a food processor. Smaller pieces ensure even roasting and a balanced crunch in every bite. Once shredded, toast the kunafa in a frying pan with a tablespoon of butter or ghee, stirring continuously until it turns a rich golden-brown. This step adds not only texture but a deep, buttery flavor that beautifully contrasts the soft brownie layer.
Blending with Pistachio Spread
After toasting, let the kunafa cool to avoid melting the pistachio spread too early. If your pistachio spread is thick, microwave it for about 30 seconds until it softens into a pourable consistency. Mix it thoroughly with the cooled kunafa using a spoon or spatula. The goal here is to achieve a cohesive mixture where each kunafa strand is coated evenly with the creamy pistachio.
Texture Balance: Creamy Meets Crunchy
The beauty of this layer lies in its dual texture. The pistachio spread brings a velvety richness, while the roasted kunafa adds a satisfying crunch. Adjust the ratio slightly based on preference. For a softer mouthfeel, add more pistachio spread. For a firmer, crispier bite, increase the toasted kunafa.
Layering the Pistachio Kunafa Mix
Once your brownie base is completely cool, evenly spread the pistachio-kunafa mixture over it. Use the back of a spoon or an offset spatula to level it out smoothly across the top. Press gently to help it stick, but don’t compact it too much—you want to preserve that crunchy texture.
This pistachio-kunafa layer adds the Middle Eastern soul to the dessert. Its nuttiness and buttery aroma make every bite more indulgent, elevating the classic brownie into something extraordinary.
Melting Chocolate and Building the Final Layer
Choosing the Right Chocolate for Topping
For the perfect finish, choose semi-sweet or dark chocolate with at least 60% cocoa content. This balances out the sweetness of the brownie and pistachio kunafa layers. Avoid overly sweet chocolate, as it can overpower the dessert’s rich, nutty complexity.
How to Melt Chocolate Without Burning
Place the chocolate in a microwave-safe bowl, and heat it in 15 to 30-second intervals, stirring between each session. This prevents scorching and keeps the chocolate silky. Alternatively, use a double boiler method by placing a heat-safe bowl over a pot of simmering water, stirring continuously until melted.
Layering Melted Chocolate Over Pistachio Kunafa
Once the chocolate is fully melted and glossy, pour it gently over the pistachio-kunafa layer. Use a spatula to spread it out evenly, covering every corner. The smooth chocolate forms a delicate shell on top, sealing in the textures beneath while adding a bold cocoa finish.
Garnishing for Flavor and Presentation
Before the chocolate sets, sprinkle slivered pistachios on top. They not only enhance the visual appeal but also offer a slight crunch that complements the layers below. If you like, you can also lightly press edible rose petals or gold leaf for an elegant presentation.
Chilling and Slicing the Dessert
Place the dessert in the refrigerator for 5 to 10 minutes, just long enough for the chocolate layer to harden slightly. Don’t let it chill too long or the brownie base may firm up too much, making it harder to slice cleanly. Once set, remove from the fridge and cut into 9 even squares using a sharp, warm knife for neat edges.
This final layer ties everything together. It adds shine, snap, and a deep chocolate finish that makes every square of Dubai Pistachio Kunafa Brownies truly irresistible.
Tips, Variations, and Storage for Dubai Pistachio Kunafa Brownies
Customize the Creaminess and Crunch
One of the best things about this recipe is its flexibility. If you prefer a creamier texture, simply increase the amount of pistachio spread in the kunafa layer. Want more crunch? Toast a bit more kunafa pastry and add it into the mix. This allows you to tailor the dessert exactly to your liking, whether you enjoy a softer bite or a crispier finish.
Use Alternative Nuts or Spreads
While pistachios give the dessert a rich, Middle Eastern flair, you can also experiment with almond butter, hazelnut spread, or even cashew butter for a different flavor profile. Just ensure the alternative spread pairs well with chocolate and has a smooth, spreadable consistency.
Flavor Enhancers to Try
If you want to elevate the flavor further, try adding a pinch of cardamom powder to the pistachio kunafa mixture or a drop of orange blossom water. These additions offer a subtle aroma and complexity that complements the nuttiness of the dish.
Making It Gluten-Free
To make this dessert suitable for gluten-sensitive eaters, swap the all-purpose flour in the brownie layer with a gluten-free baking blend. Make sure your kunafa dough is also certified gluten-free, or substitute it with shredded rice paper or gluten-free phyllo pastry as a last resort.
Storing and Serving Suggestions
Once assembled, these brownies can be stored in an airtight container in the fridge for up to 4 days. They taste just as good, if not better, the next day as the layers have time to meld together. For best results, allow them to sit at room temperature for 10–15 minutes before serving so the brownie softens slightly.
If serving for guests or special occasions, plate each square individually and top with a fresh sprinkle of chopped pistachios or a dusting of cocoa powder for a bakery-style finish.
This dessert is more than just a sweet treat-it’s a flavorful fusion of cultures that’s easy to make your own. Whether you stick to the classic version or try a creative twist, Dubai Pistachio Kunafa Brownies are guaranteed to impress.
Conclusion: Why Dubai Pistachio Kunafa Brownies Are Worth Every Bite
Dubai Pistachio Kunafa Brownies are not just a dessert—they’re an experience. Each bite is a journey through layers of deep, fudgy chocolate, crispy roasted kunafa, and luxuriously smooth pistachio spread, all topped with a glossy chocolate finish.
This recipe brings together the warmth of Middle Eastern flavors with the indulgent charm of classic brownies, creating a unique fusion that’s both nostalgic and innovative.
Whether you’re serving them at a celebration or simply satisfying a sweet craving, these brownies will leave a lasting impression.
They’re surprisingly easy to make with just a few steps and common ingredients, yet the result tastes like something straight out of an upscale dessert café.
Plus, the flexibility of this recipe means you can personalize it to suit your taste, making it a go-to option for both casual bakers and seasoned pros.