


Cheesecake has always been a timeless classic, but when it’s reimagined with a Middle Eastern flair, it becomes a show-stopping dessert unlike any other.
The Dubai Chocolate Cheesecake Recipe combines rich pistachio paste, buttery kataifi pastry, and silky chocolate ganache for a layered treat that’s as indulgent as it is unique.
Whether you’re planning a holiday gathering or just want to impress guests with something extraordinary, this recipe will redefine your cheesecake expectations.
In this article, we’ll guide you through five essential parts of this dessert, from its decadent base to the final chocolate topping. You’ll also find expert baking tips and storage solutions to make sure your cheesecake comes out picture-perfect.
The Ultimate Chocolate Cookie Crust
Choosing the Right Cookies for the Base
The crust is the first flavor note your guests will taste, so using high-quality ingredients is key. In this recipe, chocolate bear grahams are crushed to form the base. These sweet, cocoa-rich cookies provide a deep, chocolatey foundation that perfectly contrasts the nutty pistachio filling and creamy cheesecake.
If you can’t find bear grahams, don’t worry. You can substitute with chocolate graham crackers, Chocolinas, chocolate Maria cookies, or even crushed Oreos. Each option offers a slightly different texture and sweetness level, so pick according to your taste preference.
How to Create the Perfect Crust
Start by grinding the chocolate cookies in a food processor until you get fine crumbs. Melt unsalted butter and combine it thoroughly with the crumbs. This mixture is then pressed firmly into the bottom of an 8 or 9-inch springform pan. A deep pan is recommended if you’re using the smaller size to accommodate the multiple layers of the cheesecake.
Pre-bake the crust in a 325ºF oven for 10 minutes. This step is crucial because it helps set the base and prevents it from getting soggy when layered with the kataifi filling and cheesecake batter. After baking, let it cool completely before assembling the rest of the cake.
Tips for a Firm, Crisp Crust
- Pack the crust tightly: Use the bottom of a glass or measuring cup to press the crumb mixture down firmly and evenly.
- Cool completely before layering: If the crust is still warm, it could cause the kataifi filling to become mushy.
- Use parchment paper: Lining the bottom of the pan helps remove the cheesecake cleanly after chilling.
This crust brings a robust chocolate flavor and a satisfying crunch, laying the groundwork for the luxurious layers to come. Next, we’ll look at the unique and delightful pistachio kataifi filling that adds texture and exotic flair to this Dubai-style dessert.
Print
Dubai Chocolate Cheesecake Recipe
- Total Time: 7 hours 45 minutes
- Yield: 12 slices
- Diet: Vegetarian
Description
A rich and luxurious Middle Eastern-inspired dessert made with layers of chocolate cookie crust, pistachio kataifi, creamy cheesecake, and smooth chocolate ganache.
Ingredients
Chocolate Cookie Crust
2½ cups chocolate bear grahams (230g)
7 tbsp unsalted butter, melted (98g)
Pistachio Kataifi Filling
150g shredded kataifi dough, chopped
6 tbsp unsalted butter (85g)
¾ cup pistachio paste (300g)
2 tbsp tahini (30g)
Pistachio Cheesecake Batter
680g cream cheese, softened (3 x 8 oz packages)
1 cup granulated sugar (200g)
⅓ cup sour cream, room temperature
½ cup pistachio paste
2 tbsp tahini
3 large eggs, room temperature
¼ tsp almond extract
2 tsp vanilla extract
½ tsp salt
Chocolate Ganache
1¼ cup chopped semi-sweet chocolate or chocolate chips (212g)
¾ cup heavy cream (180 ml)
Decoration
Chopped pistachios for topping
Instructions
1. Preheat oven to 325ºF.
2. Process chocolate grahams into fine crumbs and mix with melted butter.
3. Press into an 8” or 9” cheesecake pan and bake for 10 minutes. Cool completely.
4. Add butter to a pan and stir in kataifi dough. Toast for 8-10 minutes until golden.
5. Mix toasted kataifi with pistachio paste and tahini. Set aside.
6. Beat cream cheese until creamy. Add sugar and beat again.
7. Add pistachio paste, tahini, and sour cream. Mix thoroughly.
8. Add eggs one at a time, followed by almond extract, vanilla, and salt. Do not overmix.
9. Grease the sides of the pan. Layer half of the kataifi filling over the crust.
10. Pour in cheesecake batter and smooth out.
11. Wrap the pan in foil, place in a roasting pan, and add hot water to create a water bath.
12. Bake for 60–70 minutes. Jiggle to test. Leave in the oven off for 1 hour.
13. Chill in the fridge for 6 hours or overnight.
14. Heat cream to 180°F and pour over chopped chocolate. Wait 1 minute, then whisk to create ganache.
15. Cool ganache until spreadable.
16. Spread half the ganache over chilled cheesecake. Add remaining kataifi filling.
17. Top with more ganache and chopped pistachios.
18. Let set for 20 minutes before slicing and serving.
Notes
You can use chocolate graham crackers, chocolate Maria cookies, or crushed Oreos as substitutes for chocolate bear grahams.
Kataifi pastry is a shredded phyllo dough used in Middle Eastern desserts. Find it in the freezer section of international or Mediterranean grocery stores.
Make sure cream cheese and eggs are at room temperature to prevent lumps and cracks.
You can refrigerate the ganache and kataifi filling ahead of time—just warm slightly before assembling.
Store cheesecake in the fridge for up to 5 days or freeze for up to 1 month.
- Prep Time: 45 minutes
- Cook Time: 1 hour
- Category: Dessert
- Method: Baking
- Cuisine: Middle Eastern
Pistachio Kataifi Filling: Crispy Meets Creamy
What Is Kataifi and Why It Matters
Kataifi pastry is a finely shredded phyllo dough that crisps beautifully when toasted in butter. It’s a staple in Middle Eastern and Mediterranean desserts and brings both texture and richness to this recipe. Unlike a soft sponge or a biscuit layer, kataifi offers a toasted crunch that complements the creamy cheesecake center.
In the Dubai Chocolate Cheesecake Recipe, this kataifi is blended with pistachio paste and tahini, forming a rich, nutty, slightly sweet layer that adds depth and cultural flair to the dish.
Preparing the Kataifi for Maximum Flavor
Start by thawing the kataifi pastry if it’s frozen. Chop it finely so that it blends better with the paste later. Melt unsalted butter in a pan over medium heat, then add the kataifi and stir to coat it evenly. Toasting it takes about 8 to 10 minutes, but don’t rush the process. Stir continuously until the strands turn golden brown. This brings out a nutty aroma and an irresistible crunch.
Remove from heat and let it cool slightly before stirring in the pistachio paste and tahini. The pistachio paste adds a creamy, earthy richness, while tahini provides a hint of bitterness and depth. The result is a spreadable filling that tastes like the heart of the Middle East.
Best Practices for Flavor Balance
- Don’t over-toast the kataifi. Golden brown is perfect, but burnt strands will taste bitter.
- Use high-quality pistachio paste. It should be smooth and vibrant green, not overly sweet or dull in color.
- Taste the filling. You can adjust the ratio of tahini to pistachio paste depending on your flavor preferences.
This filling is more than just a layer—it’s the signature of this Dubai-style cheesecake. It bridges the nutty Middle Eastern flavor profile with the rich Western dessert tradition. Coming up next, we’ll dive into the silky pistachio cheesecake batter that ties everything together.
Pistachio Cheesecake Batter: Rich, Creamy, and Dreamy
Crafting the Perfect Cream Cheese Base
The heart of any cheesecake is its batter, and in this Dubai Chocolate Cheesecake Recipe, it’s infused with pistachio paste and tahini for a distinct Middle Eastern twist. Begin with softened cream cheese—this ensures smooth mixing and prevents lumps. Beat it at medium speed for about 3 minutes until fluffy, then add granulated sugar and beat again until the mixture is creamy and slightly glossy.
Next, incorporate sour cream, pistachio paste, and tahini. These ingredients not only boost flavor but also contribute to a luxuriously smooth texture. The pistachio paste deepens the nuttiness, while tahini adds a subtle bitterness that balances the richness.
Egg Handling: The Secret to a Crack-Free Cheesecake
Eggs play a crucial role in binding the batter, but they must be handled with care. Add room-temperature eggs, one at a time, beating just enough to blend after each addition. This prevents overmixing, which can incorporate air and lead to surface cracks during baking.
Once eggs are incorporated, mix in the almond extract, vanilla extract, and a pinch of salt. These finishing touches round out the flavor and elevate the pistachio notes.
Tips for a Smooth, Luscious Batter
- Scrape the bowl often. Cream cheese tends to stick, so scrape the sides and bottom between each mixing step.
- Don’t rush the eggs. Add them slowly and mix on low to medium speed.
- Avoid overmixing. Once the eggs are in, mix just until combined. Overmixing can lead to air bubbles and cracks.
With this batter, you’re layering in elegance and flavor. It’s creamy, nutty, and subtly sweet—exactly what you want in a cheesecake that stands out. Now that the batter’s ready, let’s move to the baking method that guarantees a perfect, crack-free finish.
Baking the Cheesecake: Smooth, Crack-Free Perfection
Water Bath Method: Your Best Friend in Cheesecake Baking
One of the most common challenges when baking a cheesecake is preventing cracks, and the water bath method is the gold standard solution. Once your chocolate crust is baked and cooled, and your pistachio kataifi filling and cheesecake batter are prepped, it’s time to assemble.
Begin by greasing the exposed sides of your springform pan. Spread half of the kataifi filling over the crust, pressing it down gently with a spatula to ensure a packed layer. Then, pour the pistachio cheesecake batter over this layer. Smooth it with a spatula and gently tap the pan against the counter to release any air bubbles.
Now comes the important part—wrapping the pan. Wrap the bottom and sides of your cheesecake pan with several layers of foil. This will protect it from water seeping in during the water bath.
Place your wrapped pan into a large roasting pan, and pour hot water into the roasting pan until it reaches halfway up the sides of the cheesecake pan. This even, moist heat helps the cheesecake cook gently, preventing cracks and giving it that smooth, creamy texture.
Baking Time and Visual Cues
Bake at 325ºF for 60 to 70 minutes. The exact time will vary slightly depending on your oven and the depth of your pan. The outer edges should look set, while the center should have a slight jiggle when you gently move the pan.
Once baking time is up, turn off the oven but leave the cheesecake inside for 1 hour. This gradual cooling process is another critical step that prevents sudden temperature changes, which could cause the top to crack.
After one hour, remove the cheesecake and place it in the refrigerator for at least 6 hours—preferably overnight. This long chill allows the flavors to develop and the texture to set perfectly.
Baking Tips for Flawless Results
- Always use room-temperature ingredients to ensure even mixing and baking.
- Don’t skip the foil wrap. Even a little water in your crust can ruin the texture.
- Check with a wiggle. Avoid using a toothpick or knife to check doneness, which can lead to cracks.
With the cheesecake baked and chilled, the final touch is the luscious chocolate ganache and crunchy pistachio topping.
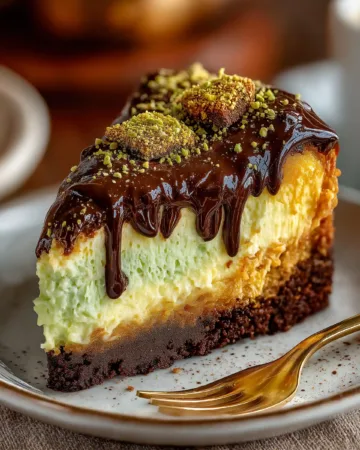
Chocolate Ganache and Pistachio Topping: The Final Touch
Making a Silky Chocolate Ganache
A rich chocolate ganache brings everything together in the Dubai Chocolate Cheesecake Recipe, adding a glossy finish and decadent flavor. To make it, heat heavy cream until it reaches about 180°F. Pour it directly over chopped semi-sweet chocolate or high-quality chocolate chips in a heatproof bowl. Let it sit for a minute, then whisk until fully smooth and velvety.
Ganache consistency is key. It should be thick but spreadable, not runny. Let it cool at room temperature or speed up the process by placing it in the fridge, stirring every 5–10 minutes until it firms up slightly.
If preparing in advance, refrigerate the ganache and gently reheat when ready to use. Be careful not to overheat—it just needs to be soft enough to spread.
Assembling the Final Layers
Once the cheesecake has fully chilled and set, it’s time for the final layer of indulgence. Spread a thin layer of ganache across the top using an offset spatula for a smooth surface. Then add the remaining kataifi-pistachio mixture, gently pressing it into place for a firm texture contrast.
Top everything with the rest of the ganache, spreading it to completely cover the kataifi layer. This technique seals the crispy filling while adding an elegant chocolate finish.
Finally, sprinkle a generous handful of chopped pistachios over the top. Not only do they add crunch and color, but they also highlight the pistachio flavor throughout the dessert.
Presentation and Serving Tips
- Wait 15–20 minutes after topping with ganache before serving. This allows it to set slightly for cleaner slicing.
- Use a hot knife (wiped clean between slices) for neat cuts.
- Serve chilled to enjoy the full contrast of textures—crunchy kataifi, creamy cheesecake, and smooth ganache.
This final layer turns the cheesecake into a gourmet showpiece. From the golden kataifi to the deep chocolate glaze, it captures both the luxury and the warmth of Dubai-inspired baking. Now, let’s wrap things up with how to store and enjoy your creation.