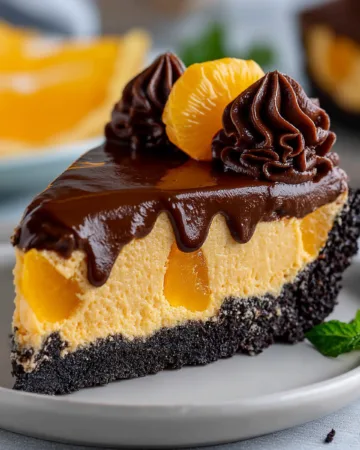


There’s something magical about the combination of rich chocolate and zesty orange. This Chocolate Orange Pie Recipe brings both flavors together in a luxurious dessert that’s surprisingly easy to make. Whether you’re planning a holiday gathering, birthday treat, or just satisfying a sweet craving, this no-bake pie delivers the perfect balance of citrus freshness and chocolate indulgence.
This article covers everything from building the perfect Oreo crust to mastering a silky orange filling and topping it with a glossy chocolate ganache. You’ll also learn key preparation tips, nutritional insights, and pro techniques for achieving picture-perfect results. Let’s get started.
The Irresistible Flavor Duo Recipe
The Science Behind the Flavor Pairing
When you think about dessert flavors that naturally go hand in hand, chocolate and orange might not be your first guess. Yet the combination is classic for a reason. Orange contains limonene, a compound found in the zest and juice, which enhances the depth of chocolate’s cocoa flavor. Chocolate, particularly semi-sweet varieties, has just the right balance of bitterness and richness to stand up against the brightness of citrus.
Popularity in Classic and Modern Desserts
This dynamic duo isn’t new. From chocolate-covered candied orange peels to orange-infused truffles, it’s a pairing that has stood the test of time. The reason? It’s universally appealing. The tangy zip of citrus complements and uplifts the dense sweetness of chocolate. In this recipe, the balance shines through a fluffy orange cream layer and a velvety chocolate ganache topping.
Why It Works for a No-Bake Pie
One of the best things about this chocolate orange pie recipe is that it’s no-bake, making it perfect for summer or for times when you don’t want to heat up the kitchen. The orange gelatin layer sets up beautifully in the fridge, and the ganache firms to the perfect sliceable consistency. Meanwhile, the Oreo crust adds texture without overpowering the filling.
Print
Chocolate Orange Pie Recipe
- Total Time: 5 hours 45 minutes
- Yield: 8 servings
- Diet: Vegetarian
Description
A rich and creamy no-bake Chocolate Orange Pie recipe featuring a crunchy Oreo crust, zesty orange filling, and a glossy chocolate ganache topping. Perfect for any celebration or citrus-chocolate lover.
Ingredients
Crust:
24 Oreo Cookies
¼ cup melted unsalted butter
Orange Filling:
3 ounces orange Jell-O (1 box)
2 teaspoons orange extract
½ cup orange juice
2 ½ cups whipped topping
11 ounces mandarin oranges (1 can), drained
Chocolate Ganache Topping:
1 cup heavy whipping cream
12 ounces semi-sweet chocolate chips
Optional Decoration:
Reserved mandarin slices
Remaining ganache (for piping)
Instructions
1. Place Oreo cookies in a food processor and pulse until finely crushed. Add melted butter and pulse until well combined.
2. Press mixture into an 8-inch pie pan and refrigerate while preparing the filling.
3. In a bowl, stir together Jell-O, orange extract, and ⅔ cup boiling water until dissolved.
4. Pour ½ cup orange juice into a measuring cup and add ice to reach 1 cup. Stir into the Jell-O mixture until slightly thickened. Remove ice.
5. Whisk in whipped topping until fully combined. Refrigerate 20 minutes until it holds shape.
6. Pat mandarin oranges dry. Reserve a few for topping if desired.
7. Spread half of the orange filling into the crust. Add mandarin slices, then spread remaining filling over them. Chill 30 minutes.
8. Heat heavy cream to boiling. Pour over chocolate chips and let sit for 4 minutes. Whisk until smooth and glossy.
9. Let ganache cool for 5–10 minutes. Pour 1 cup over the pie. Allow to cool at room temperature for 20–30 minutes, then refrigerate 4 hours or overnight.
10. Optional: Pipe remaining ganache around edges and top with mandarin slices before serving.
Notes
To slice cleanly through the ganache layer, use a knife warmed under hot water and wipe clean between cuts.
For best results, avoid sugar-free or light products, which may affect the texture and stability.
Chill overnight for cleanest presentation and best flavor.
- Prep Time: 20 minutes
- Cook Time: 25 minutes
- Category: Dessert
- Method: No-Bake
- Cuisine: American
Crafting the Perfect Oreo Crust for Your Chocolate Orange Pie
Why an Oreo Crust Works Best
When it comes to building a no-bake pie, the crust must be sturdy yet flavorful. Oreos are ideal for this role. They provide a rich, chocolatey base that enhances the depth of the ganache topping and contrasts beautifully with the light orange filling. The sweet, slightly salty profile of the cookies complements the citrus and cream elements, creating a harmonious bite from top to bottom.
Unlike traditional pie crusts that require baking, an Oreo crust comes together quickly with just two ingredients — crushed cookies and melted butter — and firms up in the fridge. No oven needed.
Step-by-Step Guide to Making the Crust
To prepare the base for this chocolate orange pie, start with 24 Oreo cookies. You don’t need to remove the cream — it helps bind the crumbs. Pulse them in a food processor until you get fine, uniform crumbs. If you don’t have a processor, place them in a sealed bag and crush them with a rolling pin until you reach a sand-like texture.
Next, add ¼ cup of melted unsalted butter. This binds the crumbs together and adds a rich, buttery taste. Pulse again or mix until the butter is evenly distributed. The mixture should resemble wet sand.
Transfer the crumb mix to an 8-inch pie pan, and press it firmly into the bottom and up the sides. Use the flat bottom of a measuring cup or glass to ensure an even, compact layer. Then, refrigerate the crust to help it set while you prepare the orange filling.
Pro Tips for a Sturdy No-Bake Crust
- Chill Time Matters: Refrigerate the crust for at least 20–30 minutes before filling. This helps solidify the butter and ensures the crust stays firm when sliced.
- Use Unsalted Butter: It gives you more control over the flavor and avoids overly salty results.
- Go Beyond Oreo: You can switch it up with chocolate graham crackers or another chocolate cookie, but nothing quite matches the indulgent taste and texture of Oreo.
Now that your crust is set and chilling, it’s time to move on to the vibrant, creamy orange filling — the heart of this dessert.
Making the Creamy Orange Filling — The Citrus Heart of the Pie
What Makes This Filling So Unique
The orange layer in this Chocolate Orange Pie Recipe is what sets it apart from other chocolate-based desserts. It’s light, fluffy, and bursting with fresh citrus flavor. Thanks to a blend of orange gelatin, whipped topping, and mandarin oranges, the texture is smooth and airy while still holding its shape beautifully. The touch of orange extract deepens the flavor, making each bite taste like sunshine wrapped in silk.
This filling isn’t just tasty — it also offers a cooling contrast to the dense Oreo crust and the rich ganache topping. It’s the middle note that ties the entire dessert together.
Ingredients and Their Role
To prepare the orange filling, you’ll need the following:
- 3 ounces of orange Jell-O: This forms the base structure of the filling.
- 2 teaspoons orange extract: Adds intensity and depth to the citrus flavor.
- ½ cup orange juice: Contributes natural tartness and fruitiness.
- 2½ cups whipped topping: Introduces creaminess and body.
- 11 ounces of mandarin oranges (drained): Adds juicy texture and visual appeal.
The Jell-O and orange juice provide structure and flavor, while the whipped topping fluffs it up. Mandarin oranges not only add contrast in texture but also give a delightful surprise in every bite.
How to Get the Texture Just Right
Start by dissolving the Jell-O and orange extract in ⅔ cup of boiling water. Stir thoroughly until no granules remain. In a measuring cup, pour in ½ cup of orange juice, then top with ice until it reaches the 1-cup mark. Add this chilled mixture to the bowl and stir until the gelatin starts to thicken slightly. This step is crucial — if it’s too runny, the whipped topping will melt, and if it’s too thick, the mix won’t combine smoothly.
Once the gelatin is slightly thickened, whisk in the whipped topping. Mix until fully blended and fluffy. Then chill this mixture for about 20 minutes, or until it begins to hold its shape.
Drain the mandarin oranges well and pat them dry using paper towels. Moisture can disrupt the set of the filling, so take your time here. If you want to save a few slices for decoration, set them aside now.
Spoon half of the orange mixture into the chilled Oreo crust. Layer in the drained mandarin oranges. Then top with the remaining orange filling. This creates a layered, visual appeal that’s as delightful to see as it is to eat.
Troubleshooting Common Filling Issues
- Too runny? Chill longer before adding to the crust or make sure your gelatin has started to set before mixing in the topping.
- Lumpy texture? Mix the gelatin and whipped topping thoroughly to avoid streaks.
- Filling too soft after slicing? Ensure the pie chills for at least 30 minutes before adding ganache and a minimum of 4 hours before serving.
Now that your pie is layered with luscious citrus filling, it’s time to take things up a notch with the final and most indulgent layer — the chocolate ganache.
Pouring the Ganache – Creating a Smooth Chocolate Topping
What Is Ganache and Why It’s Perfect for This Pie
Ganache is a rich, velvety mixture of chocolate and cream. It’s silky smooth when warm and firms up into a soft, sliceable layer when cooled. In this Chocolate Orange Pie Recipe, it serves as the luxurious final topping that brings everything together. Its deep chocolate flavor balances the bright, citrusy filling and adds an elegant finish to the dessert.
Unlike frostings or glazes that can overwhelm, ganache adds richness without heaviness. Plus, it’s visually stunning — that shiny, dark chocolate surface makes your pie look bakery-quality.
Ingredients You’ll Need for the Ganache
- 1 cup heavy whipping cream
- 12 ounces semi-sweet chocolate chips
This simple 2-ingredient topping is all about quality and method. Use real chocolate chips with good cocoa content for a smoother finish. Avoid milk chocolate, which is too sweet for the balance you need.
Step-by-Step Ganache Preparation
Start by heating the heavy cream until it just begins to boil. You can do this on the stovetop or in a microwave-safe container. As soon as you see bubbles forming, pour the hot cream over the chocolate chips in a bowl. Do not stir immediately. Let it sit for about 4 minutes to allow the chocolate to melt gently.
After 4 minutes, whisk the mixture slowly, starting from the center and working outward. Continue whisking until it becomes glossy, thick, and dark. This is when the magic happens — it transforms into a luxurious ganache that’s both pourable and firm enough to set into a beautiful layer.
Let it cool for a few minutes. You want it warm enough to pour but not so hot that it melts the orange filling.
How to Add Ganache to the Pie
Once your orange filling is set, gently pour about 1 cup of ganache over the top of the pie, letting it spread out naturally. If needed, tilt the pan or use a spatula to spread it evenly, stopping just before the edges to allow a clean border.
Let the ganache-covered pie rest on the counter for 20 to 30 minutes to begin setting. Then, refrigerate the pie for at least 4 hours, preferably overnight. This step is crucial for clean slicing and proper texture.
Optional Decoration for Extra Style
After the pie has set completely, you can use the remaining ganache to decorate. Spoon the rest into a piping bag and let it cool to room temperature so it thickens enough to hold shape. Pipe along the edge of the pie in swirls or a braided pattern for a polished look. Top with the reserved mandarin slices to give it a pop of color and a hint of what’s inside.
Pro Tips, Time-Saving Tricks, and Slicing Secrets
Time-Saving Tips for Faster Prep
Although this Chocolate Orange Pie Recipe has multiple layers, you can speed up the process with a few smart shortcuts:
- Use a food processor to crush the Oreos in seconds. It gives more consistent crumbs and saves time over manual crushing.
- Chill while you work. Refrigerate the crust while you prepare the orange filling. By the time you’re done, the crust will be firm and ready.
- Make-ahead components. You can prepare the ganache topping a day in advance. Just reheat it gently to bring it back to pouring consistency.
- Use store-bought whipped topping rather than making your own whipped cream. It offers more stability and saves effort.
Ensuring Your Pie Sets Perfectly
One of the most common challenges with layered no-bake pies is achieving a clean set, especially when using gelatin-based fillings.
Here’s how to avoid pitfalls:
- Let each layer chill before adding the next. After assembling the orange filling and layering in the oranges, chill for at least 30 minutes before adding the ganache. This prevents sinking or mixing.
- Don’t rush the final chill. The full pie needs at least 4 hours in the fridge, but overnight is even better. This gives each layer time to firm up, which means picture-perfect slices later.
- Avoid overfilling. Keep your layers within the depth of your pie pan. If you overfill, the ganache will spill, and your pie might collapse under its own weight.
Cutting Clean Slices Like a Pro
No matter how great your pie tastes, presentation counts. Cutting through a thick ganache layer can be tricky without the right approach.
Here’s how to slice it like a professional baker:
- Use a hot knife. Run your knife under hot water before slicing, and wipe it clean between each cut. The heat melts through the ganache instead of cracking it.
- Start with a small incision. Press gently through the ganache first, then follow through the softer layers. This prevents squishing.
- Use a pie server to lift slices cleanly without dragging them across the crust.
When Not to Substitute Ingredients
For best results, stick with full-fat and original products. Sugar-free or fat-free versions of whipped topping and gelatin do not set as well and may result in a runny or unstable filling. The texture and flavor of this dessert rely on the richness of these base ingredients.
Serving Suggestions, Storage, and Nutritional Breakdown
Portioning for Gatherings or Special Occasions
This Chocolate Orange Pie Recipe yields about 8 generous servings, making it a great choice for family gatherings, potlucks, or holidays. Its layered look and zesty, chocolatey flavor also make it feel special enough for celebrations like birthdays or anniversaries.
If you’re serving a larger group or want smaller portions, simply slice it into 10 or 12 thinner pieces. The richness of the ganache and creamy filling means even a smaller slice satisfies most dessert lovers.
How to Store for Freshness and Flavor
Since this pie is made with whipped topping, Jell-O, and fresh cream, refrigeration is essential. Once set:
- Keep it covered with plastic wrap or a dome lid to prevent it from absorbing fridge odors or drying out.
- Store the pie in the refrigerator for up to 5 days.
- If you’re prepping ahead, make the crust and filling a day before, then add the ganache the next day to keep the topping glossy and fresh.
Freezing isn’t recommended, as it can cause texture changes — especially in the whipped topping and gelatin, which may become grainy when thawed.
Nutrition Information per Serving
Here’s a detailed breakdown based on 8 servings:
| Nutrient | Per Serving |
|---|---|
| Calories | 472 kcal |
| Carbohydrates | 32 g |
| Protein | 4 g |
| Total Fat | 36 g |
| Saturated Fat | 22 g |
| Cholesterol | 59 mg |
| Sodium | 41 mg |
| Potassium | 336 mg |
| Fiber | 3 g |
| Sugar | 24 g |
| Vitamin A | 760 IU |
| Vitamin C | 10.9 mg |
| Calcium | 70 mg |
| Iron | 2.9 mg |
While this pie leans into indulgence, it also offers a reasonable portion of vitamin C from the oranges and a good dose of iron from the chocolate and cookies. It’s a special-occasion treat that delivers on both flavor and texture.
Conclusion: A Dessert Worth the Wait
There you have it — the complete guide to making a Chocolate Orange Pie that’s equal parts luscious, zesty, and indulgent. From the crunchy Oreo crust to the smooth citrus filling and rich chocolate ganache, every bite delivers layered satisfaction.
This no-bake dessert is not only showstopping but also beginner-friendly. Whether you’re celebrating or just craving something unique, this pie is a refreshing twist on classic chocolate treats. With proper chilling, smart layering, and a few pro tricks, your pie will be the star of the dessert table every time.