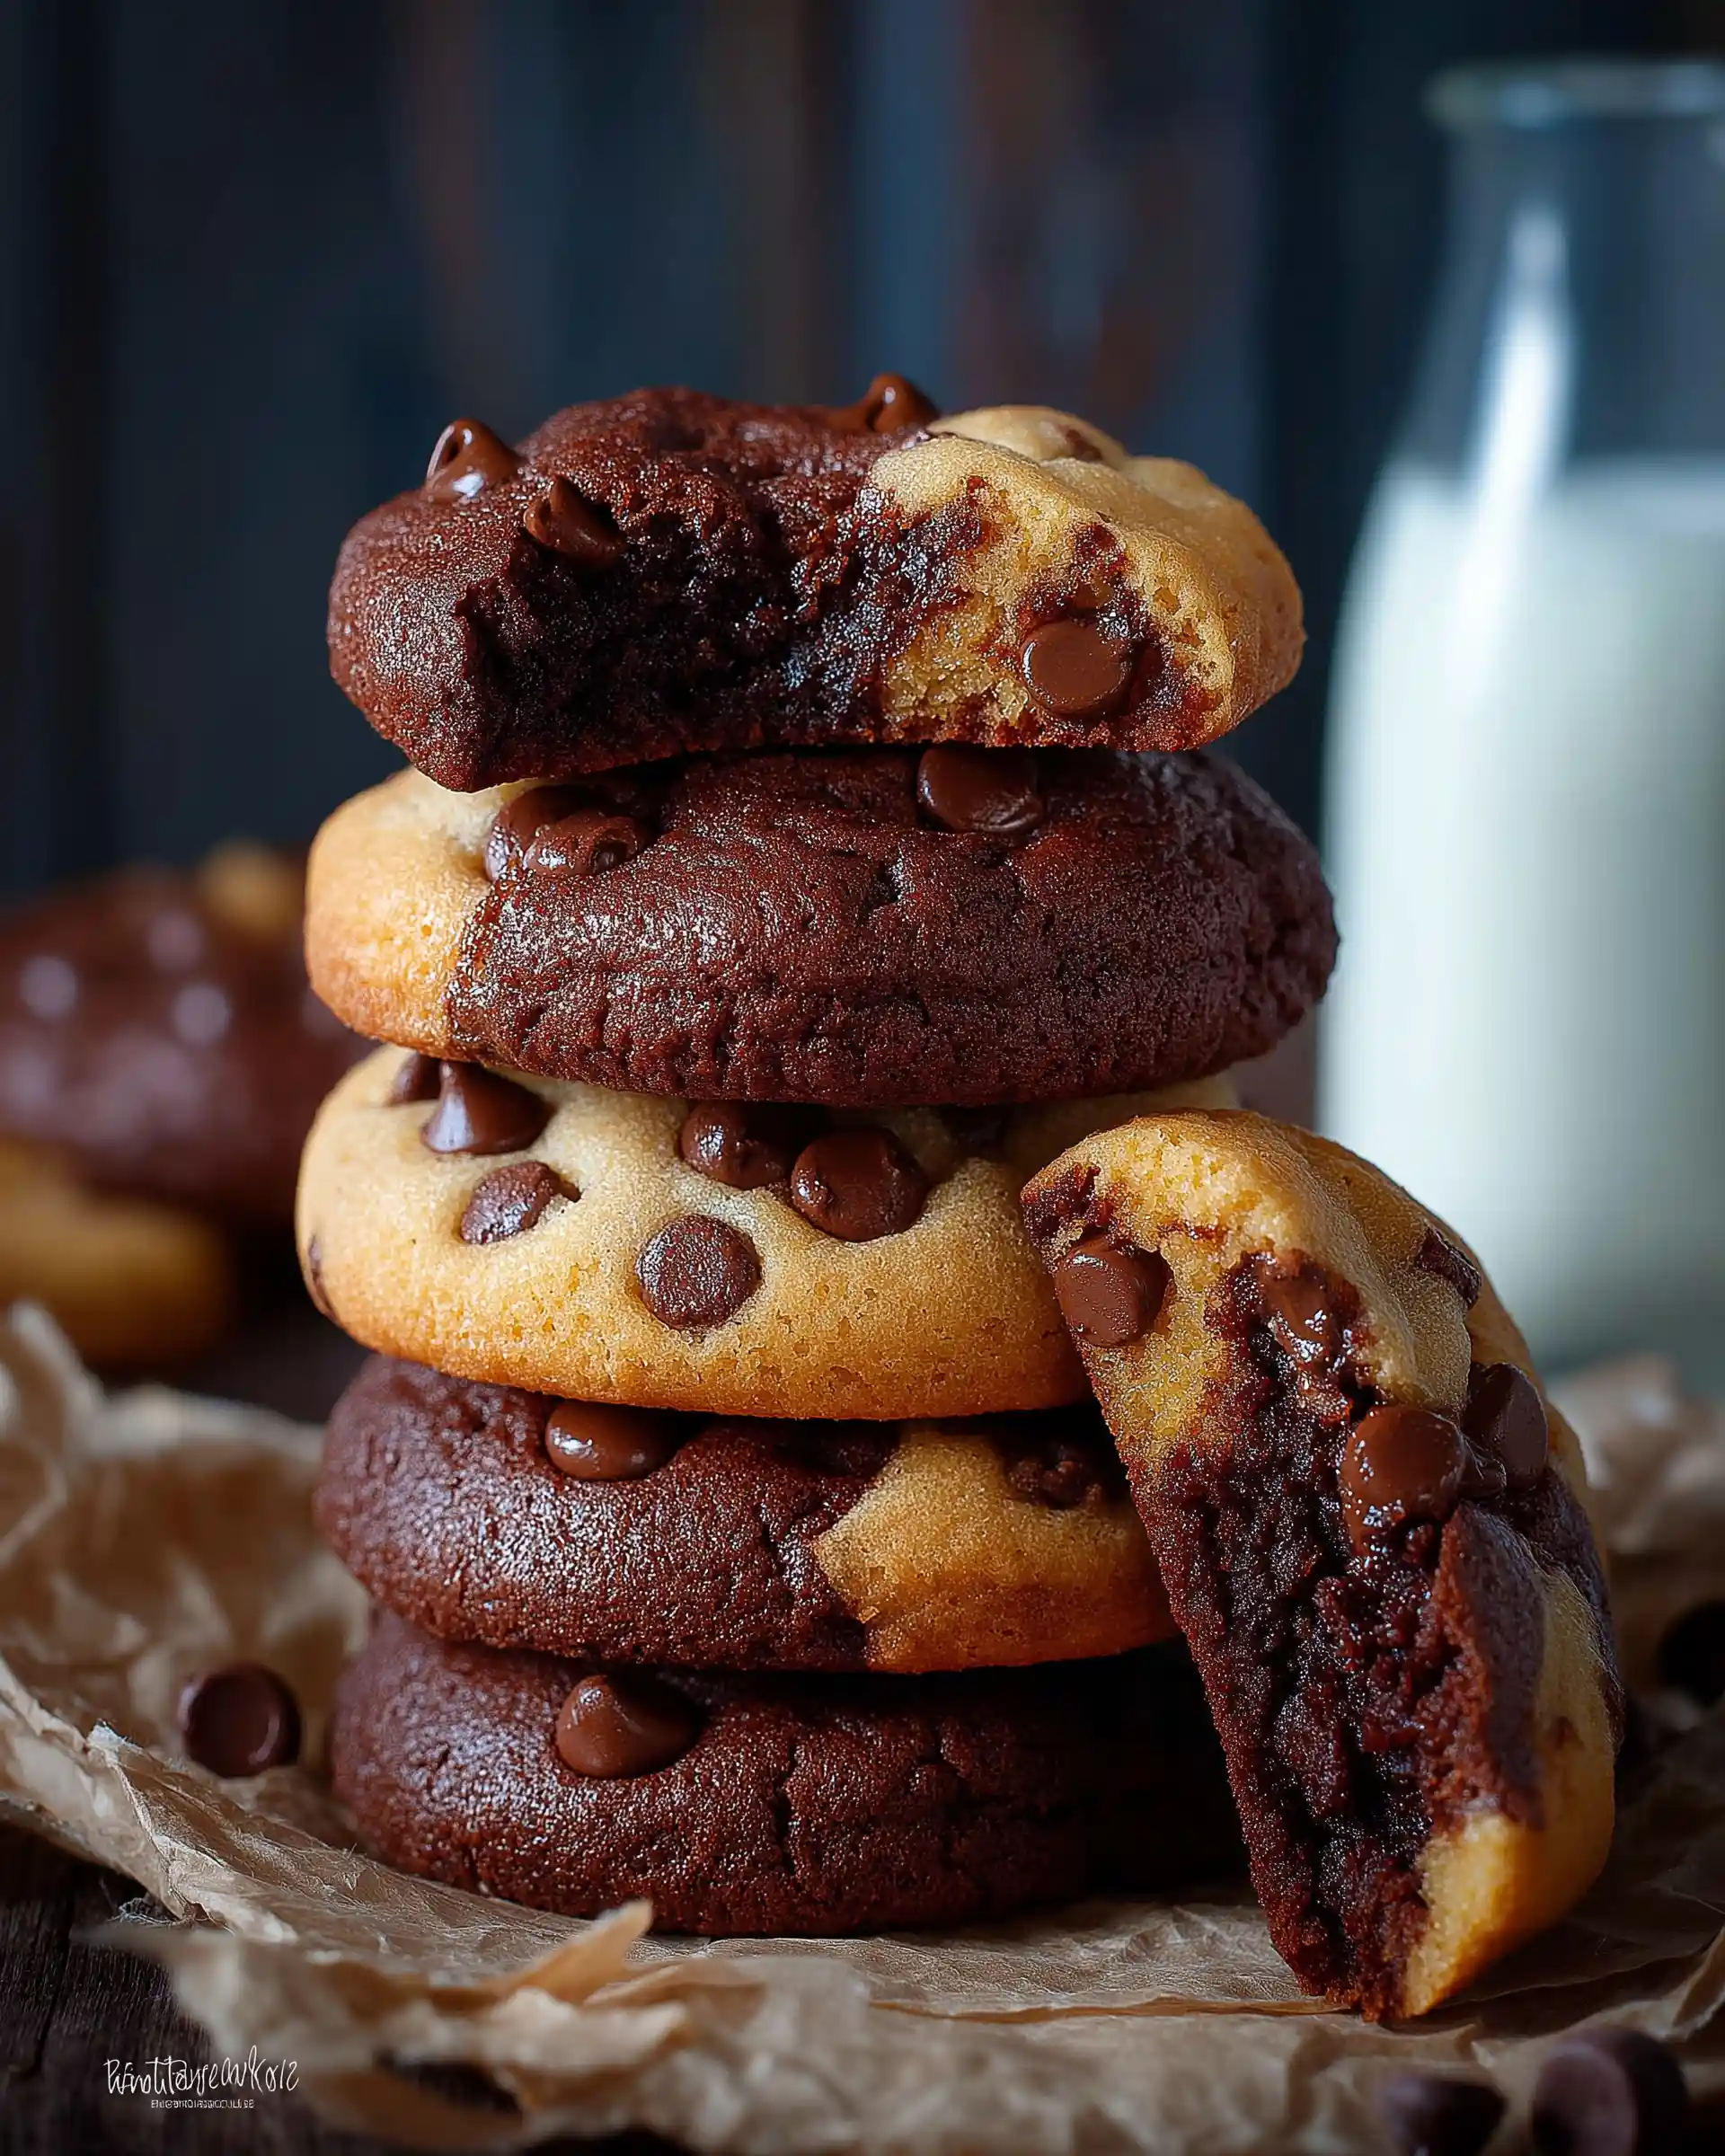
If you’ve ever found yourself torn between a rich, fudgy brownie and a classic, gooey chocolate chip cookie, brookie cookies are your perfect answer. Combining the chewy, dense texture of a brownie with the soft, buttery bliss of a chocolate chip cookie, brookies are the ultimate dessert mash-up. This recipe brings the best of both treats into one harmonious bite that’s perfect for parties, holidays, or just a weekend baking session.
Whether you’re a seasoned home baker or a beginner looking for a fun, rewarding project, this detailed guide will walk you through everything you need to know to make the perfect brookie cookies. We’ll dive into the ingredients, tools, step-by-step methods, and expert baking tips to ensure each cookie turns out bakery-worthy.
Essential Ingredients for the Best Brookie Cookies
What Makes Brookie Cookies So Unique?
Brookies are more than just a trend. They’re a textural and flavor experience that balances the best of two iconic desserts. The secret lies in the doughs themselves, one rich and chocolatey, the other soft and sweet with pockets of melted chocolate. When combined, they form a single treat that satisfies every dessert craving.
Brownie Cookie Dough: A Dense, Fudgy Base
The brownie portion of the brookie is what gives this treat its deep chocolate character. Key ingredients include:
- Unsweetened chocolate and butter: This combination is the foundation of the dense, moist brownie texture. Melting them together ensures a smooth base.
- Sugar and eggs: Granulated sugar sweetens the batter and helps give it a crackly top when baked, while eggs add structure and richness.
- Flour, baking powder, and salt: These dry ingredients give lift and balance the moisture. The small amount of baking powder allows the cookies to rise slightly without becoming cakey.
- Vanilla extract: A splash of pure vanilla enhances the chocolate flavor, deepening the overall taste.
Soft Chocolate Chip Cookie Dough: Classic, But Elevated
The chocolate chip side of the brookie plays a supporting role that’s just as important. Here’s what makes it shine:
- Light brown sugar and granulated sugar: This dual-sugar mix creates a cookie that’s both chewy and tender.
- Softened butter: Creamed with the sugars, it forms the light and airy structure of the dough.
- Eggs and vanilla: They create richness and bind the dough together while amplifying the flavor.
- Flour, baking soda, and salt: These ingredients provide structure and help the cookies spread properly during baking.
- Chocolate chips: You can use anywhere from two to four cups, depending on how chocolate-loaded you want your cookies to be.
Ingredient Quality Matters
High-quality ingredients make a noticeable difference in this recipe. Using pure vanilla extract, fresh baking powder and soda, and good chocolate will enhance flavor and texture. Avoid substituting margarine for butter unless necessary, and always measure flour accurately to avoid dry or crumbly dough.
Preparing the Doughs, Step-by-Step Process for Perfect Brookie Cookies
Setting Up Your Baking Station
Before diving into the recipe, make sure your kitchen is ready. A well-organized space makes baking more enjoyable and efficient. Gather your tools first, which include:
- Mixing bowls (at least two large ones)
- Measuring cups and spoons
- A small bowl for combining dry ingredients
- Whisks and rubber spatulas
- Electric mixer or hand mixer
- Baking sheets
- Parchment paper or silicone baking mats
- Ice cream scoop or tablespoon
Preheat your oven to 350°F. Line your baking sheets with parchment paper or silicone mats. This prevents sticking and helps cookies bake evenly.
Mixing the Brownie Cookie Dough
This portion is rich, sticky, and deeply chocolatey. It requires a little patience, but the results are absolutely worth it.
- Combine dry ingredients: In a small bowl, whisk together 1 1/4 cups all-purpose flour, 1/2 teaspoon baking powder, and 1/2 teaspoon salt. Set aside.
- Melt butter and chocolate: In a microwave-safe bowl, add 1/3 cup unsalted butter and 2 oz chopped unsweetened chocolate. Microwave for 30 seconds, stir, then microwave in 15-second intervals until fully melted. Stir until smooth.
- Add sugar and eggs: Into the melted chocolate mixture, whisk in 1 cup granulated sugar, 2 large eggs, and 1 teaspoon pure vanilla extract until smooth and glossy.
- Incorporate dry ingredients: Gently fold in the flour mixture using a spatula until fully combined. The batter might seem tacky and loose — this is expected. Set it aside to thicken while you prepare the cookie dough.
Tip: If the batter still feels too runny after a few minutes, you can place it in the fridge to help it firm up.
Creating the Soft Chocolate Chip Cookie Dough
This dough is classic, soft, and chewy, complementing the brownie side beautifully.
- Cream sugars and butter: In a large bowl, beat together 1 1/4 cups granulated sugar, 1 1/4 cups packed light brown sugar, and 1 1/2 cups softened butter until light and fluffy. This aerates the dough and adds structure.
- Mix in eggs and vanilla: Beat in 3 large eggs and 2 teaspoons vanilla extract until everything is well blended.
- Add dry ingredients: Stir in 4 1/4 cups flour, 2 teaspoons baking soda, and 1 teaspoon salt until fully combined.
- Fold in chocolate chips: Add 2–4 cups of semisweet chocolate chips based on your preference. More chips make for chunkier cookies.
Adjusting Dough Consistency
If either dough is too soft or hard to scoop, chill it for 20–30 minutes in the refrigerator. This is especially helpful for warmer climates or if your kitchen runs hot. Cold dough also helps prevent cookies from spreading too much in the oven.
Portioning the Doughs Together
Use a small ice cream scoop or a tablespoon to portion out both doughs.
- Scoop chocolate chip dough and place on your lined baking sheets, spacing each scoop about 2 inches apart.
- Scoop brownie dough next to each chocolate chip scoop.
- Pinch and mold them together gently where the two doughs meet. You want a clear division but no gaps.
This two-tone cookie setup ensures that every bite includes both flavors, and the contrast in appearance adds visual appeal.
Equipements
Baking Brookie Cookies to Perfection
How to Bake Brookies the Right Way
Once your cookie trays are prepped and your doughs are shaped together, it’s time to bake. Brookie cookies need to be handled with a little more attention than standard cookies, as they combine two different types of doughs in one.
- Preheat your oven to 350°F if you haven’t already.
- Place the trays in the center of the oven to ensure even heat distribution.
- Bake for 8–10 minutes. Keep an eye on them after the 8-minute mark. The cookie edges should look set, but the centers should remain slightly soft. That’s the sweet spot for a gooey brownie texture and a chewy cookie bite.
Understanding Bake Time and Texture
- Underbaking slightly is key. It helps maintain that fudgy brownie center and soft cookie structure. If you bake them too long, the brownie side can dry out.
- The cookies will continue to firm up while cooling, so don’t worry if they seem a bit soft when first removed from the oven.
Let the cookies cool on the tray for 1 minute, then carefully transfer them to a wire rack using a spatula. Cooling them properly prevents sogginess on the bottom and preserves texture.
Batch Baking Tips
If you’re baking multiple trays, rotate them halfway through baking to ensure they bake evenly. Switching the trays between racks and turning them front to back can make a noticeable difference, especially in older ovens that might not heat uniformly.
Cookie Appearance and Size
Each brookie should have a distinct visual split — dark chocolate on one side and golden cookie on the other. The contrast is both beautiful and appetizing.
For uniform results:
- Use a scooper to keep all cookies roughly the same size.
- Don’t flatten the dough before baking; let them spread naturally.
Yields and Scaling
The recipe, as provided, yields about 6 dozen cookies if you double the brownie portion. If you’re making a standard batch, expect around 3 dozen brookies, depending on your scoop size.
Tip: Avoid overcrowding your baking tray. Give each dough mound enough space to spread without touching others. This prevents them from fusing together and ensures crisp edges.
Cooling, Storing, and Freezing Brookie Cookies
Cooling for Best Texture and Flavor
Once your brookie cookies are out of the oven, the final texture develops as they cool. Let them rest for 1 minute on the baking sheet, then use a wide spatula to transfer each cookie to a wire rack. This step allows air to circulate underneath and avoids soggy bottoms.
Proper cooling sets the cookie’s shape without sacrificing softness. The brownie side will continue to firm slightly, giving you that perfect fudgy chew, while the cookie side stays buttery and soft.
Tip: Never stack warm cookies. It traps moisture and turns the edges mushy.
Short-Term Storage: Keep Them Soft and Fresh
Brookies stay fresh for up to one week if stored properly:
- Use an airtight container. Place cookies in a single layer or stack with parchment between layers to prevent sticking.
- Store at room temperature, away from direct sunlight or heat sources.
To maintain a soft texture, you can also drop a slice of white bread into the container. The cookies will absorb just enough moisture to stay fresh longer, without turning soggy.
Freezing Brookie Cookies
Planning ahead or want to bake in bulk? Freezing is a fantastic option.
To freeze baked cookies:
- Let cookies cool completely.
- Place them in a single layer on a baking sheet and freeze for 1 hour.
- Transfer frozen cookies into a freezer-safe bag or container.
- Label with the date and freeze for up to 3 months.
When ready to eat, simply let the cookies thaw at room temperature for 15–20 minutes. You can also warm them in the oven at 300°F for about 5 minutes for that just-baked feel.
To freeze unbaked dough:
- Portion the cookie doughs and press them together as if prepping for baking.
- Place on a tray lined with parchment and freeze until firm.
- Transfer to freezer-safe bags, separating layers with parchment.
- Bake directly from frozen, adding 1–2 extra minutes to bake time.
Tips for Large Batches and Gifting
Brookie cookies are ideal for gifting during holidays or special occasions. Wrap them in cellophane or kraft paper bags, tie with ribbon, and include a handwritten tag. If making large batches, double or triple the chocolate chip dough, and double the brownie dough to match proportions.
Label containers with “Brookie Cookies – Best by [insert date]” so recipients know when to enjoy them at peak freshness.
Creative Brookie Cookie Variations and Customizations
Flavor Twists to Try at Home
While the classic brookie cookie recipe is undeniably delicious, there’s plenty of room to get creative. Small adjustments in flavor or mix-ins can lead to a whole new cookie experience without compromising the integrity of the brookie.
Here are some simple but impactful ways to customize your batch:
1. Add Espresso Powder to the Brownie Side
A teaspoon of instant espresso powder mixed into the brownie batter deepens the chocolate flavor. It won’t taste like coffee, but it will enhance the richness and balance the sweetness.
2. Use Dark Chocolate or White Chocolate Chips
Swap semisweet chips with dark chocolate for a richer bite, or try white chocolate chips in the cookie dough for a sweet and creamy twist.
3. Stir in Chopped Nuts
Add 1/2 cup of walnuts or pecans to either the brownie or cookie dough. Nuts add crunch and complexity, pairing especially well with the fudgy brownie texture.
4. Mix in Peanut Butter Chips or Swirls
Love peanut butter? Add peanut butter chips to the cookie dough or gently swirl a spoonful of peanut butter into the brownie batter before scooping.
5. Salted Caramel Drizzle or Filling
After baking, lightly drizzle cooled brookies with salted caramel sauce. For a surprise inside, you can also press a caramel square between the doughs before baking.
Dietary Adjustments: Making Brookies Fit Your Needs
Gluten-Free Option
Use a 1:1 gluten-free flour blend in place of all-purpose flour. Be sure the baking powder, soda, and chocolate chips you use are also labeled gluten-free.
Dairy-Free Brookies
Substitute plant-based butter and use dairy-free chocolate chips. Make sure all ingredients, including margarine, are dairy-free certified.
Egg Substitutes
For egg-free versions, try:
- 1/4 cup unsweetened applesauce per egg
- 1 tablespoon ground flaxseed + 3 tablespoons water per egg
These changes might slightly affect texture but still deliver great taste.
Seasonal and Holiday Themes
Brookies can be tailored for holidays with just a few simple swaps:
- Valentine’s Day: Use heart-shaped cookie cutters after baking or mix in red and pink sprinkles.
- Halloween: Add orange and black M&Ms to the cookie dough side.
- Christmas: Stir crushed peppermint candies into the cookie dough or drizzle the finished brookies with white chocolate and green sprinkles.
These small tweaks make brookies not only tasty but visually festive.
Brookie Bars: A Fun Alternative
Want something different but equally delicious? Instead of scooping dough, press both batters into a 9×13-inch pan, layering brownie dough on one side and cookie dough on the other. Bake at 350°F for 25–30 minutes or until the center is set. Let cool completely before slicing into bars.
This method is great for serving crowds or creating clean-cut dessert bars for parties.
Expert Tips, Common Mistakes, and Troubleshooting for Brookie Cookies
Pro Tips for Bakery-Style Brookies at Home
Even though brookie cookies look fancy, a few simple techniques will help you consistently get perfect results with every batch.
1. Measure Ingredients Precisely
Use level measuring cups and spoons—especially for flour. Too much flour can result in dry, dense cookies, while too little may make the dough runny and lead to flat cookies.
2. Melt Chocolate Gently
Microwave the butter and unsweetened chocolate in short bursts, stirring between each. Overheating can cause the chocolate to seize or burn, which affects both flavor and texture.
3. Chill the Dough If It’s Too Soft
Don’t skip this step if your kitchen is warm or the batter seems sticky. Chilling the dough for 20–30 minutes helps it firm up and ensures cookies don’t spread too much in the oven.
4. Use Quality Chocolate and Vanilla
The brownie flavor depends heavily on chocolate. Go with high-quality unsweetened chocolate bars rather than low-end baking chips. Similarly, pure vanilla extract makes a big difference in flavor depth.
5. Space Cookies Evenly
Give each cookie enough room to spread without merging. About 2 inches apart is ideal for most cookie trays.
Troubleshooting Common Brookie Cookie Issues
Problem 1: Cookies Spread Too Much
- Likely Cause: Warm dough or too little flour.
- Solution: Chill both doughs longer, and make sure you’re using proper flour measurements.
Problem 2: Cookies Are Dry or Crumbly
- Likely Cause: Overbaking or too much flour.
- Solution: Bake for just 8–10 minutes, and measure flour by spooning it into the cup rather than scooping directly.
Problem 3: Brownie Side Is Too Gooey
- Likely Cause: Underbaking.
- Solution: Let cookies cool completely before moving them. If needed, add 1–2 minutes of baking time next round.
Problem 4: Doughs Won’t Stick Together
- Likely Cause: One dough is too dry or cold.
- Solution: Gently pinch the edges where both doughs meet and smooth the seam with slightly damp fingers. You can also let both doughs rest at room temperature briefly to soften before combining.
How to Scale for a Crowd
If you’re baking brookies for a bake sale, party, or holiday tray:
- Double the brownie recipe to match the larger cookie dough batch.
- Use a cookie scoop for speed and consistency.
- Bake multiple trays by rotating oven racks halfway through.
- Cool completely before packaging to avoid condensation and soggy texture.
Serving Ideas and Presentation Tips
Presentation makes a big difference—especially if you’re sharing or gifting.
- Stack brookies in clear treat bags with ribbon and a label.
- Serve on a wooden dessert board with milk, fruit, or marshmallows for a kid-friendly dessert spread.
- Use small kraft boxes with wax paper for an elegant, rustic look if you’re gifting them.
Brookies don’t need frosting or glaze—they’re indulgent on their own. A quick dusting of powdered sugar can add a bit of flair without overpowering the cookie’s natural flavor.
Conclusion
Brookie cookies bring together the best of two dessert classics—fudgy brownies and chewy chocolate chip cookies—into one irresistible treat. This homemade recipe delivers a bakery-quality cookie with rich chocolate depth, buttery cookie softness, and the perfect texture contrast in every bite.
Whether you’re baking for fun, prepping for a special event, or just satisfying a late-night craving, this guide gives you all the tools you need to create amazing brookies from scratch. From ingredient tips to baking techniques and creative variations, you’re now ready to turn your kitchen into a brookie cookie haven.