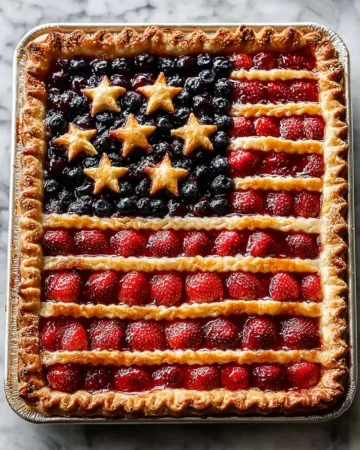


If you’re searching for a festive Fourth of July dessert, the American Flag Berry Pie Recipe is the perfect showstopper. With its bright red strawberries, deep blue blueberries, and golden crust, this pie is as beautiful as it is delicious. It’s made from scratch and shaped to resemble the American flag, making it a standout at any summer gathering.
This guide will walk you through everything, how to make the crust, prepare the fruit fillings, and assemble the patriotic design. Whether you’re baking for a party or just celebrating with family, this pie is guaranteed to impress.
Understanding the American Flag Berry Pie
What Makes the American Flag Berry Pie Special
The American Flag Berry Pie Recipe is more than just a dessert. It combines simple ingredients with a patriotic design to create a homemade pie that’s ideal for summer holidays. The stars and stripes pattern, made from pie dough and berries, brings visual appeal to a classic fruit pie.
What makes this pie stand out is the use of natural berry colors to mimic the flag. The result is a sweet and tangy treat with real visual impact.
Origin and Popularity of Flag Pies in the USA
Flag pies have grown in popularity in recent years, especially around Memorial Day and Independence Day. The idea of creating an edible American flag captures attention and spirit. Home bakers love the creativity behind it, and guests always admire the final result.
This style of pie blends tradition with celebration, and it’s now a go-to recipe for patriotic events. It’s a simple concept that delivers bold flavor and festive charm.
Essential Ingredients for the Perfect Patriotic Pie
Crust Components for Flaky Perfection
The foundation of any great American Flag Berry Pie Recipe is a reliable, flaky crust. For this version, a sour cream pie dough creates the perfect texture, soft enough to roll, but sturdy enough to hold the patriotic shape without breaking. Here’s what goes into the crust:
- All-purpose flour – Gives the structure and strength.
- Butter – Provides that flaky, golden texture and rich flavor.
- Sugar and kosher salt – Enhances flavor without overwhelming the fruit.
- Sour cream – Makes the dough smooth and pliable while keeping it tender.
Unlike traditional crusts that rely only on water or shortening, this sour cream variation gives you more flexibility during shaping. It’s easier to handle when cutting the dough into stars and stripes, and it firms up well after chilling.
If your dough ever feels too sticky while rolling, just dust it with a little flour and chill it for a few minutes before continuing.
Strawberry and Blueberry Filling Essentials
The patriotic colors in this pie come from two separate fruit fillings, strawberries for the red stripes and blueberries for the star field.
Here’s what goes into the strawberry filling:
- Fresh strawberries, hulled and quartered
- Sugar to balance the tartness
- Orange zest for a citrusy twist
- Cornstarch, flour, or tapioca as thickening agents
This mixture gives the red stripes a sweet, jammy texture after baking without turning watery.
For the blueberry section, you’ll need:
- Fresh blueberries
- Sugar
- Lemon zest and juice to brighten the flavor
- Cinnamon for subtle spice
- Cornstarch, flour, or tapioca for thickness
These two fillings, when divided in the right sections of the crust, give the pie its bold American flag appearance and summer fruit flavor. Always spoon the fillings in without their extra juices, this keeps the bottom crust from becoming soggy while baking.
With your crust prepped and berries ready, you’re now set to begin assembling a patriotic masterpiece that tastes as good as it looks.
Print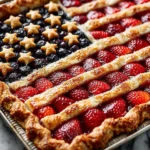
American Flag Berry Pie Recipe
- Total Time: 3 hours 10 minutes
- Yield: 12 servings
- Diet: Vegetarian
Description
A festive American Flag Berry Pie Recipe with a flaky sour cream crust, sweet strawberries, juicy blueberries, and decorative dough stars and stripes. Perfect for Fourth of July, Memorial Day, or any summer celebration.
Ingredients
For the Crust:
3 1/2 cups all-purpose flour
3 1/2 teaspoons sugar
1 1/2 teaspoons kosher salt
14 ounces butter (3 1/2 sticks), cut into cubes
7/8 cup sour cream (3/4 cup + 2 tablespoons)
For the Strawberry Filling:
3 1/2 pounds strawberries, hulled and quartered
1/2 cup sugar
2 teaspoons orange zest
4 tablespoons cornstarch, flour, or minute tapioca
For the Blueberry Filling:
1 pint blueberries (about 0.6 pounds)
3 tablespoons sugar
1/4 teaspoon cinnamon
1 teaspoon lemon zest
2 teaspoons lemon juice
2 tablespoons cornstarch, flour, or minute tapioca
For the Egg Wash:
1 egg white
1 teaspoon milk or cream
Instructions
1. Cut butter into cubes and let it sit out for 10 minutes.
2. Whisk together flour, sugar, and salt in a bowl.
3. Add butter and toss to coat, then work in with your hands until crumbly.
4. Stir in sour cream with a fork until dough forms.
5. Knead until it comes together and divide into 3 discs.
6. Wrap in plastic and chill for at least 1–2 hours.
7. Mix strawberries with sugar, orange zest, and thickener; set aside.
8. Mix blueberries with sugar, cinnamon, lemon zest and juice, and thickener.
9. Roll out 2 dough discs to fit a 13×18-inch rimmed sheet pan.
10. Layer crust into the sheet pan, crimp edges, and form a dough rectangle in the corner.
11. Chill crust.
12. Make egg wash by whisking egg white with milk.
13. Roll out the third dough disc and cut stripes and stars.
14. Brush stars and stripes with egg wash and chill.
15. Preheat oven to 450°F.
16. Fill the large section with strawberry filling and the corner with blueberries.
17. Arrange stars and stripes on top.
18. Chill assembled pie for 10–15 minutes.
19. Bake at 450°F for 15 minutes.
20. Cover with foil, reduce heat to 375°F, and bake 45–55 minutes more.
21. Let cool at least 1 hour before serving.
Notes
If using frozen berries, thaw and drain them completely to avoid excess liquid.
To make ahead, dough can be refrigerated for 5 days or frozen up to 3 months.
Decorative dough pieces should always be chilled before baking to hold their shape.
Use a star-shaped cookie cutter for a polished flag look.
You can swap strawberries or blueberries with raspberries, cherries, or blackberries.
- Prep Time: 60 minutes
- Cook Time: 70 minutes
- Category: Pies
- Method: Baking
- Cuisine: American
How to Make the Ideal Pie Dough
Mixing the Dough with Butter and Sour Cream
To build the base for your American Flag Berry Pie Recipe, the pie dough must be tender yet strong enough to hold its shape. This dough includes a unique twist—sour cream. It adds moisture, makes the dough easy to handle, and bakes into a soft, flaky crust.
Start by cutting cold butter into small cubes. Let it rest at room temperature for about 10 minutes. In a large bowl, whisk together all-purpose flour, sugar, and kosher salt. Then, toss the butter cubes into the flour mixture.
Use your hands or a pastry blender to work the butter into the flour until the texture looks like coarse crumbs or a rough meal. You want small clumps of butter throughout. These pockets create flakiness during baking.
Once the butter is evenly incorporated, add the sour cream and stir with a fork. The dough should begin to come together. When it holds its shape, use your hands to gently knead the dough into a soft, slightly sticky ball. This dough will be more pliable than a typical pie crust, which makes it easier for decorative designs.
Divide the dough into three equal portions. Shape each into a flat rectangle, wrap in plastic, and refrigerate for at least 1 hour. This chilling step allows the dough to firm up, making it easier to roll and cut cleanly later.
Shaping and Chilling the Dough Like a Pro
When ready to roll, take two of the dough rectangles from the refrigerator and let them sit at room temperature for about 10 minutes. This softens them just enough to work without cracking.
Lightly flour your surface and rolling pin. Then, roll each piece of dough to about 11 x 17 inches. One rectangle will cover half of your sheet pan, and the other will cover the rest. Lay both pieces into a 13 x 18-inch rimmed sheet pan, letting the edges hang over slightly.
Fold and crimp the edges neatly, trimming any extra dough from the center. You’ll use this trimmed dough later to make the star field divider. Roll it into a rope and shape it into a small square or rectangle in the top left corner of the pie pan—this will hold the blueberries in place.
Return the assembled crust to the fridge while you prepare the stars, stripes, and fillings. Keeping everything cold is key to achieving a crisp and flaky crust after baking.
You’re now ready to add the vibrant berries that bring this red, white, and blue pie to life.
Crafting the Red and Blue Berry Fillings
How to Prepare the Strawberry Mixture for the Stripes
The red stripes in your American Flag Berry Pie Recipe come from juicy, ripe strawberries. When baked, they deliver that sweet-tart burst of flavor and a bold, vibrant color. For best results, use fresh, in-season strawberries. Frozen ones may release too much liquid and ruin the flag’s clean look.
Start by hulling and quartering about 3½ pounds of strawberries. Place them in a large mixing bowl. Then, sprinkle in:
- ½ cup sugar
- 4 tablespoons cornstarch (or use flour or minute tapioca)
- 2 teaspoons orange zest
Gently toss everything together until the strawberries are evenly coated. The cornstarch helps thicken the filling as it bakes, so the pie slices cleanly. The orange zest adds a citrus brightness that balances the sweetness of the berries.
Let the mixture sit for about 5–10 minutes while the juice starts to draw out. But here’s a pro tip: don’t pour the entire bowl into your pie shell. Instead, spoon the strawberries into the crust, leaving any excess liquid behind. This helps prevent the crust from becoming soggy during baking.
Blending the Blueberry Filling for the Star Section
The deep blue area of your patriotic pie—representing the star field—is made from fresh blueberries. Their naturally bold color and plump texture make them perfect for the upper-left corner of your flag design.
In a separate bowl, gently toss together:
- 1 pint of blueberries (about 0.6 pounds)
- 3 tablespoons sugar
- 2 tablespoons cornstarch (or flour or tapioca)
- 1 teaspoon lemon zest
- 2 teaspoons lemon juice
- ¼ teaspoon cinnamon
This mix brings in the tartness of lemon and the warmth of cinnamon, enhancing the blueberries without overpowering them. The cornstarch works just like it does in the strawberry filling—it thickens as the pie bakes to prevent a runny mess.
Once the berries are coated, let them rest briefly. Then, just like with the strawberries, spoon the blueberries into their designated section, leaving out the extra juice.
Keeping the two berry sections clean and separate is what gives the American Flag Berry Pie Recipe its distinctive look. With your fruit prepped and the crust chilled, you’re ready for the fun part—bringing the flag to life with stars and stripes.
Assembling the Pie in Flag Formation
Rolling and Positioning the Base Crust
Now that your dough is chilled and your fillings are ready, it’s time to assemble your American Flag Berry Pie Recipe into its iconic design. Start by removing the prepared crust from the refrigerator. Let it sit for 5–10 minutes to soften slightly—it should be cool but pliable.
On a lightly floured surface, roll out the first two dough rectangles to roughly 11 x 17 inches each. These will form the full base for your 13 x 18-inch rimmed sheet pan. Gently place one rolled-out dough on one side of the pan, letting the edges hang over slightly. Repeat with the second piece, covering the opposite side and overlapping slightly in the center.
Once both pieces are in the pan, fold the edges inward and crimp them neatly all the way around. This creates a clean border and helps the crust hold its shape during baking.
Now, take the excess dough you trimmed from the center seam earlier. Roll it into a long rope and use it to shape a rectangle in the top-left corner of the pan. This divider will separate the blueberry “stars” section from the strawberry “stripes.” Press it gently into place.
Place the crust-lined pan back in the fridge for at least 10 minutes to chill while you prepare the top decorations.
Shaping the Divider and Preparing the Egg Wash
While the base chills, move on to the finishing touches that give the pie its patriotic look. First, prepare a simple egg wash by whisking together:
- 1 egg white
- 1 teaspoon of milk or cream
This will help the stars and stripes turn golden and glossy as they bake.
Next, take the third dough disc from the refrigerator. Roll it out to about 18 inches in length. Using a pizza wheel or blunt dinner knife, cut out your stripes:
- Two long stripes, about 18 inches long and 1½ inches wide
- Two shorter stripes, about 10 inches long and 1½ inches wide
Then, use a small star-shaped cookie cutter to cut dough stars. Aim for about 10–12 stars, depending on the size of your cutter.
Place the cut dough stars and stripes onto a flat tray or plate. Brush them lightly with egg wash and chill them again for 10 to 15 minutes. Keeping them cold ensures they’ll hold their shape when placed on top of the fruit fillings.
Once everything is cold and ready, remove the crust from the fridge. Spoon the strawberry filling into the larger section of the pie and the blueberry filling into the small top-left corner, being careful not to mix the juices.
Gently arrange the stripes over the strawberries and the stars over the blueberries, pressing each one lightly into place.
You’ve now assembled your American Flag Berry Pie. The design is complete, the fruit is fresh, and the crust is chilled—perfect conditions for a golden, bubbly bake.
Creating Stars and Stripes from Pie Dough
Cutting and Chilling Dough for Design Elements
The most eye-catching part of the American Flag Berry Pie Recipe is the dough decoration. To create the stars and stripes, you’ll use the third chilled dough disc, which has been resting in the fridge while you assembled the base.
Start by rolling the dough into a large rectangle, about 18 inches long and wide enough to cut clean, even shapes. A smooth, cool surface and a lightly floured rolling pin will make this step much easier.
Use a pizza wheel or a blunt knife to cut:
- Two long stripes (about 18 inches by 1½ inches)
- Two shorter stripes (about 10 inches by 1½ inches)
Try to keep the edges clean so the final pie looks crisp and polished. For the stars, use a small star-shaped cookie cutter. Aim for 10 to 12 stars, depending on your cutter’s size and how much space you have in the blueberry section of the pie.
Once everything is cut, place the stripes and stars on a parchment-lined tray or plate. Brush each piece gently with the prepared egg wash to give them that shiny, golden look after baking.
Chill the stars and stripes again for 10 to 15 minutes. Cold dough holds its shape better and won’t melt into the filling during baking.
Tips for Making Even Stars and Precise Stripes
Precision doesn’t have to mean perfection. The goal here is a clean, confident layout that clearly resembles the U.S. flag.
To keep your stripes straight and evenly spaced:
- Start placing them from the top down
- Use the longer stripes across the full width of the strawberry section
- Place shorter stripes at the lower part of the design to fit the edge cleanly
As for the stars, space them evenly in the blueberry section. Avoid crowding or overlapping, and don’t press too hard into the filling. You want them to rest gently on top so they puff slightly during baking and turn golden.
If your dough warms up and becomes hard to handle, don’t force it. Just pop it back in the fridge for a few minutes. Working with chilled dough is the key to success.
Once your dough decorations are in place and everything is set, the pie is ready for the oven. You’re just one step away from the perfect patriotic centerpiece.
Baking Instructions for a Show-Stopping Pie
Oven Settings and Temperature Transitions
Once your patriotic pie is fully assembled with its star and stripe dough decorations chilled and in place, it’s time to bake. Start by preheating your oven to 450°F. This high heat will give the crust a strong start, helping it set and begin to brown quickly.
Carefully place your pie on the center rack of the oven. Bake it at 450°F for 15 minutes. This initial blast of heat helps the crust keep its shape and starts the thickening process for the fruit filling.
After the first 15 minutes, tent the pie loosely with aluminum foil. This prevents the decorative dough pieces from over-browning too quickly. Then, reduce the oven temperature to 375°F and continue baking for 45 to 55 more minutes.
During this stage, the berries will begin to bubble, and the juices will thicken. The crust will finish turning golden brown. Keep an eye on the pie after 40 minutes—every oven bakes slightly differently, and you want the filling to bubble without burning the edges.
How to Know When the Pie is Perfectly Baked
There are a few clear signs to tell when your American Flag Berry Pie Recipe is ready to come out of the oven:
- Bubbling fruit filling: Both the blueberry and strawberry sections should be visibly bubbling. This shows the cornstarch has activated and is thickening the mixture properly.
- Golden crust: The stars and stripes should be lightly golden with a slight sheen from the egg wash.
- Firm edges: The outer crust should feel set and crisp when lightly tapped.
Once you remove the pie from the oven, let it cool for at least 1 hour on a wire rack or stovetop. This waiting time allows the fruit filling to settle and firm up, making it much easier to slice and serve.
Serving the pie too soon can lead to a runny interior, so resist the urge to cut into it right away. You’ve made it this far-give it the time it needs to set properly.
With the baking complete, you’ve now created a dessert that’s as festive as it is flavorful. Let’s move on to creative tips and easy variations to make this pie your own.
Expert Tips and Creative Variations
Using Alternate Berries Like Cherries or Raspberries
One of the best things about the American Flag Berry Pie Recipe is how flexible it can be. While strawberries and blueberries are the go-to fruits for the flag design, you don’t have to stick to just those. If you want to shake things up or work with what’s in your fridge, there are plenty of options.
Here are some excellent berry substitutions:
- Cherries: Sweet cherries can replace or be mixed with strawberries. Just be sure to pit them and slice in halves or quarters.
- Raspberries: A great stand-in for strawberries. They add a slightly tart flavor and vibrant red color.
- Blackberries: These can be blended with blueberries to give more texture and a deeper blue tone.
When using alternate berries, keep the same sugar and thickening agent ratios. You may need to slightly adjust the amounts based on how juicy the berries are.
Also, consider citrus swaps. If you don’t have oranges or lemons, you can use lime zest or juice in a pinch. Just a little goes a long way in brightening the flavor.
Fixing Common Mistakes: Soggy Crusts, Overflowing Fillings
Even the most experienced bakers can run into pie problems. Here’s how to troubleshoot the most common issues with this patriotic dessert.
Soggy bottom crust:
This usually happens when the fruit fillings release too much juice. Always spoon the fruit into the crust, leaving any extra liquid in the mixing bowl. Using cornstarch or flour helps absorb the moisture during baking.
Overflowing filling:
If the fruit mixture boils over the crust, it means the filling was too juicy or the pie was overfilled. Use a rimmed baking sheet underneath your pan to catch any drips and avoid oven messes.
Burning edges:
If the outer crust browns too fast, cover the edges with strips of foil or use a pie shield during the last 30–40 minutes of baking.
Crust too soft to work with:
Warm dough gets sticky fast. If that happens while cutting stripes or stars, chill the dough again for 5–10 minutes. Cold dough holds its shape and bakes more cleanly.
These simple tips can make the difference between a good pie and a great one. With just a little attention to detail, your American Flag Berry Pie will turn out bakery-worthy every time.
Serving and Storing the Berry Pie
Ideal Cooling Time and Presentation Tips
After all the careful work of assembling and baking your American Flag Berry Pie Recipe, the final step is letting it cool properly. This part is just as important as the bake itself. Once you remove the pie from the oven, allow it to rest on a wire rack or countertop for at least 1 full hour. This gives the berry filling time to thicken and set.
Trying to slice the pie too early will cause the fruit to spill out, making the crust soggy and the flag design messy. If possible, let it sit for 2 to 3 hours at room temperature before cutting—especially if you’re aiming for clean, photo-ready slices.
When serving, a wide spatula helps lift each piece while keeping the shape intact. For extra flair, pair each slice with a scoop of vanilla ice cream or a dollop of whipped cream. The light, creamy toppings contrast perfectly with the buttery crust and tart berries.
If you’re presenting this pie at a gathering, consider garnishing the edges of the tray with fresh mint or extra whole berries. It’s a small touch that adds visual appeal without extra effort.
How to Store Leftovers and Freeze the Pie
If you’ve got leftovers, lucky you-storing your American Flag Berry Pie is easy and hassle-free. Once the pie is completely cool, cover it tightly with foil or plastic wrap. You can keep it at room temperature for one day or in the refrigerator for up to five days.
Want to make it ahead of time? This pie holds up great in the freezer. Here’s how:
- Let the baked pie cool completely.
- Wrap it securely in plastic wrap, then a layer of aluminum foil.
- Label it and freeze for up to 3 months.
To serve after freezing, thaw the pie in the refrigerator overnight. Let it come to room temperature before serving, or warm it in a 300°F oven for 10–15 minutes if you prefer it slightly heated.
Even the unbaked crust and fillings can be prepped and frozen separately. This gives you a head start if you’re baking for an event or planning multiple pies.
With thoughtful storage, your American Flag Berry Pie stays fresh, flavorful, and ready to wow guests again and again.
Conclusion
Whether you’re celebrating the Fourth of July, Memorial Day, or simply enjoying summer’s peak berry season, this American Flag Berry Pie Recipe delivers both flavor and festive flair. With its buttery sour cream crust, vibrant strawberry and blueberry fillings, and decorative stars and stripes, this pie makes a bold and patriotic statement on any table.
By following each step—from preparing the dough to shaping and baking the flag design-you’ll create a dessert that’s not only eye-catching but also packed with natural fruit flavor. It’s a family-friendly recipe, great for both novice and experienced bakers, and flexible enough to swap in your favorite berries or citrus accents.
So, the next time you’re planning a holiday gathering, skip the store-bought sweets. Instead, create a pie that’s rich in tradition, full of homemade goodness, and beautiful enough to be the centerpiece of your celebration. The American Flag Berry Pie isn’t just dessert—it’s a symbol of summer pride baked right into every slice.