


Looking for the perfect indulgent treat that’s creamy, chocolatey, and irresistibly peanut buttery? This Reese’s Peanut Butter Pie recipe checks all the boxes. Whether you’re planning a weekend get-together, celebrating a birthday, or simply craving a dessert that hits the sweet spot, this no-bake pie will satisfy every craving.
Made with cream cheese, Cool Whip, peanut butter, and a generous helping of chopped peanut butter cups, it delivers a velvety texture paired with just the right amount of crunch and sweetness. Best of all, you can make it in under 10 minutes, with no baking required.
The prep is a breeze, and the result is pure heaven on a plate. In this article, we’ll dive into how to make the perfect Reese’s Peanut Butter Pie, tips to upgrade the texture and flavor, ingredient substitutions, storage tips, and much more.
What Makes This Reese’s Peanut Butter Pie So Special?
A Flavor Combo That Never Fails
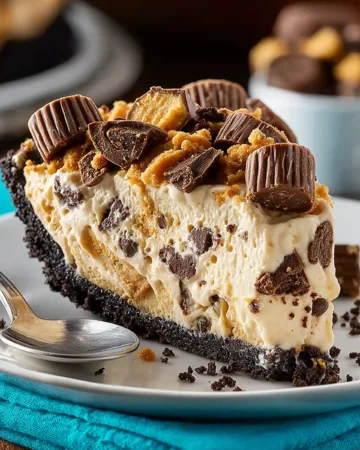
The combination of peanut butter and chocolate is a time-tested favorite. What makes this recipe shine is how it blends the salty, nutty richness of peanut butter with the cool, silky smoothness of cream cheese and whipped topping. Add in the crushed peanut butter cups and the crisp bite of the Oreo or chocolate crust, and you’ve got a texture and flavor medley that keeps everyone coming back for seconds.
No-Bake Simplicity at Its Best
One of the best features of this Reese’s Peanut Butter Pie recipe is how little effort it takes to put together. No oven, no complicated baking techniques—just mix, fold, and chill. It’s an ideal dessert for summer days when you want something sweet without heating up the kitchen. The simple, fuss-free instructions make it a great recipe even for beginners.
A Creamy Filling With a Crunchy Surprise
What elevates this pie from good to unforgettable is its structure. The cream cheese and peanut butter mixture creates a thick, creamy base that holds up beautifully once chilled. Fold in the whipped topping and chopped Reese’s pieces, and every bite offers a smooth, melt-in-your-mouth experience with a delightful crunch from the candy pieces.
Made for Peanut Butter Lovers
This recipe doesn’t hold back on the peanut butter. It’s used in the filling and is further emphasized with the chopped Reese’s cups. If you love peanut butter, this dessert is like a dream come true. It’s bold, sweet, and slightly salty, offering a balanced flavor profile that satisfies the deepest dessert cravings.
Easy to Customize
Although the original version uses a store-bought Oreo or chocolate graham cracker crust, it’s easy to make it your own. Prefer a different crust? Swap it out. Want to add a drizzle of melted chocolate or a sprinkle of crushed pretzels for contrast? Go for it. The pie is versatile enough to handle creative toppings or flavor tweaks.
Great for Make-Ahead Desserts
The pie needs a couple of hours in the fridge to set, making it an ideal choice for preparing ahead of time. This makes it perfect for parties, potlucks, and special occasions. Once set, it’s easy to slice and serve, and the flavor even improves after resting overnight in the fridge.
Print
Reese’s Peanut Butter Pie Recipe
- Total Time: 2 hours 10 minutes
- Yield: 8
- Diet: Vegetarian
Description
This no-bake Reese’s Peanut Butter Pie is a creamy, dreamy dessert packed with peanut butter flavor, chopped Reese’s cups, and a rich chocolate crust. Perfect for any occasion, it’s easy to prepare and even easier to love.
Ingredients
1 (8-ounce) package cream cheese, softened
1/2 cup peanut butter
1 teaspoon vanilla extract (alcohol-free)
1 1/2 cups powdered sugar
1 (8-ounce) container Cool Whip, thawed
2 cups chopped peanut butter cups
1 store-bought Oreo or chocolate graham cracker crust
Instructions
1. Beat cream cheese and peanut butter with an electric mixer until smooth.
2. Mix in vanilla.
3. Beat in powdered sugar until smooth.
4. Fold in Cool Whip until blended.
5. Fold in 1 1/2 cups chopped peanut butter cups.
6. Spread filling into crust.
7. Sprinkle remaining peanut butter cups on top.
8. Refrigerate for 2 to 4 hours before serving.
Notes
You can use a homemade Oreo crust or try a Nutter Butter cookie crust for a twist.
Pie can be stored in the refrigerator for up to 5 days.
For clean slices, use a sharp knife dipped in hot water and wiped dry between cuts.
- Prep Time: 10 minutes
- Cook Time: 0 minutes
- Category: Dessert
- Method: No-Bake
- Cuisine: American
Step-by-Step Instructions for Making Reese’s Peanut Butter Pie
Gather Your Ingredients
To get started, make sure all your ingredients are ready and within reach. Here’s what you’ll need for this rich and creamy pie:
- 1 (8-ounce) package cream cheese, softened for easy mixing
- 1/2 cup creamy peanut butter (use your favorite brand, but creamy works best for smooth texture)
- 1 teaspoon vanilla extract for added flavor depth
- 1 1/2 cups powdered sugar to sweeten and stabilize the filling
- 1 (8-ounce) container of Cool Whip, thawed in the refrigerator, not microwaved
- 2 cups chopped peanut butter cups, either mini or regular
- 1 store-bought Oreo or chocolate graham cracker crust
Optional: You can substitute with a homemade crust if desired, such as one made from chocolate sandwich cookies or Nutter Butter cookies for an extra peanut butter kick.
Step 1: Prepare the Creamy Base
Start by placing the softened cream cheese and peanut butter into a large mixing bowl. Using an electric mixer, beat the two together until smooth and fully combined. This forms the creamy foundation of your pie, so take time to ensure there are no lumps. You’re looking for a silky, uniform texture.
Next, add in the vanilla extract and beat again to incorporate. This little touch of vanilla gives the filling a warm undertone and balances the richness.
Step 2: Add the Sweetness
Now it’s time to mix in the powdered sugar. Add it gradually, beating until fully incorporated. The sugar will thicken the mixture, creating a firmer base that holds its shape well after chilling. Scrape down the sides of the bowl as needed to make sure everything is fully blended.
Step 3: Fold in the Cool Whip
With your sweetened peanut butter-cream cheese base ready, gently fold in the thawed Cool Whip. Use a spatula for this step to keep the mixture airy. The whipped topping lightens the texture of the pie filling and helps it become fluffy and cloud-like.
Step 4: Mix in Chopped Reese’s Peanut Butter Cups
Take 1 1/2 cups of the chopped peanut butter cups and fold them into the mixture. These little chunks give the pie its signature chocolate-peanut butter crunch and contrast beautifully with the smooth filling.
Step 5: Fill the Pie Crust
Spoon the mixture into your pre-made Oreo or chocolate crust. Use a spatula to spread the filling evenly across the surface and fill it to the edges. Once the mixture is settled, sprinkle the remaining 1/2 cup of chopped peanut butter cups on top for an eye-catching finish and extra burst of flavor.
Step 6: Chill Before Serving
Refrigerate the pie for at least 2 to 4 hours before serving. This helps the pie firm up and makes it easier to slice cleanly. The longer it chills, the better the texture becomes. For best results, prepare it the night before and let it set overnight.
Optional Step: Add Decorative Touches
If you want to dress up your pie for a party, drizzle melted peanut butter or chocolate syrup over the top before serving. A sprinkle of mini chocolate chips or a few whole Reese’s cups arranged in a circle can also give it a professional bakery-style finish.
Serving Tips
Use a sharp knife dipped in hot water and wiped dry to get clean slices. Serve chilled. This pie is rich, so small slices go a long way, making it perfect for serving a group.
Ingredient Substitutions and Flavor Variations
Swap the Crust for a Custom Twist
While a store-bought Oreo or chocolate graham cracker crust is quick and convenient, customizing your crust can elevate the flavor and texture. Here are a few easy alternatives:
- Homemade Oreo Crust: Crush 24 Oreo cookies (filling included), mix with 1/4 cup melted butter, and press into a pie pan. Chill before filling.
- Nutter Butter Crust: For a deeper peanut butter flavor, use Nutter Butter cookies in place of Oreos, following the same method above.
- Pretzel Crust: Crushed pretzels mixed with butter and sugar offer a sweet-salty balance that complements the filling well.
- Graham Cracker Crust: Classic graham crackers provide a more neutral, buttery base.
These crust options allow you to adjust the sweetness, saltiness, and crunch to suit your personal taste.
Dairy-Free or Vegan Options
Want a version that’s friendly for those avoiding dairy? Try these simple swaps:
- Dairy-Free Cream Cheese: Use a plant-based cream cheese alternative made from cashews, almonds, or soy.
- Dairy-Free Whipped Topping: Use coconut whipped topping or almond milk-based whip.
- Vegan Peanut Butter Cups: Available in many health food stores, these can replace standard Reese’s cups without sacrificing flavor.
Make sure the crust you choose is also dairy-free, especially when using store-bought varieties.
Nut-Free Alternative
If you or your guests have peanut allergies, you can still enjoy a similar style of pie. Try these swaps:
- Sunflower Seed Butter: A great stand-in for peanut butter that mimics the creamy texture.
- Nut-Free Candy Pieces: Use seed butter cups or chocolate chips that are nut-free.
- Cookie Butter: Offers a unique spiced sweetness and smooth texture, creating a different but still indulgent pie experience.
Boost the Texture with Add-Ins
To give the pie a bit more crunch or dimension, consider folding in:
- Mini chocolate chips
- Toffee bits
- Chopped roasted peanuts or almonds (if allergies aren’t a concern)
- Crisped rice cereal
These additions can create contrast in each bite, making the dessert even more interesting and satisfying.
Sweetness Control
If you prefer a pie that’s less sweet, try cutting the powdered sugar by 1/4 to 1/2 cup. You can also use natural sweeteners like maple syrup or honey in moderation, though this might slightly change the consistency.
Flavored Peanut Butter Variants
To create a fun twist, try using flavored peanut butters, such as:
- Chocolate Peanut Butter for more chocolate flavor
- Cinnamon Peanut Butter for a warm spice note
- Honey Roasted Peanut Butter for a subtle caramel sweetness
These simple changes can transform the entire flavor profile of the pie without altering the core recipe.
Equipements
Affiliate Notice: This page contains affiliate links. If you make a purchase through these links, we may receive a commission at no additional cost to you.
To View The Full List of Equipment Tools, Please Go Here ↩

This Yamteck Removable Bottom Non-Stick Pie Pan: is a must-have for anyone who loves baking perfect pies, tarts, and quiches at home. Made from durable carbon steel with a premium non-stick coating, it ensures even heat distribution and effortless release every time, no broken crusts or sticking issues. The removable bottom makes serving and cleanup incredibly easy, saving time while delivering bakery-quality results. Ideal for holidays like Thanksgiving and Christmas or everyday baking, this pan is a smart investment for consistently professional desserts. View On Amazon ↩

The MCIRCO Ceramic Baking Dishes with Handles: are perfect for home cooks who want versatility, durability, and elegant presentation in one set. Made from high-quality, oven-safe ceramic, these dishes distribute heat evenly for perfectly baked casseroles, lasagna, brownies, and more. The wide handles provide a secure grip when transferring from oven to table, while the smooth glaze makes cleaning effortless. Ideal for everyday cooking or serving guests, this bakeware set combines professional performance with timeless style that fits any kitchen. View On Amazon ↩

The Waytiffer Heavy-Duty Disposable Aluminum Pans: are the perfect solution for baking, serving, and meal prep without the mess. Made from thick, sturdy aluminum, they hold their shape even with heavy dishes like casseroles, brownies, and mini lasagnas. These pans are oven-safe, freezer-friendly, and ideal for parties, meal prep, catering, or holiday cooking. If you want convenience, reliability, and zero cleanup, these disposable pans are an absolute kitchen essential. View On Amazon ↩
Pro Tips for Perfect Texture and Taste
Soften Ingredients Properly for Smoother Mixing
One of the most common mistakes when making Reese’s Peanut Butter Pie is using cream cheese straight from the fridge. Cold cream cheese doesn’t mix well and can create lumps in your filling. Let the cream cheese sit at room temperature for about 30 minutes before starting. The same goes for Cool Whip—always thaw it in the refrigerator, not on the counter or microwave, to maintain its fluffiness.
Peanut butter should also be at room temperature to blend easily. If it’s too firm, a quick stir or gentle warm-up in a bowl over hot water can help loosen it without affecting the flavor.
Use High-Quality Peanut Butter for the Best Flavor
Not all peanut butters are created equal. For this recipe, a smooth, creamy, no-stir peanut butter gives the best results. Avoid natural peanut butters that separate, as the extra oil can make the filling too soft and may not blend evenly with the cream cheese. If you love a saltier bite, opt for a roasted or slightly salted version to balance the sweetness of the powdered sugar and Cool Whip.
Chop Reese’s Peanut Butter Cups Strategically
Rather than slicing all the peanut butter cups into tiny bits, try a mix of sizes. Rougher chunks provide a more pronounced crunch and flavor burst, while smaller pieces blend smoothly into the filling. For topping, go with slightly larger chunks—they stand out visually and add a decorative touch that signals what’s inside the pie.
You can also freeze the peanut butter cups for 5 to 10 minutes before chopping to prevent them from sticking or becoming too melty during prep.
Avoid Overmixing the Cool Whip
When folding Cool Whip into the peanut butter mixture, it’s important not to overmix. Overmixing deflates the whipped topping and can make the pie heavy or runny. Use a gentle folding motion with a spatula, turning the mixture over from the bottom to preserve its light, airy texture.
Chill Long Enough for Clean Slices
Chilling isn’t just for setting the pie—it also helps the flavors meld and makes slicing much easier. For best results, refrigerate the pie for at least 4 hours, or ideally overnight. A well-chilled pie holds its shape better and cuts into neat slices without dragging the filling.
Use a sharp knife and run it under hot water before each cut. Wipe clean between slices for a professional-looking presentation.
Store Correctly for Lasting Freshness
Once assembled, this pie can be stored in the refrigerator for up to five days. Cover it tightly with plastic wrap or store in an airtight pie container to prevent it from drying out or absorbing other fridge odors. If you’re planning to make it far in advance, you can freeze it for up to two months. Just wrap it tightly in foil and plastic wrap. Thaw in the fridge overnight before serving.
Avoid freezing with toppings already added—wait until just before serving to add chopped candy or other garnishes to keep them fresh and crisp.
Serving Ideas and Presentation Tips
Slice and Serve Like a Pro
Presentation matters, especially when you want your Reese’s Peanut Butter Pie to wow your guests. For perfectly clean slices, always chill the pie thoroughly and use a sharp chef’s knife. Dip the knife in hot water before slicing and wipe it clean after each cut. This keeps the edges of each slice neat and avoids the filling from sticking or pulling.
For extra precision, use a pie server to lift out the slices without breaking the crust. Let the pie sit at room temperature for about 10 minutes before slicing if it’s been in the fridge overnight. This slight softening makes for smoother cuts.
Garnish Creatively
Garnishing your pie is the easiest way to add flair and make it look bakery-worthy. Try these easy garnish ideas:
- Extra Chopped Reese’s Cups: Sprinkle generously over the top right before serving.
- Chocolate Shavings: Use a vegetable peeler on a chocolate bar for a fancy touch.
- Drizzle of Peanut Butter: Microwave a tablespoon of peanut butter until pourable and drizzle across the pie in a zig-zag pattern.
- Whipped Cream Rosettes: Pipe or dollop whipped cream around the edges for elegance.
Mix and match these elements for a personalized look that suits your occasion.
Serve With a Scoop or Sip (Non-Alcoholic)
Pairing your pie with something cool and creamy enhances the dessert experience. Here are some fun and simple pairings:
- Vanilla Ice Cream: The neutral creaminess complements the rich peanut butter flavor.
- Chocolate Milk or Iced Coffee: These beverages contrast beautifully with the pie’s sweetness.
- Cold Brew with a Dash of Cream: For coffee lovers, this adds a slight bitterness that balances the rich dessert.
These combinations add a fun twist for guests and create a fuller dessert moment.
Make It Mini for Parties
If you’re hosting a gathering, consider turning this full-size pie into mini pies. Simply divide the filling into cupcake liners with individual crusts or use small tart pans. Top each mini pie with a piece of Reese’s cup for a cute and tasty garnish. Not only are they adorable, but they also make serving easier and eliminate the need for slicing.
Mini pies also allow for flavor customization—you can switch up the crust or garnish in each one to cater to different tastes.
Dress It Up for Holidays
This pie can be tailored to fit any holiday or season with themed toppings or color additions:
- Halloween: Use orange and black sprinkles or candy eyes.
- Christmas: Add crushed peppermint or red and green candy pieces.
- Valentine’s Day: Top with heart-shaped chocolate candies or drizzle with strawberry syrup.
This makes the pie a fun, versatile dessert choice all year round.
Serving Temperature Matters
Though this pie is best served chilled, letting it rest out of the fridge for 5–10 minutes softens the filling slightly and brings out the full flavor. Just avoid leaving it out too long, especially in warm environments, to prevent the whipped topping from melting.
Storage, Make-Ahead Tips, and Freezing Guide
How to Store Your Reese’s Peanut Butter Pie
Once your pie is assembled and chilled, proper storage is key to keeping it fresh and delicious. After slicing, cover the pie tightly with plastic wrap or store it in an airtight pie container. Always keep it refrigerated to preserve the creamy texture and prevent spoilage.
Refrigerated, this Reese’s Peanut Butter Pie stays fresh for up to five days. Just make sure it’s kept cold and sealed well to avoid absorbing any odors from other foods in the fridge.
For best texture, do not store the pie with whipped cream toppings or garnishes already added. Save those for just before serving to keep everything looking and tasting fresh.
Make-Ahead for Events and Holidays
This no-bake dessert is the ultimate make-ahead option. You can prepare the entire pie up to 48 hours in advance and chill it until ready to serve. This gives the flavors time to meld and allows the filling to firm up completely for neat slicing.
To maximize freshness when making it ahead, wait until the day of serving to add decorative toppings like chopped Reese’s cups, chocolate drizzle, or whipped cream. This helps retain their texture and visual appeal.
If making mini pies or individual servings, you can store them in a covered muffin tin or sealed containers. These are perfect for potlucks, birthday parties, or holiday gatherings where convenience and portion control matter.
Freezing the Pie for Later
Want to enjoy a slice weeks later? No problem. Reese’s Peanut Butter Pie freezes beautifully. Follow these steps for freezing success:
- Assemble the Pie – Complete the recipe, but skip adding the toppings.
- Flash Freeze (Optional) – Place the pie uncovered in the freezer for one hour to firm up.
- Wrap Securely – Wrap the pie tightly in plastic wrap, then again in aluminum foil to prevent freezer burn.
- Label and Date – Mark the pie with the freezing date. It’s best consumed within 2 months for optimal flavor and texture.
To serve from frozen, move the pie to the fridge and let it thaw overnight. Do not microwave to thaw, as this can ruin the structure of the filling and crust. Add fresh toppings right before serving for best results.
Tips to Preserve Texture After Freezing
While the pie holds up well to freezing, here are a few extra tips to maintain its creamy texture:
- Use stabilized whipped topping like Cool Whip rather than fresh whipped cream, which can break down when frozen.
- Avoid freezing pies with decorative toppings, which may get soggy.
- Consider slicing the pie before freezing, separating slices with parchment paper for grab-and-go servings later.
Batch Prep for Busy Weeks
If you’re the kind of person who likes to have dessert always on hand, make two pies at once—one for now, one for later. The prep time barely increases, and having a pie ready in the freezer makes last-minute entertaining or late-night cravings easier to handle.
Batch prepping also gives you the flexibility to experiment. You can make one with a classic crust and one with a nutter butter base or try out different topping combinations without extra effort.
Conclusion
Reese’s Peanut Butter Pie is more than just a dessert-it’s a showstopper that brings together creamy, crunchy, sweet, and salty in one incredibly easy, no-bake package. Whether you’re preparing it for a birthday, holiday, potluck, or just a laid-back weekend treat, this pie never disappoints. With simple ingredients, flexible variations, and quick prep time, it’s a go-to recipe you’ll come back to again and again.
From the silky peanut butter filling to the rich chocolate crust and chunks of candy layered throughout, every bite delivers comfort and indulgence. Plus, with tips for customizing, storing, and freezing, you can adapt this recipe to suit your lifestyle and taste.