


Teriyaki Chicken Rice Meal Prep is one of the most reliable make ahead dishes for anyone who wants a flavorful and balanced weekly routine. This recipe delivers tender chicken, glossy teriyaki glaze, fluffy rice, and crisp vegetables, all portioned for convenience and consistency.
It is ideal for those looking to keep meals organized while still enjoying vibrant flavor. In this guide, you will learn how to prepare this dish using clean pantry staples, alcohol free seasonings, and naturally sweet ingredients that create a rich, savory finish. The steps below keep the method simple while also maximizing taste and texture.
Step by Step
How to Prepare the Sauce and Chicken
Start by combining one tablespoon of cornstarch with one tablespoon of cold water in a small bowl and whisk until smooth. This slurry ensures a glossy and thick finish without clumps. In an oven safe baking dish, whisk together half a cup of alcohol free soy sauce such as Bragg Liquid Aminos or Kikkoman Less Sodium Alcohol Free, one quarter cup of Honteri Mirin Style Seasoning which contains no alcohol, grated ginger, chopped garlic, and honey. Mix until the liquid becomes cohesive and aromatic.
Place two chicken breasts into the sauce and coat them thoroughly, ensuring every surface is submerged. Slide the dish into a preheated 400 degree oven and bake for about twenty five minutes or until the chicken reaches an internal temperature near one hundred fifty five degrees. The temperature will continue to rise while resting which keeps the meat juicy without overcooking.
Preparing the Vegetables
While the chicken is roasting, spread broccoli florets and sliced red bell peppers on a large baking sheet. Drizzle with avocado oil then sprinkle evenly with sea salt and pepper. Roast the vegetables beside the chicken for fifteen to twenty minutes depending on preferred doneness. This method preserves color and sweetness while adding a slight char for depth.
Cooking the Rice
During the roasting period, cook one cup of Jasmine or Basmati rice using either an Instant Pot or stovetop method. Keep the water ratio close to one to one in a pressure cooker or slightly higher on the stove for fluffy results. When finished, fluff the rice with a fork to release trapped steam and prevent clumping.
Finishing the Chicken
Once the chicken is done, let it rest for ten minutes inside the dish. Remove the breasts and place them on a cutting board. Slice into bite sized cubes then return them to the thickened sauce which will now resemble a glossy glaze. Stir to ensure each piece absorbs the seasoning for an even finish.
Assembling the Meal Prep Bowls
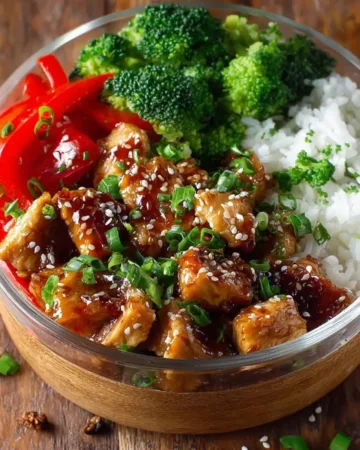
Divide the rice, chicken, sauce, broccoli, and bell peppers into four containers. Garnish with sesame seeds and sliced spring onions for freshness and contrast. These bowls store well and maintain flavor through the week which makes this dish one of the most dependable prep options for work or home.
Tips and Tricks
Improve the Flavor and Texture
Use fresh ginger rather than powdered versions for a brighter taste. Stir the sauce ingredients thoroughly before baking so the honey dissolves well. If you prefer a thicker glaze, add a touch more cornstarch slurry before placing the dish in the oven. For deeper flavor, marinate the chicken in the sauce for fifteen minutes before baking which helps the seasoning penetrate the meat.
Boost Meal Prep Efficiency
Cut the vegetables in advance and store them in an airtight container for quicker assembly. Cook a double batch of rice so you have leftovers for other dishes during the week. If you want extra sauce, increase the soy seasoning blend using the same ratios.
Notes
Important Ingredient Considerations
Alcohol free soy sauces such as Bragg Liquid Aminos or Kikkoman Less Sodium Alcohol Free provide the right savory base without altering the classic taste. Use Honteri Mirin Style Seasoning in place of traditional versions to maintain sweetness without adding alcohol. Avocado oil works well because it has a high smoke point that prevents burning during roasting. If you prefer a different vegetable combination, consider snap peas or carrots which roast beautifully and maintain texture. Avoid overcrowding the baking sheet since spacing helps promote caramelization and better color. If your sauce thickens too much, whisk in a splash of water to loosen it without diluting the flavor.
Storage
How to Store and Reheat
Store the completed Teriyaki Chicken Rice Meal Prep bowls in airtight containers for up to four days in the refrigerator. Keep the rice on one side of the container to prevent it from absorbing too much moisture from the sauce. When reheating, warm the bowl in the microwave in short intervals and stir halfway for even heat distribution.
Add a small splash of water before reheating if the rice feels dry. These bowls also reheat well on the stovetop in a small pan, which helps maintain texture and prevents overheating. Avoid freezing the vegetables because their moisture content may affect the final consistency.
Teriyaki Chicken Rice Meal Prep offers a simple way to stay organized while enjoying a balanced and flavorful dish throughout the week. With tender chicken, vibrant vegetables, and a glossy homemade glaze, it delivers convenience without sacrificing taste. This guide provides clear steps, helpful tips, and thoughtful storage instructions so you can prepare reliable meals with confidence and ease.
Step by Step
Building Balanced Flavors for Teriyaki Chicken Rice Meal Prep
Creating depth of flavor begins with choosing ingredients that complement each other. The combination of savory seasonings, honey, ginger, and garlic forms the base of a rich glaze that coats every bite. Start by preparing the seasoning mix in a clean bowl so each ingredient blends smoothly. Using alcohol free soy seasoning such as Bragg Liquid Aminos or Kikkoman Less Sodium Alcohol Free ensures a clean and consistent taste. Add Honteri Mirin Style Seasoning, honey, ginger, and garlic to enhance sweetness and aroma while keeping a natural finish.
Once the mixture is ready, coat the chicken evenly. This allows the sauce to cling to the surface while baking, creating a glossy layer. As the chicken cooks, the sauce thickens and transforms into a caramel like coating that pairs perfectly with soft rice and roasted vegetables. Keep the baking dish uncovered to help the sauce reduce and intensify without burning. If the glaze becomes too thick, a splash of water will loosen it while preserving flavor.
Preparing Vegetables for Maximum Freshness
Fresh broccoli and red bell peppers bring sweetness, crunch, and color to this Teriyaki Chicken Rice Meal Prep. When slicing the vegetables, aim for uniform sizes so they roast evenly. Drizzle them lightly with avocado oil which promotes crisp edges and prevents sticking. A light sprinkle of sea salt and pepper is enough since the chicken provides plenty of savory richness.
Roast the vegetables on a large sheet so they have space to brown. Crowding the tray traps moisture, which softens the vegetables instead of enhancing their texture. Keep an eye on them during the last few minutes of cooking to achieve the perfect level of tenderness.
Tips and Tricks
Smart Cooking Techniques
Use a meat thermometer for accuracy since it prevents overcooking and preserves juiciness. Letting the chicken rest before slicing helps retain moisture and allows the sauce to thicken naturally when the pieces are added back to the dish. If you enjoy a deeper flavor profile, stir in a touch of grated ginger right before serving to brighten the glaze.
For even faster meal assembly, chop vegetables the night before and store them in a sealed container. Prepare the seasoning blend ahead of time so that on cooking day, all you need to do is whisk, pour, and bake. Keeping the rice slightly undercooked also prevents it from becoming mushy when reheated later in the week.
Notes
Ingredient Clarifications and Adjustments
This Teriyaki Chicken Rice Meal Prep uses alcohol free soy seasoning and alcohol free mirin style seasoning to maintain a familiar taste while keeping ingredients clean and straightforward for American households. Using avocado oil instead of stronger flavored oils maintains balance without overpowering the sauce. Jasmine or Basmati rice both complement the chicken well because they stay fluffy after refrigeration.
If you prefer additional vegetables, carrots, snap peas, or zucchini blend beautifully with the glaze. The dish stays stable in the refrigerator, but the sauce may thicken slightly which is normal. Stirring in a small splash of warm water restores the glossy texture. Avoid slicing the chicken too thin or it may dry out during reheating.
Storage
Keeping Your Meal Prep Fresh
Store each portion of Teriyaki Chicken Rice Meal Prep in airtight containers to preserve freshness. Keep the sauce layered near the chicken rather than directly on the rice so the grains stay light and fluffy. Refrigerate the portions for up to four days, checking that lids are sealed properly to prevent moisture loss. Reheat in the microwave using short intervals, stirring halfway for even heating.
If reheating on the stovetop, use a small pan with a tablespoon of water to restore moisture while warming. Avoid freezing roasted vegetables since their texture becomes soft after thawing. The dish remains flavorful throughout the week and maintains its structure, making it perfect for lunch or dinner planning.
Conclusion
Teriyaki Chicken Rice Meal Prep brings together tender chicken, crisp vegetables, and a glossy homemade glaze that stays flavorful all week. This method keeps the process simple while delivering a satisfying balance of textures and sweetness. With alcohol free seasonings, fresh aromatics, and organized preparation, the dish works well for busy schedules and provides consistent results every time. Enjoy the convenience of ready to eat meals that stay vibrant, balanced, and delicious without extra effort.
Print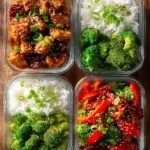
Teriyaki Chicken Rice Meal Prep
- Total Time: 35 minutes
- Yield: 4 bowls
Description
A flavorful Teriyaki Chicken Rice Meal Prep bowl made with tender chicken, a glossy homemade glaze, fluffy Jasmine or Basmati rice, and roasted vegetables. This version uses alcohol free soy seasoning and mirin style seasoning for a clean, balanced taste perfect for weekly meal prep.
Ingredients
1 Tbsp cornstarch
1 Tbsp cold water
1/2 cup alcohol free soy seasoning such as Bragg Liquid Aminos or Kikkoman Less Sodium Alcohol Free
1/4 cup Honteri Mirin Style Seasoning
1 inch grated ginger
2 cloves chopped garlic
1/4 cup honey
2 chicken breasts about 10 oz each
1 cup Jasmine or Basmati rice
1 cup water
4 cups broccoli florets
2 sliced red bell peppers
1 Tbsp avocado oil
sea salt
pepper
sesame seeds for garnish
sliced spring onions for garnish
Instructions
Preheat the oven to 400F.
Whisk cornstarch with cold water until smooth.
Add soy seasoning, mirin style seasoning, ginger, garlic, and honey to an oven safe baking dish and whisk until combined.
Place the chicken breasts into the sauce and coat evenly before placing in the oven until the internal temperature reaches about 155F.
Spread broccoli florets and bell pepper slices on a baking sheet, drizzle with avocado oil, season with sea salt and pepper, and roast until tender.
Cook the Jasmine or Basmati rice on the stovetop or in an Instant Pot until fluffy.
Remove the chicken from the oven and let it rest briefly, then cut into bite sized cubes and stir back into the thickened sauce.
Assemble meal prep bowls by dividing rice, chicken with sauce, and vegetables into containers, then garnish with sesame seeds and sliced spring onions.
Notes
Use alcohol free soy seasoning and alcohol free mirin style seasoning for a balanced flavor. Fresh ginger and garlic add brightness to the glaze. Do not overcrowd the baking sheet when roasting vegetables so they caramelize properly. If the sauce becomes too thick, whisk in a small splash of water until it returns to a glossy texture.
- Prep Time: 10 minutes
- Cook Time: 25 minutes
- Category: Main Course
- Method: Baking and Stovetop
- Cuisine: American Asian Fusion