If you’re craving something sweet but don’t want to fuss with complicated recipes, this 3 ingredient butter cookies (no eggs) recipe is exactly what you need. With just butter, powdered sugar, and flour, you can whip up a batch of cookies that are crispy, buttery, and incredibly satisfying.
No eggs, no problem — these cookies hold their shape beautifully and have that perfect crumbly texture. Whether you pipe them or shape them by hand, they’ll come out tasting like something straight from a bakery.
Let’s take a closer look at why this simple recipe works so well.
Why You’ll Love This 3 Ingredient Butter Cookies (No Eggs) Recipe
The beauty of a no-egg butter cookie recipe
Leaving out eggs actually enhances the texture of these cookies. Without eggs, they bake up crispier, lighter, and more delicate. It also makes the recipe simpler and more accessible for anyone avoiding eggs for dietary reasons.
Plus, no eggs mean fewer ingredients to worry about and a dough that’s easy to handle. You get all the rich flavor and satisfying crunch without any extra steps.
How only 3 ingredients can create magic in your oven
Three simple ingredients, yet the result is anything but basic. The butter brings richness and tenderness. Powdered sugar adds sweetness and helps create a smooth, crisp finish. And flour binds everything into a soft dough that holds its shape well during baking.
It’s minimal, but that’s what makes it special. No fillers, no additives, just the pure taste of buttery goodness in every bite.
Ingredients Breakdown and Their Importance
Butter: The secret to richness and melt-in-your-mouth texture
Butter is the heart of this 3 ingredient butter cookies (no eggs) recipe. It gives the cookies their signature richness, golden edges, and delicate texture. To get the best results, the butter should be very soft and slightly melted — not fully liquid, but soft enough that when whipped, it turns light and creamy. This helps it blend easily with the sugar and flour, creating a dough that’s smooth and easy to work with.
If your butter is too cold, the dough will be stiff and hard to pipe. If it’s too melted, the cookies may spread too much while baking. The sweet spot is butter that’s mostly soft with a small amount melted. About one tablespoon of melted butter per stick is ideal.
Powdered Sugar: Not just for sweetness, but structure too
Powdered sugar does more than sweeten the dough. Its fine texture helps create a smooth, almost silky batter that holds its shape well when piped. Unlike granulated sugar, powdered sugar doesn’t leave a gritty texture, and it contributes to the light, crisp bite of the finished cookies.
It also works quickly with the softened butter to form a fluffy, whipped base. This aerated mixture is key to the delicate, almost melt-in-your-mouth texture. You’ll cream the butter and sugar together for about five minutes, until the color changes from yellow to white — a sign that it’s ready for the flour.
All-Purpose Flour: Why this is the best base for crispiness
All-purpose flour gives the cookies their structure and slight chew. It’s the glue that binds the butter and sugar into a sturdy but tender dough. You want just enough flour to hold the cookies together without making them dense or dry.
Too much flour, and the dough becomes hard to pipe and the cookies lose their delicate texture. Too little, and they won’t hold their shape. The best method is to spoon the flour into your measuring cup and level it with a knife — never scoop directly from the bag. This keeps your flour measurement accurate and prevents dry, stiff dough.
If your dough feels too thick, mix in a little extra melted butter. If it feels too soft, chill it longer before piping or shaping.
Print
3 Ingredient Butter Cookies (No Eggs) Recipe
- Total Time: 40 minutes
- Yield: 24 cookies
- Diet: Vegetarian
Description
Crispy, buttery, and egg-free, these 3 ingredient butter cookies are incredibly easy to make and melt in your mouth with every bite. Perfect for holidays, gifts, or a quick sweet fix.
Ingredients
1 cup (227 g) butter, softened and slightly melted
1 cup (118 g) powdered sugar
2 cups (256 g) all-purpose flour
Instructions
1. Preheat oven to 350°F (177°C) and line 2 baking sheets with parchment paper.
2. In a large bowl, cream the butter and powdered sugar on high speed for about 5 minutes until light and fluffy.
3. Add the flour and mix on low, then increase speed until a thick dough forms.
4. Transfer the dough to a piping bag fitted with a large open star tip.
5. Pipe cookies onto the baking sheet, spacing them 1 inch apart.
6. Chill the tray for 30 minutes.
7. Bake in the center of the oven for 15–20 minutes, or until the edges are light golden.
8. Cool on the baking sheet before removing.
9. Store in an airtight container at room temperature.
Notes
Use butter that is very soft with a little melted portion for best texture.
Be sure to chill the dough before baking to prevent spreading.
If not using a piping bag, flatten rolled dough balls into discs and bake.
Do not bake multiple trays at once for even browning.
- Prep Time: 20 minutes
- Cook Time: 20 minutes
- Category: Cookies
- Method: Baking
- Cuisine: American
The Perfect Dough Preparation Process
Softening butter correctly for ideal dough consistency
The first step in creating flawless 3 ingredient butter cookies (no eggs) is preparing the butter just right. It should be very soft, almost to the point of melting. For best results, microwave the butter briefly until most of it is soft but with a small amount visibly melted — around 1 tablespoon of liquid per stick is ideal.
This texture makes creaming much more effective. If the butter is too firm, it won’t whip properly. If it’s too runny, the dough can become greasy and the cookies might spread too much during baking. Aim for soft, scoopable butter with a creamy texture.
Creaming butter and sugar like a pro
Add the butter and powdered sugar to a large mixing bowl. Using a stand mixer or hand mixer on high speed, beat the mixture for about five minutes. You’re looking for it to turn pale in color — from yellow to white — and develop a whipped, airy consistency. It should resemble whipped cream.
Be sure to scrape down the sides of the bowl several times with a spatula to ensure every bit of butter and sugar is blended. This aeration is key to a cookie that’s both crisp and light.
If the butter is at the perfect softness, you’ll find the creaming process quick and effortless. It’s during this step that the structure and final texture of your cookies are largely determined.
Avoiding common mistakes in mixing flour
Once your butter and sugar are well creamed, it’s time to add the flour. Begin mixing at a low speed to avoid flour flying everywhere, then slowly increase to medium as the flour blends in. The mixture will look crumbly at first — this is normal.
Keep mixing until the dough comes together in a thick, soft mass. It should feel like a dense paste, slightly sticky but not wet. If the dough still seems dry and crumbly after thorough mixing, try adding 1 tablespoon of melted butter and mix again. That often helps smooth it out without affecting the structure.
Stop mixing as soon as the dough is fully combined. Overmixing can lead to a tougher texture. Your finished dough should be thick but pipeable, able to hold its shape under pressure but still soft enough to flow through a piping tip.
Piping or Shaping Your Butter Cookies
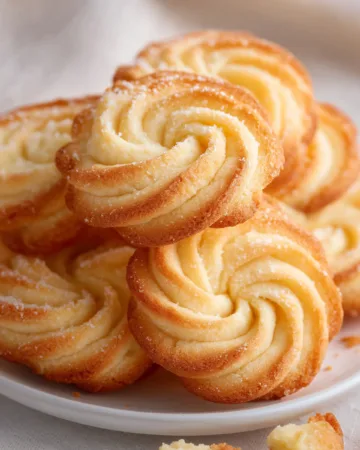
Best piping tips for bakery-style swirls
To get that classic look, use a large open star tip with a ½ inch opening. Pipe the dough onto a lined baking sheet in spirals or circles, leaving space between each cookie. If the dough feels too stiff, mix in a little melted butter.
Once piped, chill the tray for 30 minutes. This step is essential — it keeps the cookies from spreading too much in the oven and helps hold their shape.
No piping bag? No problem
If you don’t have a piping bag, scoop small amounts of dough, roll them into balls, and flatten into discs. Thinner is better for a crisp texture. You can leave them plain or press a fork across the top for a simple pattern.
Both methods give you buttery, crisp cookies, it just comes down to how you want them to look.
The Baking Process and Timing Tips
How long to chill the dough and why it matters
Once your cookies are piped or shaped, chilling is a must. Place the tray in the refrigerator for about 30 minutes. This short rest helps the dough firm up so the cookies don’t spread too much in the oven. Skipping this step can result in flat, uneven cookies.
Proper baking temperature and rack placement
Bake the cookies in a preheated oven at 350°F (177°C). Only bake one tray at a time, placing it in the center rack. This ensures even heat distribution and gives the tops and edges a light golden color. When baking two trays at once, the lower tray often stays too pale or cooks unevenly.
Keep a close eye during the last few minutes. Bake for 15 to 20 minutes, depending on your oven and cookie size. You’ll know they’re ready when the edges just begin to brown.
How to tell when cookies are perfectly baked
Look for a light golden edge and a slightly dry surface. The centers will firm up as the cookies cool, so don’t wait for them to turn dark. Overbaking can lead to dry, crumbly cookies, while underbaking might leave them too soft.
Once baked, let them cool completely on the tray. They’ll continue to firm up and become crispier as they sit. Store cooled cookies in an airtight container to preserve their texture.
Creative Variations You Can Try
Adding vanilla extract or spices for extra flavor
The base of this 3 ingredient butter cookies (no eggs) recipe is simple, but it’s also easy to customize. For a hint of warmth and aroma, try adding 1 teaspoon of vanilla extract when mixing in the flour. You can also experiment with almond extract, lemon zest, or a pinch of cinnamon for a unique twist.
These small additions won’t change the dough’s texture but will subtly enhance the flavor.
Chocolate-dipped, sprinkled, or sandwiched — optional ideas
After baking, you can dress these cookies up in lots of fun ways:
- Dip half of each cookie in melted chocolate and let it harden for an elegant look.
- Add sprinkles before baking for a pop of color, especially during the holidays.
- Spread jam or chocolate between two cookies to create sandwich-style treats.
These options add visual flair and taste variety, without complicating the base recipe. Whether kept plain or dressed up, these cookies remain crisp, buttery, and irresistible.
How to Store, Freeze, and Gift These Cookies
Proper ways to store for lasting freshness
Once cooled, store your butter cookies in an airtight container at room temperature. They’ll stay fresh and crisp for up to 7 days. Keep the container in a cool, dry place away from direct sunlight or heat, which can cause the butter to soften and the cookies to lose their crunch.
Avoid stacking the cookies too tightly — a little space helps preserve their shape and texture.
Can you freeze them? Yes, here’s how
These cookies freeze beautifully. After baking and cooling, place them in a single layer on a baking sheet and freeze for 1 hour. Then, transfer them to a freezer-safe bag or container. They can be frozen for up to 2 months.
When ready to enjoy, just let them sit at room temperature for about 10 to 15 minutes — no reheating required. They’ll be just as crisp as when freshly baked.
Perfect for holiday gifting — packaging and storage tips
Their simple beauty and delicious taste make these cookies perfect for gifting. Stack a few in clear cellophane bags tied with ribbon or arrange them in cookie tins with parchment paper between layers.
For longer travel or shipping, wrap each cookie in wax paper or use a snug box with cushioning to keep them from breaking. Since they don’t have eggs or perishable ingredients, they hold up well during shipping.
Troubleshooting and Pro Baking Advice
Why your dough might be too thick
If the dough is hard to pipe, it may have too much flour or not enough softened butter. Always spoon flour into your measuring cup instead of scooping. If needed, mix in a tablespoon of melted butter to loosen the dough slightly.
Preventing cookies from spreading too much
Cookies that flatten out often weren’t chilled enough or had overly melted butter. Chill the shaped cookies for 30 minutes before baking, and avoid warm trays.
Quick tips for better results
- Too soft after baking? Let them cool fully. They firm up as they rest.
- Uneven cookies? Pipe or shape consistently and bake one tray at a time.
- Dough too dry? Add a bit more melted butter, mix, and test again.
These quick fixes help you get great cookies every time, even on your first try.
Conclusion
With just three basic ingredients and no eggs, this 3 ingredient butter cookies (no eggs) recipe proves that simple can be incredibly satisfying. These cookies are buttery, crisp, and perfect for any occasion — from everyday snacking to holiday gifting. Whether you pipe them into elegant swirls or shape them by hand, the result is always a batch of golden, melt-in-your-mouth treats.
The steps are easy to follow, the ingredients are always in reach, and the flavor delivers every time. Once you try these, store-bought butter cookies just won’t compare. So grab your butter, sugar, and flour — and enjoy baking a classic that never goes out of style.


Can you use a cookie press
Yes