If you’re looking for a thumbprint cookies recipe that delivers soft, buttery, jam-filled cookies every time, you’ve just hit the jackpot. This comprehensive guide breaks down everything from ingredients and prep tips to baking hacks and flavor variations. Whether you’re baking for the holidays or just craving something sweet, this recipe will quickly become your go-to. We’ll also troubleshoot common baking issues and show you how to store and freeze these cookies to enjoy them any time.
Contents
- 1 Introduction to the Thumbprint Cookies Recipe
- 2 Ingredients Breakdown and Substitutions
- 3 Thumbprint Cookies Recipe
- 4 How to Make Thumbprint Cookies Step-by-Step
- 5 Baking Tips for Perfect Thumbprint Cookies
- 6 Jam Options and Flavor Variations
- 7 Storage, Freezing, and Make-Ahead Tips
- 8 Troubleshooting Common Problems
- 9 Conclusion
Introduction to the Thumbprint Cookies Recipe
What Are Thumbprint Cookies?
Thumbprint cookies are soft, buttery treats traditionally filled with fruity jams like raspberry, apricot, or strawberry. Named after the indentation pressed into the dough—often using your thumb, these cookies strike the perfect balance between tender and chewy. Their simplicity and nostalgic charm have made them a staple for holiday cookie trays and year-round snacking alike.
This thumbprint cookies recipe uses a shortbread-style dough with a rich base of butter and sugar, enhanced with vanilla and a touch of cornstarch for that melt-in-your-mouth texture. They’re easy to make and even easier to customize based on your taste or the season.
Why This Recipe Works (Texture, Taste, and Simplicity)
The secret to this recipe lies in its well-balanced ingredient ratios and method. The soft, crumbly dough is enriched with butter and egg yolk, creating a rich base that pairs beautifully with sweet jam. The added cornstarch helps create that signature tender bite, while the chilling step ensures the cookies hold their shape without spreading in the oven.
Here’s what makes this recipe stand out:
- No mixer stress: You can finish the dough with your hands if needed.
- No artificial flavors: Just real butter, sugar, vanilla, and jam.
- No-fuss ingredients: You likely have everything already in your pantry.
- Perfect for any occasion: Holiday parties, cookie swaps, or a cozy treat with tea.
These cookies are loved for their slightly crisp edges, soft centers, and burst of fruity sweetness in every bite. And the best part? They look as pretty as they taste.
Ingredients Breakdown and Substitutions
Key Ingredients in Thumbprint Cookies Recipe
Let’s take a closer look at the main ingredients that make this thumbprint cookies recipe a success. Each one plays a unique role in achieving the soft texture and rich flavor that sets these cookies apart.
- Unsalted Butter (1 cup or 226 g)
Butter is the star of the show here. It gives the dough a rich, tender base and adds that classic buttery taste. Always use softened butter at room temperature for easier mixing and consistent results. - Granulated Sugar (⅓ cup or 70 g)
This adds sweetness and helps the cookie edges get lightly crisp. Rolling the dough in extra sugar before baking gives a subtle sparkle and a nice bite. - Light Brown Sugar (⅓ cup or 70 g, tightly packed)
Adds a touch of moisture and a deep, caramel-like flavor. Brown sugar makes the cookies softer and chewier compared to using only white sugar. - Egg Yolk (1 large)
Using only the yolk adds richness without thinning the dough. It also contributes to the tender crumb texture that makes these cookies melt in your mouth. - Vanilla Extract (¾ teaspoon)
Adds warm, aromatic flavor that pairs perfectly with jam. You can substitute with almond extract for a twist. - All-Purpose Flour (2¼ cups or 280 g)
The structure builder. It binds everything together and provides the base for shaping the cookies. Always spoon and level your flour for accuracy. - Cornstarch (2 teaspoons)
A game-changer for tenderness. Cornstarch softens the cookie texture and helps prevent spreading, which is especially important for thumbprint cookies. - Salt (½ teaspoon)
Balances out the sweetness and enhances flavor. If you’re using salted butter, you can reduce or skip this. - Jam or Preserves (⅓ cup or 105 g)
This is where you can get creative. Raspberry is the classic choice, but strawberry, apricot, or even lemon curd work beautifully too. Choose a jam that isn’t too runny or it may spill out while baking. - Extra Granulated Sugar for Rolling (Optional, ½ cup)
Rolling dough balls in sugar adds texture and sparkle. It’s optional but recommended for extra crunch.
Possible Ingredient Substitutes for Dietary Needs
If you’re baking for someone with dietary restrictions, there are plenty of easy swaps you can make without sacrificing taste or texture.
- Gluten-Free Flour: Replace the all-purpose flour with a 1:1 gluten-free baking mix that includes xanthan gum.
- Vegan Butter: Use plant-based butter sticks that are formulated for baking.
- Egg-Free: Swap the egg yolk for 1 tablespoon of plain Greek yogurt or a flax egg (1 tbsp flaxseed meal + 3 tbsp water, set for 5 mins).
- Low Sugar Option: Use a sugar substitute like monk fruit sweetener or a baking blend with stevia, but keep in mind the cookies may not brown the same.
You don’t have to compromise on flavor to accommodate allergies or preferences. With the right swaps, you’ll still get cookies that are delicious, soft, and satisfying.
Print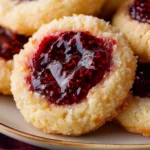
Thumbprint Cookies Recipe
- Total Time: 1 hour 1 minute
- Yield: 24 cookies
- Diet: Vegetarian
Description
Soft, buttery thumbprint cookies filled with sweet raspberry jam. This easy recipe yields tender cookies perfect for holidays or any time you need a quick, classic dessert.
Ingredients
1 cup (226 g) unsalted butter, softened to room temperature
⅓ cup (70 g) sugar
⅓ cup (70 g) light brown sugar, tightly packed
1 large egg yolk
¾ teaspoon vanilla extract
2 ¼ cup (280 g) all-purpose flour
2 teaspoons cornstarch
½ teaspoon salt
½ cup sugar (for rolling, optional)
⅓ cup (105 g) jam or preserves (raspberry recommended)
Instructions
1. Place softened butter in a mixing bowl. Beat until creamy.
2. Add granulated sugar and brown sugar. Beat until well combined.
3. Mix in egg yolk and vanilla extract. Beat until smooth.
4. In a separate bowl, whisk together flour, cornstarch, and salt.
5. Gradually add dry ingredients to the wet mixture. Mix until dough forms.
6. Roll dough into 1-tablespoon balls and smooth with your hands.
7. Optional: Roll balls in sugar and place on wax paper-lined tray.
8. Use your thumb or a teaspoon to press an indent into each dough ball.
9. Freeze dough for 30 minutes.
10. Preheat oven to 375°F (190°C). Warm jam slightly in microwave.
11. Fill each cookie indent with jam.
12. Bake cookies 11 minutes or until edges are lightly golden.
13. Cool cookies completely before serving.
Notes
Use thick jam or preserves to prevent overflow during baking.
Dough may look crumbly at first—press together with hands as needed.
Cookies can be frozen before or after baking for up to 2 months.
Do not overbake. Remove as soon as edges begin to turn golden.
- Prep Time: 20 minutes
- Cook Time: 11 minutes
- Category: Cookies Recipes
- Method: Baking
- Cuisine: American
How to Make Thumbprint Cookies Step-by-Step
Preparing the Cookie Dough the Right Way
The first step to baking flawless thumbprint cookies is getting the dough just right. This cookie dough is designed to be rich and crumbly, which gives the cookies their delicate, shortbread-like texture.
- Cream the Butter
Place softened butter in a large bowl or stand mixer. Beat on medium speed until it’s smooth and creamy. This creates a soft base that incorporates sugar evenly. - Add the Sugars
Scrape down the sides of the bowl. Add granulated sugar and light brown sugar. Beat together until fully blended and slightly fluffy—about 30 to 60 seconds. - Incorporate Egg Yolk and Vanilla
Add the egg yolk and vanilla extract. Beat until smooth. The yolk gives richness, while the vanilla enhances flavor. The mixture should look cohesive and creamy at this stage. - Mix the Dry Ingredients Separately
In another bowl, whisk all-purpose flour, cornstarch, and salt. Mixing these first helps distribute the cornstarch and salt evenly throughout the dough. - Combine Wet and Dry Mixtures
Reduce your mixer speed to low. Gradually add the dry ingredients to the wet mix. The dough will seem dry and crumbly at first—don’t worry, that’s normal. - Bring the Dough Together by Hand (if needed)
If the dough starts to strain your mixer or looks too crumbly, use your hands to bring it together. Press and knead lightly until it forms a soft, pliable dough.
Shaping, Filling, and Chilling: Key Tips
Once the dough is ready, shaping and chilling it properly ensures that your cookies bake evenly and maintain their classic look.
- Roll the Dough into Balls
Scoop 1-tablespoon portions and roll them tightly between your palms. This smooths the dough and prevents cracks later when you press into them. - Roll in Sugar (Optional)
If desired, roll each dough ball in granulated sugar before placing them on a wax-paper-lined tray. This adds a sparkly crunch to the finished cookies. - Create the Indent
Use your thumb or the back of a teaspoon to gently press an indent into the center of each cookie. Make sure not to press all the way through—just enough to hold the jam. - Chill Before Baking
Transfer the tray to the freezer and chill for 30 minutes. This step is essential. It keeps the cookies from spreading too much and helps the jam stay neatly in place. - Preheat Oven and Prep Jam
While the dough chills, preheat your oven to 375°F (190°C). Microwave your jam for 5 to 10 seconds so it’s easier to stir and spoon, but don’t let it get hot. - Fill the Indents with Jam
Spoon the warm, soft jam into each cookie’s indent, filling it to the brim. Don’t overfill—just enough to sit neatly in the center. - Bake and Cool
Place cookies 2 inches apart on a parchment-lined baking sheet and bake for 11 minutes. You’ll know they’re done when the edges turn light golden brown. Let them cool on the baking sheet completely for the best texture.
These step-by-step instructions ensure that every batch of thumbprint cookies comes out soft in the middle, crisp on the edges, and full of jammy flavor.
Baking Tips for Perfect Thumbprint Cookies
Preventing Cookies from Cracking or Spreading
Cracking and spreading are the two most common issues bakers face with thumbprint cookies. But don’t worry—both are totally preventable with a few small adjustments.
1. Roll Dough Smoothly
Before chilling, roll the dough into smooth, tight balls. If there are seams or cracks on the surface, they’re more likely to split during baking. Take a few extra seconds to really smooth them out.
2. Chill Before Baking
Never skip the 30-minute chill time. This helps the fat (butter) solidify, which slows down spreading in the oven. A cold dough holds its shape much better under heat.
3. Don’t Overwork the Dough
If you mix the dough too much, the gluten in the flour develops and makes cookies tough. Mix just until everything is combined.
4. Use Parchment Paper
Line your baking sheet with parchment paper instead of greasing it. This helps cookies bake evenly and prevents bottoms from becoming too brown or greasy.
5. Spacing Matters
Always space your cookies at least 2 inches apart. Even with chilling, they’ll expand slightly as they bake. Giving them room avoids crowding and keeps their shape clean.
Knowing When They’re Perfectly Baked
Overbaking thumbprint cookies is easy to do, especially because they don’t brown much. Follow these signs instead of relying on color alone:
- Look for light golden edges. The centers should remain pale.
- Cookies should feel soft if you press them lightly, but not gooey.
- Jam should stay in place and not bubble out.
The cookies continue to firm up as they cool on the baking sheet, so don’t move them right away. Letting them rest on the hot sheet ensures they set with the right texture—tender inside, crisp at the edges.
If your jam seems to have sunk slightly during baking, it’s totally normal. Just spoon a tiny dab more on top right after they come out of the oven for a prettier finish.
With these tips, your thumbprint cookies recipe will deliver consistent, bakery-style results every single time.
Jam Options and Flavor Variations
Best Jam Flavors to Use in Thumbprint Cookies
A classic thumbprint cookies recipe uses raspberry jam, but you’re free to get creative. Here are top jam choices that bake well and taste great:
- Raspberry: Slightly tart and a classic pick.
- Strawberry: Sweet and crowd-pleasing.
- Apricot: Mild and bright with a subtle tang.
- Blueberry or Blackberry: Bold flavors and rich color.
- Mixed Berry: A fruity blend that adds complexity.
Use thick jams or preserves so they don’t run during baking.
Creative Filling Ideas
Beyond jam, there are lots of tasty fillings to try:
- Lemon curd: Tart and bright.
- Nut butter + jam: PB&J twist.
- Chocolate spread: Add after baking for a smooth finish.
- Apple or pumpkin butter: Perfect for fall.
- Caramel or cream cheese: Adds richness and variety.
Rotate fillings by season to keep your baking fresh. This simple dough becomes a year-round treat with just a switch of flavor.
Storage, Freezing, and Make-Ahead Tips
How to Store Thumbprint Cookies for Freshness
Once your cookies have cooled completely, it’s important to store them properly to maintain their soft, buttery texture and vibrant jam center.
- Room Temperature: Store thumbprint cookies in an airtight container for up to 5 days. Layer them between sheets of parchment paper to prevent sticking.
- Avoid Moisture: Keep them away from humid areas or the fridge, which can make the cookies go soggy or dry.
For the best results, store cookies without stacking too many on top of each other. If the jam is still tacky, it may smudge.
Freezing the Dough or Baked Cookies
Want to plan ahead? Great news—this thumbprint cookies recipe freezes beautifully, both before and after baking.
Freezing Unbaked Dough:
- Shape the Dough First: Roll into balls, add indents, and freeze them on a tray until firm.
- Transfer to Bag: Once solid, place them in a zip-top freezer bag and freeze for up to 2 months.
- When Ready to Bake: Thaw for 10–15 minutes, add jam, then bake as usual.
Freezing Baked Cookies:
- Cool Completely: Let cookies cool fully before freezing.
- Use Layers: Stack with parchment between layers in an airtight container.
- Thaw Gently: Leave at room temp for about 1 hour before serving.
Pro Tip: If you freeze after baking, it’s best to add a fresh spoonful of jam before serving to revive the flavor and appearance.
Planning ahead with freezer-friendly batches means you can always have freshly baked cookies on short notice—ideal for last-minute guests or sudden cravings.
Troubleshooting Common Problems
Dry or Crumbly Cookies?
- Too much flour: Always measure flour correctly—spoon and level.
- Butter issues: Make sure you’re using the full amount of softened unsalted butter.
- Overbaking: Pull cookies from the oven as soon as edges turn light golden.
Jam Too Runny or Overflowing?
- Use thick jam or preserves.
- Don’t overfill. Just a small spoonful is enough.
- If needed, microwave jam briefly—just until spreadable, not runny.
Dough Cracking or Spreading?
- Cracking: Smooth the dough before pressing. Let it soften a bit if too cold.
- Spreading: Chill dough balls before baking and use parchment paper.
A few simple tweaks can fix most baking issues. Once you get the feel, this thumbprint cookies recipe becomes foolproof.
Conclusion
Whether you’re baking for the holidays, a family get-together, or just craving a sweet homemade treat, this thumbprint cookies recipe is one you’ll come back to again and again. With its buttery dough, sweet jam center, and melt-in-your-mouth texture, it’s a classic cookie that’s simple to make yet endlessly customizable.
From picking the perfect jam to mastering the chill-and-bake method, you’ve now got all the tips and tricks to bake flawless cookies every time. Don’t be afraid to get creative with your fillings or make them ahead for later.