Looking for a simple, moist, and flavorful dessert? This blackberry cake recipe is just what you need. It’s packed with juicy blackberries, made with basic ingredients, and comes together quickly. Perfect for brunch, gatherings, or a cozy evening at home, this cake is a must-try for berry lovers.
Contents
- 1 Why You’ll Love This Blackberry Cake Recipe
- 2 Essential Ingredients for Blackberry Cake Recipe
- 3 Blackberry Cake Recipe
- 4 Step-by-Step Instructions for the Perfect Blackberry Cake
- 5 Baking Tips for Blackberry Cake Recipe Success
- 6 Blackberry Cake Variations You’ll Want to Try
- 7 How to Store and Freeze Blackberry Cake Properly
- 8 Making the Cake Gluten-Free or Dairy-Free
- 9 Serving Suggestions for Blackberry Cake
- 10 Conclusion
Why You’ll Love This Blackberry Cake Recipe
Moist texture with juicy blackberries
Thanks to Greek yogurt, this blackberry cake recipe is light and moist. The blackberries add natural sweetness and a burst of flavor in every bite. No need for frosting—just a dusting of powdered sugar and it’s ready to serve.
Fast, simple, and flexible
You only need a few common ingredients and about 15 minutes of prep time. This recipe is easy to follow and doesn’t require a mixer. You can also swap yogurt with kefir, buttermilk, or sour cream if needed.
Essential Ingredients for Blackberry Cake Recipe
Must-have ingredients and easy swaps
This blackberry cake recipe uses simple ingredients that you probably already have on hand. Each one plays a key role in the cake’s moist texture and rich flavor.
Here’s what you’ll need:
| Ingredient | Purpose |
|---|---|
| All-purpose or cake flour | Creates a light, tender crumb |
| Baking powder | Helps the cake rise |
| Granulated sugar | Sweetens the batter and balances the tart blackberries |
| Salted butter | Adds richness and flavor |
| Eggs | Bind the ingredients and add structure |
| Greek yogurt | Keeps the Blackberry cake moist and soft |
| Vanilla extract | Enhances flavor and adds a warm aroma |
| Blackberries | The star ingredient—juicy, tangy, and bursting with flavor |
| Extra flour (1 tbsp) | Coats the berries so they don’t sink during baking |
If you’re out of Greek yogurt, no worries. You can easily use plain kefir, regular yogurt, buttermilk, or sour cream as substitutes. Greek yogurt is preferred for its thick texture and mild tang, but all of these work well to keep your Blackberry moist.
Choosing the best blackberries
For the best flavor, go with fresh, ripe blackberries that are firm and deep purple. If using frozen blackberries, make sure to thaw and pat them dry with a paper towel. This helps avoid adding too much moisture to the batter, which can make the Blackberry cake soggy.
When folding blackberries into the batter, coat them with a tablespoon of flour first. This keeps them from sinking to the bottom of the Blackberry Cake Recipe while baking. It’s a simple trick that makes a big difference in the final result.
Print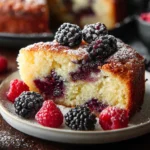
Blackberry Cake Recipe
- Total Time: 1 hour
- Yield: 10 servings
Description
This blackberry cake recipe is incredibly moist, fluffy, and full of juicy berries. Perfect for brunch, dessert, or any casual occasion. Made with simple pantry ingredients and Greek yogurt for a soft crumb.
Ingredients
2 cups all-purpose flour or cake flour (sifted or aerated)
2 teaspoons baking powder
1 cup granulated sugar
2 oz salted butter, melted (¼ cup)
2 large eggs
1 and ¼ cups plain low-fat Greek yogurt
2 teaspoons pure vanilla extract
16 oz blackberries
1 tablespoon flour for coating berries
Powdered sugar for dusting (optional)
Instructions
1. Preheat the oven to 350°F. If using convection, use convection bake. Line a 9×3-inch springform pan with parchment paper.
2. In a medium bowl, whisk together flour and baking powder. Set aside.
3. In a large bowl, whisk sugar, melted butter, and eggs until smooth and fluffy (1–2 minutes).
4. Stir in Greek yogurt and vanilla extract until just combined.
5. Gradually whisk in the flour mixture one cup at a time until fully incorporated.
6. Coat ⅔ of the blackberries in 1 tablespoon flour and gently fold them into the batter.
7. Pour the batter into the prepared springform pan and top with the remaining ⅓ of blackberries.
8. Bake for 45–50 minutes (convection) or up to 60 minutes (conventional), until a toothpick comes out clean.
9. Let cool in the pan for 20 minutes. Then release the springform and cool for another 20 minutes.
10. Dust with powdered sugar before serving.
Notes
You can use plain kefir, buttermilk, sour cream, or regular yogurt in place of Greek yogurt.
Use frozen blackberries only if thawed and dried.
To make this gluten-free, use 1:1 gluten-free baking flour and add ¼ cup extra Greek yogurt if the batter is too thick.
This recipe also works in a bundt pan, muffin tin, or cast iron skillet.
Store at room temperature for up to 4 days or freeze for up to 2 months.
- Prep Time: 15 minutes
- Cook Time: 45 minutes
- Category: Cakes
- Method: Baking
- Cuisine: American
Step-by-Step Instructions for the Perfect Blackberry Cake
Preparing your baking pan
To get started, preheat your oven to 350°F. If your oven has a convection setting, use it for more even baking. Then, line the bottom and sides of a 9×3-inch springform pan with a large piece of parchment paper. This step removes the need for greasing and ensures the cake comes out clean without sticking.
Using a springform pan also helps with easier release and presentation, especially for a moist cake like this one. Make sure the parchment paper reaches up the sides to contain the batter properly.
Mixing the batter the right way
In a medium bowl, whisk together 2 cups of flour and 2 teaspoons of baking powder. Set this dry mix aside.
In a larger bowl, whisk 1 cup of sugar, 2 oz of melted salted butter, and 2 eggs until the mixture becomes light, smooth, and slightly fluffy. This should take about 1 to 2 minutes. Add 1¼ cups of Greek yogurt and 2 teaspoons of vanilla extract, and stir until just combined.
Now, gradually add the flour mixture into the wet ingredients. Mix in one cup at a time, whisking gently until everything is just blended. Avoid over-mixing, as that can make the cake dense instead of fluffy.
In the same bowl you used for the dry ingredients, toss ⅔ of the blackberries with 1 tablespoon of flour. This coating helps keep the berries suspended in the batter. Gently fold the flour-coated berries into the batter using a spatula.
Pour the finished batter into your lined springform pan. Then, take the remaining ⅓ of blackberries and arrange them on top. This not only adds visual appeal but ensures extra fruit flavor in every slice.
Baking Tips for Blackberry Cake Recipe Success
Oven settings and baking time
For the perfect bake, preheat your oven to 350°F. If you have a convection setting, use it—it helps the Blackberry cake bake more evenly by circulating air around the pan. Place the springform pan on the middle oven rack to ensure even heat distribution.
Bake the cake for 45 to 50 minutes if you’re using convection. For a conventional oven, it may take up to 60 minutes. To check if the Blackberry cake is done, insert a toothpick into the center. If it comes out clean or with a few moist crumbs, your cake is ready. If not, continue baking in 5-minute increments, checking after each round.
Be careful not to overbake. You want the cake to be moist, and overbaking can dry it out quickly.
Common mistakes to avoid
Here are a few key tips to ensure your blackberry cake turns out perfect:
- Don’t skip parchment paper: Lining both the bottom and sides makes removing the cake clean and easy.
- Avoid overmixing: Once the flour is added, mix only until combined. Overmixing develops gluten, making the Blackberry cake dense.
- Coat the berries: Failing to flour the blackberries can cause them to sink, leaving you with a soggy bottom.
- Let the Blackberry cake cool properly: Let it cool in the pan for 20 minutes. Then release the springform ring and let it cool for another 20 minutes before removing the parchment paper. This helps the Blackberry cake set and prevents crumbling.
Blackberry Cake Variations You’ll Want to Try
Turn it into muffins, bundt cakes, or skillet cake
This blackberry cake recipe is incredibly flexible. You can easily switch up the shape or style of your cake by using different pans.
Here are your best options:
| Pan Type | Instructions |
|---|---|
| 9×13-inch rectangular pan | Grease the pan and bake for about 40 minutes, or until a toothpick comes out clean. |
| 10- or 12-inch cast iron skillet | Creates a cake with crispy, golden edges and a soft, moist center. Great for rustic presentation. |
| 12-cup muffin tin | Fill each muffin cup ⅔ full and bake for 20 to 30 minutes. Use all the blackberries in the batter. |
| 9-inch bundt pan (10–12 cup) | A beautiful option for special occasions. Be sure to grease it thoroughly and bake as usual. |
Each method gives a slightly different texture and look but keeps the same amazing flavor. Muffins are great for grab-and-go snacks, while a bundt cake makes a lovely centerpiece for brunch or dessert tables.
Flavor upgrades and add-ins
Want to make this blackberry cake recipe your own? Here are some easy ways to boost flavor:
- Add lemon zest to the batter for a citrusy kick.
- Sprinkle in cinnamon or nutmeg to warm up the flavor.
- Use almond extract instead of vanilla for a subtle nutty note.
- Top with sliced almonds before baking for a little crunch.
You can also try combining blackberries with other fruits like raspberries or blueberries for a colorful twist.
How to Store and Freeze Blackberry Cake Properly
Room temperature vs refrigeration
Once your blackberry cake has completely cooled, you can store it at room temperature for up to 4 days. Simply wrap it in plastic wrap or store it in an airtight container to keep it fresh and prevent it from drying out.
Avoid storing the Blackberry cake in the fridge unless absolutely necessary, as refrigeration can make it denser and dry out the crumb. However, if your kitchen is warm or humid, you may refrigerate it for a day or two, but make sure it’s tightly sealed.
Freezing tips for long-term storage
This blackberry cake recipe freezes beautifully. Here’s how to freeze it the right way:
- Let the cake cool completely.
- Wrap the entire cake or individual slices tightly in plastic wrap.
- Place the wrapped cake inside a freezer-safe bag or airtight container.
- Label it with the date and freeze for up to 2 months.
To thaw, transfer the cake to the refrigerator and let it defrost overnight. If you prefer, you can warm slices in the microwave for a few seconds or let them come to room temperature before serving.
For best results, avoid freezing the Blackberry cake while still warm or uncovered, as that can cause freezer burn and affect the texture.
Making the Cake Gluten-Free or Dairy-Free
Using gluten-free flours
This blackberry cake recipe can easily be adapted for gluten-free baking without compromising taste or texture. It has been tested with reliable gluten-free flour brands like Bob’s Red Mill Gluten-Free 1-to-1 Baking Flour and King Arthur Measure-for-Measure Gluten-Free Flour. Both options work well as direct substitutes for all-purpose flour.
Gluten-free batters are often a bit thicker. If yours seems too dense, stir in an extra ¼ cup of Greek yogurt to loosen it up. This simple adjustment helps maintain a smooth batter and results in a moist, tender crumb.
Make sure to double-check your baking powder to confirm it’s gluten-free as well, as some blends may contain trace amounts of gluten.
Dairy alternatives that still deliver flavor
If you need a dairy-free version of this blackberry cake recipe, you have a few solid alternatives to Greek yogurt:
| Substitute | Flavor & Texture Notes |
|---|---|
| Plain kefir | Light and tangy, very similar to Greek yogurt |
| Buttermilk | Adds richness and a mild tang |
| Regular plain yogurt | Slightly thinner than Greek, but still works well |
| Sour cream | Rich and smooth, creates a softer cake crumb |
Each of these options adds moisture while keeping that tangy, fresh flavor that makes this cake so good. If you’re going fully dairy-free, be sure to also use a plant-based butter substitute or neutral oil instead of regular butter.
Serving Suggestions for Blackberry Cake
How to garnish and serve
This blackberry cake recipe is flavorful enough to stand on its own, but a few simple touches can elevate its presentation and taste even more.
Right before serving, dust the top with powdered sugar. This not only adds a subtle sweetness but also gives the Blackberry cake a bakery-style finish. If you’re hosting guests or serving it for a special occasion, consider pairing it with:
- A dollop of whipped cream
- A scoop of vanilla ice cream
- Fresh blackberries or mixed berries on the side
- A drizzle of honey or berry compote
Because of its soft, moist crumb and bursts of juicy fruit, this cake doesn’t need heavy frosting or icing.
Serve it warm for a comforting treat, or chilled for a firmer texture. It’s great with coffee, tea, or as part of a brunch spread.
Best occasions to enjoy this cake
This blackberry cake recipe fits just about any moment. It’s a hit for:
- Weekend brunches
- Family get-togethers
- Afternoon snacks
- Picnics
- Holiday tables
It also makes a wonderful gift or potluck dessert, as it travels well and tastes even better the next day after the flavors settle.
Conclusion
This blackberry cake recipe brings together the best of home baking—simple ingredients, minimal prep, and big flavor. With its moist texture, bursts of juicy blackberries, and light tang from Greek yogurt, it’s a go-to dessert for any occasion. Whether you’re serving it warm at brunch or chilled with a cup of tea, it’s a crowd-pleaser every time.
What makes this recipe even better is how adaptable it is. You can bake it gluten-free, swap in your favorite yogurt alternative, or turn it into muffins, a bundt cake, or a skillet dessert. And with just a dusting of powdered sugar, it’s ready to impress.
For More Delicious And Easy Recipes Follow Me In Facebook And Pinterest.