Craving a cozy dessert that’s sweet, simple, and loaded with fruit flavor? This pear pie recipe is a must-try. It features tender spiced pears, a golden crust, and a buttery streusel topping. Whether it’s for the holidays or a casual weeknight treat, this pie delivers rich flavor with minimal fuss.
Contents
- 1 Why This Pear Pie Recipe Is the Best
- 2 Ingredients You’ll Need for Pear Pie
- 3 Equipment Essentials for Perfect Pear Pie
- 4 Pear Pie Recipe
- 5 Step-by-Step Pear Pie Instructions
- 6 Best Pears for Pie – What Works and What Doesn’t
- 7 Make-Ahead, Storage, and Freezing Tips
- 8 Serving Suggestions for Pear Pie
- 9 Troubleshooting Pear Pie Baking
- 10 Pear Pie Recipe Variations and Creative Twists
Why This Pear Pie Recipe Is the Best
What Makes This Pear Pie Stand Out
This isn’t your average fruit pie. The blend of firm and juicy pears, warm spices like nutmeg and cinnamon, and a sweet crumb topping makes every bite melt-in-your-mouth good. No top crust needed, which means easier prep and more texture from the streusel. It’s simple, reliable, and always a crowd-pleaser.
Benefits of Baking with Pears
Pears bake up soft but not mushy, especially when using Bosc or Anjou. Their natural sweetness means less added sugar, and their mild flavor pairs well with spices or caramel. This pear pie recipe lets the fruit shine while giving you plenty of room for topping creativity.
Ingredients You’ll Need for Pear Pie
Core Ingredients Breakdown
To make the best pear pie recipe, start with fresh, ripe pears. You’ll need about 5 cups of sliced pears, which is typically around 6 medium ones. For the best results, use a mix of Bosc and Bartlett varieties. Bosc pears hold their shape when baked, while Bartletts add moisture and sweetness.
Here’s everything you’ll need for the filling:
- 5 cups sliced, peeled pears (Bosc and Bartlett combo recommended)
- ½ cup granulated sugar – to sweeten without overpowering
- 4 tablespoons all-purpose flour – thickens the filling and absorbs juices
- ¾ teaspoon ground nutmeg and ¼ teaspoon ground cinnamon – add warm spice
- ½ teaspoon salt – balances sweetness
- 1 teaspoon lemon zest and 1 tablespoon lemon juice – adds brightness
- 1 tablespoon salted butter – dotted over the filling for richness
These ingredients work together to bring out the natural sweetness and floral notes in the pears while keeping the filling from getting watery. The spices make it feel like fall in every bite.
Streusel Topping Ingredients
Instead of a second crust, this pear pie recipe uses a crumbly streusel topping. It adds a sweet crunch and looks beautiful when baked to a golden brown.
Here’s what goes into the streusel:
- ½ cup all-purpose flour – forms the base
- ¼ cup brown sugar and ¼ cup granulated sugar – a mix for depth and sweetness
- ¼ teaspoon ground cinnamon – complements the filling
- Dash of salt – enhances flavor
- 4 tablespoons melted salted butter – binds the ingredients and gives that rich, buttery finish
You’ll simply mix the ingredients until crumbly and sprinkle them over the pear filling. It’s easy and delivers a delicious contrast in texture.
Equipment Essentials for Perfect Pear Pie
Must-Have Baking Tools
While the ingredients make the flavor, the right tools help you get that picture-perfect pear pie. Here’s what you’ll need to get the best results:
- Rolling Pin – Essential for rolling out the pie crust evenly. A smooth, even crust ensures no overbaked spots or thin areas that might crack during baking.
- 9-inch Pie Plate – This recipe is designed for a standard 9-inch dish. Using a smaller or larger pan could throw off baking times or crust thickness.
- Pastry Cutter (or fork) – Helps mix the streusel topping to the perfect crumb consistency. You can also use your hands to form small clumps for extra texture.
Even if you’re not a pro baker, these simple tools go a long way in helping you make a pie that not only tastes great but looks beautiful too.
Why Proper Tools Matter
Using the right equipment is about more than convenience. It’s about results. A poorly rolled crust may tear or bake unevenly. Using the wrong pie plate can lead to soggy bottoms or burnt edges. And when it comes to the streusel topping, having the right tool to combine your flour, sugar, and butter gives you that golden, bakery-style crumble.
If you’re someone who enjoys baking regularly, it’s worth investing in quality versions of these tools. They’ll serve you well not only for this pear pie recipe, but for every tart, quiche, or fruit dessert you decide to make next.
Print
Pear Pie Recipe
- Total Time: 5 hours 20 minutes
- Yield: 12 servings
Description
This easy pear pie recipe features a flaky crust, spiced pear filling, and a buttery streusel topping. Perfect for holidays or cozy nights in.
Ingredients
1 unbaked pie crust (for 9-inch dish)
5 cups peeled and sliced pears (about 6 medium)
1/2 cup granulated sugar
4 tablespoons all-purpose flour
3/4 teaspoon ground nutmeg
1/4 teaspoon ground cinnamon
1/2 teaspoon salt
1 teaspoon lemon zest
1 tablespoon lemon juice
1 tablespoon salted butter (cut into small pieces)
Streusel Topping:
1/2 cup all-purpose flour
1/4 cup brown sugar
1/4 cup granulated sugar
1/4 teaspoon ground cinnamon
Dash of salt
4 tablespoons salted butter, melted
Optional: 1 cup caramel sauce for serving
Instructions
1. Preheat oven to 375°F. Roll out the pie crust and place it into a 9-inch pie dish. Crimp or decorate the edges and chill.
2. Peel and slice pears into 1/2-inch slices. In a large bowl, mix pears with sugar, flour, spices, salt, lemon zest, and juice.
3. Pour filling into prepared crust. Dot with butter.
4. In a medium bowl, mix streusel ingredients. Combine until crumbly. Sprinkle evenly over filling.
5. Bake for 50–60 minutes or until the filling bubbles and the topping is golden brown. Cover edges if they brown too quickly.
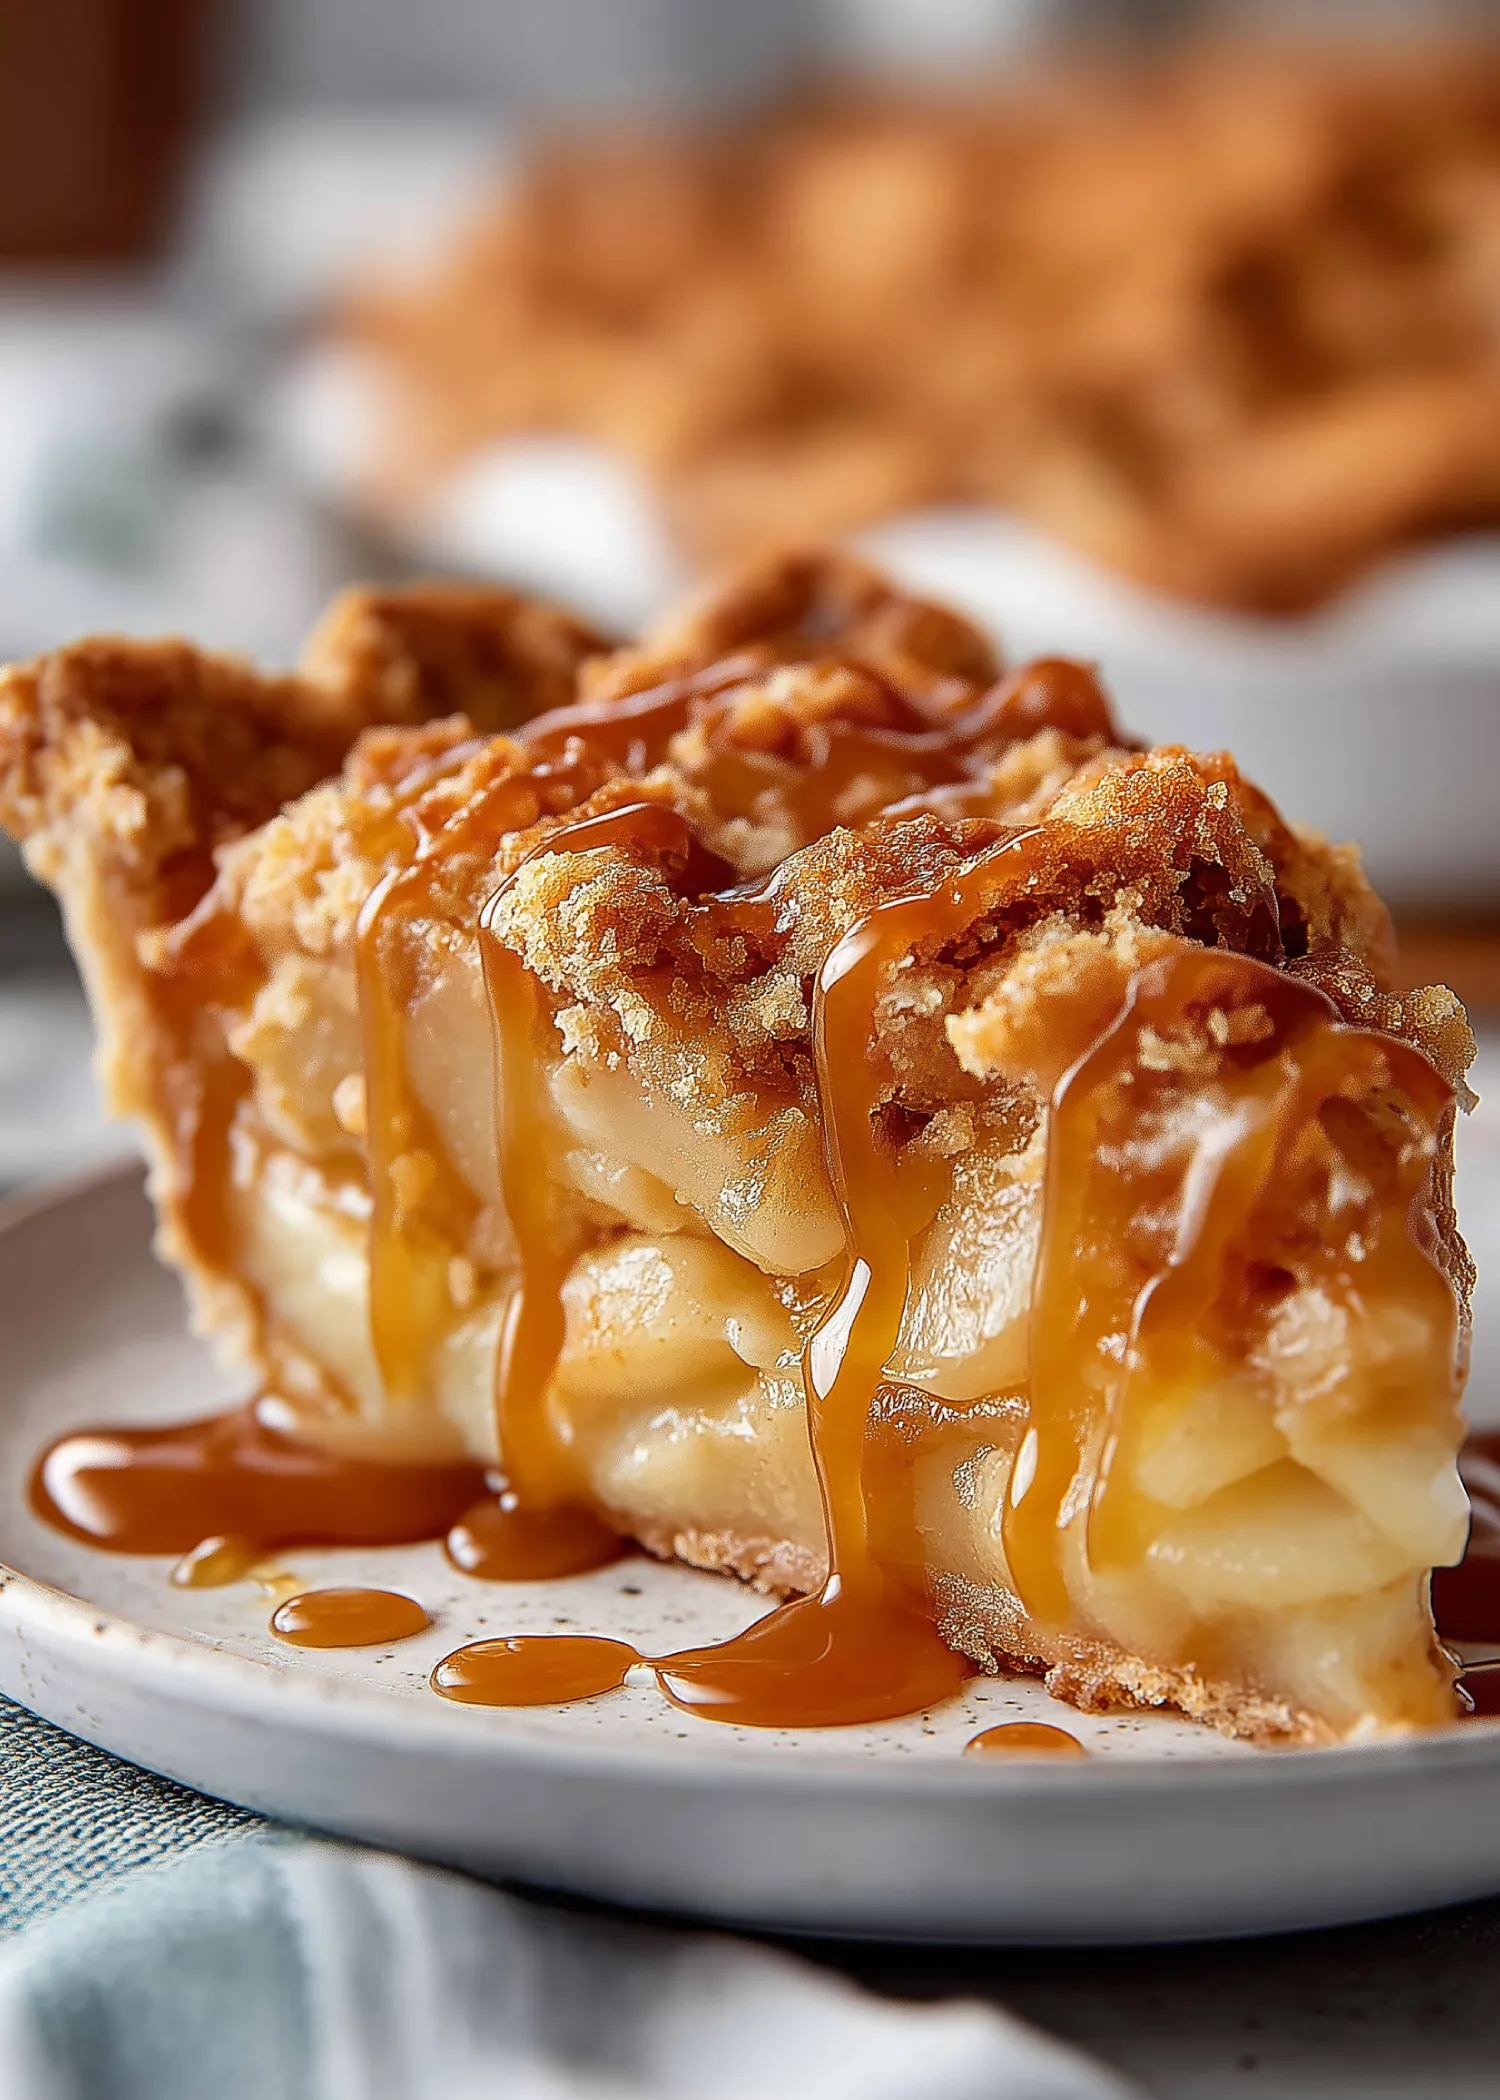
6. Cool for at least 4 hours before slicing. Serve with caramel sauce and/or vanilla ice cream.
Notes
Use a mix of Bosc and Bartlett pears for best texture and flavor.
Pie can be made ahead and refrigerated for up to 4 days.
To freeze: Wrap baked or unbaked pie tightly in plastic and foil. Store up to 3 months.
Bake unbaked pie from frozen, adding 20–30 minutes to bake time.
Reheat baked pie in the oven for 10–15 minutes before serving.
- Prep Time: 20 minutes
- Cook Time: 1 hour
- Category: Dessert
- Method: Baking
- Cuisine: American
Step-by-Step Pear Pie Instructions
Prepping the Crust
First things first, let’s get that crust ready. You can use a store-bought crust, but if you want that extra homemade feel.
- Preheat your oven to 375°F. This temperature ensures the crust bakes evenly and the filling cooks through without burning the topping.
- Roll out your unbaked crust on a lightly floured surface until it’s slightly larger than your 9-inch pie plate.
- Transfer the dough gently into the pie plate, pressing it down into the bottom and sides.
- Tuck in the edges, and crimp them decoratively using your fingers or a fork. For a fancier finish, you can braid extra dough and line the edges.
- Chill the crust in the fridge while you make the filling. A cold crust means less shrinkage and better flakiness when baked.
Making the Filling and Baking
With the crust ready, it’s time to build your filling and bring this pear pie recipe to life.
- Peel and slice about 6 medium pears into ½-inch slices to get 5 cups total. Place them in a large mixing bowl.
- Add the filling ingredients: ½ cup sugar, 4 tablespoons flour, ¾ teaspoon nutmeg, ¼ teaspoon cinnamon, ½ teaspoon salt, 1 teaspoon lemon zest, and 1 tablespoon lemon juice.
- Gently toss everything together so the pears are coated evenly in the spice and sugar mixture.
- Pour the filling into the chilled crust, spreading it out evenly. Then dot with 1 tablespoon of butter, cut into small pieces.
- Prepare the streusel topping in a separate bowl. Combine ½ cup flour, ¼ cup brown sugar, ¼ cup granulated sugar, ¼ teaspoon cinnamon, a dash of salt, and 4 tablespoons of melted butter. Mix until crumbly. Use your hands to form small clumps for better texture.
- Sprinkle the streusel generously over the pear filling, covering the entire surface.
- Bake for 50–60 minutes, or until the filling is bubbling around the edges and the topping is golden brown. If the edges of your crust begin to brown too quickly, cover them with foil or a pie shield.
Once baked, cool the pie completely for at least 4 hours before slicing. This helps the filling set and makes slicing much easier. For an extra indulgent touch, drizzle each slice with caramel sauce and serve with a scoop of vanilla ice cream.
Best Pears for Pie – What Works and What Doesn’t
Ideal Pear Types
When making any fruit pie, choosing the right variety makes all the difference—and pears are no exception. For this pear pie recipe, the best results come from using a mix of Bosc and Bartlett pears.
- Bosc pears have firm flesh that holds its shape beautifully during baking. They won’t turn mushy, even after an hour in the oven, making them ideal for structure.
- Bartlett pears are juicy and sweet, adding moisture and rich pear flavor. They soften more easily, which is why they pair well with firmer pears like Bosc.
For added variety, you can also try:
- Anjou pears – Similar to Bosc in firmness, though slightly milder in flavor.
- Comice pears – Very juicy and sweet, but they break down more during baking. Use them in combination with Bosc or Anjou, never on their own.
Avoid using just Bartlett or Comice pears. On their own, they can make the filling too soft and watery, especially if they’re overripe. The result? A mushy filling that won’t slice cleanly.
Pear Pairing Tips
When preparing the pears:
- Peel them completely. The skins can become tough and leathery when baked.
- Slice them evenly to about ½ inch thick. This ensures uniform baking and prevents over-soft spots.
- Mix firm and soft varieties. Aim for 70% firm (like Bosc or Anjou) and 30% soft (like Bartlett or Comice).
This combination gives your pear pie recipe the perfect balance of texture and juiciness. It’s not too dry, not too wet—just right.
Make-Ahead, Storage, and Freezing Tips
Storage Tips
Once your pie has cooled, you’ll want to store it properly to preserve its flavor and texture. Here’s how:
- Short-term storage: You can leave the pie on the counter overnight, loosely covered with foil or plastic wrap. This keeps the crust from getting soggy.
- Refrigeration: For longer freshness, store the pie in the refrigerator. It will stay good for 3 to 4 days when properly wrapped or placed in an airtight container.
- Serving after refrigeration: Let the pie sit at room temperature for 20–30 minutes before serving, or warm individual slices in the oven at 300°F for 10–15 minutes.
Freezing Your Pear Pie
One of the great things about this pear pie recipe is that it freezes well, both before and after baking. This makes it perfect for planning ahead for holidays or surprise guests.
Freezing an Unbaked Pear Pie:
- Assemble the pie in a freezer-safe dish, including the filling and streusel topping.
- Place it in the freezer uncovered for 1 hour to firm up the crust and topping.
- Wrap the entire pie tightly in plastic wrap, then again in aluminum foil.
- Label it and freeze for up to 3 months.
To bake from frozen:
- Unwrap the pie and bake directly from the freezer at 375°F.
- Add 20–30 minutes to your original bake time, covering the edges with foil if they brown too fast.
Freezing a Baked Pear Pie:
- Allow the pie to cool completely.
- Wrap it the same way—first in plastic wrap, then in foil.
- Freeze for up to 3 months.
To serve after freezing:
- Thaw overnight in the fridge.
- Let it come to room temperature, then warm it in the oven at 325°F for 10–15 minutes before slicing.
Freezing doesn’t compromise the quality of this pie, especially when you use firm pears and a sturdy crust. It’s one of the best make-ahead desserts to keep on hand.
Serving Suggestions for Pear Pie
Classic Serving Ideas
Serve this pear pie recipe warm or at room temperature for best flavor. Here are a few simple ways to make it shine:
- With vanilla ice cream – The creamy cold meets warm spiced pie perfectly.
- Drizzled with caramel sauce – Adds richness and looks great.
- Topped with whipped cream – Light, fluffy, and classic.
Warm leftover slices at 300°F for 10–15 minutes if refrigerated.
Holiday or Party Style
- Garnish with thin pear slices or mint for a fresh touch.
- Use ramekins or dessert plates for pre-sliced servings.
- Display on a pie stand to dress it up for guests.
It’s a simple dessert that can still feel special, no matter the occasion.
Troubleshooting Pear Pie Baking
Quick Fixes for Common Issues
- Runny filling? Use the full 4 tablespoons of flour and bake until juices bubble.
- Crust browning too fast? Cover edges with foil halfway through baking.
- Soft streusel? Bake longer at a slightly lower temp to crisp it up.
- Pie won’t set? Cool for at least 4 hours before slicing.
Quick Tips
- Use firm pears like Bosc for structure.
- Don’t skip lemon juice—it adds balance and prevents browning.
- Look for bubbling edges to know it’s fully baked.
These quick tips keep your pear pie recipe on track and looking (and tasting) just right.
Pear Pie Recipe Variations and Creative Twists
Flavor Add-Ins
Want to switch things up? Here are a few simple ways to tweak the flavor while sticking to the basics of this pear pie recipe:
- Add ginger or cloves for a warmer spice profile.
- Use almond extract instead of lemon for a nuttier aroma.
- Toss in cranberries to add tartness and color.
These easy upgrades give your pie a festive or seasonal flair without changing the core structure.
Crust and Topping Alternatives
Prefer a different finish? Try one of these ideas:
- Lattice crust – For a more traditional pie look.
- Graham cracker crust – Adds crunch and a slight sweetness.
- Add oats to the streusel – Gives it a rustic, hearty feel.
All of these work with the same filling, so feel free to mix and match.
This pear pie recipe brings together everything you want in a dessert—sweet, spiced fruit, a flaky crust, and a golden streusel topping. It’s easy enough for a weeknight and impressive enough for the holidays. Whether you’re baking it fresh or pulling one from the freezer, it’s a dessert that delivers comfort and flavor in every slice. Pair it with caramel, ice cream, or enjoy it as-is—either way, it’s guaranteed to be a crowd favorite.
For More Delicious And Easy Recipes Follow Me In Facebook And Pinterest.
