Peanut butter cup cookies are the ultimate treat for anyone who loves the sweet and salty combination of peanut butter and chocolate. These cookies deliver a chewy bite with a melty peanut butter cup nestled in the center, making them both visually appealing and irresistibly tasty. Whether you’re baking for the holidays, a party, or just to satisfy a late-night craving, this recipe offers consistent, bakery-quality results.
In this article, we’ll guide you through everything you need to know to master the perfect peanut butter cup cookies, from the ingredients that make all the difference to essential baking techniques. We’ll cover mixing methods, dough chilling, baking tricks, storing tips, and even how to freeze them properly for later. By the end, you’ll feel confident making these crowd-pleasing cookies like a pro.
Contents
- 1 Essential Ingredients for the Perfect Peanut Butter Cup Cookies
- 2 Peanut Butter Cup Cookies Recipe
- 3 Mixing the Dough and Chilling – Setting the Stage for Perfect Texture
- 4 Baking and Shaping – Creating the Signature Peanut Butter Cup Cookie
- 5 Storing, Freezing, and Make-Ahead Tips for Peanut Butter Cup Cookies
- 6 Pro Tips and Troubleshooting for Peanut Butter Cup Cookies Recipe Success
- 7 Variations, Customizations, and Occasion-Based Twists for Peanut Butter Cup Cookies
- 8 Conclusion: Why Peanut Butter Cup Cookies Belong in Your Baking Repertoire
Essential Ingredients for the Perfect Peanut Butter Cup Cookies
What You Need to Get Started
The quality of your ingredients can either make or break your cookie game. Here’s what you’ll need to prepare a batch of 24 chewy, rich peanut butter cup cookies:
- All-Purpose Flour (1 and 1/4 cups or 156g): Flour provides the structural base of your cookie. Spoon and level it properly to avoid compacting, which leads to tough cookies.
- Baking Soda (1/2 teaspoon): Helps the cookies rise just enough while also ensuring they don’t spread too much in the oven.
- Salt (1/4 teaspoon): Enhances the flavor of peanut butter and chocolate. Skipping it may leave your cookies tasting flat.
- Unsalted Butter (1/2 cup or 113g): Softened to room temperature for smooth mixing. Using unsalted lets you control salt levels.
- Brown Sugar (1/2 cup or 100g): Adds moisture and gives a soft, chewy texture thanks to the molasses content.
- Granulated Sugar (1/4 cup or 50g): Balances the brown sugar, contributing to structure and sweetness.
- Creamy Peanut Butter (3/4 cup or 185g): Go for a thick, non-oily version. This is the heart of the flavor.
- Large Egg (room temperature): Binds ingredients and supports the soft structure of the cookie.
- Pure Vanilla Extract (1 teaspoon): Adds a warm depth to the cookie’s base.
The Secret in the Toppings
To make these cookies iconic, the toppings must be perfect.
- Granulated Sugar (1/2 cup or 100g): Used for rolling dough balls to give the cookies a subtle sugary crunch.
- Reese’s Miniature Peanut Butter Cups (24 pieces): These little chocolates become the star center of each cookie. Press them into the warm cookies immediately after baking.
Room Temperature is Non-Negotiable
Room temperature ingredients are critical for smooth mixing. When your butter and egg are at room temp, they emulsify better with sugars, resulting in even dough with no curdling or separation. For the egg, let it sit in a cup of warm water for 5 minutes. Butter should be soft but not melted — just enough to leave a light finger dent.
In the next section, we’ll explore how to mix these ingredients properly, why chilling the dough matters, and the technique behind forming the perfect cookie.
Print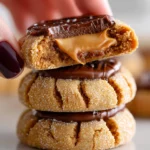
Peanut Butter Cup Cookies Recipe
- Total Time: 1 hour 45 minutes
- Yield: 24 cookies
- Diet: Vegetarian
Description
Soft, chewy peanut butter cookies topped with rich peanut butter cups — the perfect treat for chocolate and peanut butter lovers.
Ingredients
1 and 1/4 cups (156g) all-purpose flour (spooned & leveled)
1/2 teaspoon baking soda
1/4 teaspoon salt
1/2 cup (113g) unsalted butter, softened to room temperature
1/2 cup (100g) packed light or dark brown sugar
1/4 cup (50g) granulated sugar
3/4 cup (185g) creamy peanut butter
1 large egg, at room temperature
1 teaspoon pure vanilla extract
Topping:
1/2 cup (100g) granulated sugar (for rolling, optional)
24 Reese’s Miniature Peanut Butter Cups, unwrapped
Instructions
1. Whisk the flour, baking soda, and salt together in a medium bowl.
2. In a large bowl, cream the butter, brown sugar, and granulated sugar on medium speed until combined.
3. Beat in the peanut butter, egg, and vanilla extract on low speed.
4. Increase to high speed and beat until light in color and smooth, about 1–2 minutes.
5. Slowly add the dry ingredients and mix just until combined.
6. Cover and chill the dough for at least 1 hour and up to 3 days.
7. Preheat oven to 350°F (177°C) and line two large baking sheets with parchment paper or silicone mats.
8. Roll dough into 1.5 tablespoon-sized balls and roll each in granulated sugar.
9. Place cookies 3 inches apart on baking sheets and bake for 11–13 minutes until very soft.
10. Cool for 5 minutes on the baking sheet.
11. Press 1 peanut butter cup into the center of each cookie while still warm.
12. Transfer cookies to a plate and freeze for 10–15 minutes or until set.
Notes
Cookies stay fresh covered at room temperature for up to 1 week.
Cookie dough can be chilled for up to 4 days before baking.
Baked cookies freeze well for up to 3 months.
Dough balls freeze well unbaked for up to 3 months — bake from frozen, adding 1 extra minute.
- Prep Time: 1 hour 30 minutes
- Cook Time: 12 minutes
- Method: Baking
- Cuisine: American
Mixing the Dough and Chilling – Setting the Stage for Perfect Texture
Step-by-Step Mixing for Perfect Consistency
Once you have all your ingredients measured and ready, it’s time to bring the dough together. This process isn’t just about tossing everything into a bowl. Each step plays a role in creating cookies with the ideal chew and structure.
- Whisk Dry Ingredients First:
In a medium bowl, whisk together the flour, baking soda, and salt. This ensures even distribution of the leavening and seasoning, preventing pockets of baking soda or salt in your cookies. - Creaming the Butter and Sugars:
In a large mixing bowl, beat the softened butter, brown sugar, and granulated sugar on medium speed using a handheld mixer or stand mixer fitted with a paddle attachment. Mix until everything is creamy and fully combined. This step incorporates air into the butter, which helps the cookies rise gently and stay soft in the middle. - Add Peanut Butter, Egg, and Vanilla:
Drop the mixer speed to low. Add in the peanut butter, then crack the egg and pour in the vanilla extract. Once everything is in the bowl, increase the speed to high and beat until the mixture turns light in color and looks smooth, about 1 to 2 minutes. Don’t forget to scrape down the sides and bottom with a rubber spatula to make sure everything is fully incorporated. - Combine Wet and Dry:
With the mixer on low, gradually add the dry ingredients. Mix just until the flour disappears into the dough. Over-mixing at this point can lead to tough cookies, so stop once the mixture looks evenly combined.
Why You Should Chill the Dough
Chilling isn’t optional in this recipe. It’s essential. Here’s why:
- Prevents Over-Spreading: Chilled dough holds its shape better in the oven, giving you cookies that are tall, round, and thick instead of flat and crispy.
- Intensifies Flavor: Letting the dough rest gives time for the ingredients to meld, producing a deeper, more developed peanut butter taste.
- Improves Texture: Cold dough creates cookies with chewy centers and lightly crisp edges, exactly what you want in a peanut butter cup cookie.
Once your dough is mixed, cover it tightly and place it in the refrigerator for at least 1 hour. You can keep it in there for up to 3 days, but the longer it chills, the firmer and easier it will be to scoop.
Tip: If you’re doubling or tripling the recipe, extend the chill time to about 90 minutes, as a larger volume of dough takes longer to firm up.
Ready for Baking? Not Just Yet
Before baking, allow the dough to sit at room temperature for 20 to 30 minutes if it’s been chilled for longer than a few hours. This slight softening makes it easier to scoop and shape while still keeping the benefits of chilled dough.
Baking and Shaping – Creating the Signature Peanut Butter Cup Cookie
Prepping the Baking Sheets and Oven
After your dough is thoroughly chilled and slightly softened, it’s time to prepare for baking. This is where patience meets payoff, and following the process precisely ensures your cookies turn out just right.
- Preheat Your Oven:
Set your oven to 350°F (177°C). Allow it to preheat fully before placing the cookies inside. A consistent temperature is crucial for even baking. - Line the Baking Sheets:
Use parchment paper or silicone baking mats to line two large baking sheets. These surfaces prevent sticking, promote even browning, and make cleanup a breeze. Avoid greasing the pans, as this can cause over-spreading.
Rolling the Dough and Shaping Cookies
- Scoop the Dough:
Measure out 1.5 tablespoons of dough per cookie. Using a medium cookie scoop makes this process faster and helps maintain uniformity, which ensures every cookie bakes evenly. - Roll in Sugar (Optional but Recommended):
Pour 1/2 cup of granulated sugar into a small bowl. Roll each dough ball into the sugar until fully coated. This extra layer adds a slight crunch to the outer surface and enhances the cookie’s flavor profile. - Space Evenly on Baking Sheets:
Arrange the sugar-coated dough balls at least 3 inches apart on the prepared baking sheets. This gives them room to spread slightly while maintaining that plump, chewy shape.
Time to Bake
Place the trays in the preheated oven and bake for 11 to 13 minutes. Keep a close eye toward the end – the cookies should look set on the edges but still very soft in the center when you take them out.
Don’t overbake. They will continue to cook slightly on the baking sheet after removal. Softness in the middle is what gives these cookies their signature chewy texture.
Pressing in the Peanut Butter Cups
This next step transforms an already great cookie into a peanut butter-chocolate dream:
- Let Cookies Cool for 5 Minutes:
Once out of the oven, let the cookies rest on the baking sheet for about five minutes. This brief cooling period helps stabilize the cookie’s structure without allowing it to harden. - Press in the Candy:
Working quickly while the cookies are still warm, gently press one Reese’s Miniature Peanut Butter Cup into the center of each cookie. The warmth helps the chocolate melt slightly, letting it stick to the cookie and settle into the middle.
Final Set: Into the Freezer
To preserve the perfect shape of the peanut butter cups and prevent full melting, transfer the cookies to a freezer-safe dish or plate. Place them in the freezer for 10 to 15 minutes until the peanut butter cups are set.
Don’t worry if a few melt slightly. That’s normal – and it adds a delicious gooeyness when you bite into them later.
Storing, Freezing, and Make-Ahead Tips for Peanut Butter Cup Cookies
How to Store Freshly Baked Cookies
Once your cookies are completely cooled and the peanut butter cups have set, it’s time to store them correctly to maintain their soft, chewy texture.
- Room Temperature Storage:
Place cookies in an airtight container. They’ll stay fresh for up to 1 week at room temperature. Add a small slice of bread to the container to maintain moisture – the cookies absorb the bread’s humidity without becoming soggy. - Avoid Refrigeration:
Refrigerating baked cookies can dry them out quickly. Stick to room temperature storage unless you need to keep them longer.
Freezing Baked Cookies
Peanut butter cup cookies freeze incredibly well, making them perfect for long-term storage or preparing treats ahead of a big event.
- Freezing Baked Cookies:
Let the cookies cool completely. Arrange them in a single layer in a freezer-safe container or separate layers with parchment paper.
Freeze for up to 3 months. When ready to eat, thaw at room temperature for 30 to 60 minutes. - Texture After Freezing:
Cookies maintain their softness beautifully after thawing, especially if you stored them in airtight conditions.
Freezing Cookie Dough Balls
If you prefer fresh-baked cookies anytime, freezing the dough is the way to go.
- Shape Before Freezing:
Roll your chilled dough into 1.5 tablespoon balls, as you would before baking. Don’t roll them in sugar yet — do that just before baking. - Freeze Dough Balls:
Place dough balls on a baking sheet in a single layer. Freeze until solid, about an hour. Then transfer to a freezer-safe bag or container and label with the date. - Baking from Frozen:
No need to thaw. Just roll in granulated sugar and bake straight from the freezer at 350°F (177°C). Add 1 extra minute to the baking time.
Make-Ahead Timeline Tips
Planning ahead? Here’s a quick guide:
| Task | Prep Time | Fridge | Freezer |
|---|---|---|---|
| Dough (uncooked) | 10 mins | Up to 4 days | Up to 3 months |
| Baked Cookies | – | 1 week (room temp) | 3 months |
| Peanut Butter Cups Pressed | – | Best same day | Freeze after baking |
Pro Tips and Troubleshooting for Peanut Butter Cup Cookies Recipe Success
Expert Baking Tips for Flawless Cookies
Even though this peanut butter cup cookies recipe is beginner-friendly, a few professional tricks can elevate your results from good to bakery-quality.
1. Use a Cookie Scoop for Uniformity
Uniform cookies not only look better, they bake evenly. A medium cookie scoop (about 1.5 tablespoons) ensures all cookies are the same size, helping them cook at the same rate and creating a consistent texture throughout.
2. Don’t Overmix After Adding Flour
Once the dry ingredients go in, mix just until incorporated. Overmixing activates the gluten, which can result in dense, tough cookies. The goal is a tender, chewy texture, not a cake-like consistency.
3. Chilling is a Must – Not a Suggestion
Skipping the chill step leads to flat cookies with greasy edges. Chill for at least 1 hour, and if making a double or triple batch, increase the chill time to 90 minutes or more.
4. Use a Cooling Rack After Freezing
Once the peanut butter cups are set in the freezer, transfer the cookies to a cooling rack. This helps keep the bottoms from getting too soft or soggy by allowing airflow underneath.
5. Don’t Let Dough Sit Out Too Long
After chilling, dough softens quickly at room temperature. Work in small batches if needed, keeping the rest of the dough in the fridge to maintain its firmness for easy rolling.
Common Mistakes to Avoid
Knowing what not to do is just as valuable as knowing the right steps. Let’s go over the most common issues bakers face with peanut butter cup cookies and how to fix them.
| Problem | Cause | Solution |
|---|---|---|
| Cookies spread too much | Dough not chilled or too much butter | Always chill the dough and measure ingredients carefully |
| Cookies are dry or crumbly | Overbaking or not enough fat | Bake only until edges are set, use full-fat peanut butter |
| Peanut butter cups melt too much | Cookies too hot when pressed | Let cookies cool for 5 minutes before adding candy |
| Cookies have uneven texture | Inconsistent dough size | Use a scoop for uniformity |
| Tough cookies | Overmixed dough | Mix dry ingredients until just combined |
Choosing the Right Peanut Butter
The type of peanut butter you use can seriously impact your cookie texture.
- Best Choice: Thick, non-natural creamy peanut butter (like commercial brands that don’t separate)
- Avoid: Oily or runny natural-style peanut butters — they can lead to greasy, dense cookies
- If Using Natural: Stir extremely well until fully incorporated, and make sure it’s thick, not drippy
Enhancing Flavor Naturally
For a deeper peanut butter flavor, let the dough rest in the refrigerator overnight. The extended chilling time allows the ingredients to marry, giving your cookies an even richer taste.
Variations, Customizations, and Occasion-Based Twists for Peanut Butter Cup Cookies
Creative Flavor Twists to Try
The classic peanut butter cup cookies recipe is already a hit, but you can customize it to match your preferences or seasonal vibes without losing that signature chewy center and melty chocolate top.
1. Chocolate Drizzle Finish
After pressing in the peanut butter cups and letting them set, drizzle a little melted semi-sweet or dark chocolate over the top. It adds a sophisticated look and a rich finish for chocolate lovers.
2. Stuffed Surprise Version
Roll two smaller dough balls around a mini peanut butter cup, enclosing it completely. Bake as normal. This twist creates a filled cookie with a hidden center – perfect for gifting or party trays.
3. Crunchy Peanut Texture
Add 1/4 cup of chopped salted peanuts to the dough for added texture and a salty crunch to balance the sweet. Make sure the peanuts are evenly distributed throughout the dough.
4. Sea Salt Topping
Sprinkle a few flakes of sea salt on top of each cookie right after pressing in the peanut butter cups. This enhances the sweet-salty flavor contrast and looks stunning.
Dietary Adaptations for Every Baker
Need to adjust this recipe to fit different dietary needs? Here are a few proven options:
1. Gluten-Free Peanut Butter Cup Cookies
Use a 1:1 gluten-free all-purpose flour substitute that contains xanthan gum. Brands made for baking usually work without needing extra adjustments.
2. Dairy-Free Version
Swap the unsalted butter for vegan butter or solid refined coconut oil. Just note that coconut oil might change the texture slightly, making the cookies a bit softer. Also, check that your peanut butter cups are dairy-free, or substitute them with a vegan chocolate-peanut butter candy.
3. Egg-Free Option
Use a flax egg (1 tablespoon ground flaxseed + 3 tablespoons water, let sit for 5 minutes) in place of the egg. The cookie may be slightly softer but still holds shape well.
Batch Scaling for Events and Gifting
Planning for a bake sale, party, or holiday gift box? This recipe scales beautifully. Just remember to increase chilling time proportionally:
| Batch Size | Chill Time | Yield |
|---|---|---|
| Single | 1 hour | 24 cookies |
| Double | 90 minutes | 48 cookies |
| Triple | 2 hours | 72 cookies |
For large batches, bake in batches using fresh parchment paper each time and allow cookie sheets to cool completely between rounds to prevent over-spreading.
Perfect for Every Occasion
This peanut butter cup cookies recipe is versatile enough to work for just about any event:
- Holidays: Wrap cookies in clear bags tied with festive ribbon
- Birthdays: Stack cookies and serve as edible party favors
- School Events: Easy to transport and allergen-aware (just be sure to label if peanut allergies are a concern)
- Gifting: Place a dozen in a bakery box with a handwritten tag — they freeze well, so they stay fresh until delivery
Conclusion: Why Peanut Butter Cup Cookies Belong in Your Baking Repertoire
Peanut butter cup cookies are more than just a fun treat — they’re a go-to recipe that delivers rich flavor, satisfying texture, and a little surprise in every bite. With simple ingredients, a foolproof process, and room for creativity, these cookies are perfect whether you’re baking for a cozy night in, a special occasion, or just to share something sweet.
By following the steps and tips outlined in this article, you’ll be equipped to bake them perfectly every time — chewy centers, melty peanut butter cups, and all. With thoughtful storage and freezing options, make-ahead tricks, and clever customizations, there’s no limit to how and when you can enjoy them.
Bake a batch today and taste the magic of this timeless combination — you just might find your new favorite cookie.