Peanut butter blossom cookies are a nostalgic American classic, beloved for their perfect blend of creamy peanut butter and a chocolate kiss nestled in the center. They show up in holiday cookie trays, school events, bake sales, and everyday kitchen moments. In this detailed guide, we’ll walk you through a fail-proof peanut butter blossom cookies recipe, offer insider baking tips, troubleshoot common issues, and suggest fun recipe twists for every occasion.
From choosing the right peanut butter to freezing techniques that preserve chocolate shape, we cover every angle. If you’ve ever struggled with flat cookies, hard dough, or melted chocolate centers, you’re in the right place. Our guide is packed with expert advice, nutrition facts, and answers to your most common questions about this timeless treat.
Contents
- 1 Introduction to Peanut Butter Blossom Cookies
- 2 Ingredients Breakdown for the Perfect Peanut Butter Blossom Cookies Recipe
- 3 Peanut Butter Blossom Cookies Recipe
- 4 Step-by-Step Instructions for Peanut Butter Blossom Cookies Recipe
- 5 Baking Tips for Consistently Perfect Results
- 6 Chocolate Kiss Center: How to Get It Just Right
- 7 Troubleshooting the Peanut Butter Blossom Cookies Recipe
- 8 Serving, Storing, and Freezing Peanut Butter Blossom Cookies
- 9 Peanut Butter Blossom Cookies Recipe Variations
- 10 Conclusion
Introduction to Peanut Butter Blossom Cookies
What Makes Peanut Butter Blossom Cookies So Special
Peanut butter blossom cookies combine the rich, salty-sweet flavor of peanut butter with a melty chocolate kiss. This iconic combo creates a crave-worthy contrast in taste and texture. What sets them apart is their unmistakable shape, sugar-rolled exterior, and cracked top that naturally forms as the cookies bake and puff up.
Even for beginner bakers, this cookie is an accessible entry point. The dough is simple, ingredients are pantry-friendly, and no special tools are required beyond a mixing bowl and baking sheet. The end result looks like something from a professional bakery.
These cookies are especially popular during the holidays but they’re delicious any time of year. Their appearance alone makes them a standout on dessert trays.
Brief History and Popularity of the Recipe
The peanut butter blossom cookie recipe was introduced in the 1950s by Freda Smith of Gibsonburg, Ohio. She submitted it to the Pillsbury Bake-Off competition in 1957. Even though it didn’t win first place, it quickly gained nationwide attention and has remained a staple in American households ever since.
Over the decades, the recipe has been adapted in countless ways—some add sprinkles or tinted sugar, others swap the chocolate kiss for peanut butter cups or caramel centers. Still, the original peanut butter blossom recipe holds its ground as the ultimate comfort cookie.
Ingredients Breakdown for the Perfect Peanut Butter Blossom Cookies Recipe
Essential Pantry Staples and Why They Matter
Every successful peanut butter blossom cookies recipe starts with high-quality, well-balanced ingredients. Understanding the purpose of each can take your cookies from good to bakery-quality.
Creamy Peanut Butter
This is the heart of the cookie. It brings moisture, richness, and the signature nutty flavor. Make sure to use a no-stir, shelf-stable peanut butter with stabilizers. Natural peanut butter tends to separate, which affects the dough’s texture and structure.
Unsalted Butter
Butter provides structure and enhances the overall flavor. Using unsalted butter gives you control over the cookie’s salt level. Always make sure it’s softened to room temperature so it creams easily with the sugars.
Granulated and Brown Sugars
Both sugars serve a distinct role. Granulated sugar helps the cookies hold their shape and gives them a slight crisp edge. Light brown sugar brings in moisture and chewiness thanks to its molasses content. The mix gives you that perfect soft-in-the-middle, slightly-crisp-on-the-outside result.
Egg and Vanilla Extract
The egg binds the ingredients together and helps with rise. Use a room-temperature egg for better integration. Vanilla extract rounds out the flavors, adding warmth and depth to the dough.
All-Purpose Flour
Flour gives your cookies structure. For best results, weigh your flour. If using cups, spoon the flour into the cup and level it with a knife. Avoid packing, which leads to dry cookies.
Baking Soda
This leavening agent helps the cookies rise and develop those classic cracks on top. It also reacts with the brown sugar’s acidity to create lightness in the final product.
Salt
Just a pinch balances the sweetness and enhances the peanut butter’s nutty taste.
Chocolate Kisses
The signature topping that turns this into a peanut butter blossom cookie. They’re pressed into the cookies just after baking to gently melt into place. Freeze them for 10 minutes before using if you’re worried about melting too fast.
Substitution Tips for Dietary Needs and Allergies
If you have dietary restrictions or want to make the recipe a bit healthier, here are a few safe swaps that still yield great-tasting cookies:
- Gluten-Free Flour: Use a 1-to-1 baking flour blend for a gluten-free option. Stick with blends that contain xanthan gum to mimic the structure of wheat flour.
- Vegan Substitute for Egg: Use a flax egg or unsweetened applesauce in place of the egg. One tablespoon of ground flaxseed mixed with three tablespoons of water equals one egg.
- Dairy-Free Butter: A plant-based baking butter or solid coconut oil can replace unsalted butter. Note that coconut oil will slightly alter the flavor.
Whatever adjustments you make, aim to keep the dough soft but firm. The consistency should allow you to roll it easily without it sticking too much to your hands.
Print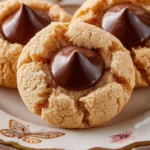
Peanut Butter Blossom Cookies Recipe
- Total Time: 30 minutes
- Yield: 36 cookies
Description
Soft, chewy peanut butter cookies rolled in sugar and topped with a Hershey’s chocolate kiss. This classic treat is perfect for holidays or everyday baking.
Ingredients
¾ cup creamy peanut butter (188g)
½ cup unsalted butter, softened (113g)
½ cup granulated sugar, plus more for rolling (100g)
½ cup packed light brown sugar (110g)
¼ teaspoon salt
1 large egg, room temperature
1 teaspoon vanilla extract
1½ cups all-purpose flour (180g)
½ teaspoon baking soda
36 Hershey’s chocolate kisses, unwrapped
Instructions
1. Preheat the oven to 375°F and line cookie sheets with parchment paper.
2. In a large mixing bowl, beat together the peanut butter, unsalted butter, granulated sugar, brown sugar, and salt until creamy.
3. Add the egg and vanilla extract. Beat until fully combined and scrape down the bowl.
4. Mix in the flour and baking soda until the dough comes together.
5. Scoop and roll dough into 1-inch balls, then roll in extra sugar.
6. Place the dough balls 2 inches apart on the baking sheets.
7. Bake for 8 to 10 minutes until puffed and cracked.
8. Immediately press a Hershey’s kiss into the center of each cookie.
9. Let cookies cool completely on the pan so the chocolate sets.
10. Store in an airtight container for up to one week.
Notes
Use room temperature ingredients for best results.
Avoid overbaking to keep cookies soft.
If desired, freeze Hershey’s kisses for 10 minutes before using to prevent melting.
Measure flour properly to avoid dry cookies.
Let kids help with unwrapping kisses and rolling dough for a fun baking activity.
- Prep Time: 20 minutes
- Cook Time: 10 minutes
- Category: Cookies Recipes
- Method: Baking
- Cuisine: American
Step-by-Step Instructions for Peanut Butter Blossom Cookies Recipe
Preparing Your Baking Station Like a Pro
Before you start mixing ingredients, setting up your space can save you time and prevent mistakes. Preheat your oven to 375°F (190°C) and line two baking sheets with parchment paper. This temperature allows the cookies to puff up, set quickly, and retain that perfect soft center.
Gather all your ingredients in advance. It’s helpful to measure everything out beforehand—this makes the process smoother and helps prevent missed ingredients.
Make sure your butter is softened but not melted, and your egg is at room temperature. This ensures the dough mixes evenly and gives a consistent texture to your cookies.
Set aside extra granulated sugar in a shallow dish for rolling the cookie dough balls later. This simple step creates the cookies’ signature sugary crust.
Mixing and Shaping Dough with Precision
Start by combining ¾ cup creamy peanut butter, ½ cup softened unsalted butter, ½ cup granulated sugar, ½ cup light brown sugar, and ¼ teaspoon salt in a large mixing bowl. Use a hand mixer or stand mixer fitted with the paddle attachment. Beat the mixture on medium speed until smooth and fluffy. This typically takes about 2 to 3 minutes.
Next, add 1 large egg and 1 teaspoon vanilla extract. Beat again until fully incorporated. Don’t forget to scrape down the sides of the bowl to ensure everything mixes evenly.
In a separate bowl, whisk together 1½ cups all-purpose flour and ½ teaspoon baking soda. Add the dry ingredients gradually to the wet mixture, beating on low speed until just combined. Overmixing at this stage can lead to tough cookies, so stop as soon as you see no dry patches.
Using a small cookie scoop or tablespoon, scoop the dough and roll it between your palms into 1-inch balls. Immediately roll each ball in the reserved granulated sugar to coat it evenly.
Place the dough balls on the prepared baking sheet, leaving about 2 inches of space between each one. This allows for spreading while they bake.
Bake in the preheated oven for 8 to 10 minutes, or until the cookies look puffed and slightly cracked on top. The edges should be just starting to turn golden, and the bottoms should feel set when gently lifted.
As soon as the cookies come out of the oven, press a Hershey’s chocolate kiss into the center of each cookie. Don’t wait too long—this helps the chocolate melt just enough to anchor it to the cookie. The heat will cause the cookie to crack slightly around the edges, which is a classic part of its look.
Allow the cookies to cool completely on the baking sheet. This helps the chocolate kiss firm back up without melting too much. Once cool, transfer them to an airtight container. They’ll stay fresh for up to one week at room temperature.
Baking Tips for Consistently Perfect Results
Common Mistakes to Avoid When Baking Blossom Cookies
Even the best peanut butter blossom cookies recipe can fall short if you make a few small errors. Avoiding these common missteps ensures your cookies bake up soft, flavorful, and beautiful every time.
Using Cold Butter or Eggs
Cold butter doesn’t cream well with sugars, leading to dense dough. Cold eggs don’t blend evenly into the mixture. Always start with room temperature ingredients. If you’re short on time, place the egg in warm water for 5 minutes and microwave butter on low power in 5-second intervals.
Overmeasuring Flour
Too much flour makes the cookies dry and crumbly. Use a kitchen scale if possible. If measuring by volume, spoon the flour into your measuring cup, then level it off with a knife. Don’t scoop directly from the bag or pack it into the cup.
Overbaking
Peanut butter blossoms are meant to be soft and chewy. Bake them just until the tops are puffed and cracked, and the bottoms are just beginning to brown. They may look slightly underdone when you remove them, but they will continue to cook as they cool on the pan.
Pressing the Kiss Too Late
If you wait too long to add the chocolate kiss after baking, it won’t adhere properly to the warm cookie. Press it in immediately after taking them out of the oven, so it gently melts and bonds to the top.
Skipping the Sugar Roll
That extra granulated sugar coating adds sparkle, texture, and a slight crunch to each bite. Skipping this step can make your cookies look flat and less polished.
Timing and Temperature Guidelines Explained
Perfect timing and temperature are everything in baking. Here’s a quick guide to help you master the process:
| Step | Temperature | Time |
|---|---|---|
| Preheat Oven | 375°F (190°C) | 10 minutes before baking |
| Baking Time | 375°F (190°C) | 8 to 10 minutes |
| Cooling on Sheet | Room Temp | Until chocolate sets (30 minutes) |
Be sure your oven is fully preheated before putting the cookies in. An oven thermometer is useful if your oven tends to run hot or cold.
Rotate the baking sheet halfway through baking if your oven has hot spots. This ensures even baking, especially if you’re making multiple trays.
Lastly, cool the cookies on the pan, not on a wire rack. This preserves their soft centers and helps the chocolate kisses stay firm after setting.
Chocolate Kiss Center: How to Get It Just Right
The Best Way to Press Hershey’s Kisses into the Cookies
The iconic chocolate kiss in the center is what transforms a basic peanut butter cookie into a true peanut butter blossom. To get that picture-perfect finish, timing is everything.
Once your cookies come out of the oven, act quickly. While they’re still warm and soft, press an unwrapped Hershey’s kiss straight down into the center of each cookie. Push gently, just until the base of the kiss is flush with the surface of the cookie. This allows the chocolate to melt slightly and bond without sliding off.
You’ll notice that the cookie naturally cracks around the kiss when you press it in. That’s exactly what you want. The cracks not only look appealing, but they also give a satisfying texture contrast in every bite.
If you press too hard or wait too long, the cookie might break or the kiss won’t stick well. Make it a smooth, confident motion right out of the oven for the best results.
Why Freezing the Chocolate Helps and When to Do It
Worried about the chocolate kisses melting or losing their shape? While most bakers find that standard, room-temperature kisses hold up just fine, freezing them adds extra protection—especially if your kitchen is warm or you’re baking multiple batches.
To do this, unwrap the kisses and place them in a single layer on a plate or small tray. Pop them in the freezer for about 10 to 15 minutes while you prepare and bake your cookie dough.
Frozen chocolate melts more slowly, which helps preserve the signature shape and swirl top even as it bonds to the warm cookie. Just make sure the kisses are unwrapped before freezing. Trying to unwrap cold chocolate can lead to cracked or broken tips.
This small step can make a big difference in how neat and professional your cookies look, especially for special events or gifting.
Using the right chocolate technique is what separates a decent cookie from a stunning one. It’s one of the most visually satisfying parts of this peanut butter blossom cookies recipe, so don’t skip the details.
Troubleshooting the Peanut Butter Blossom Cookies Recipe
Why Are My Cookies Dry, Flat, or Spreading Too Much?
Even when you follow a peanut butter blossom cookies recipe closely, issues can happen. Let’s break down common baking problems and how to fix them so your cookies come out soft, chewy, and beautifully shaped every time.
Cookies Are Too Dry
Dry peanut butter blossoms are usually caused by too much flour. Always measure flour by weight—180 grams for this recipe—or spoon and level it if using measuring cups. Packing the flour or scooping directly from the bag leads to dense dough.
Also, overbaking dries out the cookies. Remove them when they’re just puffed and the edges are slightly golden. They will firm up as they cool, so don’t wait until they look completely done.
Cookies Spread Too Much
If your cookies flatten too much during baking, it might be because the butter was too soft or melted. Over-creaming the butter and sugar can also cause excess spread. Mix just until smooth and fluffy—no more than 2 to 3 minutes.
Warm dough can also lead to spreading. If your kitchen is warm, chill the dough for 15 to 20 minutes before rolling into balls. This helps the cookies hold their shape better in the oven.
Cookies Are Too Flat and Thin
Too little flour or too much sugar can cause thin cookies. Make sure your measurements are accurate. Also, don’t skip the baking soda. It’s the leavening agent that helps give the cookies a lift. Without it, your dough won’t puff properly and may bake into a pancake.
Chocolate Kiss Falling Off or Melting
If the kisses slide off or melt into a puddle, it’s likely they weren’t pressed in soon enough or were too warm. Press them in immediately after removing the cookies from the oven, and consider using frozen kisses if your kitchen is especially warm.
Fixing Texture, Flavor, and Appearance Issues
Cookies Are Too Crumbly
This often means the dough is too dry or hasn’t been mixed thoroughly enough. Be sure to cream the butter and sugars well before adding the egg. Once the flour is added, mix only until it disappears into the dough.
Flavor Tastes Bland
Use a good quality vanilla extract and don’t skip the salt. Salt balances the sweetness and enhances the peanut butter flavor. Also, stick with creamy peanut butter that has some salt already in it. Natural peanut butter often lacks the structure and flavor needed for this recipe.
Cookies Don’t Crack on Top
That signature cracked surface happens when the dough puffs up and expands quickly in a hot oven. If your cookies stay smooth, check your baking soda for freshness. Make sure the oven is fully preheated to 375°F before the tray goes in. Cold dough and uneven oven temperature can also prevent cracking.
Once you troubleshoot and dial in these baking basics, your peanut butter blossom cookies recipe will turn out consistently delicious—and camera-ready—every single time.
Serving, Storing, and Freezing Peanut Butter Blossom Cookies
How to Keep Your Cookies Fresh and Chewy
Once your peanut butter blossom cookies have cooled completely and the chocolate kisses are set, proper storage is key to keeping them fresh and delicious. These cookies have a soft center and slightly crisp edge, so you want to maintain that balance.
Store the cookies in an airtight container at room temperature. Layer them with parchment paper if stacking, to prevent the kisses from smearing. Keep them away from direct sunlight or heat sources, which can cause the chocolate to soften or bloom.
Under ideal storage conditions, peanut butter blossom cookies stay fresh for up to 1 week. After that, the texture begins to dry out, though the flavor remains intact.
If you’re baking ahead for a party or holiday, it’s best to bake them fresh and store them in a cool, dry place until you’re ready to serve.
Freezing Tips for Long-Term Storage and Holiday Prep
These cookies freeze extremely well, which makes them perfect for holiday baking marathons or batch cooking. You can freeze them either before or after baking, depending on your needs.
Freezing Baked Cookies
Allow the cookies to cool completely. Arrange them in a single layer on a baking sheet and freeze for 1 to 2 hours. Once frozen, transfer them to a freezer-safe container or zip-top bag. Use parchment or wax paper between layers to avoid sticking. They’ll stay fresh in the freezer for up to 3 months.
To serve, let them thaw at room temperature for 1 to 2 hours. The chocolate kiss may take a bit longer to fully soften again, so plan accordingly if you’re serving them at an event.
Freezing Cookie Dough Balls
If you prefer to freeze the dough, roll it into 1-inch balls (without the sugar coating) and arrange on a baking sheet. Freeze until solid, then transfer to a freezer bag. When ready to bake, roll them in sugar and place them directly on a prepared baking sheet. Bake from frozen, adding an extra 1 to 2 minutes to the bake time.
This method is perfect if you want warm, freshly baked cookies anytime without starting from scratch.
Freezing Chocolate Kisses
While not necessary, you can also freeze the chocolate kisses ahead of time. This helps them hold their shape better when pressed into warm cookies. Simply unwrap them and freeze in a zip-top bag for 10 to 15 minutes before use.
With these storage and freezing tips, your peanut butter blossom cookies recipe becomes more than a one-day treat. It transforms into a convenient, go-to solution for surprise guests, packed lunches, or stress-free entertaining.
Peanut Butter Blossom Cookies Recipe Variations
Festive Variants: Colored Sugar and Flavored Kisses
Want to give your peanut butter blossom cookies a fun twist? Try rolling the dough in colored sugar like red or green before baking. It adds sparkle and seasonal flair, perfect for holidays.
You can also switch out the classic milk chocolate kiss for flavored varieties like dark chocolate, peppermint, or caramel. These simple swaps instantly create new versions of this beloved treat.
Miniature peanut butter blossoms made with smaller dough balls and mini chocolate kisses are also a hit, especially for parties or kid-friendly snacks.
Healthier and Allergy-Friendly Swaps
Need to adjust the recipe? No problem.
- Gluten-Free: Use a 1:1 gluten-free flour blend.
- Dairy-Free: Swap in plant-based butter and dairy-free chocolate.
- Low Sugar: Reduce the sugar slightly or use alternatives like coconut sugar.
- Vegan: Use a flax egg and plant-based ingredients.
These small changes let everyone enjoy a version of this peanut butter blossom cookies recipe that works for their lifestyle.
Conclusion
Whether you’re baking for a holiday gathering, family dessert night, or just because you love a good cookie, this peanut butter blossom cookies recipe is a must-have in your kitchen rotation. It’s easy to follow, delivers consistent results, and leaves you with soft, chewy cookies topped with the perfect chocolate kiss in every bite.
From mastering your ingredients to troubleshooting common baking problems, you’ve now got all the tools to bake peanut butter blossoms like a pro. And with fun variations and allergy-friendly swaps, this timeless cookie can fit just about any occasion or dietary need.
Let everyone in your home get involved—rolling dough, unwrapping kisses, or sneaking warm cookies off the tray. That’s the kind of joy that makes baking these cookies just as sweet as eating them.