Get ready to master the ultimate marble cupcake recipe—a perfect swirl of vanilla and chocolate in one moist, flavorful cupcake. Whether you’re baking for birthdays, holidays, or just because, these Marble Cupcakes deliver on taste, texture, and wow-factor. From the soft, fluffy base to the creamy, two-tone buttercream, we’ll cover each step in detail.
Contents
- 1 Understanding Marble Cupcakes
- 2 Marble Cupcake Recipe with Swirled Buttercream
- 3 Ingredients Breakdown and Tips
- 4 Making the Vanilla Batter
- 5 Creating the Chocolate Swirl
- 6 Baking the Marble Cupcakes to Perfection
- 7 Making Swirled Swiss Meringue Buttercream
- 8 Piping the Perfect Swirl
- 9 Storing, Freezing, and Reheating Cupcakes
- 10 Conclusion: Bake and Swirl Your Way to Sweet Perfection
- 10.1 Are Marble Cupcakes better with oil or butter?
- 10.2 What to add to Marble Cupcakes to make them better?
- 10.3 How to make Marble Cupcakes smooth on top?
- 10.4 What temperature do you bake Mary Berry cupcakes?
- 10.5 Can I make marble cupcakes without a mixer?
- 10.6 Why are my Marble Cupcakes dry?
- 10.7 Can I skip the chocolate batter?
- 10.8 How do I know when Swiss meringue is ready?
- 10.9 What’s the best piping tip for buttercream swirls?
- 10.10 Can I use this recipe for a cake instead of Marble Cupcakes?
Understanding Marble Cupcakes
What Is a Marble Cupcake?
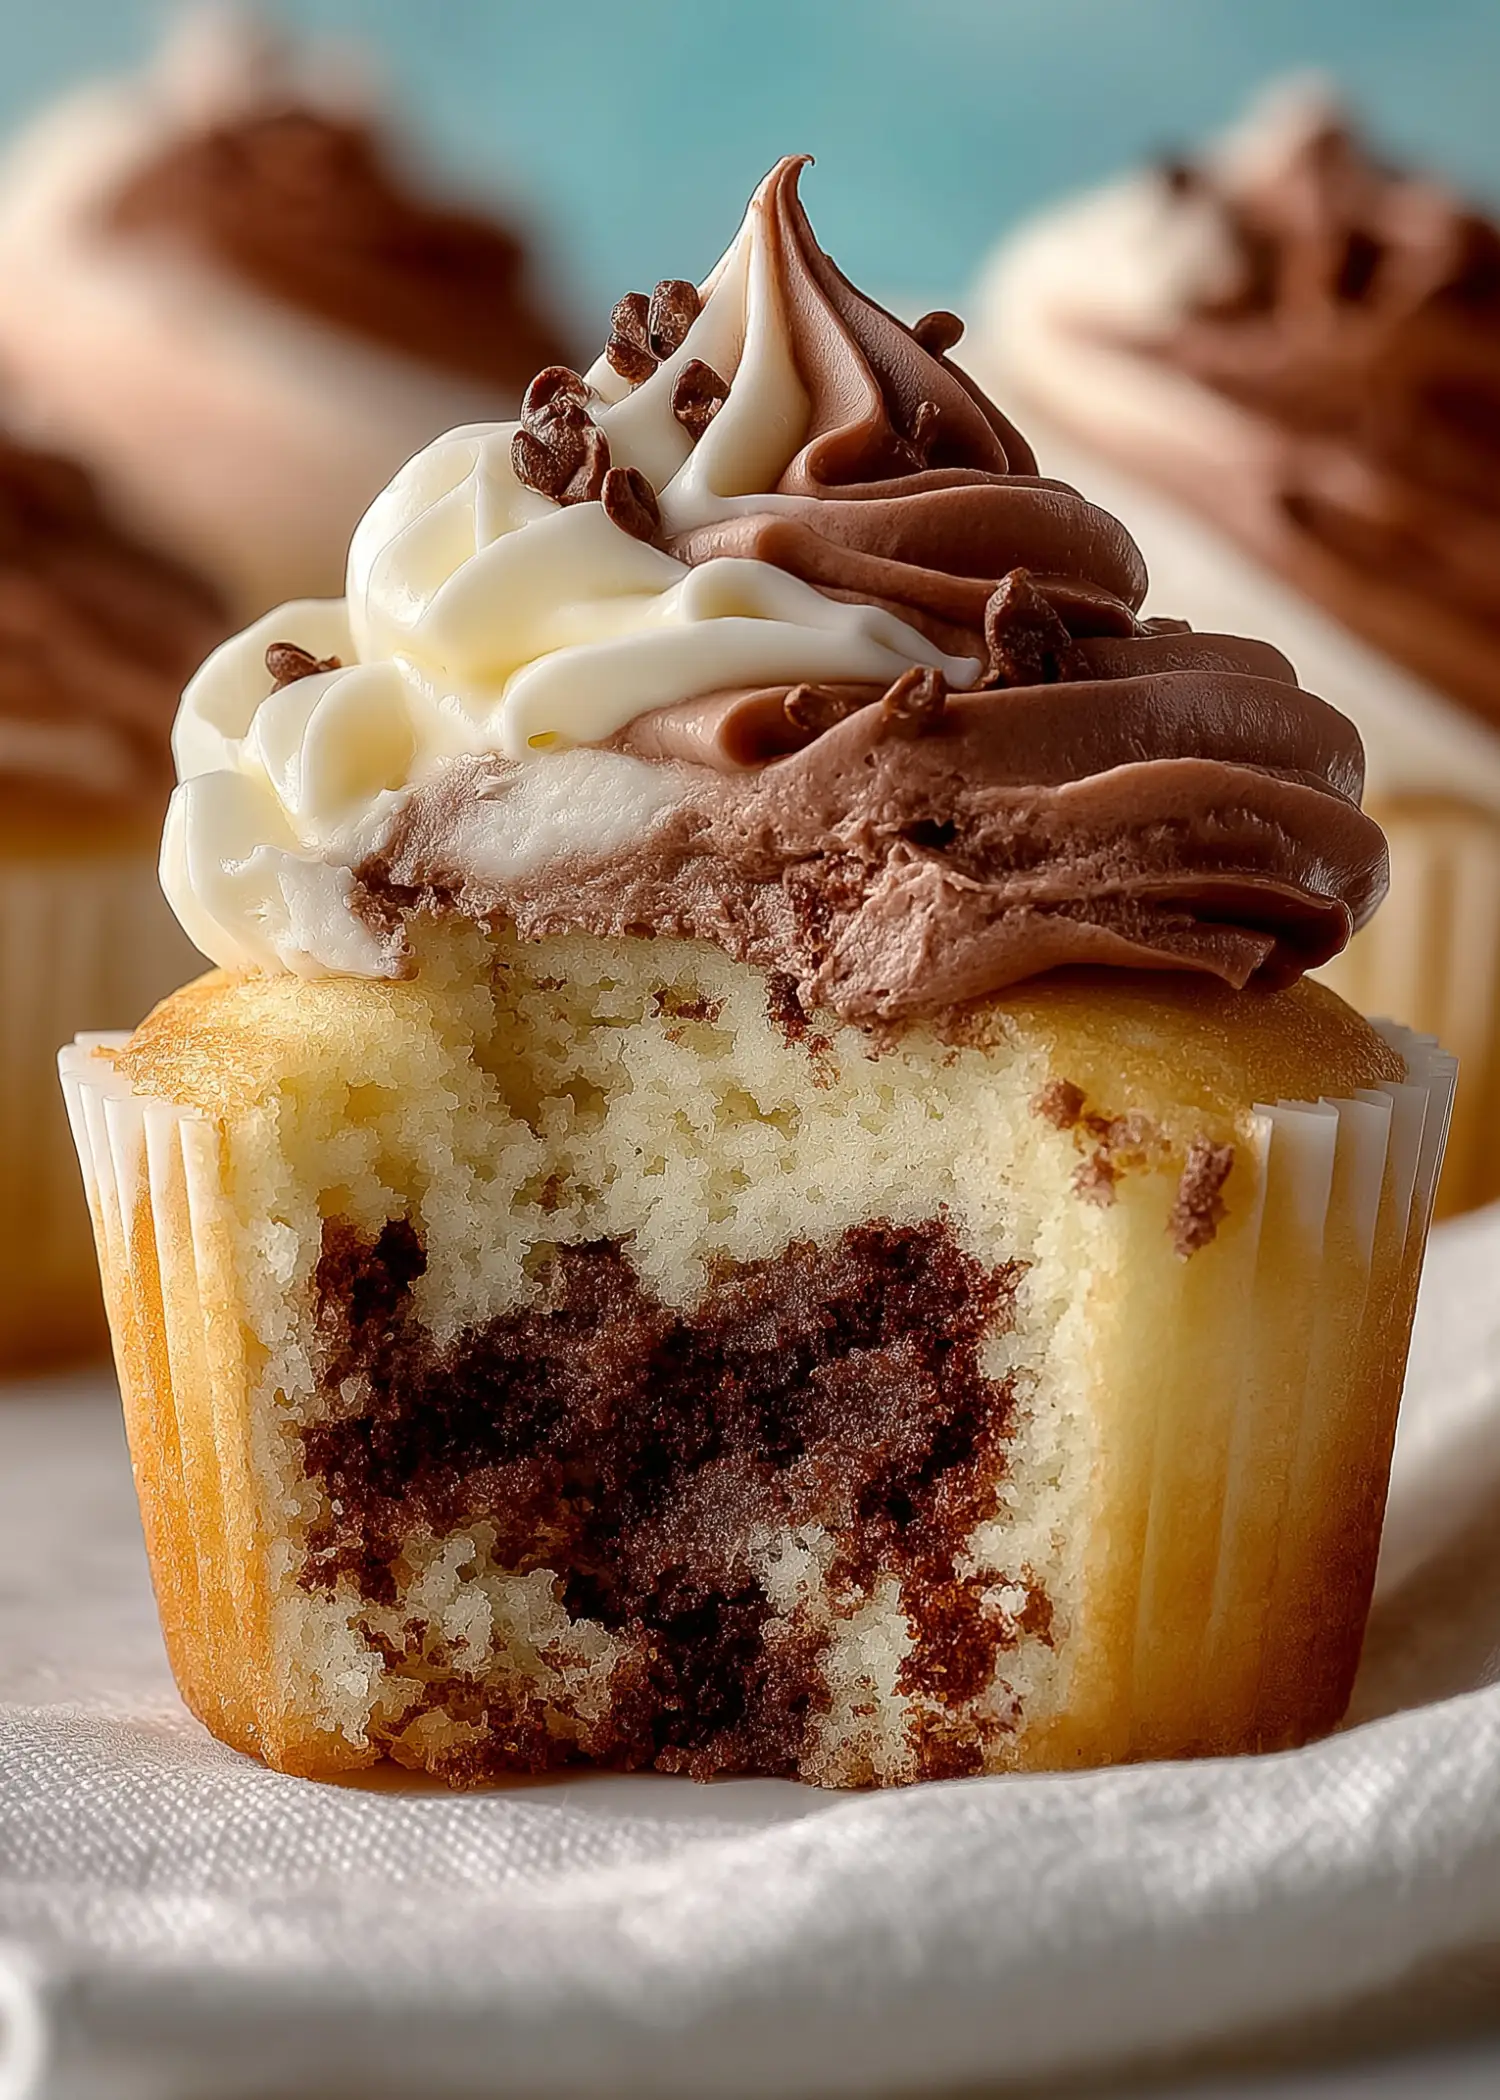
A marble cupcake is a blend of vanilla and chocolate batters swirled together in one cupcake liner. The swirl creates a unique marble effect, giving each cupcake its own design. You get two classic flavors in every bite without making two separate batches.
Why Choose a Marble Cupcake Recipe?
Marble cupcakes are visually stunning and incredibly tasty. They’re ideal for indecisive eaters and make an elegant upgrade from plain vanilla or chocolate cupcakes. Plus, you only need one base batter-less work with double the flavor.
Print
Marble Cupcake Recipe with Swirled Buttercream
- Total Time: 36 minutes
- Yield: 12 cupcakes
- Diet: Vegetarian
Description
Moist marble cupcakes swirled with rich chocolate and vanilla, topped with a two-toned Swiss meringue buttercream. A perfect dessert for any occasion.
Ingredients
VANILLA BATTER:
1⅔ cups (200g) all-purpose flour
½ tsp baking powder
¼ tsp baking soda
½ tsp salt
½ cup (113g) unsalted butter, melted and cooled
1 cup (200g) granulated sugar
1 large egg, room temperature
¼ cup (61g) full-fat yogurt or sour cream
¾ cup (180mL) whole milk or cream
1 tsp vanilla extract
CHOCOLATE BATTER:
½ cup vanilla batter
1½ tbsp (8g) unsweetened cocoa powder
1 tbsp (15mL) whole milk or cream
SWISS MERINGUE BUTTERCREAM:
6 large egg whites
1½ cups (300g) granulated sugar
1½ cups (340g) unsalted butter, softened
2 tsp vanilla extract
⅛ tsp salt
3 oz (85g) semi-sweet chocolate, melted and cooled
Instructions
1. Preheat oven to 350ºF (177ºC) and line a 12-count cupcake tray.
2. Whisk together flour, baking powder, baking soda, and salt in a bowl.
3. In another bowl, beat melted butter, sugar, egg, yogurt, milk, and vanilla until smooth.
4. Slowly mix dry ingredients into the wet ingredients just until combined. Fold gently to remove lumps.
5. Remove ½ cup of the vanilla batter, mix it with cocoa powder and milk to make the chocolate batter.
6. Layer batters in liners: 1 tbsp vanilla, 1 tsp chocolate, repeat. Fill only ⅔ to ¾ full.
7. Swirl batters with a toothpick using gentle figure-eight motion.
8. Bake for 15–17 minutes until a toothpick comes out mostly clean. Cool completely.
9. To make buttercream, whisk egg whites and sugar over simmering water until dissolved and 160ºF.
10. Whip to stiff peaks, then beat in butter one tablespoon at a time. Add vanilla and salt.
11. Split the buttercream. Add cooled chocolate to one half, mix until combined.
12. Pipe swirled frosting using both buttercreams side-by-side in a piping bag fitted with a 1M or 2D tip.
Notes
Use full-fat dairy for moist cupcakes.
Do not use egg whites from a carton—fresh only.
Ensure all frosting equipment is grease-free.
Cupcakes keep for 3 days at room temperature or 5 days refrigerated.
Freeze for up to 3 months.
- Prep Time: 20 minutes
- Cook Time: 16 minutes
- Category: Dessert
- Method: Baking
- Cuisine: American
Ingredients Breakdown and Tips
Essential Ingredients for Vanilla and Chocolate Batters
To nail this marble cupcake recipe, start with high-quality, full-fat ingredients. Here’s what you’ll need and why each one matters:
| Ingredient | Purpose |
|---|---|
| All-purpose flour (1⅔ cups) | Forms the structure of the cupcake. Measure it properly to avoid dense texture. |
| Baking powder & baking soda | Help the cupcakes rise evenly and stay fluffy. |
| Salt (½ tsp) | Balances sweetness and enhances flavor. |
| Unsalted butter (½ cup) | Adds richness and moisture. Melted butter ensures a smoother batter. |
| Granulated sugar (1 cup) | Sweetens the cupcakes and aids in structure. |
| Large egg (1) | Binds everything together and adds richness. |
| Full-fat yogurt or sour cream (¼ cup) | Keeps cupcakes super moist. Don’t substitute with low-fat! |
| Whole milk or cream (¾ cup total) | Adds moisture and keeps the crumb tender. |
| Vanilla extract (1 tsp) | Provides the main flavor base in the vanilla batter. |
For the chocolate swirl:
- Cocoa powder (1½ tbsp) – Delivers a bold chocolate flavor with minimal effort.
- Whole milk (1 tbsp) – Loosens the chocolate batter just enough to swirl smoothly.
Using full-fat dairy is essential because it offsets the moisture lost from using melted butter. If you go for low-fat alternatives, the Marble Cupcakes can turn out dry and crumbly.
Why Full-Fat and Room-Temperature Ingredients Matter
When your ingredients are all at room temperature, they blend more easily. Cold eggs or yogurt can cause your batter to seize or separate. The result? Uneven texture and poor rise.
Here’s a quick trick to bring eggs to room temp fast: place them in a bowl of warm water for 5–10 minutes. For dairy, let it sit on the counter while you prep other ingredients.
Using unsalted butter gives you full control over the salt levels. Salted butter can make the cupcakes overly salty, especially when combined with salt already in the recipe.
Smart Substitutions (if you’re in a pinch)
- No yogurt or sour cream? Try full-fat buttermilk.
- No whole milk? A 50/50 mix of cream and water will mimic the fat content.
- Vegan swap needed? Use plant-based butter and dairy alternatives but expect a slightly different texture.
By understanding what each ingredient does, you gain better control over the outcome. Great cupcakes start with smart choices at the ingredient level.
Check out how different dairy options affect cupcake texture in our related guide:
(Note: This would link to a future or cornerstone dairy guide if available.)
Making the Vanilla Batter
Step-by-Step Guide to Mixing the Base Batter
The vanilla batter is the foundation of this marble cupcake recipe. Here’s how to get it just right:
- Preheat your oven to 350ºF (177ºC) and line a 12-count cupcake pan with paper liners. This ensures your Marble Cupcakes bake evenly and release cleanly.
- Whisk the dry ingredients in a large bowl:
- 1⅔ cups all-purpose flour
- ½ teaspoon baking powder
- ¼ teaspoon baking soda
- ½ teaspoon salt
Set this bowl aside.
- In another large bowl, beat the wet ingredients:
- ½ cup melted and cooled unsalted butter
- 1 cup granulated sugar
- 1 large room-temperature egg
- ¼ cup full-fat yogurt or sour cream
- ¾ cup whole milk or cream
- 1 teaspoon vanilla extract
- Combine wet and dry ingredients.
Reduce the mixer speed to low and gradually add the dry mix into the wet. Mix until just combined—do not overbeat. - Final folding.
Using a large spatula, gently fold the batter. Scrape along the sides of the bowl to press out any remaining flour lumps. Small lumps are fine; overmixing is not.
Pro Tips to Avoid Overmixing
Overmixed batter equals tough cupcakes. The key to tender, soft cupcakes lies in minimal handling after combining the ingredients. Here’s how to avoid going too far:
- Stop mixing as soon as you no longer see dry flour.
- Fold, don’t stir aggressively, during the final mix.
- If using a stand mixer, don’t walk away—keep it on low and mix briefly.
If you’re baking without a mixer, don’t worry. This batter comes together beautifully with just a whisk and a spatula. In fact, hand-mixing gives you more control and helps prevent overmixing altogether.
Discover great ideas like adjusting mixing times for high-altitude baking in our cupcake troubleshooting guide.
Creating the Chocolate Swirl
Transforming Vanilla Batter into Chocolate
Here’s where the marble cupcake recipe gets its magic. Instead of making a whole separate chocolate batter, you’ll just modify a portion of the vanilla base.
Steps:
- Scoop out ½ cup of your vanilla batter and place it into a separate small bowl.
- Add:
- 1½ tablespoons (8g) unsweetened cocoa powder
- 1 tablespoon (15mL) whole milk or cream
- Stir until fully combined. The consistency should match your vanilla batter to swirl properly.
This simple change gives you a rich, chocolatey batter without having to start from scratch. It’s smooth, quick, and keeps the process efficient.
How to Layer and Swirl the Batters
Now that you’ve got both vanilla and chocolate batters ready, it’s time to create that signature swirl in your Marble Cupcake liners.
Here’s how to do it:
- Add 1 heaping tablespoon of vanilla batter to each cupcake liner.
- Spoon in 1 heaping teaspoon of chocolate batter right on top of the vanilla.
- Repeat with another scoop of vanilla and chocolate, layering carefully.
- By now, your Marble Cupcake liners should be ⅔ to ¾ full.
- Use a toothpick or cake tester to gently swirl the batters.
- Avoid circular motions. Instead, try an “S” or zigzag pattern for that authentic marbled look.
Important Tip:
Swirl just enough to combine the colors, not so much that the batters fully blend. The contrast between chocolate and vanilla should still be visible after baking.
If you over-swirl, you’ll lose the visual definition and the cupcakes might look more like a muddled chocolate batter.
Troubleshooting Swirl Technique
| Problem | Fix |
|---|---|
| Batters blend too much | Swirl more gently and less frequently. |
| Chocolate batter sinks | Make sure both batters are the same consistency before layering. |
| Uneven bake | Ensure each cupcake liner is filled to the same level. Use scoops for accuracy. |
Don’t miss our guide on how to use cookie scoops for perfect portioning in every cupcake (link to relevant cornerstone if available).
Now that your Marble Cupcake are marbled and ready, it’s time to bake them to golden perfection in the next section.
Baking the Marble Cupcakes to Perfection
Oven Temperatures and Bake Times
You’ve layered and swirled the batters, now it’s time to bring those cupcakes to life. Baking is a science, and even the best marble cupcake recipe can fail with the wrong temperature or time.
Here’s what you need to know:
- Bake at 350ºF (177ºC) for 15–17 minutes.
- The tops should appear slightly golden and bounce back when gently touched.
- Insert a toothpick or cake tester into the center. If it comes out with a few moist crumbs (not wet batter), they’re done.
Every oven runs differently, so keep an eye on them after the 14-minute mark. Avoid opening the oven door early, as it can cause the cupcakes to sink.
If you’re using a dark or nonstick pan, your Marble Cupcake may bake faster. Consider reducing the temperature by 5ºF or checking for doneness a minute or two earlier.
Common Mistakes and Fixes
Even seasoned bakers can run into trouble. Here’s how to troubleshoot before, during, or after the bake:
| Mistake | Cause | Fix |
|---|---|---|
| Cupcakes sink in the middle | Underbaking or opening the oven too early | Let them bake fully and don’t peek until after 14 minutes |
| Dry texture | Overbaking or low-fat dairy used | Use full-fat milk and yogurt, and test doneness early |
| Cupcakes overflow | Overfilled liners | Fill only ⅔ to ¾ full and use a scoop for consistency |
| Uneven cupcakes | Oven hot spots or uneven batter | Rotate pan halfway through baking (carefully), use scoops |
Quick tip: Don’t rush to remove the Marble Cupcake from the pan. Let them cool in the tray for 5 minutes before transferring them to a wire rack. This helps them firm up without drying out.
Once cooled completely, you’re ready for the best part: the frosting.
Making Swirled Swiss Meringue Buttercream
The Double Boiler Method Explained
Swiss meringue buttercream is silky, stable, and not overly sweet—perfect for our marble cupcake recipe. Unlike American buttercream, this version uses cooked egg whites for a smooth texture that pipes beautifully.
Here’s how to make it step by step:
1. Prep your equipment.
Wipe down your mixing bowl, whisk, and any spatulas with vinegar or lemon juice. Even a bit of grease will ruin the meringue.
2. Create a double boiler.
Place a small saucepan with 1–2 inches of water over medium heat. Set a large heatproof bowl (or your stand mixer bowl) on top, ensuring the bottom doesn’t touch the water.
3. Combine and heat the base.
In that bowl, whisk together:
- 6 large egg whites
- 1½ cups granulated sugar
Whisk constantly until the mixture becomes frothy and sugar fully dissolves. It should feel smooth when rubbed between your fingers and reach 160ºF (71ºC) if using a thermometer.
4. Whip the meringue.
Move the bowl to your stand mixer fitted with the whisk attachment. Beat on high speed for 10–15 minutes until you see medium-stiff peaks. The bowl should be cool or just slightly warm.
Adding Chocolate to Half the Buttercream
Now comes the butter:
5. Add butter gradually.
Reduce speed to low and add:
- 1½ cups (340g) unsalted butter, 1 tablespoon at a time
If the mixture curdles, just keep mixing—it will come together. Once all butter is in, turn speed to high and whip until smooth and fluffy.
6. Flavor the buttercream.
Add:
- 2 teaspoons vanilla extract
- ⅛ teaspoon salt
Whip until fully combined.
7. Create the swirl.
Melt 3 oz of semi-sweet chocolate, let it cool, then stir it into half of the buttercream until evenly mixed. You now have one bowl of vanilla and one bowl of chocolate buttercream.
This dual-flavor buttercream is key to complementing the marble effect inside the Marble Cupcakes. The light, whipped texture won’t overpower the cupcake, and the swirl makes the presentation stunning.
Pro Tip: If you’re short on time or want to simplify, you can use just one flavor of buttercream—vanilla, chocolate, or even store-bought.
Looking for a simplified buttercream variation? Don’t miss our one-bowl frosting hacks for busy bakers.
Piping the Perfect Swirl
Filling and Holding the Piping Bag
To create a two-tone frosting swirl, fill one side of your piping bag with vanilla buttercream and the other with chocolate buttercream. Use a tall glass to hold the bag open for easy filling. Gently press the frosting down to remove air pockets and twist the top closed.
A Wilton 1M or 2D tip works great for a bakery-style finish.
Decorating Techniques for a Professional Look
Hold the piping bag straight up over the center of the Marble Cupcake. Apply even pressure and swirl from the outside in. One fluid motion gives the best results.
Want to elevate the look? Add toppings like chocolate chips, sprinkles, or shaved chocolate. Clean the tip between cupcakes for neat swirls.
Your cupcakes are now topped and ready to impress!
Storing, Freezing, and Reheating Cupcakes
Best Practices for Storing Cupcakes
Once frosted, your marble cupcakes can be stored:
- At room temperature (in an airtight container) for up to 3 days
- In the fridge for up to 5 days
Keep them in a single layer to preserve the buttercream swirl. If your kitchen runs warm, refrigeration is the better choice.
Let refrigerated cupcakes sit at room temperature for 30 minutes before serving to bring back the soft texture and full flavor.
How to Freeze and Thaw Without Losing Texture
Freeze frosted or unfrosted cupcakes:
- Place them on a tray in a single layer and freeze until solid
- Wrap individually in plastic, then store in a freezer-safe bag or container
They’ll stay fresh for up to 3 months
To thaw:
- Place in the fridge overnight
- Or thaw at room temp for a few hours, uncovered, to avoid condensation
Frozen buttercream may need a quick swirl touch-up after thawing, but the taste and texture will remain excellent.
Check out our freezer-friendly dessert guide for tips on long-term storage success.
Conclusion: Bake and Swirl Your Way to Sweet Perfection
This marble cupcake recipe brings together the best of both worlds—rich chocolate and classic vanilla—in one beautifully swirled, moist cupcake. With simple ingredients, easy-to-follow steps, and a show-stopping two-tone buttercream, you can create a dessert that’s both visually stunning and incredibly satisfying.
Whether you’re baking for a party, a holiday, or a weekend treat, these Marble Cupcakes are sure to impress. And once you master the swirling technique and creamy Swiss meringue buttercream, you’ll want to make them again and again—with your own delicious twists.
For More Delicious And Easy Recipes Follow Me In Facebook And Pinterest.
Are Marble Cupcakes better with oil or butter?
Both have their benefits. Butter gives cupcakes a rich flavor and a denser crumb, which is perfect for a recipe like this one. Oil adds more moisture and can make cupcakes softer, but it doesn’t deliver the same deep flavor as butter. For marble cupcakes where taste and structure matter, butter is the better choice.
What to add to Marble Cupcakes to make them better?
Enhance cupcakes with full-fat dairy, high-quality vanilla extract, or even a spoonful of sour cream or yogurt for extra moisture. Toppings like ganache, fruit compote, or flavored buttercream can also take them to the next level. For a texture boost, try folding in mini chocolate chips or chopped nuts.
How to make Marble Cupcakes smooth on top?
To get a smooth cupcake top:
– Don’t overfill the liners (aim for ⅔ to ¾ full)
– Tap the tray gently before baking to level the batter
– Bake at a steady, even temperature
Avoid overmixing, as that can cause uneven rising or doming.
What temperature do you bake Mary Berry cupcakes?
Mary Berry’s cupcake recipes typically bake at 350°F (180°C), the same as this marble cupcake recipe. It ensures even cooking and a golden finish without overbaking.
Can I make marble cupcakes without a mixer?
Yes. The batter can be made by hand with a whisk and spatula. Just make sure everything is well combined. A mixer helps with buttercream, but isn’t required for the cupcakes themselves.
Why are my Marble Cupcakes dry?
Usually from overbaking or using low-fat ingredients. Always use full-fat milk or yogurt and watch your bake time carefully.
Can I skip the chocolate batter?
Definitely. You can make all-vanilla cupcakes or convert the entire batter to chocolate by adding cocoa powder and milk.
How do I know when Swiss meringue is ready?
It should be smooth, glossy, and form stiff peaks. If you’re unsure, use a thermometer—the egg white mixture should reach 160ºF (71ºC) before whipping.
What’s the best piping tip for buttercream swirls?
A Wilton 1M or 2D piping tip creates a clean, beautiful swirl. Ideal for soft but structured buttercream like Swiss meringue.
Can I use this recipe for a cake instead of Marble Cupcakes?
Yes! Just pour the batter into a greased cake pan and adjust the baking time (around 30–35 minutes depending on size).
