Looking for a light, fruity dessert that’s easy to make? This kiwi cake recipe brings a fresh twist to traditional baking. Using real kiwi fruit for natural sweetness and tang, this cake is soft, moist, and topped with a creamy yogurt frosting. It’s perfect for family meals, celebrations, or just when you want something different
Contents
- 1 Introduction to Kiwi Cake Recipe
- 2 Ingredients Breakdown for the Best Kiwi Cake Recipe
- 3 Kiwi Cake Recipe
- 4 Step-by-Step Guide to Making Kiwi Cake
- 5 Whipping Up the Creamy Kiwi Frosting
- 6 Presentation and Garnishing Tips
- 7 Variations of the Kiwi Cake Recipe
- 8 Storing and Serving Suggestions
- 9 Common Kiwi Cake Mistakes and Fixes
- 10 Conclusion
Introduction to Kiwi Cake Recipe
Why Make a Kiwi Cake?
Kiwi adds a naturally sweet, slightly tart flavor that makes cakes stand out. It blends well in batter and gives a nice green hue without food coloring. This kiwi cake recipe is simple and makes a moist, delicious dessert.
Is Kiwi Cake Healthy?
Yes. Kiwi is packed with Vitamin C, fiber, and antioxidants. Paired with Greek yogurt and honey in the frosting, it’s a lighter alternative to heavier cakes.
Ingredients Breakdown for the Best Kiwi Cake Recipe
Essential Dry Ingredients and Their Roles
To get the perfect texture in your kiwi cake, your dry ingredients must be balanced. Here’s what you’ll need:
- All-purpose flour (1 ¼ cups): This forms the base of the cake and gives it structure.
- Cornstarch (¼ cup): Lightens the crumb and makes the cake softer by reducing the protein content of the flour.
- Baking powder (1 ½ teaspoons) and baking soda (½ teaspoon): These leavening agents work together with the acid from the kiwi to help the cake rise and stay fluffy.
- Salt (½ teaspoon): Enhances all the flavors and balances the sweetness.
- Granulated sugar (½ cup): Sweetens the cake without overpowering the kiwi flavor.
This blend of dry ingredients ensures your kiwi cake recipe turns out soft, light, and balanced in taste.
Wet Ingredients and Flavor Enhancers
Moisture and flavor come from a mix of fresh and rich components. Here’s what makes this cake shine:
- Fresh kiwi fruit (10 oz, pureed): The star of the show, kiwi brings moisture, natural acidity, and fruity notes. Be sure to measure ¾ cup of puree for best results.
- Honey (¼ cup): Adds a warm sweetness and helps the cake stay moist longer.
- Butter (¼ cup, melted): Gives richness and enhances texture. Melted butter mixes easily with the other ingredients.
- Vanilla extract (½ tablespoon): Rounds out the flavor with a classic, comforting note.
- Eggs (2): Provide structure, richness, and help bind everything together.
These ingredients combine for a balanced batter that highlights kiwi without overwhelming it, making this one of the most refreshing fruit cake recipes you’ll ever bake.
Print
Kiwi Cake Recipe
- Total Time: 35 minutes
- Yield: 10 slices 1x
- Diet: Vegetarian
Description
A moist and fruity kiwi cake topped with creamy yogurt frosting.
Ingredients
1 ¼ cups all-purpose flour
¼ cup cornstarch
½ cup sugar
2 eggs
10 oz kiwi (pureed)
¼ cup honey
¼ cup butter, melted
1 ½ tsp baking powder
½ tsp baking soda
½ tsp salt
½ tbsp vanilla extract
Instructions
1. Preheat oven to 350°F and line a 9-inch pan.
2. Whisk dry ingredients together.
3. Blend kiwi with eggs, honey, butter, and vanilla.
4. Mix wet and dry ingredients until smooth.
5. Bake for 24–26 minutes. Let cool.
6. Beat cream cheese, yogurt, vanilla, and sugar.
7. Frost and top with kiwi slices.
Notes
Store in the refrigerator for up to 3 days.
Best served chilled.
- Prep Time: 10 minutes
- Cook Time: 25 minutes
- Category: Dessert
- Method: Baking
- Cuisine: American
Nutrition
- Serving Size: 1 slice
- Calories: 278
- Sugar: 26g
- Sodium: 256mg
- Fat: 9g
- Saturated Fat: 5g
- Unsaturated Fat: 3g
- Trans Fat: 0.2g
- Carbohydrates: 50g
- Fiber: 3g
- Protein: 5g
- Cholesterol: 25mg
Step-by-Step Guide to Making Kiwi Cake
Preparing the Batter with Fresh Kiwi
Making this kiwi cake recipe is simple if you follow a few key steps. First, gather your ingredients and prep your workspace:
- Preheat the oven to 350°F and position the rack in the center.
- Grease and line a 9-inch cake pan with parchment paper for easy release.
- In a large bowl, whisk together dry ingredients: flour, cornstarch, sugar, baking powder, baking soda, and salt.
- In a food processor or blender, puree the peeled kiwi fruit. Measure ¾ cup of puree. Avoid over-pureeing to keep texture smooth but not watery.
- In a separate bowl, whisk the eggs, then mix in honey, melted butter, and vanilla extract.
- Add the kiwi puree to the wet mixture and whisk until fully blended.
This batter comes together quickly and should look light green and slightly thick.
Baking Tips to Achieve the Perfect Texture
Now it’s time to bake your fresh kiwi creation:
- Pour the batter into the prepared cake pan and smooth the top with a spatula.
- Bake for 24 to 26 minutes, or until a toothpick inserted in the center comes out clean or with just a few moist crumbs.
- Let the cake cool in the pan for 10 minutes, then transfer it to a wire rack to cool completely.
Avoid overbaking—kiwi contains natural enzymes that can keep the cake tender if not overheated. The finished cake should be soft, lightly golden on top, and springy to the touch.
Whipping Up the Creamy Kiwi Frosting
Ingredients for the Cream Cheese Yogurt Frosting
This cake shines with a light, tangy topping that complements the natural sweetness of the kiwi. Here’s what you’ll need for the frosting:
- Cream cheese (4 oz): Provides richness and a slightly tangy base that pairs beautifully with fruit.
- Greek yogurt (¾ cup): Adds creaminess, protein, and a mild tartness that balances the sweet notes in the cake.
- Vanilla extract (½ teaspoon): Enhances the overall flavor with a smooth, classic aroma.
- Confectioners’ sugar (⅓ cup): Sweetens the frosting without making it too heavy.
This blend creates a smooth, spreadable topping with fewer calories than traditional buttercream.
How to Get a Smooth and Fluffy Finish
Follow these steps for a light and creamy frosting:
- In a medium bowl, use a hand or stand mixer with a paddle or whisk attachment.
- Beat together the cream cheese, Greek yogurt, and vanilla extract on medium speed until smooth and lump-free.
- Add the confectioners’ sugar and mix on low speed for 30 seconds. Then increase to high speed until the frosting becomes light and fluffy, about 1 to 2 minutes.
Once your cake has cooled completely, frost the top and decorate with fresh kiwi slices. For a minimalist look, leave the sides bare—this “naked cake” style is lighter and elegant. Want more coverage? Simply double the frosting to fully coat the cake.
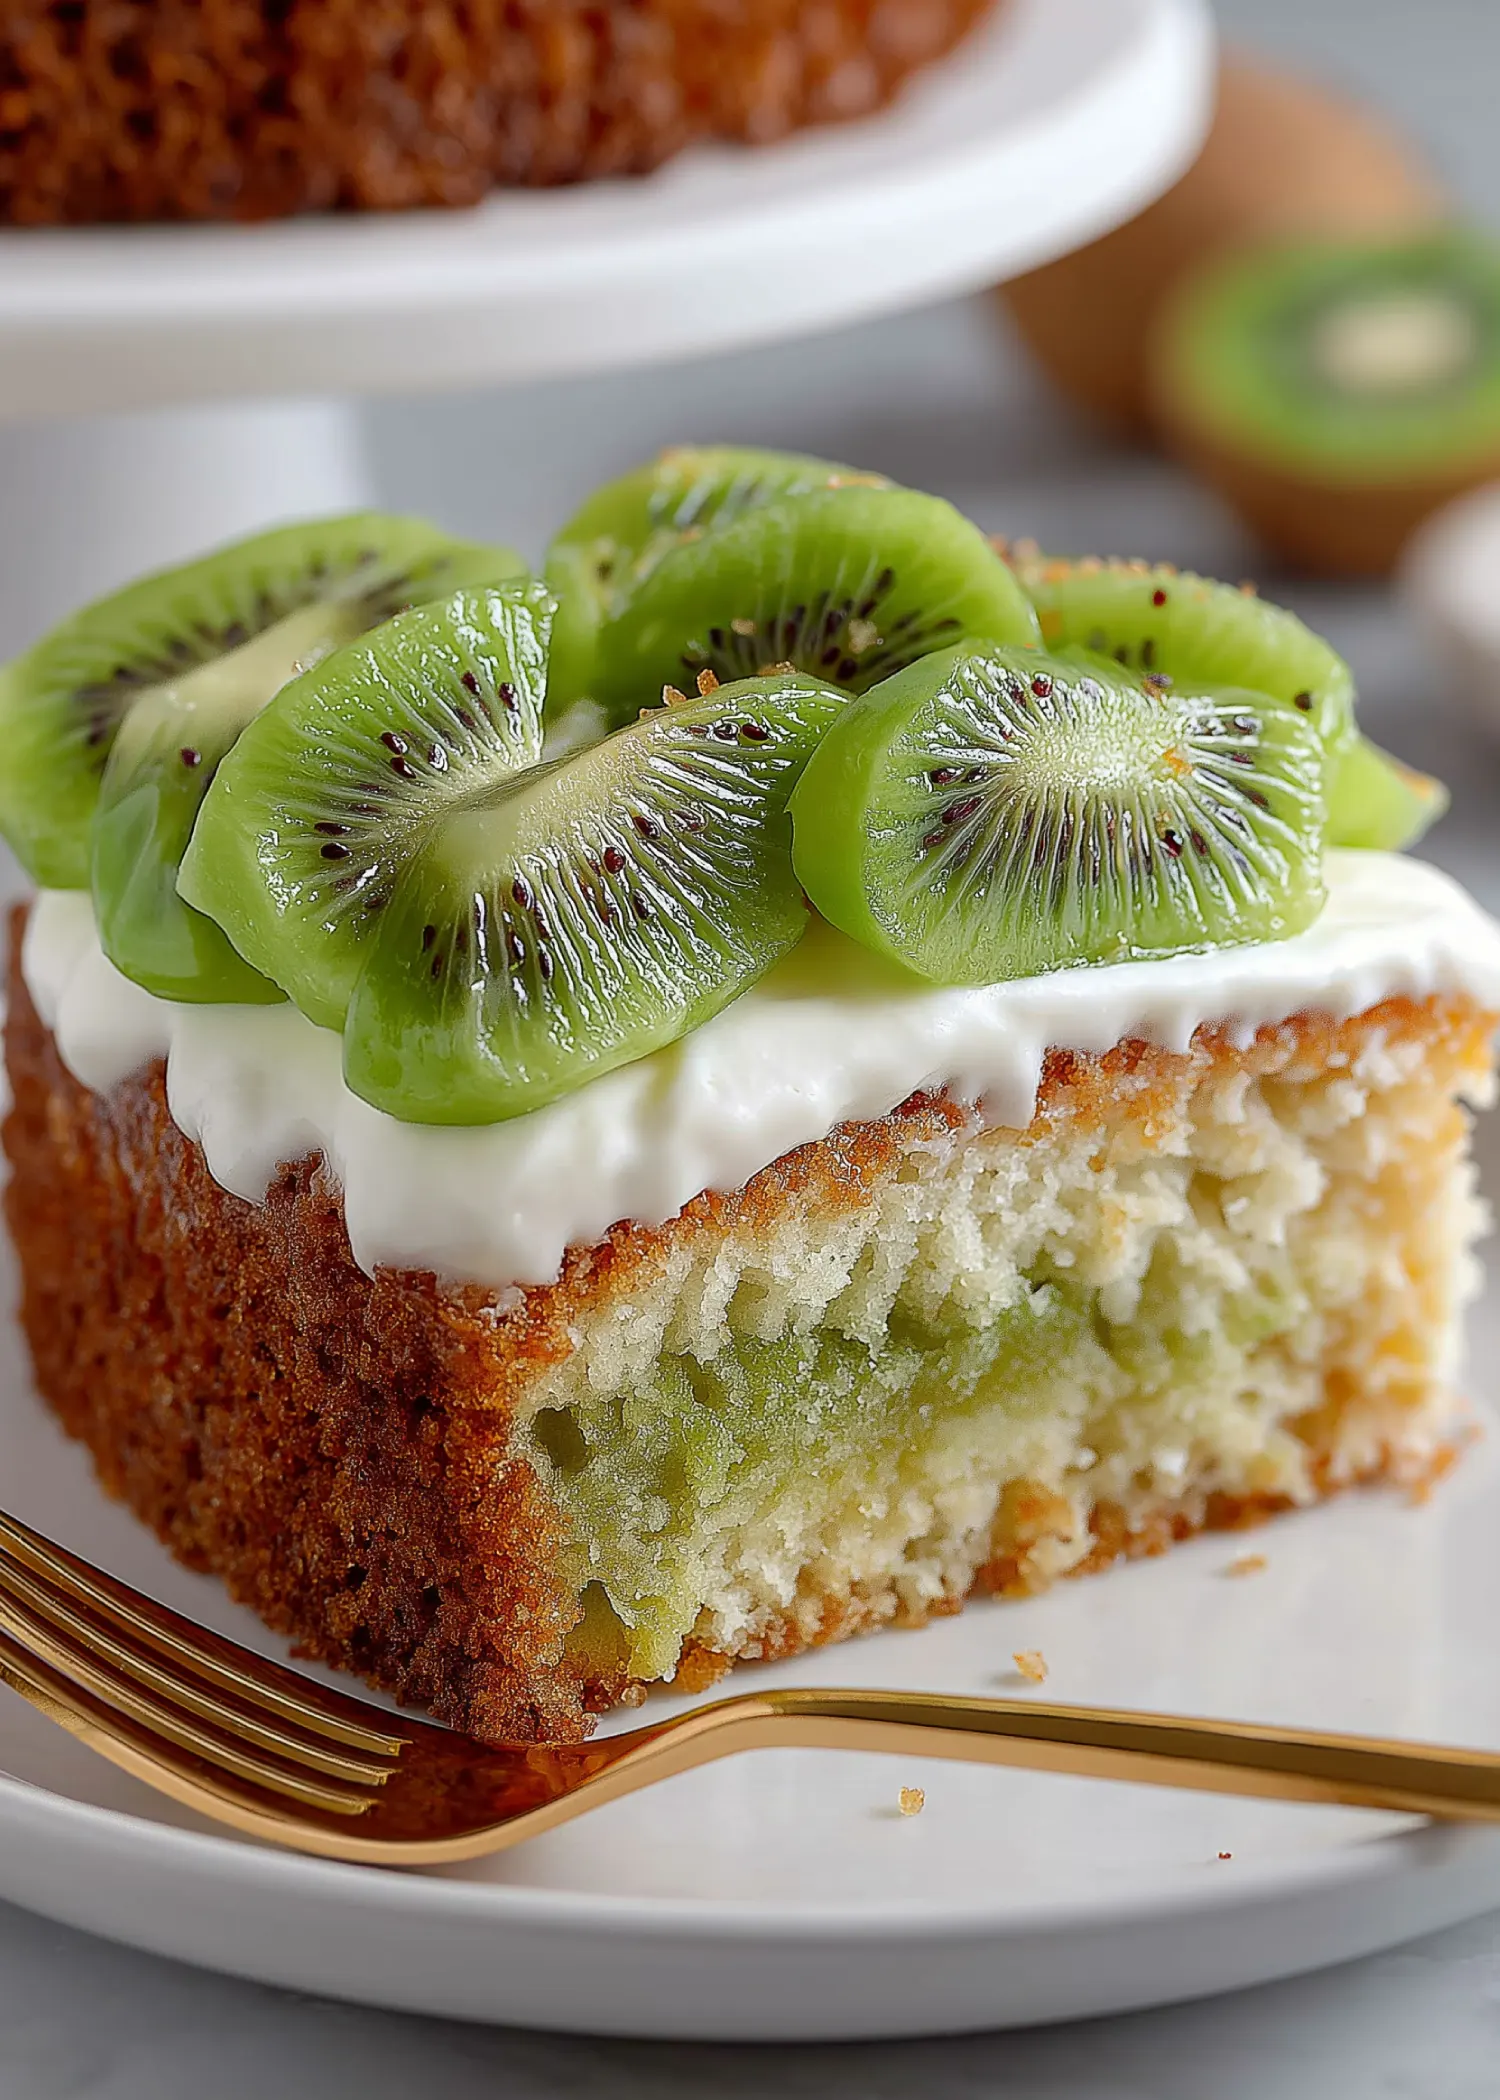
Presentation and Garnishing Tips
How to Decorate with Fresh Kiwi Slices
Once your cake is frosted, it’s time to make it look as good as it tastes. Fresh kiwi slices are the ideal finishing touch—they add vibrant color, texture, and a juicy bite. Here’s how to garnish your kiwi cake recipe beautifully:
- Use ripe but firm kiwi so slices hold their shape and don’t bleed into the frosting.
- Peel and cut into thin rounds or half-moons. Place them gently across the top in a circular pattern, starting from the center and working outward.
- For a modern look, try an asymmetrical arrangement with grouped slices on one side.
- Add a few mint leaves or thin lime slices for extra color contrast.
Presentation makes a big difference, especially when serving guests. Fresh fruit is not only beautiful but enhances the cake’s refreshing vibe.
Naked Cake vs Fully Frosted Cake Look
This recipe works well with a minimalist “naked” cake style. That means frosting only the top while leaving the sides exposed. This look is trendy and emphasizes the cake’s natural color and texture—plus, it’s quicker and healthier.
However, if you prefer a more traditional finish, double the frosting and apply it generously around the sides for a full-coverage look. Use an offset spatula for smooth edges, or create soft swirls for a rustic style.
Whether you choose clean and simple or elegant and layered, your kiwi cake will stand out on any dessert table.
Variations of the Kiwi Cake Recipe
Gluten-Free, Egg-Free, and Vegan Options
This kiwi cake recipe adapts well to different diets:
- Gluten-free: Use a 1:1 gluten-free baking mix.
- Egg-free: Replace eggs with ¼ cup applesauce or 3 tbsp aquafaba per egg.
- Vegan: Use egg-free swaps, plant-based yogurt, and vegan cream cheese.
These options still deliver a soft texture and fruity flavor.
Make Cupcakes or a Layer Cake
- Cupcakes: Divide the batter into a muffin tin and bake for 16–18 minutes. Top with frosting and a kiwi slice.
- Layer cake: Double the recipe, bake in two pans, and frost between the layers.
Perfect for parties, brunch, or a fun twist on the classic.
Storing and Serving Suggestions
Storage Instructions to Keep the Cake Fresh
To keep your kiwi cake moist and flavorful:
- Refrigerate leftovers in an airtight container or covered with plastic wrap.
- Best enjoyed within 3 days.
- If unfrosted, you can wrap the cake tightly and freeze it for up to 1 month. Thaw in the fridge overnight before frosting.
Avoid leaving the cake at room temperature too long, especially with the yogurt-based topping.
Best Pairings and Serving Ideas
This kiwi cake recipe pairs well with:
- A cup of hot tea or coffee.
- Fresh fruit sides like berries or melon.
- A dollop of extra Greek yogurt or a drizzle of honey on the side.
For special occasions, dust the top with a bit of powdered sugar before serving or slice the cake into squares for an elegant platter presentation.
Common Kiwi Cake Mistakes and Fixes
Why Your Cake Might Be Too Dense or Gummy
Even the best bakers can hit a few bumps. Here are common reasons your kiwi cake might not turn out as expected:
- Too much kiwi puree: Exceeding ¾ cup can make the batter too wet and heavy. Always measure it accurately.
- Overmixing the batter: This can develop too much gluten and make the cake dense. Mix just until combined.
- Incorrect oven temp: If the oven is too cool, your cake may bake unevenly and turn out gummy inside. Use an oven thermometer for accuracy.
Stick to the measurements and method to avoid these issues.
How to Prevent Overbaking or Underbaking
Perfect baking time ensures moisture and a soft crumb:
- Check at the 24-minute mark. Insert a toothpick into the center. It should come out clean or with a few moist crumbs.
- Avoid opening the oven early, which can cause the cake to collapse. Wait until the last few minutes to peek.
- Let it cool fully before frosting. A warm cake will melt your topping and ruin the texture.
By following these simple tips, your kiwi cake recipe will come out light, fluffy, and perfectly baked every time.
Conclusion
This kiwi cake recipe is proof that desserts can be fresh, light, and full of natural flavor. From its soft, moist crumb to the creamy yogurt frosting and tangy kiwi topping, every slice delivers a balance of texture and taste. Whether you’re baking for a weekday treat or a special occasion, this cake is sure to impress.
It’s easy to adapt—make it vegan, gluten-free, or turn it into cupcakes. Plus, with health-conscious ingredients like Greek yogurt and real kiwi, you can feel good about every bite.
For More Delicious And Easy Recipes Follow Me In Facebook And Pinterest.
