Crème brûlée tart brings together the best of two beloved desserts — the rich custard of crème brûlée and the crisp, buttery crust of a classic tart. With its smooth, vanilla-infused filling and that signature caramelized sugar topping, it’s a show-stopping treat that feels both refined and comforting. Perfect for special occasions or as a weekend baking challenge, this recipe offers a step-by-step guide to mastering every detail, from the delicate crust to the final torching of sugar.
In this article, you’ll discover how to prepare an authentic crème brûlée tart, avoid common mistakes, and tweak it to match your preferences. We’ll cover the essential ingredients, crust techniques, the secrets to a velvety filling, and how to brûlée like a pro. Plus, helpful tips on substitutions, expert methods, and how to store or serve your tart just right.
Contents
- 1 Perfecting the Tart Crust for Your Crème Brûlée Tart Recipe
- 2 Crème Brûlée Tart Recipe
- 3 Creating the Silky Vanilla Custard Filling
- 4 Mastering the Brûlée Topping
- 5 Expert Tips to Elevate Your Crème Brûlée Tart
- 6 Substitutions and Custom Variations
- 7 Storing and Serving Tips for Maximum Enjoyment
- 8 Conclusion: Why This Crème Brûlée Tart Recipe Deserves a Spot in Your Baking Repertoire
Perfecting the Tart Crust for Your Crème Brûlée Tart Recipe
The Importance of a Solid Tart Base
The crust is the base of your entire dessert, both structurally and in flavor. A tender, flaky tart shell not only supports the creamy custard but also provides that satisfying contrast in texture. Unlike pie crusts, tart crusts are more delicate and buttery, and they need a bit more care in preparation and baking.
Ingredients That Build Structure and Flavor
This tart crust starts with all-purpose flour for structure, powdered sugar for tenderness, and baking powder for a light lift. Cold salted butter is essential — its temperature keeps the dough from becoming greasy, helping to create a crumbly texture. A room-temperature egg adds richness, and vanilla extract adds flavor depth without overpowering the filling.
How to Work the Dough Like a Pastry Chef
When mixing the dough, the goal is to work it as little as possible. Using a food processor with a dough blade helps pulse the ingredients quickly without warming the butter. Add the egg and vanilla last, pulsing only until the dough forms a ball. Overmixing will create a tough crust.
After forming the dough, it’s flattened and rolled between parchment sheets. This not only keeps things mess-free but prevents sticking. Roll it evenly to about ¼ inch thickness so it bakes uniformly.
Fitting and Pre-Baking the Crust
Transfer the dough gently into a 9-inch tart pan, preferably one with a removable bottom. Press the dough evenly, making sure there are no air pockets, and trim the excess edges for a clean look. Before baking, lay parchment paper on the dough and fill with pie weights. This step keeps the crust from puffing up.
Bake first with the weights to set the shape, then remove them for a second bake to develop a light golden brown color. The final texture should be crisp yet tender, ready to cradle the creamy custard filling.
In the next part, we’ll dive into making the silky smooth vanilla custard that defines the crème brûlée experience.
Print
Crème Brûlée Tart Recipe
- Total Time: 4 hours 25 minutes
- Yield: 10 servings
Description
A silky vanilla custard tart nestled in a buttery crust and topped with a crisp brûléed sugar layer. A perfect fusion of elegance and comfort.
Ingredients
Crust:
1½ cups all purpose flour
⅔ cup powdered sugar
¼ teaspoon baking powder
7½ Tablespoons salted butter, cold and sliced
1 large egg, room temperature
1¼ teaspoons vanilla extract
Filling:
1 cup whole milk
1 cup heavy cream
1 2-inch piece vanilla bean, split
½ cup granulated sugar
¼ cup cornstarch
6 large egg yolks, room temperature
¼ cup salted butter, sliced
To Finish:
¼ cup granulated sugar
Instructions
1. Preheat oven to 350℉.
2. In a food processor, combine flour, powdered sugar, and baking powder. Pulse to mix.
3. Add cold butter in pieces and pulse until combined.
4. Add egg and vanilla. Pulse until dough comes together.
5. Roll dough between parchment sheets to ¼-inch thickness.
6. Fit dough into a 9-inch tart pan, trim edges, and press out air bubbles.
7. Place parchment over crust, fill with pie weights. Bake 20 minutes.
8. Remove weights and parchment. Cover edges. Bake 15 more minutes until lightly golden. Cool.
9. In a bowl, whisk together sugar and cornstarch. Add egg yolks and whisk until smooth.
10. In a saucepan, heat milk, cream, and vanilla bean until it begins to bubble. Remove vanilla bean.
11. Slowly whisk hot milk mixture into yolks to temper. Return to pan.
12. Cook over medium-low heat, stirring constantly, until thickened.
13. Remove from heat. Stir in butter until fully melted.
14. Pour filling into cooled crust. Smooth top. Chill for 2–3 hours until set.
15. Before serving, sprinkle sugar evenly on top.
16. Use a kitchen torch to caramelize sugar until golden and crisp.
Notes
Do not overwork the crust dough — pulse only until it comes together.
Always brûlée the sugar just before serving to keep it crisp.
You can use ½ tsp vanilla extract if vanilla beans are unavailable.
For a freeze-friendly version, replace cornstarch with ½ cup of flour.
Use a tart pan with a removable bottom for easy release.
Refrigerate tart uncovered to avoid condensation.
- Prep Time: 30 minutes
- Cook Time: 55 minutes
- Category: Pies
- Method: Bake, Brûlée
- Cuisine: American
Creating the Silky Vanilla Custard Filling
Why This Custard Stands Out
The heart of any crème brûlée tart recipe lies in its custard. This one blends whole milk and heavy cream with real vanilla bean for a luxurious texture and deep flavor. The richness comes from egg yolks and butter, while cornstarch thickens the mixture into a sliceable, smooth filling.
Using both milk and cream provides the perfect balance between creamy and light. The milk cuts through the heaviness of cream, while still allowing that luscious mouthfeel we crave in a crème brûlée.
Vanilla Bean vs. Extract — What’s the Difference?
If you’ve never used a real vanilla bean, this recipe is the perfect time to start. It adds specks of vanilla seeds throughout the custard, enhancing both flavor and visual appeal. Split a 2-inch piece of vanilla bean down the middle and steep it in the milk and cream as it warms.
If you don’t have a vanilla bean, high-quality vanilla bean paste or pure vanilla extract will work. About ½ teaspoon of either can be substituted. However, for that authentic gourmet aroma and depth, vanilla bean is unmatched.
The Science Behind Tempering
Tempering is the process of slowly mixing hot liquid into egg yolks to prevent them from scrambling. In this recipe, once the milk and cream mixture is hot, it’s added gradually to the egg yolk, sugar, and cornstarch blend. This careful process brings everything to a uniform temperature before returning it to the heat.
Skipping this step can lead to curdled custard. So, whisk continuously and add the hot liquid a little at a time. Once everything’s combined and returned to the saucepan, stir constantly over medium-low heat until the custard thickens.
Getting the Texture Right
Don’t rush the cooking. The custard should hold its shape on a spoon before you remove it from heat. At this stage, it may look too thick, but that’s exactly what you want. Once it cools, it will set into a firm yet creamy texture, perfect for slicing.
Finish the filling by whisking in slices of salted butter. This adds a glossy finish and deepens the flavor. Spoon the custard into your fully baked and cooled tart shell, smoothing the surface evenly with a spatula.
Then, it’s time to let the refrigerator do the work. Chill the tart uncovered for 2–3 hours until it’s fully set. Placing plastic wrap gently over the surface can help prevent a skin from forming.
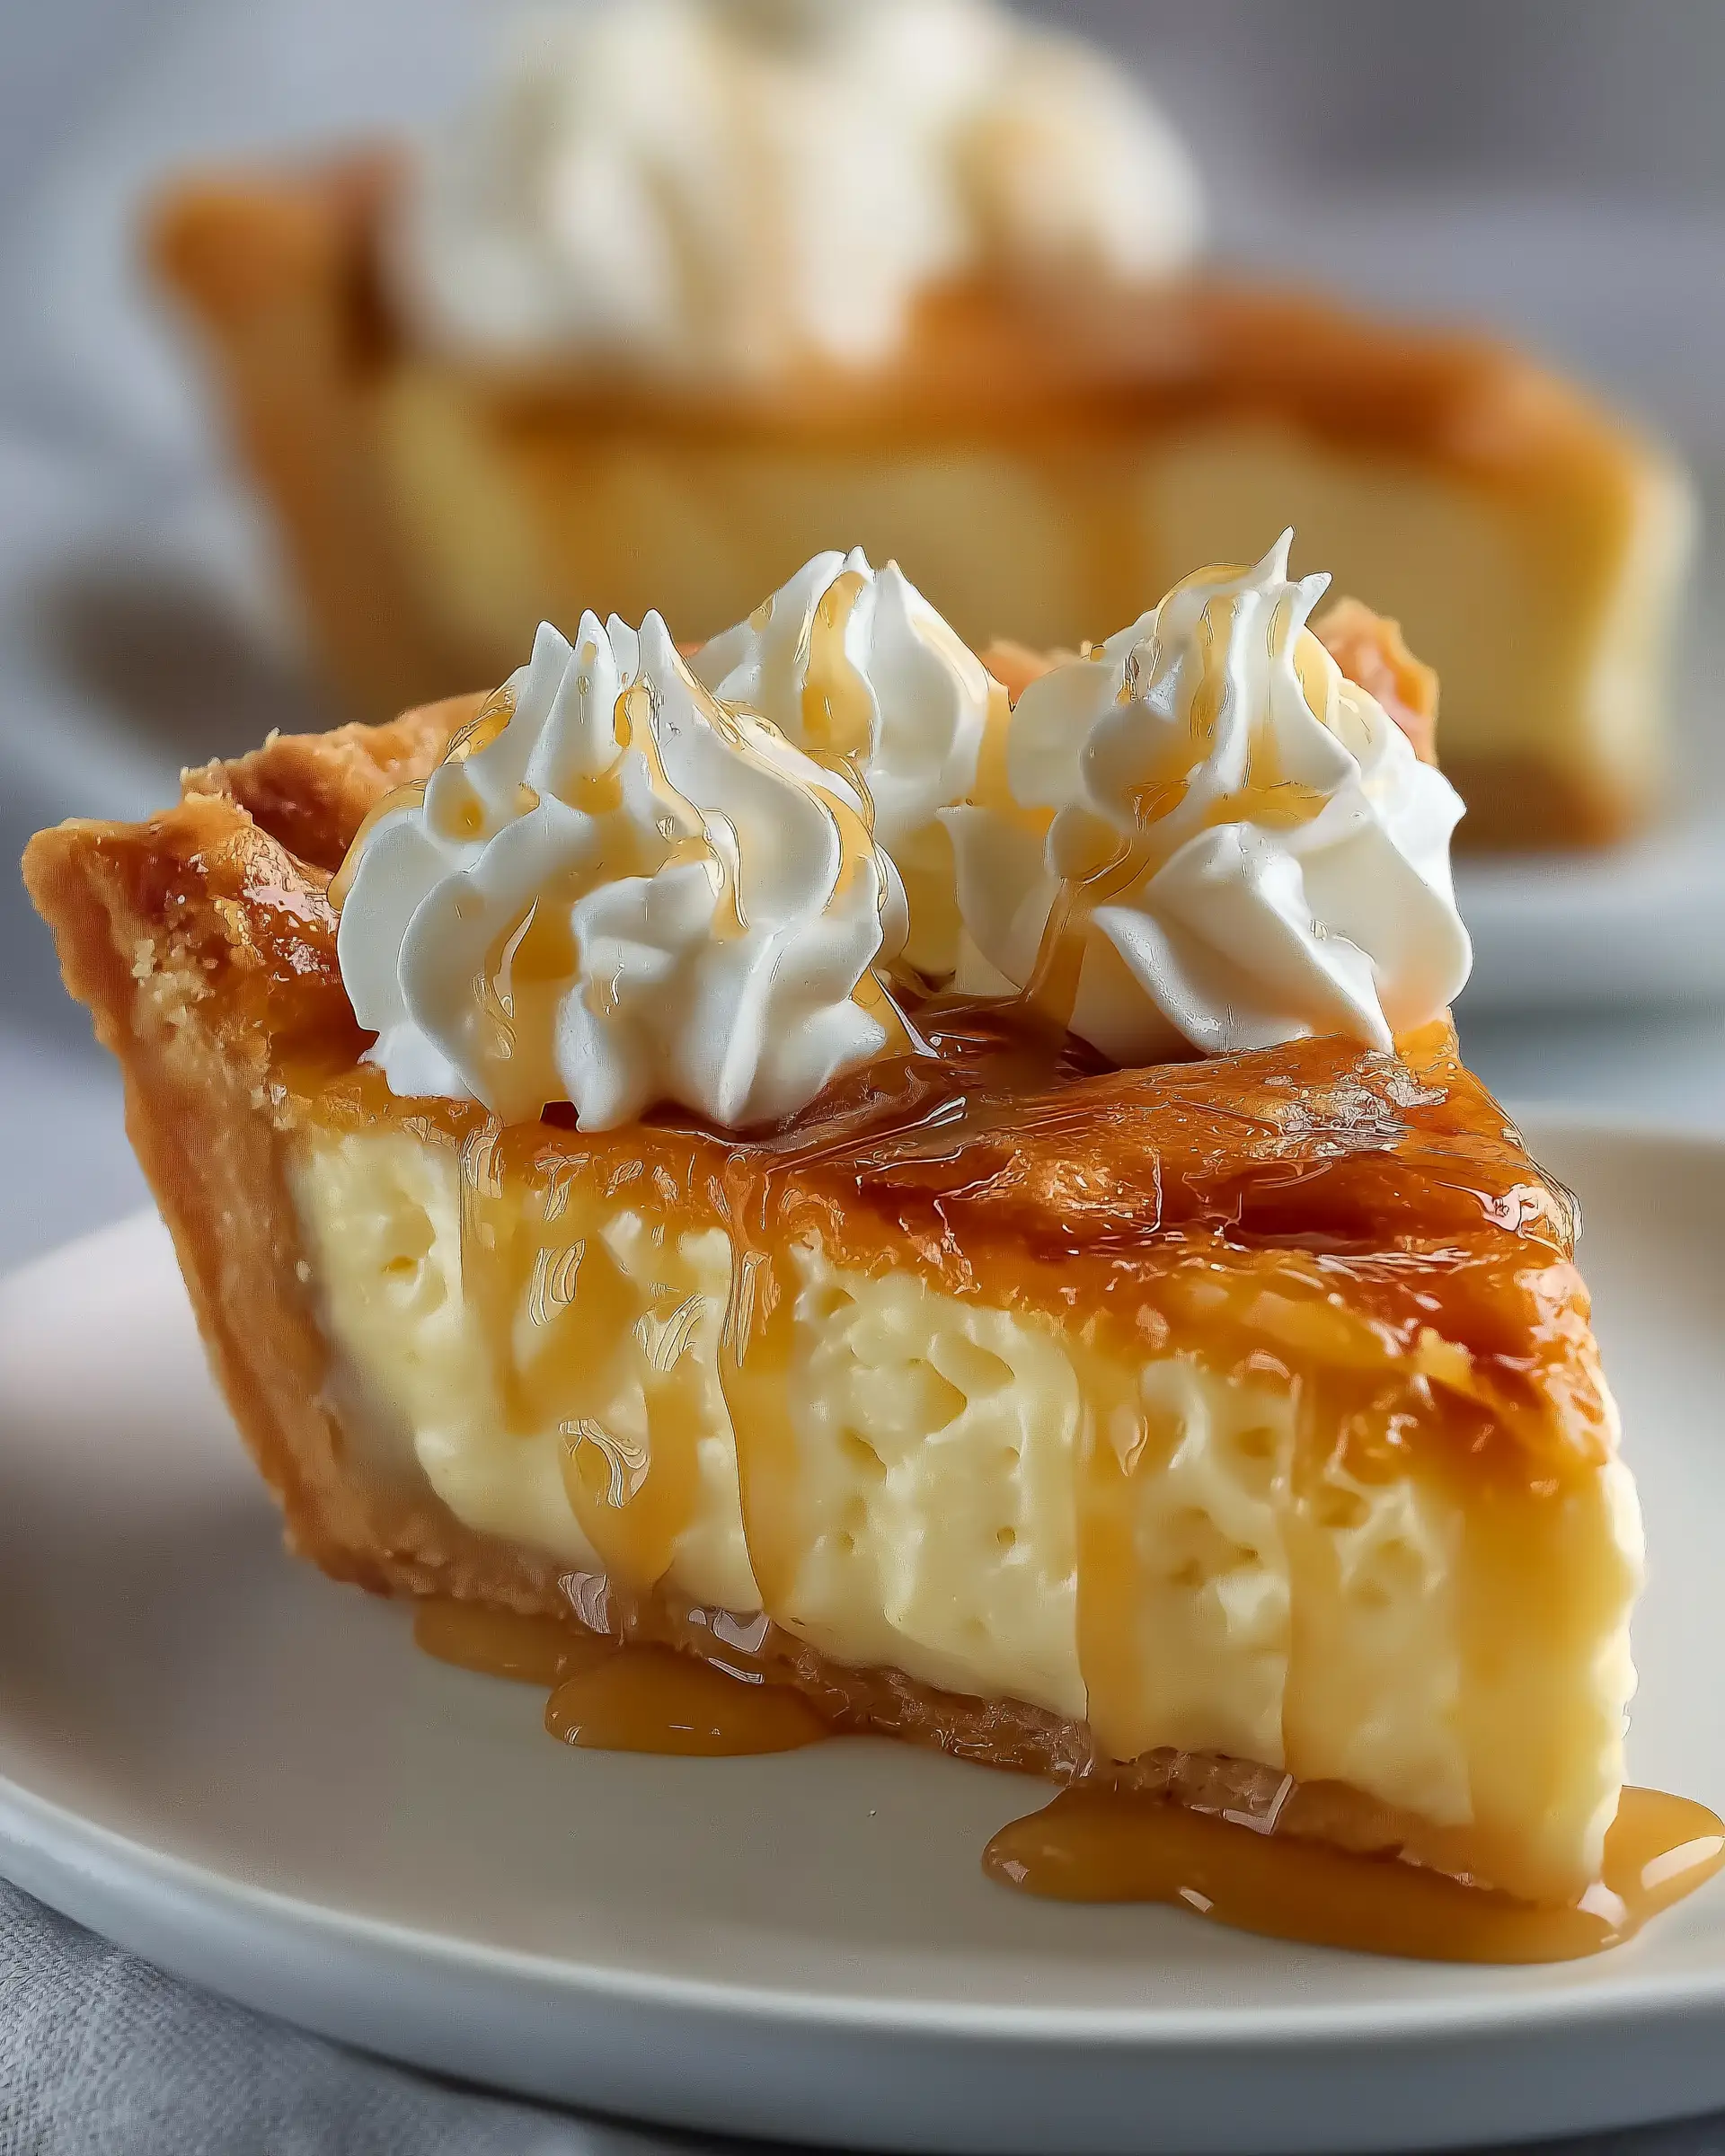
Mastering the Brûlée Topping
The Signature Finish of a Crème Brûlée Tart
What sets a crème brûlée tart recipe apart from other custard desserts is its signature brûlée topping — a thin, crackly layer of caramelized sugar that shatters under your spoon. This step transforms the tart from a simple custard pie into a sophisticated dessert with contrast, crunch, and a hint of bitterness to balance the sweet, creamy filling.
The brûlée process isn’t just for show. It adds texture and a smoky, toasted sugar note that makes each bite more interesting. Done correctly, the topping should be thin but firm, breaking like glass with just a tap.
Choosing the Right Sugar for Brûlée
Granulated white sugar is the go-to option for brûlée. It melts evenly and caramelizes smoothly when exposed to direct flame. Other sugars like brown sugar or powdered sugar don’t brûlée well — they either burn too quickly or clump.
Use about ¼ cup of granulated sugar to cover the top of the tart. You want just enough to form a thin layer without overwhelming the custard below. Spread the sugar in an even, consistent layer across the top, making sure there are no thick patches.
Using a Kitchen Torch Like a Pro
A kitchen torch gives you the most control for brûlée. Hold the flame a few inches from the sugar and move it in a circular motion. The sugar will begin to melt, then bubble, then turn golden and amber. Keep the torch moving to avoid burning any one area.
If you don’t have a torch, you can use your oven broiler in a pinch, but the results will be less even. Place the tart under the broiler and watch carefully. Rotate it often to caramelize the sugar evenly, but know that a torch still provides the best finish.
Only brûlée the sugar right before serving. If done too early, it will absorb moisture from the air and lose its signature crunch.
Troubleshooting Burnt or Wet Sugar
If your sugar burns, your torch may be too close or you’re holding it in one spot too long. If your sugar melts but doesn’t harden, it could be too thick or the tart wasn’t chilled long enough before brûléeing.
Be patient and practice. Brûléeing is part science, part art — but once you get it, it’s incredibly rewarding.
Expert Tips to Elevate Your Crème Brûlée Tart
Use the Right Equipment for Precision
A successful crème brûlée tart recipe isn’t just about ingredients — it’s also about technique and tools. Start with a tart pan that has a removable bottom. This makes it easier to release the tart without damaging the crust, especially when it’s filled with a delicate custard.
A food processor with a dough blade helps pulse the crust ingredients quickly without overworking the dough. And of course, a kitchen torch is essential for the brûlée topping. Avoid using lighters or candles, as they don’t provide enough heat or control.
Chill the Dough and Filling Correctly
One of the top mistakes bakers make is rushing through the chilling steps. After rolling the dough and fitting it into the tart pan, it’s helpful to chill it in the freezer for 10–15 minutes before baking. This helps the crust hold its shape better and prevents shrinking.
Once your custard is poured into the baked shell, chill it for a full 2–3 hours, or until it’s completely set. Don’t skip this step — trying to brûlée a soft custard will lead to a messy, melted topping.
Watch the Dough: Don’t Overmix or Overbake
Less is more when it comes to working your crust. Overmixing activates the gluten in the flour, which leads to a tougher texture. Pulse just until the dough comes together and no dry spots remain.
During baking, aim for a light golden color. Overbaking can make the crust too hard or dry, and it may even crack under the filling. Keep an eye on it, especially after removing the pie weights.
Perfecting the Custard Texture
Once your filling is thickened on the stove, keep stirring for two additional minutes. This ensures that the cornstarch is fully cooked out and the custard sets properly in the fridge. If it seems too thick during cooking, that’s a good sign. It needs to be firm enough to slice cleanly later.
Another pro tip? Remove the vanilla bean before adding the hot milk mixture to the egg yolks. This step matters, not just for presentation but for consistency.
Keep the Sugar Topping Crisp
Don’t brûlée the sugar until you’re just about to serve. Even a few hours of exposure to humidity can cause it to soften or dissolve. If you’re preparing the tart in advance, store it covered in the refrigerator and wait until the last minute to torch the top
Substitutions and Custom Variations
Adapting Ingredients for Flexibility
Every great crème brûlée tart recipe can be customized to suit your pantry or dietary needs without losing its luxurious texture or flavor. If you’re short on a few items or just want to try something new, these substitutions are reliable and effective.
No Vanilla Bean?
You can use ½ teaspoon of high-quality vanilla bean paste or pure vanilla extract. While the visual specks from the vanilla bean won’t be there, the flavor will still be wonderfully aromatic. Make sure to add the extract after heating the milk to preserve its taste.
Cornstarch Swap
If you don’t have cornstarch or want a version that freezes better, use all-purpose flour. You’ll need ½ cup of flour to replace ¼ cup of cornstarch. It changes the custard texture slightly, making it denser and more pie-like, but still delicious and sliceable.
Allergy-Friendly and Dietary Changes
Gluten-Free Option
To make the crust gluten-free, substitute the all-purpose flour with a 1:1 gluten-free flour blend that includes xanthan gum. Avoid single flours like almond or coconut alone, as they behave differently and won’t provide the same structure.
Dairy-Free Adjustments
You can swap the whole milk and cream for full-fat coconut milk or a dairy-free cream alternative. Choose options with a high fat content to mimic the creaminess. Use plant-based butter in both the crust and filling, though the flavor may vary slightly.
Lower Sugar Option
You can reduce the sugar in the filling slightly if needed, but keep at least ¼ cup in the custard mixture to maintain flavor and texture. Using less sugar in the topping may cause the brûlée effect to be uneven or too thin.
Flavor Variations to Try
Citrus Infusion
Add a few strips of lemon or orange zest to the milk and cream as they warm to infuse a bright, fresh flavor. Remove before tempering the eggs.
Spiced Version
For a cozy twist, stir in a pinch of ground cinnamon, cardamom, or nutmeg into the filling just before cooking. These spices pair beautifully with the caramelized sugar topping.
Chocolate Crust
Mix 2 tablespoons of unsweetened cocoa powder into the tart crust dough for a subtle chocolate base that complements the vanilla custard.
With these substitutions and variations, your crème brûlée tart can evolve into different styles while maintaining the same creamy, crackly delight. In the next section, we’ll focus on how to properly store and serve your tart for best results.
Storing and Serving Tips for Maximum Enjoyment
How to Store a Crème Brûlée Tart Properly
After all the effort of creating a perfectly creamy custard and a crisp crust, storing your crème brûlée tart correctly is key to preserving its flavor and texture. Always store the tart in the refrigerator, ideally in an airtight container or covered tightly with plastic wrap. This prevents the custard from drying out and keeps the crust from absorbing unwanted fridge odors.
If the tart hasn’t been brûléed yet, it can stay fresh for up to 3 days in the fridge. Make sure the plastic wrap sits directly on top of the custard (without pressing too hard) to prevent a skin from forming.
Once you’ve added the brûlée sugar topping, the countdown begins. The caramelized sugar will start to soften within a few hours, especially in humid environments. So if you want that crisp, glass-like topping, always torch the sugar right before serving.
Can You Freeze a Crème Brûlée Tart?
Yes, with a few adjustments. If you’re planning to freeze the tart, use flour instead of cornstarch in the custard, as flour holds up better to freezing and thawing. Once fully cooled, wrap the unbrûléed tart in plastic wrap, followed by a layer of foil.
You can freeze it for up to 1 month. Thaw overnight in the refrigerator before serving, then brûlée the sugar topping just before presentation.
Avoid freezing tarts that already have the sugar crust, as it will weep and lose its crunch during the thawing process.
Serving Like a Pro
For the best results, serve the tart chilled, not frozen, and brûlée the top moments before placing it on the table. Use a sharp knife dipped in hot water to make clean slices without dragging the custard.
Serve it alone, or garnish lightly with fresh berries or mint leaves for a pop of color. Avoid overly sweet sauces or sides — the tart is rich enough on its own.
Conclusion: Why This Crème Brûlée Tart Recipe Deserves a Spot in Your Baking Repertoire
From its delicate crust to its creamy vanilla custard and crackling caramelized topping, this crème brûlée tart recipe is more than just dessert — it’s an experience. Whether you’re preparing it for a holiday table, a dinner party, or a quiet weekend indulgence, the balance of textures and flavors makes it a true standout.
You’ve learned how to make every component from scratch, adapt the recipe to different needs, and troubleshoot like a pro. And while it takes a little time and attention to detail, the results are absolutely worth it. Slice into your tart and listen for that satisfying crack — it’s the sound of success.