
Coffee cake recipe, those three words instantly bring me back to the heart of my childhood kitchen. That’s where my love for baking began, standing beside my grandmother, watching her whip together sugar, butter, and coffee into something magical. She believed every good cake started with a story, and over time, her recipes became part of mine.
At Wish-Cake.com, that story continues. What began as a childhood joy has become a daily ritual in my own kitchen, now filled with giggles, floury handprints, and two hungry kids always ready to taste-test. Baking isn’t just about ingredients or timing, it’s about sharing love in the form of something warm, sweet, and made by hand.
This coffee cake recipe is one of those beloved bakes. It’s simple, rich in flavor, soft in texture, and topped with a creamy coffee buttercream that’s truly unforgettable. Whether you’re baking for guests, family, or just yourself, this coffee cake brings the kind of comfort that only home baking can.
Print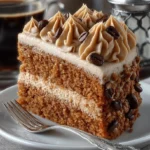
Contents
- 1 Coffee Cake Recipe
- 2 Understanding the Foundation of a Coffee Cake Recipe
- 3 Preparing the Coffee Sponge Base
- 4 Creating the Perfect Coffee Buttercream
- 5 Assembling Your Coffee Cake Like a Pro
- 6 Baking Tools and Tins for Optimal Results
- 7 Customizing Your Coffee Cake Recipe
- 8 Coffee Cake Storage, Shelf Life, and Freezing
- 9 FAQs – Coffee Cake Recipe
Coffee Cake Recipe
- Total Time: 55 minutes
- Yield: 12 servings
- Diet: Vegetarian
Description
A moist and fluffy coffee cake with bold coffee flavor and creamy coffee buttercream. Perfect for birthdays, brunch, or cozy afternoon treats.
Ingredients
For the sponge:
3 tbsp instant coffee powder
200 g plain flour
2½ tsp baking powder
220 g soft light brown sugar
220 g margarine or softened butter
4 medium eggs
2 tsp milk
⅛ tsp salt
For the buttercream:
200 g butter, softened
400 g icing sugar
¼ tsp vanilla extract
8 tsp instant coffee powder
4 tsp boiling water
A little milk (as needed)
Instructions
1. Preheat the oven to 160ºC (140ºC fan). Line two 20cm sandwich tins with greaseproof paper.
2. Place all sponge ingredients in a large mixing bowl. Beat with a hand or electric mixer until well combined.
3. Divide the batter evenly between the tins. Smooth the tops and bake for 30–35 minutes.
4. Let cakes cool in the tins for 10 minutes. Then transfer to a wire rack to cool completely.
5. Dissolve 8 tsp coffee in 4 tsp boiling water and let it cool.
6. Beat butter and vanilla until soft. Add icing sugar gradually, then add coffee mixture 1 tsp at a time, beating until smooth.
7. Adjust buttercream consistency with a little milk, if needed.
8. Spread 1/3 of the buttercream over one cake layer. Top with the second sponge.
9. Spread another 1/3 of the buttercream on top.
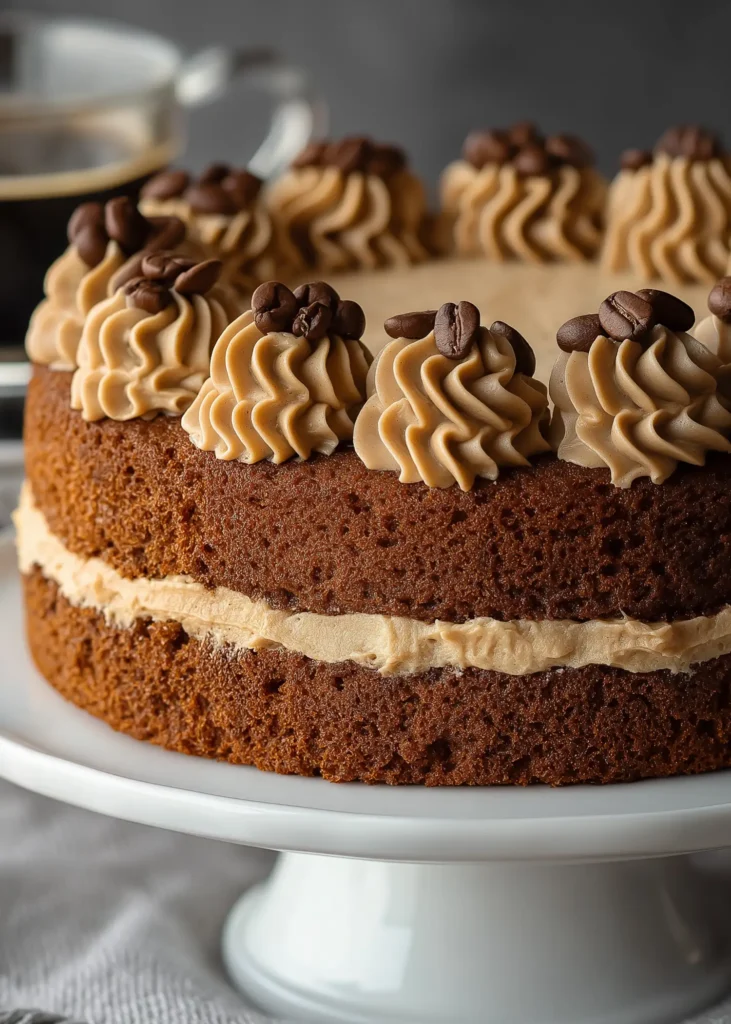
10. Use remaining buttercream to pipe 12 swirls around the edge. Decorate if desired.
Notes
You can add chopped walnuts to the sponge for extra texture.
Jam between layers adds a sweet contrast.
For stronger coffee flavor, increase coffee by 1 tsp.
The sponge can be frozen for up to 3 months.
- Prep Time: 25 minutes
- Cook Time: 30 minutes
- Category: Dessert
- Method: Baking
- Cuisine: American
Understanding the Foundation of a Coffee Cake Recipe
– What Makes a Great Coffee Cake?
A great coffee cake recipe starts with balance. You want just enough coffee to give it that rich, aromatic flavor, but not so much that it overwhelms the sponge. The texture should be moist, tender, and light, with a crumb that melts in your mouth. This cake achieves all of that thanks to a few key ingredients and techniques.
Instant coffee powder brings bold, deep coffee flavor without making the sponge bitter. Soft light brown sugar adds moisture and a subtle caramel note, which pairs beautifully with coffee. Margarine or butter creates a smooth, rich base, and eggs give structure while helping the cake rise. Baking powder provides the essential lift for a light, airy sponge.
What truly elevates this recipe, though, is the simplicity. There’s no need to cream butter and sugar separately or sift flour. Everything comes together in one bowl, making it quick, easy, and perfect for busy bakers or spontaneous cravings.
– The Role of Each Ingredient in the Recipe
Every element in this coffee cake has a job. Understanding their purpose helps you bake with more confidence and tweak the recipe if needed.
- Instant Coffee Powder: Provides the signature flavor. Ground into a powder, it blends smoothly without graininess.
- Plain Flour: The base structure of the coffee cake. Its lower protein content compared to bread flour ensures tenderness.
- Baking Powder: Acts as the leavening agent. It helps the cake rise by releasing carbon dioxide when heated.
- Soft Light Brown Sugar: Adds sweetness and moisture, with a hint of molasses depth.
- Butter or Margarine: Offers richness and a tender crumb. Make sure it’s soft so it blends evenly.
- Eggs: Bind everything together, add structure, and contribute to the coffee cake’s rise.
- Milk: A splash adds moisture and helps create a smooth batter.
- Salt: Enhances the other flavors and keeps the sweetness in check.
Combined in the right proportions, these ingredients create a cake that’s soft but sturdy enough to hold generous layers of buttercream. It’s a perfect foundation for both everyday treats and special occasions.
Preparing the Coffee Sponge Base
– Step-by-Step Sponge Preparation
The foundation of a perfect coffee cake recipe is the sponge, and it all starts with careful preparation. Begin by preheating your oven to 160ºC (140ºC fan). Line two 20cm round sandwich tins with greaseproof paper or reusable liners. This step is essential—an unlined tin can cause your cake to stick or bake unevenly.
Now, in a large mixing bowl, add all the sponge ingredients:
- 3 tbsp instant coffee powder
- 200 g plain flour
- 2½ tsp baking powder
- 220 g soft light brown sugar
- 220 g margarine or softened butter
- 4 medium eggs
- 2 tsp milk
- ⅛ tsp salt
Using an electric mixer or a hand whisk on low speed, blend everything together until smooth. The batter should be thick yet spreadable, without any lumps of dry flour or butter.
Next, divide the mixture evenly between your prepared tins. Smooth the tops with a spoon or spatula so they bake uniformly. Place the tins in the oven and bake for 30 to 35 minutes. You’ll know they’re ready when a skewer inserted in the center comes out clean and the tops spring back to the touch.
Once baked, remove them from the oven and let them cool in their tins for about 10 minutes. Then gently transfer them to a wire rack to cool completely before adding the buttercream.
– Common Mistakes to Avoid When Baking Sponges
Even a tried-and-true recipe can go wrong if a few basic rules are overlooked. Here’s what to watch out for:
- Overmixing the batter: This can lead to a tough sponge. Mix just until the ingredients are combined and smooth.
- Incorrect oven temperature: Always preheat your oven and use an oven thermometer if possible. A temperature that’s too hot will cause the coffee cake to rise quickly and collapse.
- Cold ingredients: Butter and eggs should be at room temperature. Cold ingredients don’t blend well and can lead to curdled batter or uneven texture.
- Uneven tin sizes or batter distribution: If your tins aren’t the same size or one has more batter than the other, you’ll get lopsided cakes. Use a scale to divide evenly.
- Opening the oven too early: This causes the sponge to deflate. Wait until at least 25 minutes have passed before checking.
Perfecting the sponge is all about patience and precision. Once you’ve nailed it, the rest of the recipe flows easily and the result is well worth the effort.
Creating the Perfect Coffee Buttercream
– Mixing Techniques for a Smooth Buttercream
Buttercream is the crown jewel of any coffee cake recipe, and when done right, it brings richness, smooth texture, and a burst of coffee flavor that ties the whole cake together. To start, you’ll need:
- 200 g butter (softened at room temperature)
- 400 g icing sugar
- ¼ tsp vanilla extract
- 8 tsp instant coffee powder or granules
- 4 tsp boiling water
- A little milk (optional)
Begin by dissolving the instant coffee in boiling water. Stir it until the granules are completely melted and the mixture is smooth, then set it aside to cool. This step is key because hot coffee can melt your buttercream and ruin the texture.
In a large bowl, beat the butter and vanilla extract on low speed until soft and fluffy. Slowly add the icing sugar, about a third at a time. After each addition, mix on low until fully incorporated. Be patient—rushing this step can create a gritty or lumpy texture.
Once the sugar and butter are fully blended, add the cooled coffee mixture, just 1 tsp at a time. After each addition, beat the buttercream until the coffee is fully mixed in. This slow, gradual approach ensures your frosting is light and evenly flavored.
Check the consistency as you go. A good buttercream should be soft enough to spread easily but thick enough to hold its shape. If it’s too firm, stir in a little milk—start with half a teaspoon at a time until you get the right texture.
– Adjusting Buttercream Consistency
Not all kitchens are created equal. If your buttercream is too runny, it might be due to warm room temperatures or too much coffee liquid. Let it chill in the fridge for 10 minutes, then whip again to thicken. If it’s too stiff, you can:
- Add more milk (a few drops at a time)
- Beat in a bit of extra softened butter
- Warm it gently by placing the bowl over another bowl of hot water for a few seconds (then re-whip)
Pro tip: Buttercream should be spreadable enough to glide onto cake layers, but firm enough that it doesn’t slide or drip. Aim for a texture similar to room-temperature cream cheese.
This coffee buttercream is rich, silky, and full of flavor—perfect for layering, piping, or simply enjoying by the spoonful.
Assembling Your Coffee Cake Like a Pro
– Layering and Spreading the Filling
With your sponge cakes cooled and your buttercream ready, it’s time to assemble your coffee cake recipe. Start by placing one cake layer on a serving plate or stand. Spread a third of the buttercream evenly over the top—use a palette knife or the back of a spoon. Try to get an even layer all the way to the edges.
Place the second sponge on top and gently press it down to settle. Then, spread another third of the buttercream over the top. Smooth it out or give it a rustic swirl—both look great.
– Optional Piping Tips and Decoration Ideas
If you want to get fancy, spoon the final third of the buttercream into a piping bag with a star nozzle. Pipe 12 small swirls around the edge of the coffee cake. You can also skip the piping and just spread all the buttercream evenly across the top.
Decorate with a dusting of coffee powder, chocolate shavings, or a few walnut halves if you like. Simple or styled, the coffee cake will shine either way.
Baking Tools and Tins for Optimal Results
– Recommended Bakeware and Why It Matters
Using the right tools can make or break your coffee cake recipe, literally. For this recipe, two 20cm round sandwich tins are ideal. They bake evenly, create perfect layers, and don’t require you to cut a single cake in half, which can sometimes lead to crumbling or uneven layers.
Lining your tins is also important. Use greaseproof paper or reusable silicone liners to prevent sticking and make cleanup a breeze. If you don’t have sandwich tins, you can bake the batter in one deep tin and slice it later, but be sure to adjust the bake time and test the center with a skewer.
– Tools That Simplify the Process
You don’t need a professional kitchen to bake like one. Here are a few helpful tools that make this coffee cake even easier:
- Electric Mixer or Hand Whisk: Speeds up mixing and gives a smoother batter and buttercream.
- Digital Kitchen Scale: Ensures your ingredients are accurately measured for consistent results.
- Offset Palette Knife: Great for spreading buttercream evenly and smoothly.
- Piping Bag with Star Nozzle: If you’re decorating the top, this adds that extra touch without much effort.
- Cooling Rack: Helps your sponge cool evenly and avoids soggy bottoms.
These basics keep your baking stress-free and your results consistent.
Customizing Your Coffee Cake Recipe
This coffee cake recipe is easy to personalize with a few simple changes. To add texture, mix in a handful of chopped walnuts or pecans before baking. They add crunch and complement the coffee flavor. For a richer version, try dark chocolate chips in the batter or sprinkled on top after frosting.
Looking for a fruity twist? Spread a layer of raspberry or strawberry jam between the sponges before adding the buttercream. It adds a bright, sweet contrast that balances the coffee perfectly.
You can also adjust the flavor strength. For a bolder coffee taste, add 1 extra teaspoon of instant coffee to the sponge or buttercream. If you prefer it lighter, reduce the coffee to 2 tablespoons in the sponge mixture.
Want it less sweet? Cut the brown sugar slightly in the batter or use less icing sugar in the frosting. A small pinch of salt in the buttercream also helps tone down the sweetness.
For a dairy-free version, use plant-based butter and a splash of oat or almond milk.
These small tweaks keep the texture and structure just right, while letting you make this cake your own.
Coffee Cake Storage, Shelf Life, and Freezing
– How to Store Coffee Cake for Maximum Freshness
Once your coffee cake recipe is fully assembled, proper storage is key to keeping it fresh and delicious. If you’re serving it within a day, keep it covered at room temperature in an airtight container. This keeps the sponge moist and the buttercream soft.
For longer storage-up to 4 days—refrigerate the cake in a sealed container. Before serving, let it sit at room temperature for about 30 minutes so the buttercream softens and the flavors come through.
Avoid storing it uncovered in the fridge. The cool air dries out the sponge and hardens the frosting, which takes away from that melt-in-your-mouth texture.
– Freezing Options for Ahead-of-Time Baking
Need to plan ahead? You can freeze the sponge layers and even the fully frosted cake.
To freeze the sponge layers:
- Let them cool completely.
- Wrap each one tightly in plastic wrap and then in foil.
- Store them in a freezer-safe bag for up to 3 months.
When ready to use, thaw the layers at room temperature, unwrap them, and decorate as usual.
To freeze the assembled cake:
- Chill the cake in the fridge until the buttercream firms up.
- Wrap it well in plastic wrap, then foil.
- Freeze for up to 1 month.
Thaw overnight in the fridge, then let it come to room temperature before serving.
This coffee cake recipe is more than just a dessert—it’s a warm, comforting bake that brings people together. From the rich, flavorful sponge to the creamy coffee buttercream, every bite delivers a balance of sweetness and bold coffee notes that’s perfect for any occasion.
Whether you’re baking for a birthday, a weekend brunch, or simply treating yourself, this cake fits the moment. It’s simple enough for beginners, yet delicious enough to impress a crowd. And with options to customize it—adding nuts, chocolate, or jam—it’s a recipe you’ll come back to again and again.
What makes this coffee cake truly special is how it invites you to slow down, gather around the kitchen, and create something meaningful from scratch. It’s not just about the ingredients—it’s about the memories, the laughter, and the joy of sharing something homemade.
Thanks for baking with me at Wish-Cake.com, where every recipe is made with heart and a little sprinkle of nostalgia.
For More Delicious And Easy Recipes Follow Me In Facebook And Pinterest.
FAQs – Coffee Cake Recipe
Does Starbucks coffee cake have coffee in it?
Despite the name, Starbucks’ classic coffee cake does not contain coffee. It’s meant to be enjoyed with coffee, not made from it. The name refers to the pairing rather than the ingredients. Starbucks’ version typically features a cinnamon streusel topping over a buttery vanilla-flavored sponge.
Is tiramisu a coffee cake?
Tiramisu isn’t considered a traditional coffee cake, but it does contain strong coffee flavors. It’s a layered Italian dessert made with espresso-soaked ladyfingers, mascarpone cream, and cocoa powder. While both share coffee as a key flavor, tiramisu is a chilled dessert, whereas coffee cake is baked and more bread-like in texture.
Is a king cake a coffee cake?
No, king cake and coffee cake are quite different. A king cake is a festive dessert tied to Mardi Gras traditions, made with a yeast-based dough often filled with cinnamon or cream cheese and decorated with colored sugar. Coffee cake, on the other hand, is usually a tender sponge cake flavored with coffee and sometimes topped with streusel or icing.
Why is a coffee cake called a buckle?
The term “buckle” refers to a type of coffee cake that includes fruit and a streusel topping. As it bakes, the cake rises and the topping causes it to “buckle” or collapse slightly in the center, creating a rustic, crumbled appearance. While not all coffee cakes are buckles, the name describes this particular variation.
