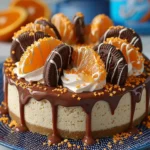
Chocolate and orange is a flavor pairing that never goes out of style, especially when combined in a creamy, indulgent dessert. This no bake Chocolate Orange Cheesecake is the perfect treat for those who love rich, zesty flavors without the hassle of baking. With a buttery biscuit base, a smooth chocolate-orange cheesecake layer, and a decorative finish that turns heads, this dessert is as easy as it is impressive.
Whether you’re planning a family gathering, a holiday celebration, or simply satisfying a sweet craving, this cheesecake is a crowd-pleaser. We’ll cover everything from selecting the right ingredients and preparing the base to perfecting the topping and presentation. This guide also includes important tips to help you avoid common no-bake cheesecake mistakes and ensure your dessert turns out perfectly sliceable every time.
Contents
- 1 Crafting the Perfect No Bake Biscuit Base
- 2 Chocolate Orange Cheesecake (No Bake Recipe)
- 3 Making the Creamiest Chocolate Orange Cheesecake Filling
- 4 How to Decorate Chocolate Orange Cheesecake Like a Pro
- 5 Chilling, Setting, and Serving Your Cheesecake
- 6 Ingredient Swaps, Storage Tips, and Making Ahead
- 7 Troubleshooting Common No Bake Cheesecake Problems + Expert Tips
- 8 Conclusion
Crafting the Perfect No Bake Biscuit Base
Choosing the Right Biscuits
The base of a cheesecake serves as the backbone for the entire dessert. For this Chocolate Orange Cheesecake, digestive biscuits are the go-to choice, providing a slightly sweet, grainy texture that balances the creamy filling. If you’re located in the US, Graham Crackers are an ideal substitute, offering a similar taste and structure.
When selecting your biscuits, go for ones that are plain and not overly sweet or flavored. This allows the zesty orange and rich chocolate in the filling to shine through without competing for attention.
Crushing and Mixing for Ideal Texture
To achieve that perfect “lumpy sand” texture, pulse the biscuits in a food processor or seal them in a zip-top bag and crush with a rolling pin. Avoid grinding them into a fine powder, some texture in the crumbs helps hold the melted butter better and gives a more satisfying bite.
Once your biscuits are crushed, combine them with melted unsalted butter. Stir until every crumb is coated and glistening. The butter not only binds the crumbs but also provides richness that enhances the overall flavor.
Pressing and Chilling the Base
Transfer the mixture into a 7-inch springform tin, pressing it down firmly with the back of a spoon or the base of a glass. This creates an even, stable foundation. Pay extra attention to the edges, pressing them firmly to avoid crumbling when slicing later.
Let the base chill in the fridge while you prepare the filling. This helps it set and makes it easier to spread the cheesecake mixture over it without shifting.
Tips for a Stable Crust
- Use real butter, not margarine, to ensure the base holds together.
- Make sure the butter is fully melted before mixing, to coat the crumbs thoroughly.
- Chill the base for at least 30 minutes before adding the filling to ensure it’s firm enough.
Chocolate Orange Cheesecake (No Bake Recipe)
- Total Time: 4 hours 30 minutes
- Yield: 12 slices
Description
A creamy and indulgent no bake Chocolate Orange Cheesecake made with Terry’s Chocolate Orange, whipped cream, and a buttery biscuit base. Perfect for special occasions or weekend treats.
Ingredients
For the base:
100 g Butter, melted
200 g Digestive biscuits (or Graham Crackers in the US)
For the cheesecake mixture:
2 Terry’s Chocolate Oranges (157g each)
500 ml Double cream, whipped
560 g Full-fat cream cheese
100 g Icing sugar, sifted
Juice of half a lemon
2 tsp Orange extract (optional)
For decoration:
100 g White chocolate
100 ml Double cream, whipped
12 Terry’s Chocolate Orange segments
Orange gel food coloring (optional)
Instructions
1. Crush digestive biscuits into crumbs, either with a food processor or in a bag using a rolling pin.
2. Mix crushed biscuits with melted butter until fully coated.
3. Press the mixture into a 7″ springform tin, smoothing the surface evenly.
4. Melt the Terry’s Chocolate Oranges over simmering water until smooth, then set aside to cool for 5 minutes.
5. In a large bowl, mix whipped double cream, full-fat cream cheese, sifted icing sugar, lemon juice, and optional orange extract until well combined.
6. Fold in the cooled melted chocolate and mix thoroughly.
7. Spoon the cheesecake mixture over the biscuit base and smooth the top with a spoon or palette knife.
8. Chill in the freezer for 2 hours or the fridge for 4 hours, preferably overnight.
9. Melt white chocolate and add orange gel food coloring. Let cool slightly before drizzling over the set cheesecake.
10. Pipe whipped cream over the top and place Terry’s Chocolate Orange segments decoratively.
11. Serve and enjoy.
Notes
Always use full-fat cream cheese for the best texture.
Orange extract is optional but enhances flavor.
If the white chocolate seizes while coloring, add a few drops of vegetable oil and stir.
Decorate only after the cheesecake is fully set.
Use a springform tin for easy removal.
- Prep Time: 30 minutes
- Cook Time: 0 minutes
- Category: Cheesecake
- Method: No Bake
- Cuisine: Family Food
Making the Creamiest Chocolate Orange Cheesecake Filling
Selecting the Best Chocolate Orange
At the heart of this no bake cheesecake lies the iconic Terry’s Chocolate Orange, known for its smooth milk chocolate infused with orange oil. You’ll need two whole Chocolate Oranges (157g each) to achieve a deep, rich flavor in every bite.
To prepare, gently melt the chocolate using a double boiler method. Place a heatproof bowl over a pan of simmering water and stir continuously until smooth. Once melted, remove from heat and let it cool slightly for about 5 minutes. This cooling step is crucial, as adding hot chocolate directly into the cold cheesecake mixture could affect its smooth consistency.
Building the Cheesecake Base Mixture
The filling starts with the core ingredients that give this cheesecake its signature creamy, tangy flavor. Combine the following in a large bowl:
- 500 ml whipped double cream (or heavy cream in the US), whipped until it forms soft peaks. This gives the cheesecake its light, airy texture.
- 560 g full-fat cream cheese, which brings richness and structure. Philadelphia is a reliable choice due to its smooth consistency and blendability.
- 100 g icing sugar, sifted to avoid lumps and ensure a smooth finish.
- Juice from half a lemon, which helps balance the sweetness and subtly enhances the orange flavor.
- 2 teaspoons orange extract (optional), for those who prefer a stronger citrus taste.
Use a spatula or electric mixer on low to gently fold all ingredients together until fully combined. Take your time during this step—overmixing can cause the mixture to lose its fluffiness.
Adding Melted Chocolate
Once the chocolate has cooled to a safe temperature (warm, not hot), fold it into the cheesecake mixture. This is when the dessert really comes together. The chocolate adds both flavor and richness, and folding rather than beating ensures the whipped cream doesn’t deflate.
Keep folding until the chocolate is evenly distributed. The result should be thick, creamy, and lightly speckled with the sheen of melted chocolate.
Achieving the Ideal Cheesecake Consistency
You’re looking for a consistency that’s smooth and sliceable, like room-temperature butter. It should hold its shape when spooned and leveled. If it feels too soft, place it in the fridge for 10 to 15 minutes before spreading it over the biscuit base.
Gently spoon the mixture onto the chilled base and smooth the top with the back of a spoon or a palette knife. Make sure the surface is even and level to set the stage for your decorative topping.
Once assembled, place the entire cheesecake in the freezer for 2 hours or fridge for 4 hours to allow it to fully set. For best results, let it sit overnight to develop the full flavor and firm up completely.
How to Decorate Chocolate Orange Cheesecake Like a Pro
Preparing the White Chocolate Drizzle
A stunning cheesecake deserves a decorative touch that’s as delightful to look at as it is to eat. The first layer of decoration involves a white chocolate drizzle, adding visual contrast and a sweet complement to the rich chocolate-orange flavor.
To make it:
- Melt 100 g of white chocolate in a heatproof bowl over a pan of simmering water.
- Once melted, add a tiny amount of orange gel food coloring. Gel coloring is preferred because it won’t thin the chocolate or change its consistency.
Be cautious at this stage. If the chocolate thickens or seizes (becomes lumpy and unworkable), add a few drops of vegetable oil and stir until smooth again. This simple fix can rescue seized chocolate without altering the taste.
Before drizzling, let the colored chocolate cool slightly. Pouring hot chocolate over the cheesecake could cause it to melt or lose shape. Once cooled, use a spoon or piping bag to drizzle zigzag patterns across the top of the cheesecake. A cooler drizzle also results in neater, more controlled lines.
Whipping Cream for Topping
Take your remaining 100 ml of double cream, straight from the fridge, and whip it until it holds its shape, similar to soft ice cream. Cold cream whips better and faster, creating the perfect texture for piping.
Spoon the whipped cream into a piping bag fitted with a star tip for decorative swirls or dollops along the edge of the cheesecake. If you don’t have a piping bag, a plastic sandwich bag with the corner snipped off works just fine.
Adding Chocolate Orange Segments
To finish the decoration, use 12 pieces of Terry’s Chocolate Orange, spacing them evenly around the top. Each segment serves as a tasty garnish and a hint of the flavor to come.
Place one piece on each swirl of cream, pressing gently so they stay in place. This adds a touch of height and elegance, making your cheesecake look professionally finished.
Presentation Tips
- Place your cheesecake on a serving board or decorative cake stand for extra flair.
- For a party or gathering, you can pre-slice it into 12 portions and decorate each slice individually.
- If you’re serving later, wait to add the whipped cream and chocolate segments until just before presenting to maintain freshness and texture.
Chilling, Setting, and Serving Your Cheesecake
Why Chilling Time Matters
With no baking involved, chilling is the most critical step in setting the structure of your Chocolate Orange Cheesecake. Without enough time in the fridge or freezer, the filling won’t firm up properly and could collapse when sliced.
You have two options depending on your schedule:
- Quick Set: Place the cheesecake in the freezer for 2 hours. This helps it firm up faster, but be cautious—don’t let it freeze completely solid if you plan to serve it right away.
- Slow Set: Refrigerate for at least 4 hours, though overnight is ideal. This slow chill process improves both the texture and flavor, letting the citrus and chocolate blend beautifully.
If using the freezer method, transfer the cheesecake to the fridge after the initial 2-hour chill to allow it to reach a sliceable consistency before serving.
Removing From the Tin Without Cracks
Once the cheesecake is fully chilled and firm to the touch, it’s time to release it from the tin. Use a springform tin for easy removal without disturbing the shape.
Tips to remove cleanly:
- Run a thin knife around the edge before unclipping the tin. This prevents the sides from sticking.
- Warm the outside of the tin slightly with your hands or a warm towel. It helps the edges loosen naturally.
- Always lift from the base, not the sides, to avoid cracks or collapse.
Transfer to a serving platter using a wide cake lifter or two spatulas for added support.
Slicing the Perfect Piece
Cutting cheesecake cleanly is all about technique. Use a sharp, long-bladed knife and dip it in hot water between slices. Wipe it clean each time to ensure each piece looks perfect.
A well-set cheesecake should be:
- Firm but not stiff
- Creamy with a slight wobble
- Smooth and even throughout the slice
Ideal Serving Temperature
Remove the cheesecake from the fridge about 15 minutes before serving. This allows it to soften slightly for the best flavor and texture. Too cold, and the chocolate might dominate; too warm, and it could lose its structure.
Pair each slice with a dollop of whipped cream or a fresh orange twist if you’re feeling fancy. It doesn’t need anything extra, but these little touches go a long way when you want to impress guests.
Ingredient Swaps, Storage Tips, and Making Ahead
Simple Ingredient Swaps for Accessibility
Whether you’re outside the UK or just missing a key ingredient, there are a few smart swaps to keep your Chocolate Orange Cheesecake on track without compromising flavor or texture.
- Digestive Biscuits: In the US or Canada, use Graham Crackers as a 1:1 substitute. They offer a similar crumbly texture and slight sweetness that pairs perfectly with the creamy filling.
- Double Cream: If you’re in the US, heavy whipping cream is the ideal equivalent. It has the necessary fat content to whip and hold its shape.
- Cream Cheese: Full-fat Philadelphia is preferred for its consistency, but other full-fat brands work. Avoid low-fat versions as they may result in a runny or unstable texture.
- Orange Extract: Optional but recommended for extra zing. If you don’t have orange extract, try using a small amount of freshly grated orange zest instead.
- White Chocolate Coloring: Only use gel food coloring, never liquid. Liquid colorings can cause the chocolate to seize. If you don’t have orange gel coloring, you can skip it and keep the drizzle natural for a white-and-chocolate contrast.
Making the Cheesecake Ahead
This cheesecake is an excellent make-ahead dessert because it requires chilling time. Prepare it the day before you plan to serve, and you’ll have more time to focus on other dishes or relax.
When making ahead:
- Complete the cheesecake, including the biscuit base and cheesecake filling.
- Wrap it tightly in plastic wrap or foil to prevent moisture from affecting the top layer.
- Leave off the decorative cream and toppings until just before serving, so they look fresh and vibrant.
It can safely sit in the fridge for up to 3 days before serving.
Freezing for Later
If you’re looking to freeze the cheesecake, it’s totally doable—just freeze it without decorations.
Steps:
- After it sets, wrap the cheesecake (still in the tin) in plastic wrap and then foil.
- Freeze for up to 1 month.
- When ready to eat, thaw overnight in the refrigerator.
- Add decorations like whipped cream and Chocolate Orange pieces just before serving.
Note: The texture may soften slightly after freezing, but the flavor remains delicious.
Storing Leftovers Properly
Store leftovers in an airtight container or wrap the cheesecake slices individually. Keep in the refrigerator and consume within 3 to 4 days for the best taste and texture.
Avoid leaving it at room temperature for more than 1 hour, especially in warm weather, to prevent the filling from softening too much.
Troubleshooting Common No Bake Cheesecake Problems + Expert Tips
Why Won’t My Cheesecake Set?
One of the most common concerns with a no bake cheesecake is the filling not firming up. If your Chocolate Orange Cheesecake is soft or runny after chilling, here’s what might have gone wrong:
- Underwhipped Cream: The cream must be whipped until it holds its shape. If it’s still too soft, the mixture won’t firm up.
- Low-Fat Cream Cheese: Always use full-fat cream cheese. Low-fat versions contain more water, which weakens the structure.
- Hot Chocolate: Adding the melted Terry’s Chocolate Orange when it’s still too hot can cause the cream to soften or split. Make sure it’s slightly cooled before mixing.
- Not Enough Chill Time: While it can firm up in 4 hours, overnight chilling produces the most stable and sliceable results.
If your cheesecake is already set in the tin and seems too soft, let it stay in the fridge longer. You can also try freezing it briefly to give it more structure.
My Cheesecake Cracked or Collapsed
No bake cheesecakes usually don’t crack like baked versions, but they can collapse or cave if:
- The base was not chilled properly before adding the filling.
- It was removed from the tin too early.
- The filling was too runny due to warm ingredients or underwhipped cream.
Always ensure your cheesecake feels firm to the touch before trying to unmold it.
Lumpy Cheesecake Mixture
Lumps in the filling usually come from unsifted icing sugar or cream cheese that hasn’t softened slightly. To avoid this:
- Sift the icing sugar before mixing.
- Let your cream cheese sit at room temperature for 10-15 minutes before combining.
- Use a rubber spatula or hand mixer on low to blend the mixture gently.
Lumps from seized chocolate can be smoothed out by adding a few drops of vegetable oil and beating well until it softens again.
Advanced Tips for Pro Results
- Use a palette knife to get ultra-smooth edges and top. Warming the knife slightly helps create that bakery-style finish.
- Add stability with gelatin if you’re planning to transport the cheesecake or keep it at room temperature longer. It’s not required for home use but great for events.
- Flavor boost: Add a bit of orange zest to the filling for a burst of citrus and a more intense aroma.
- Texture contrast: For extra crunch, mix crushed orange-flavored chocolate or chopped candied orange peel into the filling or on top.
Visual Test for Doneness
Once chilled, press the top gently with the back of a spoon. The cheesecake should give a soft wobble, similar to room-temperature butter. If it feels like pudding or yogurt, it needs more time.
Conclusion
This no bake Chocolate Orange Cheesecake is everything a dessert lover could ask for—rich, creamy, citrusy, and visually stunning, all without turning on the oven. It’s easy to make with accessible ingredients, and the results are worthy of any celebration or quiet weekend indulgence.
From crushing the biscuit base to the final decorative touches, each step in this recipe brings you closer to a cheesecake that’s as satisfying to make as it is to eat. Plus, with smart ingredient swaps, expert troubleshooting, and make-ahead tips, even beginners can master this impressive dessert.
Whether you’re serving it at a holiday feast, a birthday party, or just enjoying a slice after dinner, this no bake cheesecake will quickly become a household favorite.