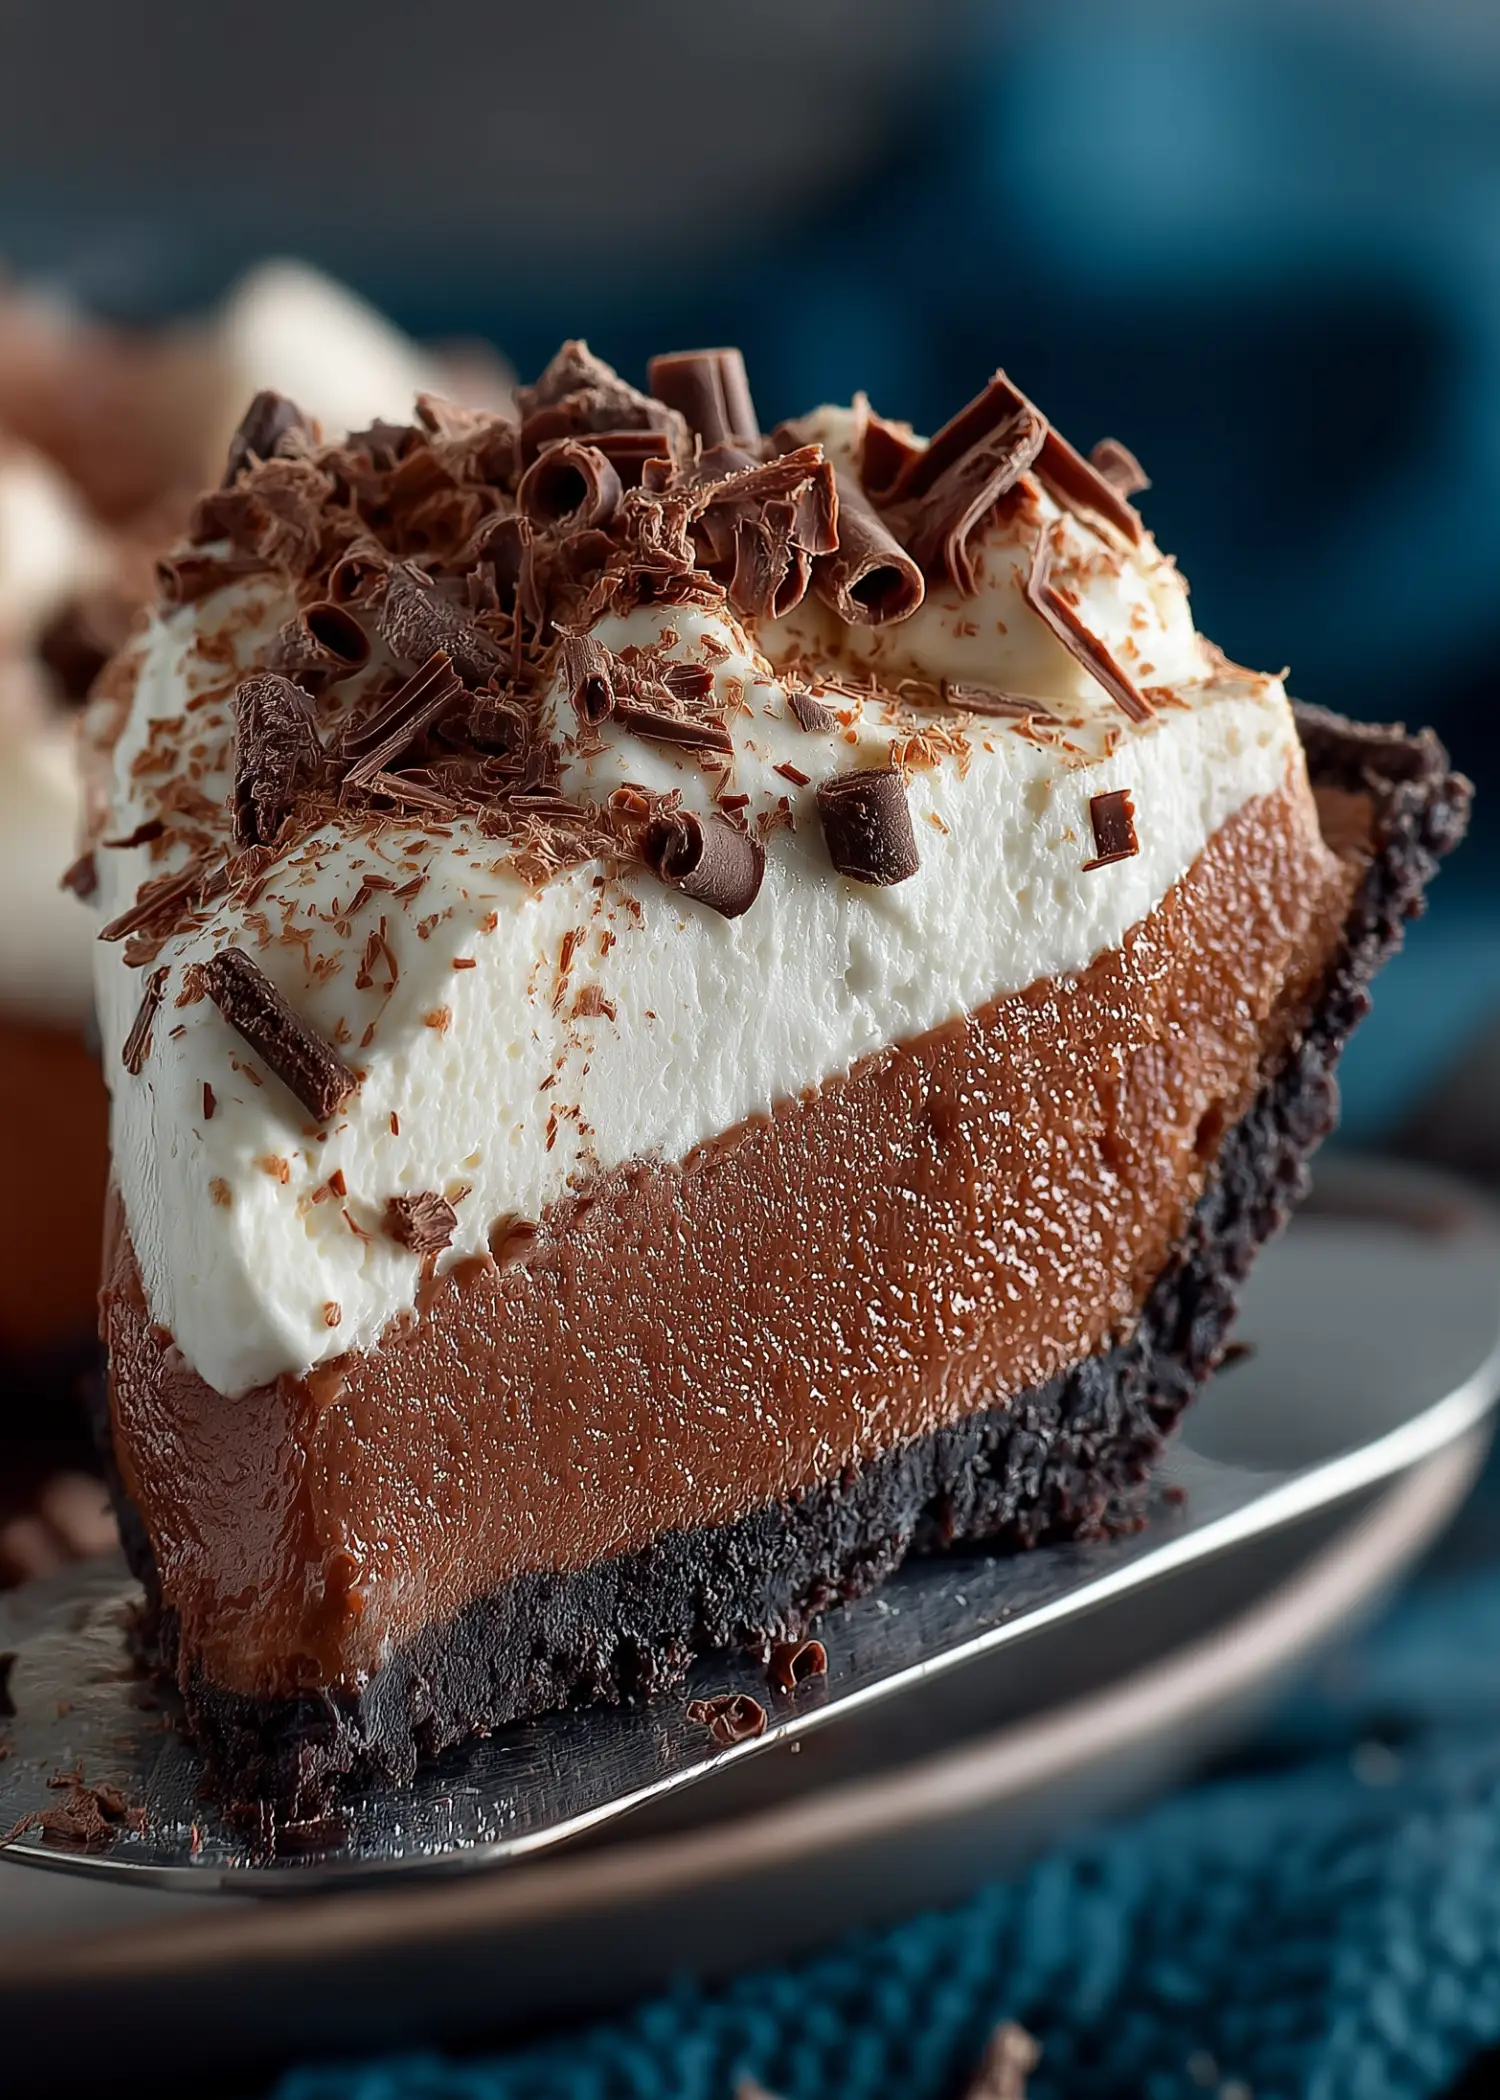
If you’re looking for an easy, no-bake dessert that feels fancy but takes minimal effort, this chocolate mousse pie recipe is it. With a smooth, airy filling made from melted chocolate, marshmallows, and whipped cream all set inside a crunchy Oreo crust, this treat is a guaranteed crowd-pleaser.
Contents
- 1 Why This Chocolate Mousse Pie Recipe Is a Must-Try
- 2 Ingredients Breakdown and Substitutions
- 3 Chocolate Mousse Pie Recipe
- 4 Step-by-Step Chocolate Mousse Pie Instructions
- 5 Expert Tips for a Perfect Chocolate Mousse Pie
- 6 Topping Variations and Garnishing Ideas
- 7 Common Mistakes to Avoid When Making Chocolate Mousse Pie
- 8 Storage, Serving, and Make-Ahead Advice
- 9 Customizing the Oreo Crust and Exploring Other Options
Why This Chocolate Mousse Pie Recipe Is a Must-Try
A Rich, Creamy Chocolate Flavor
This Chocolate Mousse Pie combines semi-sweet and bittersweet chocolate chips for a bold, deep chocolate taste. The marshmallows melt into the mixture, giving the mousse a smooth texture without the need for eggs or gelatin.
Perfect for Any Event
Whether you’re hosting dinner or just want a sweet treat in the fridge, this pie fits. It chills in just a few hours, looks elegant with whipped cream and chocolate shavings, and stores easily. It’s the kind of dessert that works all year round.
Ingredients Breakdown and Substitutions
Key Components for Mousse Perfection
This chocolate mousse pie recipe shines because of its simple, well-balanced ingredients. Here’s what you’ll need and why each one matters:
- Semi-sweet chocolate chips (1 cup): They bring balanced sweetness and melt smoothly. They’re the base of the chocolate flavor.
- Bittersweet chocolate chips (1/2 cup): Add richness and depth. If you prefer a sweeter pie, replace them with more semi-sweet or milk chocolate chips.
- Mini marshmallows (2 cups): These melt into the chocolate and act as a stabilizer. They help set the mousse without needing gelatin or eggs.
- Milk (1/3 cup): Whole or 2% milk works. It loosens the mixture for smoother blending and gives moisture.
- Salted butter (2 Tbsp): Adds richness and balances the sweetness. Using salted butter also eliminates the need to add extra salt.
- Vanilla extract (1 tsp): Enhances the chocolate flavor and brings warmth.
- Heavy whipping cream (1 ¾ cups for the mousse + 1 cup for topping): Whipped to stiff peaks, it creates the airy texture. Make sure it’s very cold for best results.
- Oreo pie crust (1 pre-made, 6 oz): A crunchy, no-bake base that contrasts the mousse texture. Store-bought keeps it fast and easy.
Simple Swaps for Dietary Preferences
Here are a few easy substitutions if you’re adapting for different needs:
| Ingredient | Substitute Option | Notes |
|---|---|---|
| Semi-sweet chocolate | Milk or dark chocolate | Choose based on desired sweetness |
| Mini marshmallows | Vegan marshmallows | Great for vegetarian or dairy-free diets |
| Milk | Almond or oat milk | Works fine but may be slightly less creamy |
| Heavy whipping cream | Coconut cream (full-fat, chilled) | Whips well and offers a mild coconut flavor |
| Oreo crust | Gluten-free chocolate cookie crust | Ideal for gluten-free adaptations |

Chocolate Mousse Pie Recipe
- Total Time: 4 hours 20 minutes
- Yield: 10 servings
- Diet: Vegetarian
Description
An easy no-bake chocolate mousse pie with a rich creamy filling, Oreo crust, and whipped cream topping. Perfect for any occasion.
Ingredients
2 Tbsp (28g) salted butter, diced
1 cup (6 oz) semi-sweet chocolate chips
1/2 cup (3 oz) bittersweet chocolate chips
2 cups (104g) mini marshmallows
1/3 cup (80ml) milk
1 tsp vanilla extract
1 3/4 cups (415ml) heavy whipping cream
1 (6 oz) store-bought Oreo pie crust
Topping:
1 cup (235ml) heavy cream
2 Tbsp (25g) granulated sugar
Chocolate shavings, for garnish
Instructions
1. Add butter, milk, chocolate chips, and marshmallows to a saucepan.
2. Heat over low, stirring constantly until melted and smooth.
3. Remove from heat, stir in vanilla, and let cool to room temperature (about 45–60 minutes).
4. Whip 1 3/4 cups cream to stiff peaks.
5. Fold whipped cream into cooled chocolate mixture until combined.
6. Pour into Oreo crust and smooth out evenly.
7. Chill in refrigerator for at least 3 hours.
8. Whip remaining 1 cup cream with sugar to stiff peaks.
9. Spread whipped cream over pie and garnish with chocolate shavings.
10. Slice and serve chilled. Store in fridge.
Notes
For a sweeter twist, swap bittersweet chocolate for milk chocolate.
Use a vegetable peeler on a chocolate bar for easy shavings.
You can freeze slices individually for later enjoyment.
- Prep Time: 20 minutes
- Cook Time: 15 minutes
- Category: Pie Recipes
- Method: No-Bake
- Cuisine: American
Step-by-Step Chocolate Mousse Pie Instructions
Making this chocolate mousse pie is easier than it looks. With just a few key steps and a bit of chilling time, you’ll have a creamy, dreamy dessert ready to impress. Here’s exactly how to do it:
Melting the Chocolate and Marshmallow Base
Start by combining the core ingredients in a saucepan:
- Add 2 Tbsp of diced salted butter, 1 cup semi-sweet chocolate chips, 1/2 cup bittersweet chocolate chips, 2 cups mini marshmallows, and 1/3 cup milk to a large saucepan.
- Turn the heat to low. Stir constantly to prevent burning. This step takes time, especially for the marshmallows to fully melt, so be patient and keep mixing.
- Once the mixture is completely smooth and glossy, remove from heat.
- Stir in 1 tsp of vanilla extract for that extra flavor boost.
- Transfer the mixture to a large bowl and let it cool for 45 to 60 minutes, or until it’s at room temperature. Don’t skip this — it’s crucial for the whipped cream to fold in properly.
Folding in Whipped Cream and Assembling the Chocolate Mousse Pie
While the chocolate mix cools:
- Whip 1 ¾ cups of heavy whipping cream in a chilled bowl until very stiff peaks form. Using a cold bowl and beaters makes a noticeable difference.
- Gently fold the whipped cream into the cooled chocolate mixture. Do this in batches using a rubber spatula, being careful not to deflate the mousse. The texture should remain fluffy.
- Spoon the mixture into the Oreo crust, smoothing it into an even layer. If it looks a bit too tall, feel free to save a few scoops in cups for a mousse-on-the-go treat.
Once assembled:
- Chill the Chocolate Mousse Pie in the refrigerator for at least 3 hours. This allows it to firm up while keeping that smooth, airy bite.
Expert Tips for a Perfect Chocolate Mousse Pie
Even though this chocolate mousse pie recipe is simple, a few smart techniques can take it from good to absolutely flawless. Here are the top tips to guarantee rich flavor, silky texture, and a beautiful presentation every time.
Chilling Time and Consistency Matters
- Let the chocolate cool completely before folding in whipped cream. If it’s warm, it will melt the whipped cream and ruin the texture. The ideal is room temperature.
- Once assembled, refrigerate for at least 3 hours. This sets the mousse and firms the crust slightly. For best results, chill overnight — the flavor deepens beautifully with time.
- Always serve cold, straight from the fridge. At room temperature, the mousse may start to soften too much, especially on warm days.
Preventing Mousse Deflation
- Use stiff peaks, not soft peaks, when whipping the cream. This gives the mousse its structure.
- When folding whipped cream into the chocolate mixture, do it gently. Use a spatula and fold with light strokes from the bottom up. This keeps the mousse fluffy.
- Avoid overmixing. It’s okay if some streaks of cream remain — they’ll blend as the mousse sets.
Check out our foolproof tips for folding whipped cream without losing volume — perfect for mousse, trifles, and no-bake desserts.
Bonus Presentation Tips
- Use a clean, warm knife to slice the Chocolate Mousse Pie. Dip it in hot water, wipe clean, and slice for smooth edges.
- For picture-worthy results, garnish just before serving with freshly whipped cream and chocolate shavings.
Topping Variations and Garnishing Ideas
The topping is the final flourish that transforms your chocolate mousse pie from a simple dessert into a showstopper. Whether you like it classic or want to add a creative spin, here are easy ways to top your Chocolate Mousse Pie for taste and style.
Whipped Cream, Shavings, and More
For the traditional topping:
- Whip 1 cup of heavy cream with 2 tablespoons of granulated sugar until stiff peaks form. Chill your mixing bowl and beaters beforehand for best results.
- Spread the whipped cream over the chilled mousse pie in a thick, even layer.
- Finish with chocolate shavings for that elegant touch. Use a vegetable peeler to shave a bar of chocolate along the edge, and let the curls fall naturally onto the whipped topping.
Other easy toppings to try:
- Crushed Oreos for crunch
- Mini chocolate chips
- Dusting of cocoa powder
- Chocolate drizzle (melt 2 tbsp chocolate chips with 1 tsp oil)
Check out our guide to creating chocolate curls and garnishes to give your desserts bakery-style flair.
Flavor Twists: Peppermint, Espresso, or Fruit
Want to give your Chocolate Mousse Pie a flavor upgrade? Here are a few simple add-ins:
| Twist | How to Add It | Resulting Flavor Profile |
|---|---|---|
| Peppermint | Add 1/4 tsp peppermint extract to the mousse | A cool, holiday-ready vibe |
| Espresso | Stir in 1 tsp instant espresso powder | Richer, deeper chocolate flavor |
| Fruit Sauce | Swirl raspberry or cherry preserves on top | Bright, tangy contrast to chocolate |
| Coconut Flakes | Sprinkle over whipped cream topping | Tropical flair with added texture |
Don’t miss our dessert flavor pairing guide for more creative topping combinations and sauces.
Common Mistakes to Avoid When Making Chocolate Mousse Pie
Even easy recipes have their tricky spots. Watch out for these common errors to keep your chocolate mousse pie smooth and delicious.
Over-Whipping the Cream
Whip the cream until stiff peaks form, but stop there. Over-whipped cream turns grainy and won’t fold in smoothly. If you go too far, try adding a bit of unwhipped cream to bring it back.
Folding into Warm Chocolate
If the chocolate base is still warm, it will melt the whipped cream, ruining the mousse texture. Always cool the chocolate mixture to room temperature before folding.
Not Chilling Long Enough
The mousse needs at least 3 hours in the fridge to set properly. If you slice too soon, it may collapse. For best results, chill overnight.
Storage, Serving, and Make-Ahead Advice
This chocolate mousse pie recipe isn’t just easy to make, it’s also super convenient when it comes to storing and serving. Here’s how to keep it fresh and plan ahead without losing flavor or texture.
How to Store for Freshness
- Refrigerate tightly covered: After slicing, cover the pie with plastic wrap or a pie lid and store it in the fridge. It stays fresh for up to 4 days.
- Avoid soggy crust: Don’t let the pie sit out too long. The Oreo crust can soften if exposed to too much moisture or air.
Making Mousse Pie Ahead of Time
- You can make the full pie a day in advance, including the topping. The mousse texture holds up beautifully.
- For extra freshness, you can wait to whip and spread the topping cream just before serving.
- Freeze individual slices: If you want to save leftovers, freeze slices on a tray first, then wrap them tightly. Thaw in the fridge overnight. The texture will stay creamy.
Serving Tips for the Best Experience
- Use a warm, clean knife to slice the Chocolate Mousse Pie cleanly.
- Serve directly from the fridge for the best mousse texture.
- For a crisp crust, avoid letting it sit at room temp too long.
Customizing the Oreo Crust and Exploring Other Options
The Oreo crust in this chocolate mousse pie recipe is a favorite for its flavor and no-bake ease, but you’ve got plenty of options if you’re looking to change things up. Whether for dietary reasons or just variety, here’s how to customize it.
Crust Alternatives: Graham Cracker, Digestive Biscuit, or Shortbread
While the Oreo crust adds a rich, chocolatey base, other crusts can work just as well and offer new flavor pairings.
| Crust Type | Flavor Profile | Notes |
|---|---|---|
| Graham Cracker | Sweet and slightly nutty | Great for a lighter feel with rich chocolate mousse |
| Digestive Biscuit | Buttery and mild | Popular in UK-style pies, holds together nicely |
| Shortbread Cookie | Rich, buttery, crumbly | Adds indulgence and a soft crunch |
Each of these crusts can be made the same way: crush the cookies, mix with melted butter, press into the pie dish, and chill until firm.
Flavor-Enhancing Tips for Your Crust
- Add a pinch of salt to boost contrast and enhance the chocolate.
- Mix in crushed nuts like pecans or almonds for texture.
- Add 1 tbsp of cocoa powder to a graham cracker crust for a chocolate boost.
- Want a touch of spice? Mix cinnamon or espresso powder into the crumbs.
This chocolate mousse pie recipe is everything a great dessert should be: rich, airy, chocolatey, and unbelievably easy to make. With no baking required and simple ingredients, it’s the kind of recipe you’ll come back to again and again. Whether you stick with the classic Oreo crust or mix things up with new toppings or healthier swaps, this pie is guaranteed to please a crowd — or just treat yourself.
For More Delicious And Easy Recipes Follow Me In Facebook And Pinterest.