Looking to impress with a cake that’s both fun and flavorful? This checkered cake recipe gives you a beautiful, colorful design inside every slice. Perfect for birthdays or any special event, this Checkered cake blends moist vanilla layers, bright sprinkles, and a smooth buttercream frosting. It’s simpler to make than it looks and guarantees a wow moment once it’s cut.
Contents
- 1 What Is a Checkered Cake?
- 2 Ingredients You Need for a Homemade Checkered Cake
- 3 Checkered Cake Recipe
- 4 Prepping the Cake Pans and Tools
- 5 Step-by-Step Guide to Making Checkered Cake Layers
- 6 Baking the Layers Perfectly
- 7 Cutting the Checkered Cake into Concentric Circles
- 8 Making Vanilla Buttercream Frosting
- 9 Assembling and Decorating the Checkered Cake
- 10 Serving, Storing, and Make-Ahead Tips
- 11 Conclusion
What Is a Checkered Cake?
What Makes Checkered Cakes Unique
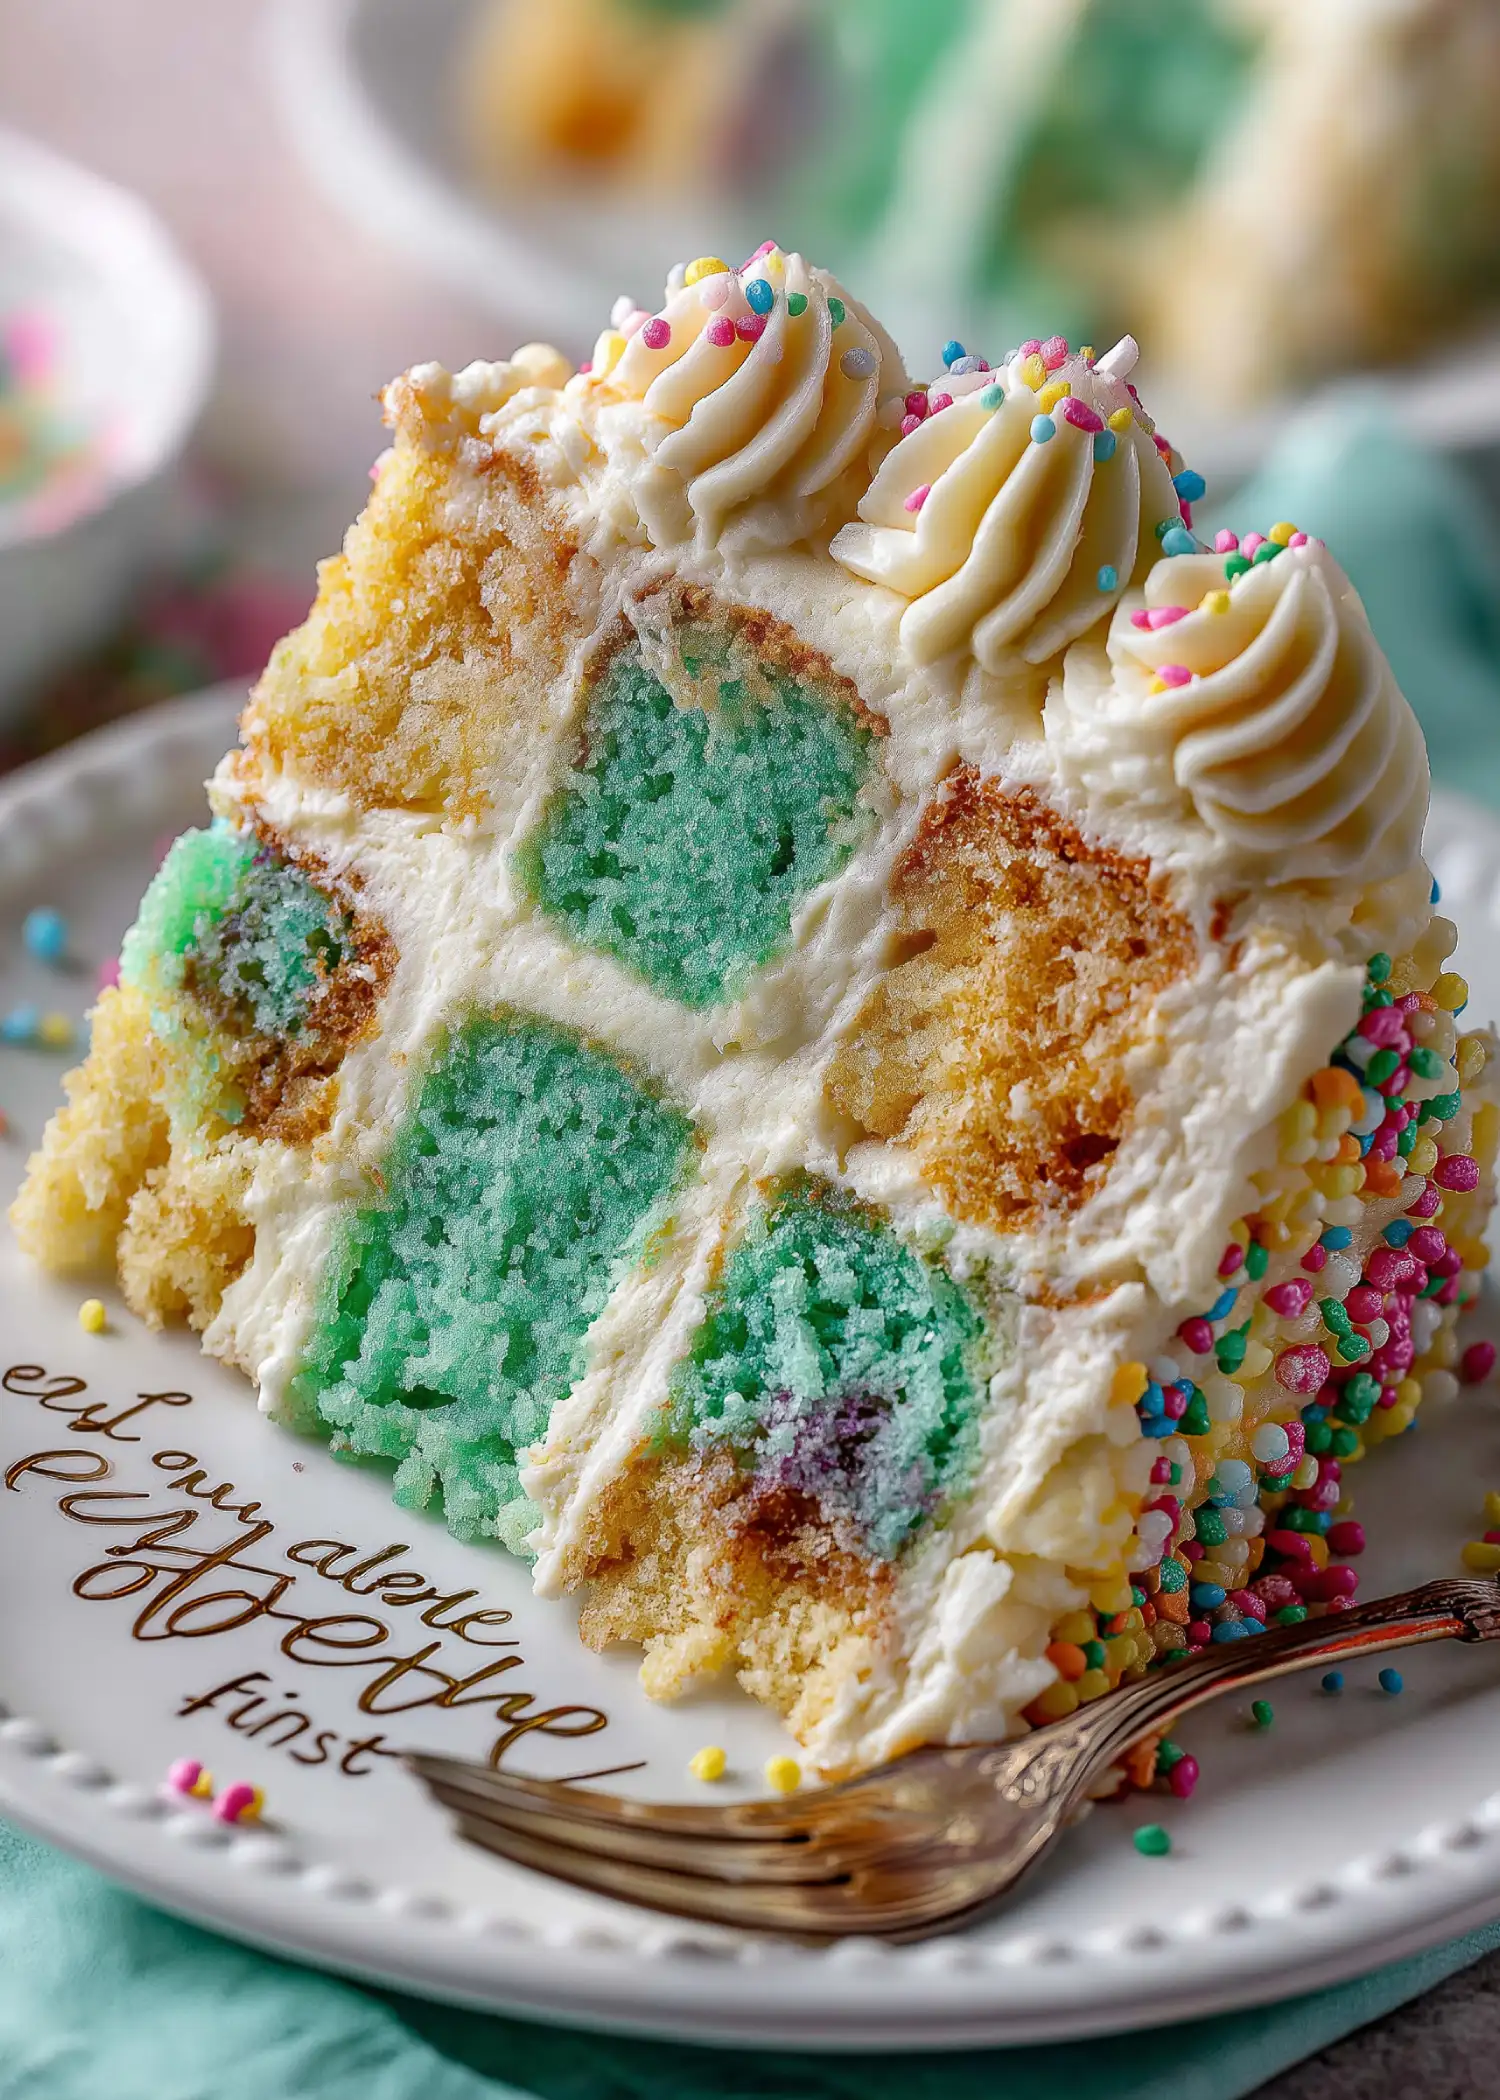
A checkered cake, or checkerboard cake, reveals a surprise pattern inside—alternating squares of color or flavor that look like a checkerboard when sliced. It’s an eye-catching dessert that’s surprisingly easy to assemble with the right tools.
Simple but Stunning Design
Despite the detailed look, this checkered cake recipe uses basic steps—bake, cut, and layer. No special pans are needed, just cookie cutters and some patience. It’s a fun way to turn a classic cake into something spectacular with minimal effort.
Ingredients You Need for a Homemade Checkered Cake
Creating a perfect checkered cake recipe starts with using quality ingredients in the right amounts. This Checkered cake combines rich vanilla flavor, a soft texture, and vibrant colors, making it perfect for parties and celebrations.
Essential Pantry Ingredients and Smart Substitutes
For the Checkered cake layers, here’s what you’ll need:
- 3 and 3/4 cups (443g) all-purpose flour – sifted, spooned, and leveled for accurate measurement.
- 2 teaspoons baking powder – ensures lift and fluffiness.
- 3/4 teaspoon baking soda – reacts with buttermilk for a tender crumb.
- 1 teaspoon salt – enhances overall flavor.
- 1 and 1/2 cups (340g) unsalted butter – softened to room temperature.
- 2 cups (400g) granulated sugar – for sweetness and structure.
- 5 large eggs – room temperature eggs mix better and help with rise.
- 3 teaspoons pure vanilla extract – adds deep, warm flavor.
- 1 and 3/4 cups (420ml) buttermilk – creates moisture and tenderness.
Tip: No buttermilk? Make your own by mixing 1 tablespoon white vinegar or lemon juice with enough whole milk to reach 1 3/4 cups. Let it sit for 5 minutes.
You’ll also need:
- 1/3 cup (50g) rainbow sprinkles – for funfetti layers.
- 2–3 drops teal food coloring – or any color you prefer for contrast.
Ingredients for the Vanilla Buttercream Frosting
The frosting is as important as the Checkered cake itself. You’ll need:
- 1 and 3/4 cups (396g) unsalted butter – softened.
- 7 cups (840g) confectioners’ sugar – sifted if needed.
- 6 tablespoons (90ml) heavy cream – adds smoothness and spreadability.
- 1 teaspoon vanilla extract – pairs perfectly with the Checkered cake layers.
- 1/4 teaspoon salt – to balance the sweetness.
Adjust consistency with more sugar (for thickening) or more cream (for thinning). A pinch of salt can tame the sweetness if needed.
Optional Garnishes
- Extra sprinkles – to decorate the sides or top.
- Food-safe cake toppers – to match your celebration theme.
With these ingredients ready, you’re set to bake vibrant, flavorful layers that will make your checkered cake recipe stand out.
Print
Checkered Cake Recipe
- Total Time: 4 hours 25 minutes
- Yield: 10–12 servings 1x
- Diet: Vegetarian
Description
A stunning and colorful checkered cake recipe that combines funfetti and teal vanilla layers with creamy buttercream frosting—perfect for birthdays and parties.
Ingredients
Cake:
3 and 3/4 cups (443g) sifted all-purpose flour (spooned & leveled)
2 teaspoons baking powder
3/4 teaspoon baking soda
1 teaspoon salt
1 and 1/2 cups (340g) unsalted butter, softened to room temperature
2 cups (400g) granulated sugar
5 large eggs, at room temperature
3 teaspoons pure vanilla extract
1 and 3/4 cups (420ml) buttermilk, at room temperature
1/3 cup (50g) rainbow sprinkles (plus more for garnish)
2–3 drops teal food coloring (or any color)
Vanilla Buttercream:
1 and 3/4 cups (396g) unsalted butter, softened to room temperature
7 cups (840g) confectioners’ sugar
6 Tablespoons (90ml) heavy cream
1 teaspoon pure vanilla extract
1/4 teaspoon salt
Instructions
1. Preheat oven to 350°F (177°C). Grease and line four 9-inch cake pans with parchment.
2. In a bowl, whisk together flour, baking powder, baking soda, and salt.
3. In another bowl, beat butter until creamy, then add sugar and beat for 5 minutes.
4. Add eggs one at a time, mixing well, then add vanilla extract.
5. Alternate adding dry ingredients and buttermilk, starting and ending with dry mix.
6. Divide batter in half. Add sprinkles to one half, teal food coloring to the other.
7. Pour batter evenly into prepared pans and bake for 25–27 minutes.
8. Cool cakes completely on wire racks.
9. Use 6-inch and 3-inch round cutters to create concentric rings in each layer.
10. Swap rings to alternate colors and reassemble each layer.
11. Prepare buttercream by beating butter, then adding sugar, cream, vanilla, and salt.
12. Stack the layers, alternating ring colors, adding buttercream between each.
13. Frost the top and sides, smoothing with a spatula.
14. Decorate with extra sprinkles.
15. Chill for at least 1 hour before slicing.
Notes
Make-Ahead: Bake layers the day before, wrap tightly, and store at room temperature.
The buttercream can also be made a day ahead and re-whipped before using.
For a clean slice, refrigerate the cake before cutting.
Store at room temp for 1-2 days or refrigerate for up to 1 week.
Freeze unfrosted layers for up to 2 months.
- Prep Time: 4 hours
- Cook Time: 25 minutes
- Category: Dessert
- Method: Baking
- Cuisine: American
Nutrition
- Serving Size: 1 slice
- Calories: 580
- Sugar: 45g
- Sodium: 180mg
- Fat: 32g
- Saturated Fat: 19g
- Unsaturated Fat: 11g
- Trans Fat: 0.5g
- Carbohydrates: 68g
- Fiber: 1g
- Protein: 5g
- Cholesterol: 115mg
Prepping the Cake Pans and Tools
Before you mix your batter, the right prep work makes all the difference. This step helps ensure your cake layers bake evenly, release cleanly from the pans, and are easy to cut into rings later. Every successful checkered cake recipe starts with smart preparation.
Why Pan Preparation Is Key for Clean Layers
Properly greasing and lining your cake pans prevents sticking and tearing, especially when working with delicate layers that need to be cut later. Here’s how to do it right:
- Grease four 9-inch round cake pans thoroughly using butter or nonstick spray.
- Line the bottoms with parchment paper rounds. This guarantees smooth removal.
- Grease the parchment paper again. Double coverage ensures zero sticking.
If you don’t have four pans, bake two layers at a time, but make sure the pans cool and are re-greased between bakes.
Tools You Need for Precision and Ease
To get those signature checkerboard rings, you’ll need just a few tools that make the process easier and more precise:
| Tool | Purpose |
|---|---|
| 6-inch round cookie cutter | Cuts the inner circle from each cake layer |
| 3-inch round cookie cutter | Cuts the center circle for ring pattern |
| Offset icing spatula | Smooths frosting and helps layer cakes |
| Cake turntable (optional) | Eases decorating and layering |
| Mixing bowls + whisk | For combining ingredients evenly |
| Electric mixer | Ensures a smooth batter and creamy frosting |
Having the right setup before you begin baking streamlines the entire process. With everything measured, lined, and ready, you’ll be more confident and efficient as you bring your checkered cake recipe to life.
Step-by-Step Guide to Making Checkered Cake Layers
Creating the perfect layers is the heart of any checkered cake recipe. These steps ensure your batter is smooth, evenly colored, and baked to soft, moist perfection. Take your time with this part—it’s worth it.
Mixing the Batter Correctly Without Overmixing
To start, whisk together the dry ingredients in a large mixing bowl:
- 3 and 3/4 cups sifted all-purpose flour
- 2 teaspoons baking powder
- 3/4 teaspoon baking soda
- 1 teaspoon salt
Set that aside. In another large bowl, use a handheld or stand mixer fitted with a paddle attachment to:
- Beat 1 1/2 cups unsalted butter on high speed for 1 minute until creamy.
- Add 2 cups granulated sugar and beat for 5 full minutes until fluffy and pale.
- Add 5 eggs, one at a time, mixing well after each. Then add 3 teaspoons vanilla extract.
- With your mixer on low, add the dry ingredients in three parts, alternating with 1 3/4 cups buttermilk, starting and ending with the dry mix.
Your batter should be velvety and slightly thick—not runny or overworked. Overmixing leads to dense cakes, so stop mixing once everything is just combined.
How to Split and Color the Batter
This recipe yields 8 cups of batter total. Transfer half to another bowl:
- Stir 1/3 cup rainbow sprinkles into one bowl for the funfetti layer.
- Add 2–3 drops of teal food coloring (or your choice of color) to the second bowl.
Use a spatula to gently fold the additions in. This helps keep the air in the batter for a soft texture.
Next, divide the two batters evenly between your 4 prepared 9-inch cake pans—two pans for each color. Spread the batter out evenly using an offset spatula for flat, uniform layers.
Bake at 350°F (177°C) for about 25 minutes. Check with a toothpick in the center—if it comes out clean, the Checkered cakes are done.
Let the Checkered cakes cool completely in their pans before transferring to a wire rack. Fully cooled cakes are easier to cut and stack cleanly, which is essential for your checkered cake recipe to come out crisp and precise.
Baking the Layers Perfectly
The key to a beautiful checkered cake recipe lies not just in batter prep but also in how well your layers bake. This part ensures your cakes are light, level, and easy to cut into clean rings.
Timing, Temperature, and Testing for Doneness
Once your batter is divided and poured into four 9-inch pans, it’s time to bake. Here’s what you need to know:
- Preheat your oven to 350°F (177°C) before placing the pans inside. This ensures even baking from the start.
- Bake for 25–27 minutes, but begin checking at the 24-minute mark. Each oven is different, so stay close.
- Insert a toothpick into the center of each cake. If it comes out clean or with just a few crumbs, your cake is done.
Don’t open the oven too early, or your cakes may collapse in the center.
Avoid doming or cracking by using light-colored aluminum pans, which distribute heat more evenly.
Cooling Techniques That Prevent Crumbling
Cool your cakes completely before cutting or frosting. Here’s how to do it safely:
- Let cakes cool in their pans for 15–20 minutes on a wire rack.
- Carefully remove from pans, peel off the parchment paper, and place cakes back on the rack to cool fully—this takes about 45 minutes.
You’ll need your layers completely cool to cut smooth circles and prevent the sponge from breaking or sticking to your cutters.
If you plan to assemble your checkered cake later, you can wrap cooled layers tightly in plastic wrap and store them at room temperature for up to 24 hours.
Cutting the Checkered Cake into Concentric Circles
This step is where the magic happens. With your cake layers baked and cooled, it’s time to transform them into a bold checkerboard pattern. Using just a couple of round cookie cutters, you’ll cut and reassemble the layers into colorful rings that alternate in every slice.
How to Use Cookie Cutters to Create Rings
To get the signature look of this checkered cake recipe, you’ll need:
- A 6-inch round cookie cutter
- A 3-inch round cookie cutter
Follow these steps for each cake layer:
- Place one 9-inch cake layer on a flat surface.
- Center the 6-inch cutter and press down to remove the middle ring.
- Without removing the outer ring, center the 3-inch cutter inside the 6-inch cutout. Press to make a small circle.
- Repeat the process for all four layers.
When you’re done, you’ll have:
- 4 outer rings (9-inch outlines)
- 4 medium rings (6-inch cutouts)
- 4 inner circles (3-inch centers)
Each ring will match a different color—either the teal or funfetti layer—ready for you to alternate and stack.
Tips for Even Layering and Pattern Matching
Now comes the fun part: swapping and stacking the rings to create the checkerboard look.
Here’s how to build each layer:
- Place a 9-inch teal ring, fill with a 6-inch funfetti ring, then place a 3-inch teal center inside.
- For the next layer, reverse the colors: use a 9-inch funfetti ring, fill with a 6-inch teal ring, and finish with a 3-inch funfetti circle.
- Continue alternating as you stack all four layers.
This alternating pattern is what gives the Checkered cake its checkered surprise once sliced.
To keep the rings snug and aligned:
- Gently press each ring into the one surrounding it.
- Use a little frosting between rings if needed to hold them in place.
Making Vanilla Buttercream Frosting
A smooth, rich vanilla buttercream is the perfect finish for your checkered cake recipe. It not only holds the rings together but also adds sweet, creamy flavor that complements the soft cake layers. Getting the texture right is key—light enough to spread easily, but sturdy enough to hold the Checkered cake’s shape.
How to Get the Ideal Creamy Texture
To make your frosting:
- In a large bowl, beat 1 and 3/4 cups (396g) unsalted butter on medium speed until creamy—about 2 minutes.
- With the mixer on low, gradually add 7 cups (840g) confectioners’ sugar.
- Add 6 tablespoons (90ml) heavy cream, 1 teaspoon vanilla extract, and 1/4 teaspoon salt.
Once the ingredients are combined, increase the mixer speed to high. Beat for 3 full minutes until the frosting is fluffy and smooth.
Want it thinner for spreading? Add a tablespoon of cream.
Too runny? Mix in more confectioners’ sugar, a bit at a time.
If the frosting tastes too sweet, a pinch more salt will balance it out.
Troubleshooting Common Frosting Issues
If your frosting is:
- Too stiff: Add 1 teaspoon of cream at a time until it softens.
- Grainy: Let the butter soften fully before beating, and sift the sugar if needed.
- Too sweet: Add a pinch of salt or a teaspoon of lemon juice to cut sweetness.
For the best results, use room temperature ingredients and beat long enough to whip air into the frosting, giving it that light, silky texture.
Use an offset spatula to apply the frosting. Spread it evenly between each cake layer and cover the sides and top once the checkerboard rings are stacked.
Assembling and Decorating the Checkered Cake
Now that your Checkered cake rings and frosting are ready, it’s time to bring your checkered cake recipe together. This is where your hard work turns into a show-stopping dessert. Stacking the layers carefully and adding smooth buttercream helps make every slice clean, colorful, and irresistible.
Layering the Rings for a Checkerboard Effect
Start with a sturdy cake stand or flat serving plate. Here’s how to build the checkerboard pattern layer by layer:
- Begin with a teal 9-inch ring, filled with a funfetti 6-inch ring, and a teal 3-inch center.
- Spread a thin, even layer of vanilla buttercream on top.
- For the second layer, reverse the pattern: a funfetti outer ring, a teal middle ring, and a funfetti center.
- Add more frosting between each layer to hold everything together.
Repeat this alternating pattern for all four cake layers. Make sure the sides line up and the cake stays level. Press down gently after each layer to secure it in place.
Decorating Tips and Ideas with Sprinkles
Once the full cake is assembled, it’s time to frost the outside:
- Use an offset spatula to spread the remaining buttercream over the top and sides.
- For a smooth finish, dip your spatula in hot water, wipe it dry, and run it over the frosting.
- Decorate the top and sides with extra rainbow sprinkles for a fun finish.
Optional ideas:
- Pipe frosting swirls on top for a bakery-style look.
- Use a cake scraper for clean sides.
- Add a topper for birthdays or special events.
Once frosted, refrigerate the cake for at least 1 hour. This firms up the layers and makes slicing easier, ensuring the checkerboard pattern stays sharp when cut.
Serving, Storing, and Make-Ahead Tips
After all your work building this stunning dessert, it’s time to enjoy every bite. This section helps you serve your checkered cake recipe like a pro and keep leftovers tasting fresh.
How Long to Refrigerate for Clean Slices
Before slicing, chill the frosted cake for at least one hour. This helps the buttercream firm up and keeps the checkerboard pattern crisp when cutting.
Use a sharp, thin-bladed knife for the cleanest cuts. Dip the knife in warm water and wipe it dry between slices to avoid smearing frosting or colors.
Serve at room temperature. Let the cake sit out for about 30 minutes after refrigeration for the softest texture and fullest flavor.
Storage, Freezing, and Reheating Recommendations
Short-term storage:
- Cover leftover cake tightly and store at room temperature for up to 2 days.
- For longer freshness, refrigerate for up to 1 week in an airtight container.
Freezing instructions:
- Wrap unfrosted cake layers individually in plastic wrap, then foil.
- Freeze for up to 2 months.
- Thaw overnight in the fridge, then bring to room temperature before decorating.
Frosted cakes can also be frozen, but may lose some texture. For best results:
- Chill the frosted cake first until firm.
- Wrap tightly in plastic and foil.
- Freeze up to 2 months. Thaw slowly in the refrigerator.
Make-ahead tip:
- You can bake and cool the layers the night before.
- Store them tightly wrapped at room temperature.
- Make the buttercream a day ahead and refrigerate it. Bring it to room temperature and re-whip before using.
Conclusion
A homemade checkered cake recipe brings together visual appeal, vibrant flavor, and celebration-worthy presentation in one incredible dessert. While it may look complex, the steps are surprisingly simple—bake, cut, layer, and frost. By combining a soft vanilla base, colorful funfetti touches, and creamy buttercream, you get a cake that not only looks exciting on the inside but tastes amazing with every bite.
Whether you’re celebrating a birthday, surprising a loved one, or just trying something new, this checkerboard-style cake turns any occasion into something memorable. With the tips and techniques shared here, you’re now ready to impress your guests with a cake that’s both beautiful and delicious.
For More Delicious And Easy Recipes Follow Me In Facebook And Pinterest.
