The bumpy cake recipe isn’t just another chocolate dessert — it’s a nostalgic slice of Midwestern heritage. Famous for its signature rows of buttercream bumps buried beneath a smooth fudge frosting, this cake combines rich chocolate flavor with creamy texture in a way that’s both satisfying and visually striking.
In this article, you’ll learn how to bake a bumpy cake from scratch using simple ingredients and clear instructions. From creating the moist chocolate base to the final glossy pour of fudge, every step is broken down to help you master this retro favorite. Whether you’re baking for a party or treating yourself to something special, this guide makes it easy to bring bakery-quality results into your home kitchen.
Contents
- 1 Rich Nostalgia in Every Bite of Bumpy Cake
- 2 The Origin and Popularity of Bumpy Cake
- 3 Essential Tools and Ingredients for Bumpy Cake
- 4 Bumpy Cake Recipe
- 5 Preparing the Perfect Chocolate Cake Base
- 6 Crafting the Classic Buttercream “Bumps”
- 7 Creating the Signature Fudge Frosting
- 8 Final Assembly of the Bumpy Cake
- 9 Common Mistakes and How to Avoid Them
- 10 Storing and Serving Bumpy Cake
- 11 Bumpy Cake Variations and Serving Ideas
- 12 Conclusion
Rich Nostalgia in Every Bite of Bumpy Cake
The bumpy cake recipe isn’t just another chocolate dessert — it’s a nostalgic slice of Midwestern heritage. Famous for its signature rows of buttercream bumps buried beneath a smooth fudge frosting, this cake combines rich chocolate flavor with creamy texture in a way that’s both satisfying and visually striking.
In this article, you’ll learn how to bake a bumpy cake from scratch using simple ingredients and clear instructions. From creating the moist chocolate base to the final glossy pour of fudge, every step is broken down to help you master this retro favorite. Whether you’re baking for a party or treating yourself to something special, this guide makes it easy to bring bakery-quality results into your home kitchen.
The Origin and Popularity of Bumpy Cake
What is Bumpy Cake?
Bumpy cake is a rich chocolate sheet cake with thick stripes of vanilla buttercream running across the top, then finished with a pour of warm, glossy fudge frosting. The “bumps” are actually piped ridges of buttercream that hold their shape beneath the fudge layer, creating visual interest and a delightful bite of creamy contrast in every slice.
Unlike layer cakes or cupcakes, this dessert is baked in a single pan and decorated in a unique, recognizable pattern. It’s an excellent dessert choice for celebrations or any time you want something a little out of the ordinary.
A Brief History of This Midwestern Favorite
This cake’s roots trace back to the Detroit-based Sanders Confectionery Company, where it first gained popularity in the early 1900s. Originally marketed as “Devil’s Food Buttercream Cake,” it became widely known as “bumpy cake” due to its lumpy appearance.
It quickly became a Midwest icon, especially in Michigan, where it’s still a nostalgic staple for many families. Over the years, its fame spread across the country, inspiring countless home bakers to recreate it at home.
Essential Tools and Ingredients for Bumpy Cake
Must-Have Kitchen Equipment
Before you dive into this bumpy cake recipe, make sure your kitchen is equipped with the essentials. This bumpy cake isn’t overly complicated, but having the right tools will make each step smoother and more enjoyable.
Here’s what you’ll need:
| Tool | Purpose |
|---|---|
| 9″ x 13″ baking pan | For baking the sheet cake |
| Mixing bowls (large & medium) | For combining ingredients |
| Electric mixer | To blend cake batter and buttercream evenly |
| Rubber spatula | For scraping bowls clean |
| Wire cooling rack | To help the cake cool evenly after baking |
| Piping bag with ½” tip | To create the buttercream bumps |
| Saucepan (medium, heavy-bottomed) | To cook the fudge frosting |
| Measuring cups & spoons | For precise ingredient amounts |
Having these on hand will help you create a professional-looking cake with perfect bumps and that irresistible glossy finish.
Ingredient Quality Tips: Cocoa, Buttermilk, and More
The ingredients you choose matter. In this recipe, each component plays a specific role, and using quality ingredients will enhance flavor, texture, and appearance.
Dutch-process cocoa: This type of cocoa is less acidic than natural cocoa and delivers a smooth, rich flavor with a deep chocolate hue. It also reacts differently with leaveners like baking soda, so always stick to what the recipe calls for.
Buttermilk: Buttermilk adds tenderness and moisture while giving the cake a subtle tang that balances the sweetness. Room temperature is key here, so take it out ahead of time.
Vegetable oil vs. butter: Oil is used for a moist, tender crumb. Unlike butter, oil stays liquid at room temperature, keeping the cake soft for days.
Confectioners’ sugar: Always sift before using, especially in the buttercream and fudge. It prevents clumps and ensures smooth frosting.
Dark corn syrup: This gives the fudge its glossy finish and slightly chewy texture. While it might be tempting to skip it, don’t. It’s what keeps that iconic topping perfectly pourable.
Vanilla extract: Use pure vanilla extract. Imitation varieties can leave a chemical aftertaste that undermines the rich flavors in your bumpy cake.
Print
Bumpy Cake Recipe
- Total Time: 2 hours 13 minutes
- Yield: One 9x13 inch cake (20 servings) 1x
- Diet: Vegetarian
Description
A classic Midwestern chocolate cake featuring buttercream “bumps” hidden beneath rich fudge frosting. Perfect for parties, nostalgic desserts, or a weekend treat.
Ingredients
For the Cake
1/2 cup (43g) Dutch-process cocoa
1/2 cup (113g) brewed coffee or hot water
1/2 cup (99g) vegetable oil
1 cup (227g) buttermilk, at room temperature
1 1/2 teaspoons baking soda
1/2 teaspoon table salt
2 teaspoons vanilla extract
2 large eggs, at room temperature
1 3/4 cups (347g) granulated sugar
2 cups (240g) all-purpose flour
For the Buttercream
6 tablespoons (85g) unsalted butter, at room temperature
1/8 teaspoon salt
2 cups (227g) confectioners’ sugar, sifted
1 teaspoon vanilla extract
1 to 2 tablespoons milk or half-and-half
For the Fudge Frosting
1/2 cup (113g) buttermilk
2 tablespoons (39g) dark corn syrup
8 tablespoons (113g) unsalted butter
1/2 cup (43g) Dutch-process cocoa
1/4 teaspoon salt
4 cups (454g) confectioners’ sugar, sifted
1 teaspoon vanilla extract
Instructions
1. Preheat oven to 350°F. Grease a 9×13 inch pan.
2. Whisk cocoa and hot coffee until smooth. Add oil and buttermilk, stir well.
3. Add baking soda and salt. Beat briefly. Add vanilla and eggs, then mix again.
4. Stir in sugar and flour. Beat on medium speed for 2 minutes.
5. Scrape the bowl, beat again briefly. Pour into prepared pan.
6. Bake 33–35 minutes until cake springs back when touched.
7. Cool 30 minutes on rack, then freeze cake for 1 hour.
8. To make buttercream, beat butter and salt until fluffy.
9. Add confectioners’ sugar and vanilla, beat well.
10. Add milk as needed for smooth consistency.
11. Transfer frosting to piping bag with 1/2″ round tip.
12. Pipe seven stripes across short side of cake. Freeze 30 minutes.
13. Make fudge: In saucepan, combine buttermilk, syrup, butter, cocoa, and salt.
14. Bring to a boil. Cook 2–3 minutes until bubbles snap.
15. Turn heat low, whisk in sugar until glossy. Stir in vanilla.
16. Cool slightly. Pour half over chilled cake to cover bumps.
17. Freeze 10 minutes. Pour remaining fudge over cake.
18. Refrigerate 20 minutes to set. Slice and serve chilled.
Notes
Store covered in the refrigerator for up to 1 week.
Let slices sit at room temperature for 10–15 minutes before serving for best flavor.
Freeze cake before frosting if storing long-term.
Slice with a warm knife for clean cuts.
- Prep Time: 40 minutes
- Cook Time: 35 minutes
- Category: Dessert
- Method: Baking
- Cuisine: American
Nutrition
- Serving Size: 1 slice
- Calories: 420
- Sugar: 38g
- Sodium: 180mg
- Fat: 22g
- Saturated Fat: 12g
- Unsaturated Fat: 8g
- Trans Fat: 0g
- Carbohydrates: 52g
- Fiber: 2g
- Protein: 4g
- Cholesterol: 65mg
Preparing the Perfect Chocolate Cake Base
Step-by-Step: Mixing the Wet and Dry Ingredients
The heart of any bumpy cake recipe is its soft, moist chocolate base. Here, you’ll use Dutch-process cocoa, buttermilk, oil, and brewed coffee to build rich, deep flavors. Follow these steps closely to create a cake that’s tender, chocolaty, and perfectly structured to support those signature buttercream bumps.
1. Preheat and prep:
Set your oven to 350°F. Grease a 9″ x 13″ baking pan thoroughly, making sure to coat the corners and sides. You can also line it with parchment paper for easier removal later.
2. Bloom the cocoa:
In a large mixing bowl, add ½ cup of Dutch-process cocoa. Pour in ½ cup of hot brewed coffee or hot water. Stir until the mixture is smooth and lump-free. This step deepens the cocoa flavor.
3. Add wet ingredients:
To the cocoa mixture, stir in ½ cup vegetable oil and 1 cup room-temperature buttermilk. Mix until combined. Then, sprinkle in 1½ teaspoons baking soda and ½ teaspoon salt. Beat for 30 seconds to activate the soda.
4. Add eggs and vanilla:
Next, mix in 2 teaspoons of vanilla extract and 2 large eggs, both at room temperature. Beat the mixture until it’s creamy and smooth.
5. Combine sugar and flour:
Gradually add 1¾ cups of granulated sugar and 2 cups of all-purpose flour. Beat on medium speed for 2 minutes. Scrape down the sides of the bowl and mix for 30 seconds more. Your batter should be silky and pourable.
Baking Tips for Moist Texture and Even Rise
Here’s how to make sure your cake bakes evenly and stays moist throughout:
- Use room-temperature ingredients. Cold eggs or buttermilk can cause uneven mixing and texture.
- Don’t overmix. Once the flour is added, overbeating can lead to a dense cake. Stop as soon as the batter is smooth.
- Check early. Start checking at 33 minutes. The bumpy cake is done when the top springs back lightly and the edges begin to pull away from the pan.
- Cool correctly. Place the pan on a wire rack for 30 minutes. Then transfer it to the freezer for at least 1 hour. This helps firm the cake before you pipe the buttercream.
You’re now set up with a rich, chocolaty base that’s ready for the next step — buttercream piping.
Crafting the Classic Buttercream “Bumps”
How to Make the Fluffy Vanilla Buttercream
The iconic bumps in a bumpy cake recipe come from smooth, sweet buttercream piped across the top of the cooled cake. It’s a simple vanilla frosting, but its texture and consistency are key — you want it soft enough to pipe but firm enough to hold its shape.
Follow these steps to make it just right:
1. Beat the butter and salt:
In a medium bowl, add 6 tablespoons (85g) of unsalted butter at room temperature and 1/8 teaspoon of salt. Beat until pale, fluffy, and smooth. This usually takes about 2 minutes with an electric mixer.
2. Add the sugar gradually:
Sift 2 cups (227g) of confectioners’ sugar and slowly mix it into the butter. Start at low speed to avoid clouds of sugar. Once incorporated, beat on medium speed for 1 minute.
3. Add vanilla and liquid:
Pour in 1 teaspoon of vanilla extract. Add 1 tablespoon of milk or half-and-half to soften the frosting. If it’s too thick to pipe, add another tablespoon gradually until smooth.
4. Chill slightly before piping:
If the buttercream is too soft, chill it in the fridge for 5–10 minutes. You want a pipeable texture that won’t flatten on the cake.
Piping Techniques to Form Even Cake Strips
Once the cake is baked and frozen for at least an hour, you’re ready to pipe the signature buttercream bumps.
Here’s how to do it right:
1. Prepare your piping bag:
Fit a pastry bag with a ½-inch round tip. If you don’t have one, a resealable plastic bag with the corner snipped off works too.
2. Pipe seven lines:
Start at one short end of the cake (the 9″ side) and pipe seven straight lines of buttercream, evenly spaced across the cake. Each line should be about ½ inch thick and spaced 1 inch apart. Don’t worry about perfection — the fudge layer will smooth out small bumps.
3. Freeze again:
Place the bumpy cake back in the freezer for at least 30 minutes. This helps the buttercream stay firm during the next step when the warm fudge is poured on top.
Creating the Signature Fudge Frosting
Cooking the Fudge: Timing and Temperature
The luscious fudge frosting is what truly sets this bumpy cake recipe apart. Warm, rich, and glossy, it’s poured over the buttercream stripes to create the cake’s signature bumpy look. The key to getting the right texture is cooking it just long enough to thicken, but not too long that it sets before pouring.
1. Combine the ingredients in a saucepan:
In a medium, heavy-bottomed saucepan, add:
- ½ cup (113g) buttermilk
- 2 tablespoons (39g) dark corn syrup
- 8 tablespoons (113g) unsalted butter
- ½ cup (43g) Dutch-process cocoa
- ¼ teaspoon salt
2. Bring to a boil:
Place the pan over medium heat. Stir constantly until the mixture reaches a boil. Once boiling, stop stirring and let it cook for 2 to 3 minutes, until the bubbles make a subtle snapping sound as they burst. This means it’s thickening to the right consistency.
3. Add sugar and vanilla:
Turn the heat to low and whisk in 4 cups (454g) of sifted confectioners’ sugar gradually. Keep whisking until smooth and glossy, without lumps. Once fully blended, remove from the heat and stir in 1 teaspoon vanilla extract.
4. Let it cool slightly:
Transfer the fudge into a large glass measuring cup or bowl with a spout for easy pouring. Let it sit for a few minutes until just warm — not hot. If it’s too hot, it will melt the buttercream. If too cold, it won’t pour smoothly.
Pouring and Setting for That Glossy Finish
With the fudge ready and the buttercream bumps firm from the freezer, it’s time for the magic moment — pouring.
1. First pour:
Remove the cake from the freezer and slowly pour half of the warm fudge frosting over the cake. Start at one end and use long, even strokes to cover all buttercream bumps completely.
2. Spread gently if needed:
Use an offset spatula or tilt the pan slightly to guide the fudge across the cake. Avoid using pressure — let gravity do the work to preserve the bumps underneath.
3. Freeze again:
Return the cake to the freezer for 5 to 10 minutes. This helps set the first layer of fudge quickly and cleanly.
4. Second pour:
Reheat the remaining frosting gently in the microwave if it has thickened too much. Stir until smooth and pour it over the cake to fully cover any missed spots or thin areas. Let it run down the sides if desired.
5. Final chill:
Place the cake in the refrigerator for 20 minutes or more until the frosting is set and glossy. You’ll get a perfect slice every time.
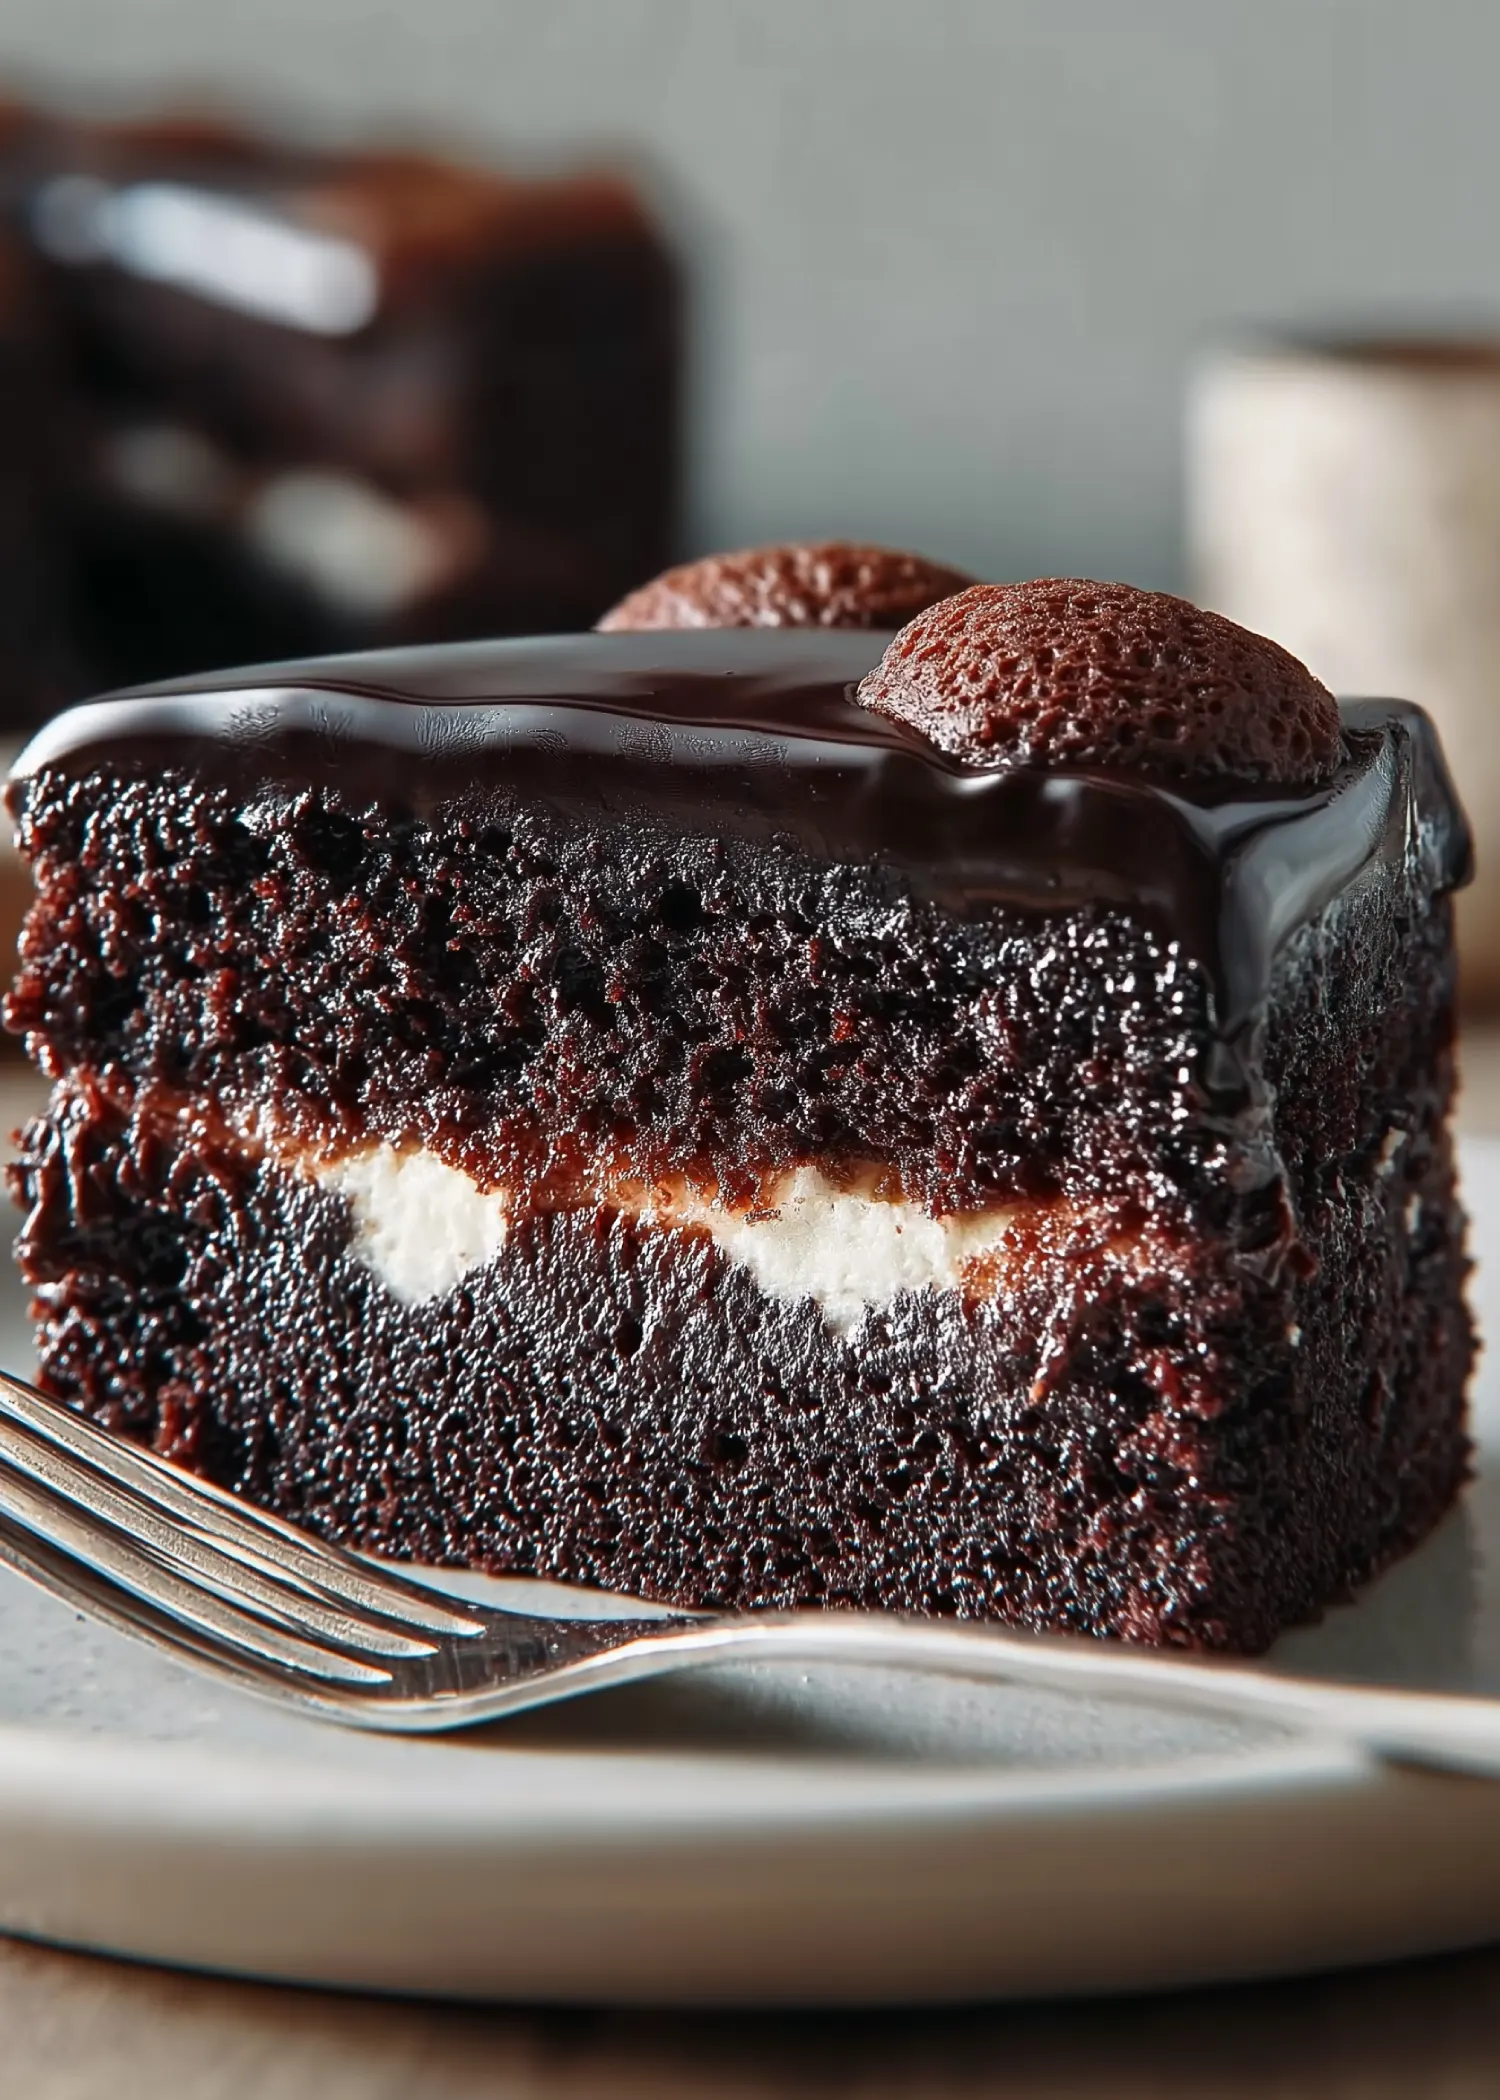
This step gives the cake its dramatic, chocolatey finish. When sliced, the cross-section reveals bumps of cream beneath a rich layer of chocolate fudge — a stunning treat with bakery-level appeal.
Final Assembly of the Bumpy Cake
Chilling, Layering, and Finishing Tips
With your bumpy cake base baked, buttercream bumps piped, and fudge frosting ready, it’s time for the final assembly. This stage combines everything you’ve made into a stunning and delicious whole. The goal here is a smooth, glossy top and distinct cream bumps beneath the fudge — just like the classic Midwestern original.
1. Prepare your space:
Place the chilled cake on a flat surface near your work area. Have a spoon, offset spatula, or a small angled spreader ready for guiding the fudge, if needed.
2. Pour the first fudge layer (recap):
Using half of the fudge frosting (already slightly cooled), pour it slowly across the buttercream lines. Begin at one edge and let it cascade smoothly over the bumps. Avoid going back and forth — that can disturb the shape.
3. Freeze briefly to set the shape:
Transfer the bumpy cake back into the freezer for 5 to 10 minutes. This locks in the shape of the bumps and cools the first layer of fudge so the second application won’t blend it unevenly.
4. Apply the second fudge layer:
Reheat the remaining fudge slightly if needed. Pour over the cake again, covering any exposed buttercream and evening out the top layer. The bumps should be fully hidden beneath a shiny, seamless surface.
5. Final chill:
Place the cake into the refrigerator, not the freezer this time, for about 20 minutes to set the fudge without hardening it. The result? A luxurious, silky finish with that classic “bumpy” surprise underneath.
6. Clean the edges (optional):
Once set, run a warm knife along the edges of the pan or lift the parchment if used. This gives you clean sides and easier slicing later.
How to Avoid Melting or Cracking Frosting
Temperature control is crucial in this stage. Here are a few practical tips to keep everything flawless:
- Don’t pour hot fudge on warm buttercream. The cream will melt, run, and destroy the bump shapes.
- Keep the bumpy cake cold but not frozen before slicing. This makes the fudge firm enough to cut cleanly without cracking.
- Use a hot, dry knife. Dip your knife in hot water and wipe it dry before slicing each piece. It helps create clean, beautiful cuts.
Common Mistakes and How to Avoid Them
Even though this bumpy cake recipe is beginner-friendly, small missteps can affect the texture, flavor, or appearance. Avoid these common pitfalls to make sure your cake turns out bakery-perfect.
Preventing Dry Cake and Runny Frosting
1. Overbaking the cake:
The most frequent issue? Dry, crumbly cake. Always check for doneness starting at 33 minutes. A light press on the center should spring back gently, and the edges should slightly pull away from the pan. If you’re unsure, a toothpick inserted in the center should come out with a few moist crumbs, not dry.
2. Skipping the freezer steps:
It might be tempting to save time by skipping freezing, but don’t. Freezing the cake before piping the buttercream stabilizes the base, while chilling the bumpy cake after piping firms the bumps. These steps are essential for structure.
3. Using hot fudge frosting:
Pouring fudge that’s too hot over buttercream can melt the bumps instantly. Let the frosting cool slightly before pouring. If it runs too fast or feels too thin, it’s too hot.
4. Not sifting confectioners’ sugar:
Lumpy frosting or grainy fudge is often caused by unsifted sugar. Always sift before mixing, especially when working with buttercream or fudge toppings.
5. Frosting too early:
Make sure the bumpy cake is cool before applying the buttercream. A warm base will cause the buttercream to slide and won’t allow proper setting in the freezer.
Buttercream Strip Troubleshooting
Problem: Buttercream is too soft to pipe
Solution: Chill it in the fridge for 5–10 minutes. Don’t freeze it — that will make it too hard to pipe.
Problem: Buttercream strips are uneven
Solution: Use the 9″ short side as a guide and mark the spacing lightly with a knife before piping. Aim for seven evenly spaced bumps about 1 inch apart.
Problem: Fudge layer is too thick or lumpy
Solution: If the fudge thickens too much before pouring, reheat it in 5-second intervals in the microwave, stirring between each. Add a teaspoon of milk if it feels stiff.
Problem: Cracked fudge when cutting
Solution: Slice the bumpy cake with a warm, dry knife. Rinse in hot water and wipe clean between cuts. This keeps the topping smooth and glossy.
By planning ahead and watching out for these easy-to-miss steps, you’ll bake a bumpy cake that’s rich, creamy, and perfectly presented.
Storing and Serving Bumpy Cake
Refrigerator vs. Freezer Storage
Proper storage is key to maintaining the taste and texture of your bumpy cake recipe. With its creamy buttercream and glossy fudge frosting, this cake needs a cool environment to stay fresh and firm.
Short-Term Storage (up to 1 week):
- Refrigerate the cake in the pan, tightly covered with plastic wrap or a fitted lid. This keeps the buttercream and fudge from softening too much.
- Let slices sit at room temperature for 10–15 minutes before serving so the frosting softens just slightly for the best flavor and texture.
Freezer Storage (up to 2 months):
- Freeze the bumpy cake before adding the fudge layer if you plan to store it long-term.
- Wrap it tightly in two layers of plastic wrap and one layer of foil.
- When ready to serve, thaw in the fridge overnight. Pipe fresh buttercream bumps and add fudge frosting just before serving.
Avoid storing at room temperature. The buttercream will soften and lose its structure, and the fudge may become sticky or runny, especially in warm or humid environments.
Cutting Tips for Clean, Even Slices
Cutting a cake with soft frosting layers can be tricky, especially when you’re aiming to preserve the visual appeal of the buttercream bumps beneath that thick chocolate layer.
1. Use a warm, dry knife:
Run your knife under hot water, then wipe it dry. Repeat between slices for smooth, glossy cuts without dragging frosting.
2. Slice straight down:
Use a single motion rather than sawing. This prevents the top layer from cracking or shifting.
3. Serve chilled:
Cut the bumpy cake while it’s cold from the fridge. The fudge will hold better, and each piece will look neat and clean.
4. Use a wide spatula for lifting:
A cake server or wide, flat spatula works best to lift slices without breaking them.
5. Portion ideas:
For smaller servings, cut the 9×13 cake into a 5×4 grid — 20 generous portions. For bite-sized treats, go for a 6×5 grid.
With the bumpy cake stored properly and sliced cleanly, you’re ready to enjoy every rich bite just the way it’s meant to be — soft, chocolatey, and wonderfully bumpy.
Bumpy Cake Variations and Serving Ideas
Flavor Twists: Mint, Peanut Butter, and Raspberry
The classic bumpy cake recipe is timeless, but don’t be afraid to get creative. With a few small tweaks, you can create delicious flavor variations that suit your taste or match the season.
1. Mint Chocolate Bumpy Cake:
- Add ½ teaspoon of peppermint extract to the buttercream instead of vanilla.
- For a finishing touch, sprinkle finely crushed peppermint candies over the final fudge layer before it sets.
- This version is great for holidays or a cool, refreshing twist.
2. Peanut Butter Bumpy Cake:
- Swap out 2 tablespoons of butter in the buttercream for smooth peanut butter.
- Add 1 tablespoon of powdered peanut butter to intensify the flavor.
- The combo of rich chocolate fudge and peanut butter bumps creates a crowd-pleasing flavor reminiscent of classic candy bars.
3. Raspberry Bumpy Cake:
- Add 1 tablespoon of raspberry preserves to the buttercream and reduce the milk slightly to adjust for added moisture.
- Optional: swirl raspberry jam into the fudge frosting before pouring for a marbled finish.
Pairing with Non-Alcoholic Beverages
Whether you’re serving it at a party, family dinner, or just treating yourself, pairing your bumpy cake with the right drink enhances the entire dessert experience. Here are a few no-fuss, alcohol-free suggestions:
| Beverage | Why It Works |
|---|---|
| Cold Brew Coffee | Enhances the chocolate tones |
| Vanilla Almond Milk | Echoes the buttercream flavor |
| Chai Latte | Adds warm spices that contrast nicely |
| Chocolate Milk | A rich pairing for chocolate lovers |
| Iced Raspberry Tea | Complements fruity cake variations |
For kids’ parties or casual events, serve with a scoop of vanilla ice cream and a tall glass of milk for a classic, nostalgic dessert plate.
Conclusion
This bumpy cake recipe brings together everything dessert lovers crave — moist chocolate cake, fluffy vanilla buttercream, and rich, glossy fudge frosting. From understanding the cake’s nostalgic roots to baking and assembling it step-by-step, you’ve now got all the tools to make this iconic treat in your own kitchen.
Whether you’re preparing it for a special event, holiday, or weekend indulgence, this bumpy cake delivers both on flavor and visual appeal. It’s one of those rare desserts that’s as fun to make as it is to eat.
For More Delicious And Easy Recipes Follow Me In Facebook And Pinterest.
