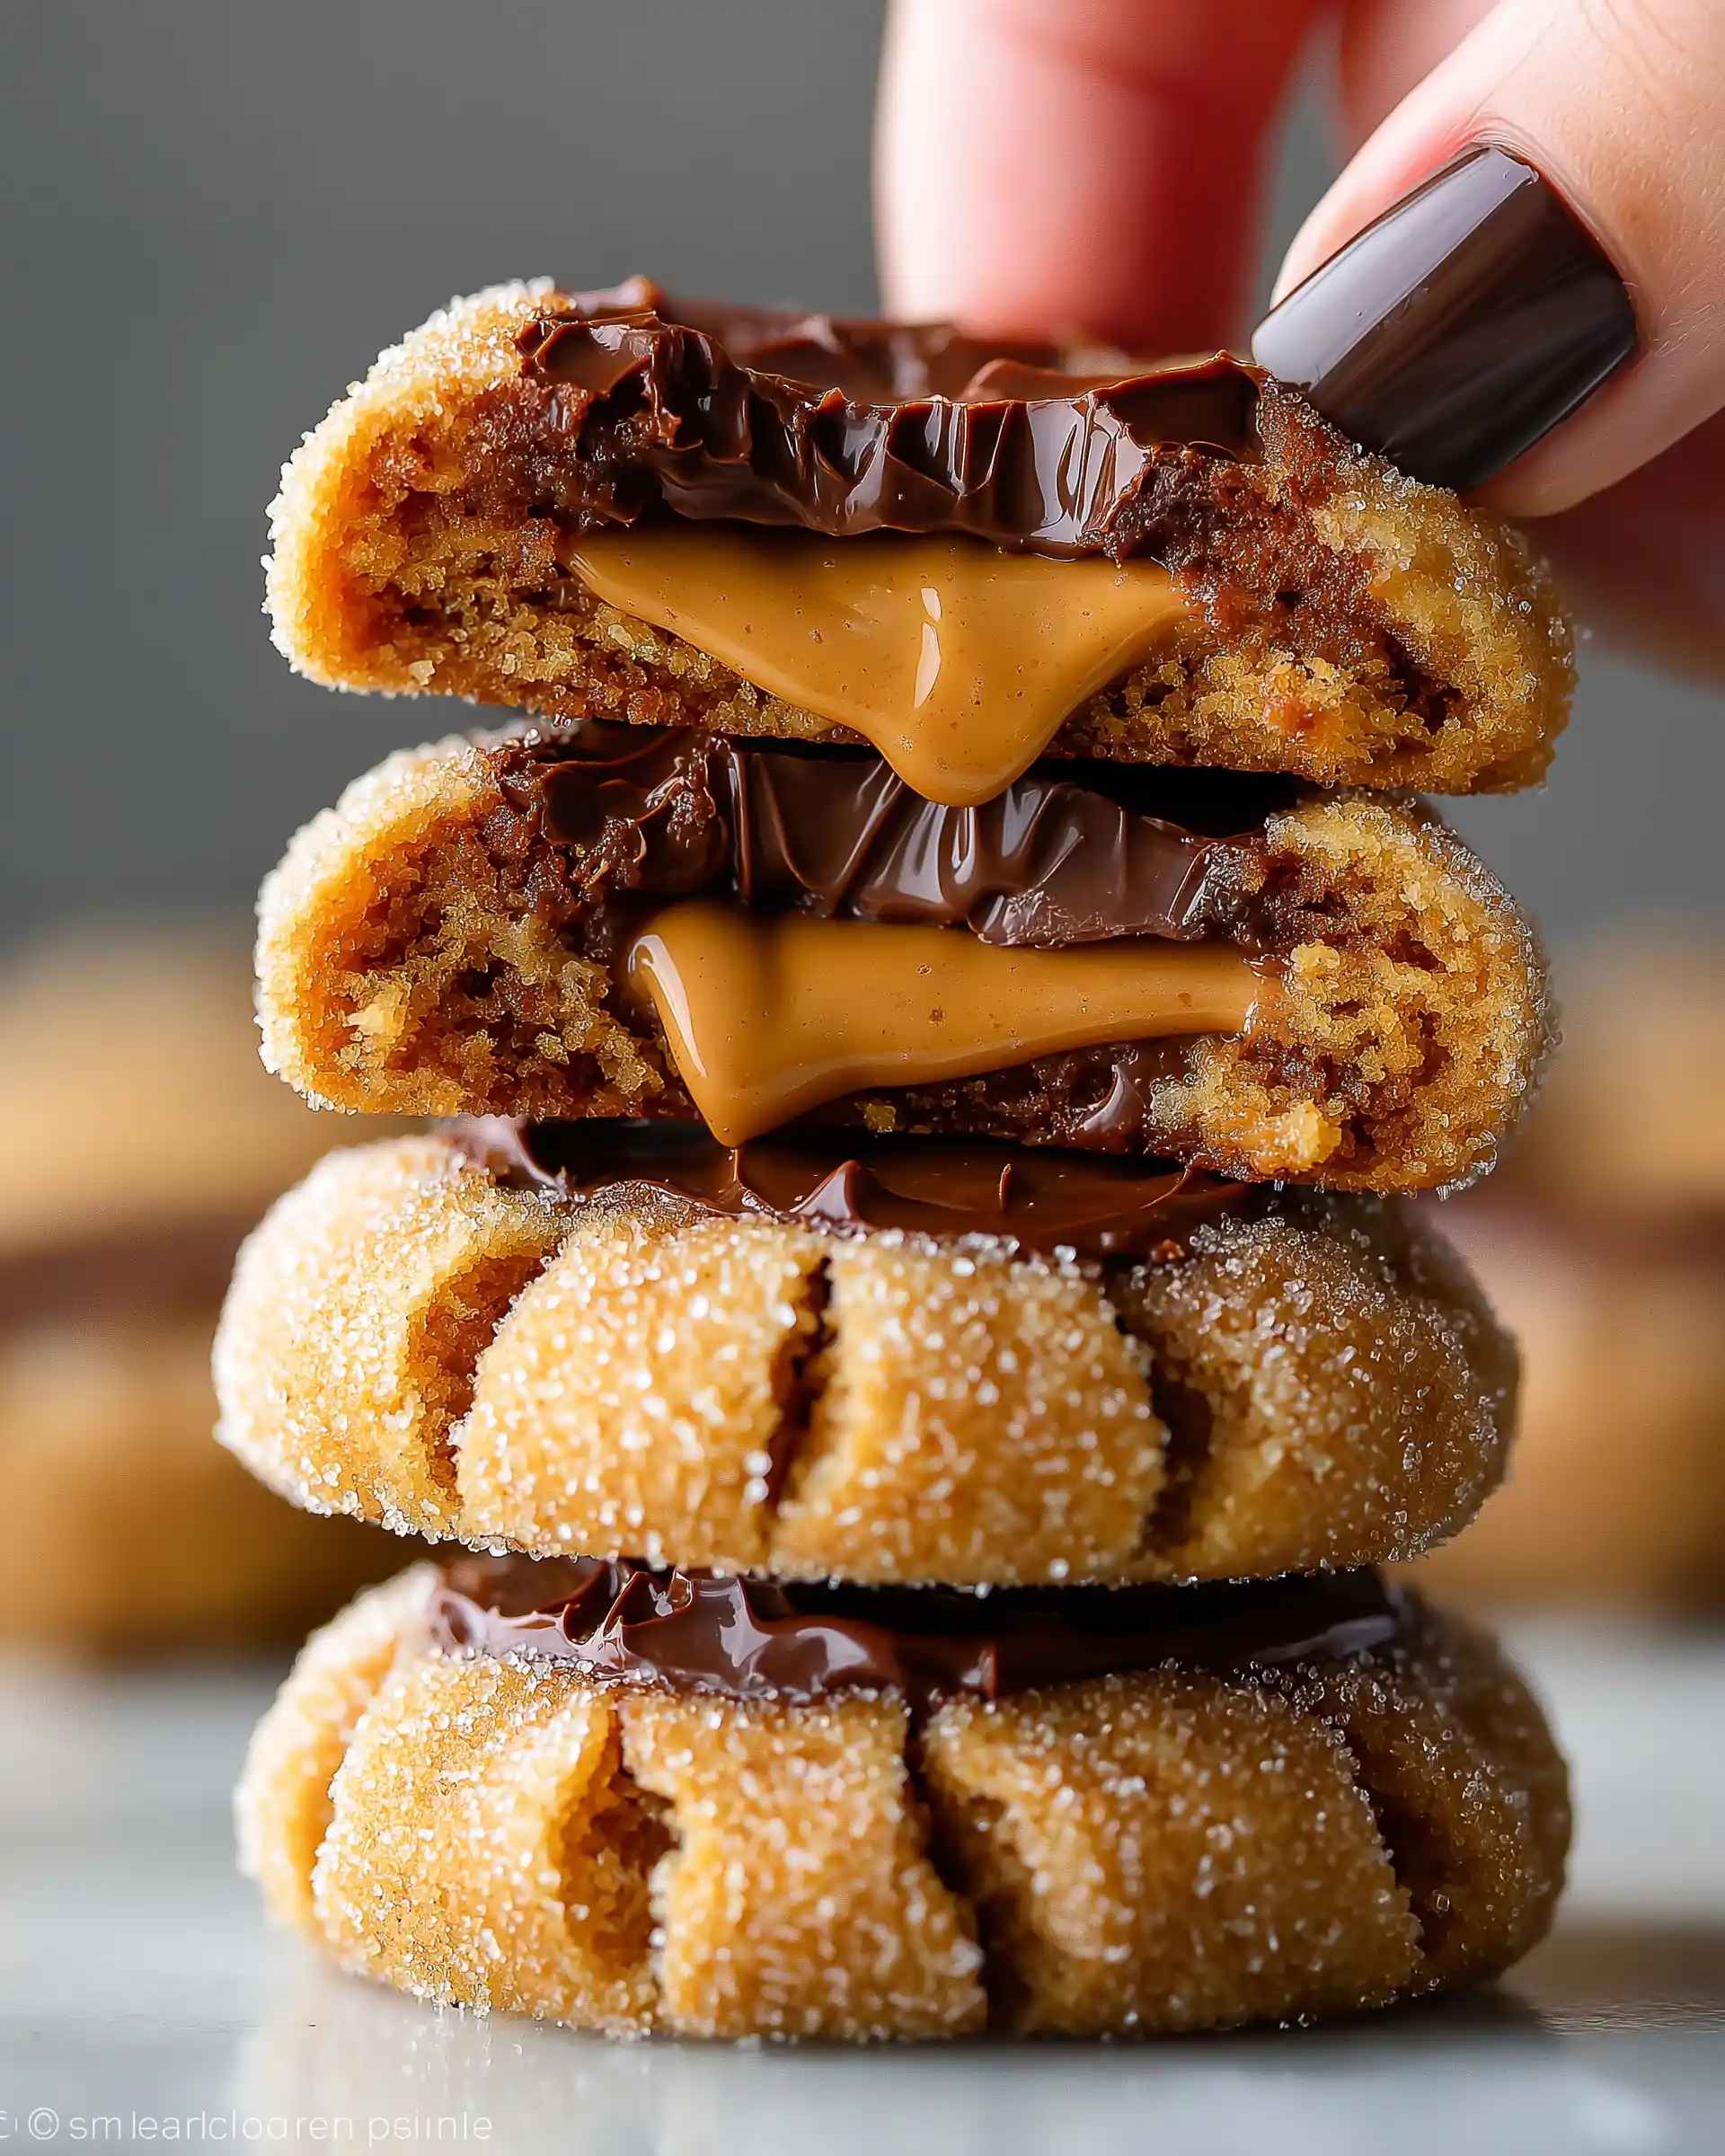
Few desserts hit the sweet spot like brownie cookies. Rich like brownies but shaped like cookies, they offer the best of both treats in one simple recipe. Whether you’re baking for guests, a special occasion, or just yourself, this Brownie Cookies Recipe delivers big chocolate flavor, soft chewy centers, and crisp edges. It’s a quick, satisfying bake that’s easy enough for beginners but impressive enough for any dessert table. Let’s begin with a look at the key ingredients that make these cookies so irresistible.
Ingredients Breakdown for the Ultimate Brownie Cookies
Chocolate and Butter – The Flavor Foundation
Start with 8 oz of chopped semisweet or dark chocolate bars and ¼ cup of unsalted butter. Melted together, they create a deep, fudgy base with a silky texture. Chocolate bars melt better than chips and give richer flavor.
Sugars – Sweetness with Structure
A blend of ⅔ cup granulated sugar and ⅓ cup packed light brown sugar adds sweetness and chew. The brown sugar also keeps the center soft and moist.
Eggs and Vanilla – For Lift and Aroma
Use 2 large eggs at room temperature and 1 teaspoon vanilla extract. Beating the eggs with the sugar makes the batter light and helps create that brownie-like texture.
Dry Ingredients – Structure and Balance
You’ll need ⅓ cup all-purpose flour, ¼ cup natural cocoa powder, and ¼ teaspoon baking powder. This low flour ratio keeps the cookies soft, while cocoa intensifies the chocolate flavor. A touch of salt (¼ teaspoon) balances everything.
Mini Chocolate Chips – The Final Touch
Fold in ½ cup mini chocolate chips for gooey pockets of chocolate in every bite. Mini chips distribute more evenly than full-size ones and add bursts of meltiness.
Contents
- 1 Tools and Prep for Perfect Brownie Cookies
- 2 Brownie Cookies Recipe
- 3 Melting Chocolate and Butter the Right Way
- 4 Mixing the Wet Ingredients for Brownie-Like Texture
- 5 Folding in Dry Ingredients for Structure
- 6 Chilling and Scooping the Dough
- 7 Baking and Cooling for the Perfect Texture
- 8 Storage Tips and Make-Ahead Options
- 9 Conclusion
Tools and Prep for Perfect Brownie Cookies
Essential Equipment You’ll Need
This Brownie Cookies Recipe doesn’t require any fancy tools, but using the right equipment makes the process smoother and the results more consistent. Here’s what you’ll need:
- Mixing bowls – One medium for melting and one large for mixing.
- Electric mixer – A hand or stand mixer is essential for beating the eggs and sugars to the right volume.
- Baking sheet – A flat, rimmed baking sheet helps cookies bake evenly.
- Parchment paper – Keeps the cookies from sticking and makes cleanup easier.
- Cookie scoop – A 2-tablespoon scoop ensures uniform size and even baking.
These basic tools help you achieve the signature texture of brownie cookies: soft in the middle, lightly crisp on the edges, and evenly baked all around.
Getting Prepped Before You Bake
Start by organizing your ingredients and equipment. Preheat your oven to 350°F (175°C) and line your baking sheet with parchment paper. This small step ensures your cookies won’t stick and that they’ll bake evenly across the surface.
Also, prepare your mixing space so everything is within reach. Since timing and mixing speed are important in this recipe, having ingredients pre-measured keeps the process flowing smoothly.
Why Preparation Matters
With brownie cookies, small details make a big difference. Cold eggs or rushing the sugar-egg mixing can change the final texture. Prepping everything ahead of time ensures each step goes exactly as it should for perfect results.
Now that your workspace is ready and your tools are in place, it’s time to dive into the rich, chocolatey heart of the recipe-melting the chocolate and butter for the base.
Print
Brownie Cookies Recipe
- Total Time: 50 minutes
- Yield: 16 cookies
Description
This Brownie Cookies Recipe is the ultimate fusion of rich, fudgy brownies and soft, chewy cookies. Perfect for chocolate lovers, it’s quick to make, freezer-friendly, and delivers bakery-style results in every bite.
Ingredients
8 oz semisweet or dark chocolate bars, chopped
¼ cup (57 g) unsalted butter, cut into pieces
⅔ cup (133 g) granulated sugar
⅓ cup (66 g) light brown sugar, firmly packed
2 large eggs, room temperature
1 teaspoon vanilla extract
¼ teaspoon table salt
⅓ cup (41 g) all-purpose flour
¼ cup (25 g) natural cocoa powder
¼ teaspoon baking powder
½ cup (95 g) mini chocolate chips
Instructions
1. Melt chopped chocolate and butter in a microwave-safe bowl in 25-second intervals, stirring in between, until smooth. Set aside to cool slightly.
2. In a large mixing bowl, beat granulated sugar, light brown sugar, eggs, vanilla extract, and salt with an electric mixer until thick and pale, about 2-3 minutes on high speed.
3. Slowly drizzle in the melted chocolate mixture while mixing on low speed until fully combined.
4. Sift flour, cocoa powder, and baking powder into the wet mixture. Fold gently with a spatula until no dry spots remain.
5. Stir in the mini chocolate chips evenly throughout the batter.
6. Cover the bowl with plastic wrap and chill the dough for 20 to 30 minutes.
7. Preheat the oven to 350°F (175°C) and line baking sheets with parchment paper.
8. Scoop dough into 2-tablespoon balls, roll slightly between palms, and space them 2 inches apart on the baking sheets.
9. Bake on the center rack for 10 minutes. Cookies will appear soft in the center and cracked on top.
10. Let the cookies cool completely on the baking sheet before removing and serving.
Notes
Store in an airtight container at room temperature for up to 5 days.
To freeze, scoop dough into balls and freeze on a tray. Once solid, transfer to a freezer-safe container for up to 3 months.
For extra gooey cookies, microwave for 5 seconds before eating.
- Prep Time: 15 minutes
- Cook Time: 10 minutes
- Category: Cookies
- Method: Baking
- Cuisine: American
Melting Chocolate and Butter the Right Way
How to Melt for Smoothness and Flavor
The first key step in this Brownie Cookies Recipe is melting your 8 oz chopped chocolate bars with ¼ cup of unsalted butter. This creates the base that gives these cookies their rich, brownie-like texture and flavor. You have two options for melting, and both work beautifully when done correctly.
Microwave Method: Quick and Easy
Place the chopped chocolate and butter in a medium microwave-safe bowl. Microwave in 25-second intervals, stirring after each round. This prevents overheating and helps everything melt evenly. You’ll know it’s ready when the mixture is smooth and glossy with no chunks left.
Double Boiler Method: Slow and Controlled
If you prefer more control, use the double boiler technique. Fill a pot with a small amount of water and bring it to a simmer. Place a heat-safe bowl over the pot without touching the water. Stir the chocolate and butter together until fully melted. This method reduces the risk of burning and works well if you’re multitasking in the kitchen.
Let It Cool Slightly Before Mixing
After melting, let the chocolate mixture sit for a few minutes to cool down slightly. You don’t want it too hot when adding it to the egg mixture later, or it may cause the eggs to cook prematurely. Slightly warm is perfect—it blends smoothly without affecting the batter’s structure.
This step might seem simple, but it’s the heart of the brownie cookie’s flavor. Taking the time to melt gently and stir patiently ensures the final dough will be rich, velvety, and ready to deliver bold chocolate flavor in every bite.
Mixing the Wet Ingredients for Brownie-Like Texture
Beating Eggs and Sugars to the Perfect Consistency
This step is where the real magic begins in your Brownie Cookies Recipe. In a large mixing bowl, combine ⅔ cup granulated sugar, ⅓ cup packed light brown sugar, 2 large room-temperature eggs, 1 teaspoon vanilla extract, and ¼ teaspoon table salt. Use an electric mixer to start blending everything on low speed, then gradually increase to high.
Beat the mixture for at least 2 to 3 minutes on high speed. You’re looking for a thick, pale, and slightly fluffy consistency. This process dissolves the sugars and incorporates air into the eggs, which is essential for creating that signature chewy, brownie-like center in the finished cookies.
Why Mixing Time Matters
If you stop too early, the batter won’t have the volume it needs. Mixing thoroughly gives your cookies a lighter texture on the inside without losing that rich, fudgy bite. The sugar also begins to emulsify with the eggs, helping the cookies hold their shape during baking.
Combining the Chocolate Mixture with the Egg Mixture
Once your eggs and sugars are properly beaten, it’s time to slowly add in the slightly cooled melted chocolate and butter. Drizzle it into the bowl while mixing on low speed or stirring by hand with a spatula. Pouring slowly allows the chocolate to blend smoothly without scrambling the eggs or seizing the batter.
Stir just until fully combined. The result should be a thick, shiny batter that smells intensely chocolatey and already has a slight brownie feel to it.
Folding in Dry Ingredients for Structure
Sifting for a Smooth, Lump-Free Batter
Once your wet mixture is thick and glossy, it’s time to bring in the dry ingredients that give the cookies just the right structure. Start by sifting together the following directly over your chocolate-egg mixture:
- ⅓ cup all-purpose flour
- ¼ cup natural cocoa powder
- ¼ teaspoon baking powder
Sifting isn’t just for show — it breaks up any clumps, especially in the cocoa powder, and ensures everything blends evenly. It also helps distribute the baking powder more uniformly, which gives the cookies a soft lift during baking without making them cakey.
Folding Gently to Maintain Texture
Use a spatula or wooden spoon to gently fold the dry ingredients into the wet. Avoid stirring aggressively or using the mixer for this step. Folding helps maintain the air you beat into the eggs earlier and prevents over-developing the gluten, which can lead to tough, dense cookies.
The batter should be thick but still slightly glossy, holding its shape as you mix. Take your time to fold until no dry streaks remain, but stop as soon as the mixture is fully incorporated.
Adding Mini Chocolate Chips – The Final Mix-In
To finish the dough, stir in ½ cup of mini chocolate chips. These melt into rich pockets of chocolate and add extra texture to every bite. Since they’re smaller than standard chips, they disperse more evenly, giving you that perfect chocolate hit in each cookie.
Fold them in gently to avoid overmixing. Once the chips are evenly spread throughout, your dough is ready for its quick chill — a crucial step to perfecting the final bake.
Chilling and Scooping the Dough
Why Chilling the Dough Matters in a Brownie Cookies Recipe
Before you even think about baking, your dough needs a short rest. Cover the bowl tightly with plastic wrap and chill it for 20 to 30 minutes. This small step plays a big role in the final cookie.
Chilling thickens the dough, making it easier to scoop and shape. It also helps the flour and cocoa hydrate fully, intensifying the chocolate flavor. More importantly, it prevents the cookies from spreading too much in the oven, which keeps them thick and chewy in the center with just the right amount of crisp on the edges.
Skipping this step may leave you with flat, overly soft cookies — and less of that brownie-like bite you’re aiming for.
Scooping for Uniform Size and Even Baking
Once chilled, remove the dough from the fridge. Preheat your oven to 350°F (175°C) if you haven’t already, and line your baking sheet with parchment paper.
Using a 2-tablespoon cookie scoop, portion out the dough into rounded balls. Gently roll each scoop between your palms for a smoother finish. This helps the cookies bake more evenly and gives them that picture-perfect, crackled top you expect from a good brownie-cookie hybrid.
Spacing is Key for Airflow and Spread
Place the dough balls at least 2 inches (5 cm) apart on the lined baking sheet. These cookies will spread slightly as they bake, and spacing them well prevents them from merging into one another.
Once your trays are filled and ready, you’re just minutes away from rich, gooey, chocolatey perfection. In the next part, we’ll walk through the baking process and how to cool them properly to lock in the best texture.
Baking and Cooling for the Perfect Texture
Bake Time and Temperature for Consistent Results
With your dough portioned and your oven preheated to 350°F (175°C), it’s time to bake. Place the cookies on the center rack for even heat distribution and bake for exactly 10 minutes.
Don’t expect the cookies to look fully set when you pull them out — that’s the point. They should look slightly underbaked in the center, with cracked tops and firm edges. That soft middle will set as they cool, creating the fudgy, brownie-like texture you want.
Overbaking can turn your chewy cookies into dry discs, so stick to the timer and trust the process. If you’re using multiple trays, rotate them halfway through to ensure even baking.
Cooling on the Baking Sheet – The Secret to Chewiness
Once the baking time is up, do not move the cookies immediately. Let them cool completely on the baking sheet. This resting period helps the centers firm up while keeping the edges crisp.
Moving them too early can cause them to break apart or collapse. The hot tray continues to cook the cookies just enough to finish the process without overdoing it.
After about 20 minutes, once they’ve cooled and set, the cookies will have that rich, crackled exterior and soft, melty center that make this Brownie Cookies Recipe unforgettable.
Storage Tips and Make-Ahead Options
How to Store Brownie Cookies for Maximum Freshness
Once your cookies have cooled completely, it’s important to store them correctly to maintain their texture. Place them in an airtight container at room temperature. They’ll stay fresh for up to 5 days, retaining their chewy centers and crisp edges.
If you’re stacking them, consider placing a sheet of parchment paper between layers. This prevents them from sticking together and helps preserve their delicate tops.
Avoid refrigerating them, as this can dry them out and dull the rich chocolate flavor. For the best experience, enjoy them at room temperature, or give them a 5-second warm-up in the microwave to bring back that just-baked gooeyness.
Make-Ahead Options for Busy Bakers
Need to prep in advance? No problem. This Brownie Cookies Recipe works well with make-ahead strategies. After mixing the dough and scooping it into balls, you can:
- Refrigerate: Store covered dough balls in the fridge for up to 48 hours before baking.
- Freeze: Place the scooped dough balls on a tray and freeze them until solid. Then transfer to a freezer-safe bag or container. They’ll keep for up to 3 months.
When you’re ready to bake, simply place frozen dough balls on a parchment-lined tray and bake directly from frozen — just add 1 to 2 extra minutes to the baking time.
This flexibility makes the recipe perfect for planning ahead, whether for parties, holidays, or unexpected chocolate cravings.
Conclusion
This Brownie Cookies Recipe brings together the best parts of two beloved desserts — the rich, fudgy depth of brownies and the satisfying bite of cookies. With simple ingredients, minimal prep, and a quick bake time, this recipe delivers bakery-level results right from your home kitchen. Whether you’re baking for a special occasion or just treating yourself to something sweet, these cookies check every box: chewy, gooey, crisp on the edges, and packed with chocolate flavor.
Their make-ahead flexibility and freezer-friendly nature make them even more convenient, while the consistent results ensure success with every batch. Once you try them, they’ll become a regular in your dessert rotation. So the next time you’re craving chocolate, skip the store-bought options — make these instead, and enjoy the pure comfort of homemade brownie cookies.