There’s something magical about the combination of creamy cheesecake, sweet-tart blueberries, and a golden, buttery crumble topping. This Blueberry Crumble Cheesecake recipe brings together layers of textures and flavors in a dessert that’s as beautiful as it is indulgent. Whether you’re preparing for a special celebration or simply want to surprise your family with a show-stopping treat, this recipe is the perfect go-to.
In this article, you’ll learn how to prepare every component of this dessert from the crisp graham cracker crust to the luscious cheesecake filling, homemade blueberry jam, and the irresistible crumble topping. We’ll also cover expert tips for baking and chilling to achieve that flawless, no-crack finish. Along the way, you’ll discover why using fresh ingredients and the right mixing techniques makes all the difference in your final product.
Contents
- 1 Crafting the Perfect Graham Cracker Crust
- 2 Blueberry Crumble Cheesecake Recipe
- 3 Making the Blueberry Jam for Swirls of Fruity Goodness
- 4 Mixing the Rich, Creamy Cheesecake Filling Just Right
- 5 Layering the Cheesecake Like a Pro for Best Flavor and Texture
- 6 Baking with Precision: Avoiding Cracks and Overbaking
- 7 Serving, Storing, and Making the Most of Every Bite
- 8 Conclusion
Crafting the Perfect Graham Cracker Crust
Selecting the Right Ingredients for Structure and Flavor
The foundation of any great cheesecake lies in its crust. In this recipe, we use a classic graham cracker crust that’s subtly sweet and delightfully crisp. To get it just right, you’ll need:
- Graham cracker crumbs: These create the base texture. You want a fine crumb for best results, ensuring a uniform crust that presses easily into the pan. Pre-crushed graham crackers or blending your own both work well.
- Brown sugar: This adds a rich, molasses-like sweetness that complements the tanginess of the cheesecake filling.
- Unsalted butter: Melted butter binds the crust together and adds that golden, toasty flavor once baked.
The balance of these three ingredients results in a crust that’s not too sweet, not too dry, and holds its shape even under the weight of the dense cheesecake filling.
Assembling and Pre-Baking the Crust
Once your ingredients are ready, combine them in a food processor. Pulse until the crumbs are evenly moistened. Press the mixture firmly into the bottom and sides of a springform pan using the base of a glass or measuring cup. This helps ensure an even, compressed crust that won’t fall apart when sliced.
Bake the crust for 8 minutes at 350°F. Pre-baking solidifies the structure and helps develop a toasted, buttery flavor. After baking, remove the crust from the oven and allow it to cool completely while preparing the next components. Then, reduce the oven temperature to 325°F, the ideal temperature for baking the cheesecake without cracking or overbaking.
This step may seem small, but it’s essential for the integrity of the dessert. Skipping the pre-bake or under-pressing the crust could cause it to crumble apart when sliced or absorb too much moisture from the filling.
Print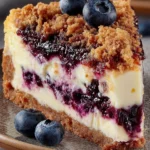
Blueberry Crumble Cheesecake Recipe
- Total Time: 6 hours
- Yield: 10 servings
- Diet: Vegetarian
Description
This Blueberry Crumble Cheesecake recipe layers a buttery graham cracker crust, rich cream cheese filling, vibrant homemade blueberry jam, and a sweet cinnamon crumble topping. Perfect for any occasion, it’s an indulgent dessert that’s as impressive as it is delicious.
Ingredients
Graham Cracker Crust:
1 3/4 cups graham cracker crumbs (161 grams)
3 tablespoons brown sugar (39 grams)
6 tablespoons unsalted butter, melted (3 ounces)
Cheesecake Filling:
1 cup granulated sugar (200 grams)
24 ounces cream cheese, room temperature
1/4 cup sour cream (61 grams)
1/4 cup heavy cream (60 mL)
1/4 teaspoon salt
2 teaspoons vanilla extract (8 grams)
3 large eggs
Blueberry Jam:
3 cups fresh blueberries (450 grams)
1/3 cup water (79 mL)
1/4 cup granulated sugar (50 grams)
1 tablespoon cornstarch (7 grams)
1/2 teaspoon cinnamon (optional) (1 gram)
Crumble Topping:
1 cup all-purpose flour (125 grams)
1/4 cup granulated sugar (50 grams)
6 tablespoons brown sugar (75 grams)
2 teaspoons ground cinnamon (5 grams)
6 tablespoons unsalted butter, melted (3 ounces)
Instructions
1. Preheat oven to 350°F.
2. Combine graham cracker crumbs, brown sugar, and melted butter in a food processor. Pulse until combined.
3. Press mixture into the bottom and sides of an 8-inch springform pan. Bake for 8 minutes. Cool completely. Reduce oven temperature to 325°F.
4. Prepare the blueberry jam by adding blueberries, water, sugar, cornstarch, and optional cinnamon to a skillet. Cook over medium heat, stirring until thickened. Cool completely.
5. For the crumble topping, mix flour, sugars, cinnamon, and melted butter with a fork. Refrigerate until needed.
6. In a mixing bowl, beat cream cheese, sour cream, and sugar until smooth. Add heavy cream, vanilla, and salt. Mix until combined. Add eggs one at a time, mixing just until blended.
7. Pour half the cheesecake batter into the cooled crust. Dollop some blueberry jam on top. Add remaining batter, then more jam. Gently swirl.
8. Sprinkle crumble topping evenly over cheesecake.
9. Wrap pan in foil, place in a roasting pan with 2 inches of hot water. Bake at 325°F for 80–90 minutes.
10. Turn off oven, crack door, and let cheesecake cool inside for 1 hour.
11. Refrigerate for 4 hours or overnight before serving.
12. Slice with a hot knife and wipe between cuts for clean slices.
Notes
Use room-temperature ingredients for a smoother batter.
Don’t overmix after adding eggs to avoid cracks.
Cool jam completely before layering.
Cheesecake is best when chilled overnight.
Store leftovers in the fridge up to 5 days or freeze individual slices up to 2 months.
- Prep Time: 20 minutes
- Cook Time: 90 minutes
- Category: Dessert
- Method: Baking
- Cuisine: American
Making the Blueberry Jam for Swirls of Fruity Goodness
Why Homemade Jam Enhances the Cheesecake Flavor
Store-bought fruit toppings often come with excess preservatives, added sweeteners, and artificial flavoring. That’s why making your own blueberry jam not only provides a fresher, more natural taste but also allows you to control the sweetness and consistency. In this recipe, the jam plays a dual role—it’s swirled into the cheesecake filling and layered on top before baking, infusing every bite with bursts of juicy flavor.
Using fresh blueberries is key. They provide that bright, tangy note that cuts through the richness of the cream cheese, adding a fruity contrast that balances the dessert. Cooking the berries gently with sugar and just the right amount of thickener ensures the jam isn’t runny or overly firm.
Cooking the Jam to the Perfect Consistency
To make the jam, combine the following in a skillet:
- 3 cups fresh blueberries
- 1/3 cup water
- 1/4 cup granulated sugar
- 1 tablespoon cornstarch
- ½ teaspoon cinnamon (optional for warmth and depth)
Heat the mixture over medium, stirring frequently. As the berries break down, the mixture will begin to bubble and thicken. The cornstarch activates with the heat, giving the jam its luscious, spoonable consistency. Keep stirring until the liquid turns glossy and thick enough to coat the back of a spoon.
The optional cinnamon can elevate the jam’s flavor, especially if you’re serving this dessert in cooler months. Once done, remove the skillet from the heat and allow the jam to cool completely. Warm jam can alter the texture of your cheesecake batter or cause uneven baking if added while still hot.
Tips for Cooling and Storing
Transfer the jam to a separate bowl and let it cool at room temperature. If you’re in a rush, place it in the refrigerator, but avoid freezing. Make sure the jam is not even slightly warm when dolloping into the cheesecake layer—it must be fully set to preserve the structure of the dessert.
You’ll use half of this jam in the middle layer of the cheesecake, and the rest on top, just before adding the crumble topping. It creates that iconic swirl of deep purple color and tangy contrast, making your Blueberry Crumble Cheesecake not just delicious, but visually stunning too.
Mixing the Rich, Creamy Cheesecake Filling Just Right
The Essential Ingredients for a Smooth Cheesecake Texture
Creating a rich and creamy cheesecake filling begins with using high-quality, room-temperature ingredients. This allows for smooth blending and prevents lumps in the batter. For this Blueberry Crumble Cheesecake recipe, the filling uses a combination of creamy and tangy elements to strike a luxurious balance. Here’s what you’ll need:
- 24 ounces of cream cheese (three 8-ounce blocks), softened
- 1 cup granulated sugar
- 1/4 cup sour cream
- 1/4 cup heavy cream
- 2 teaspoons vanilla extract
- 1/4 teaspoon salt
- 3 large eggs
Cream cheese is the star of this show. Full-fat cream cheese works best, lending a dense, velvety texture. The sour cream adds a mild tang and helps keep the filling from becoming too heavy. A splash of heavy cream creates a silkier finish and ensures that each bite melts in your mouth.
Step-by-Step Mixing Method for a Lump-Free Filling
Start by placing the softened cream cheese, sugar, and sour cream in the bowl of a stand mixer fitted with a paddle attachment. If using a handheld mixer, a large mixing bowl works fine. Beat the mixture on medium speed for 2 to 3 minutes, stopping halfway to scrape down the sides of the bowl. This ensures even mixing and a smooth base.
Next, add the vanilla extract, salt, and heavy cream. Beat just until incorporated. Overmixing at this stage could incorporate too much air, which may lead to cracking during baking.
Now comes the most critical step: adding the eggs one at a time, mixing just until combined after each addition. Do not overbeat. Scraping down the bowl between each egg addition ensures a cohesive batter without streaks.
If you’re worried about overmixing, you can incorporate the eggs by hand using a spatula. This slower method minimizes the risk of air bubbles and helps prevent overworked batter.
Avoiding Common Mistakes When Mixing Cheesecake
- Do not use cold ingredients. Cold cream cheese or eggs can cause lumps and make the batter harder to mix.
- Avoid overmixing, especially after adding eggs. Too much air leads to puffiness and cracks during baking.
- Scrape the bowl often. Uneven mixing leads to lumps and inconsistent texture in the final product.
When you’re done, the batter should be silky, glossy, and free of any lumps or streaks. This carefully crafted filling will bake into a rich center that contrasts beautifully with the tart blueberry swirls and crunchy crumble topping.
Layering the Cheesecake Like a Pro for Best Flavor and Texture
Building the Perfect Layers for Balance and Visual Appeal
Once your graham cracker crust is pre-baked, the blueberry jam is cooled, and the cheesecake filling is smooth, it’s time to bring all the elements together. Layering the cheesecake properly is what gives it its iconic look and unforgettable taste. This step is about more than just flavor—it creates visual drama with every slice and guarantees each bite delivers a harmonious mix of creamy, fruity, and crunchy textures.
Start by pouring half of the cheesecake batter into the cooled graham cracker crust. Use a spatula to smooth the top evenly, making sure it reaches the edges of the pan.
Then, dollop spoonfuls of the blueberry jam over the surface. Use a spoon or knife to gently swirl the jam into the batter without blending it completely. This creates pockets of jam throughout the layer rather than just a top coating.
Now, pour the remaining cheesecake batter on top, gently spreading it out to cover the jam layer. Be patient and avoid mixing the layers together. The separation ensures each bite has a contrast of creamy cheesecake and fruity brightness.
Finish the layering by adding more blueberry jam on top in scattered spoonfuls. Do not swirl this top layer too much—these dollops will slightly sink during baking and create beautiful patterns on the finished cheesecake.
Adding the Crumble Topping for Texture and Crunch
With your layers assembled, it’s time to crown the cheesecake with the crumble topping you made earlier. Take it out of the refrigerator and, using your hands or a fork, break it into small, uneven chunks. These will bake into golden, crisp nuggets of texture that contrast the silky cheesecake.
Scatter the crumble evenly across the top of the cheesecake, allowing some of the blueberry jam to peek through for visual effect. Avoid pressing it down into the batter. It should sit gently on top and bake into a crispy, caramelized topping that delivers a rich, buttery crunch.
This layered structure is what makes the Blueberry Crumble Cheesecake recipe a showstopper. It looks beautiful on a dessert table, but more importantly, every forkful brings the perfect mix of cool creaminess, fruit brightness, and satisfying crunch.
Baking with Precision: Avoiding Cracks and Overbaking
Why a Water Bath Matters for Cheesecake Baking
One of the biggest mistakes home bakers make when baking cheesecake is skipping the water bath. Cheesecake is a custard-style dessert, and custards need gentle, even heat to cook correctly. Baking without moisture can cause rapid temperature changes, leading to unsightly cracks or an uneven center.
To bake this Blueberry Crumble Cheesecake like a pro, you’ll wrap the outside of your springform pan in several layers of aluminum foil. This prevents water from seeping into the crust during baking. Then, place the foil-wrapped pan inside a large roasting pan. Carefully pour boiling water into the roasting pan until it comes about 2 inches up the sides of the springform pan.
This water bath (or bain-marie) surrounds the cheesecake with steady, moist heat. It slows down the baking process, reducing the chances of a cracked surface or dry texture. Moisture is your secret weapon for that creamy, smooth finish.
Knowing When the Cheesecake Is Perfectly Baked
Preheat your oven to 325°F—a slightly lower temperature than most baked goods. This lower heat ensures the custard-like batter cooks slowly and evenly.
Place the roasting pan with your cheesecake into the oven and bake for 80 to 90 minutes. You’ll know it’s done when the edges are firm and set, but the center has a slight jiggle. It should not slosh or look liquid in the middle, but it should still wobble like gelatin.
Avoid opening the oven door frequently. Sudden drops in temperature can cause the cheesecake to collapse or crack on top.
Once baking time is up, prop the oven door open slightly and allow the cheesecake to sit inside for another 1 hour. This gentle cooling transition helps prevent surface cracks and ensures the cheesecake finishes setting properly.
Why Patience is Key to the Final Texture
After the hour-long oven rest, remove the cheesecake from the water bath. Let it cool at room temperature for another 30 minutes, then cover and refrigerate for at least 4 hours, though overnight is best.
This long chilling process allows the flavors to deepen, the texture to firm up, and the layers to meld. Cutting into it too early may lead to a runny or overly soft center.
So while the baking process takes time and care, it’s absolutely worth it. When done right, your cheesecake will have a silky interior, rich flavor, and a flawless top-no cracks, no sinking, just creamy perfection.
Serving, Storing, and Making the Most of Every Bite
How to Slice and Serve the Cheesecake Like a Pro
After the cheesecake has chilled completely-preferably overnight-it’s ready to be sliced and served. To get clean, professional-looking slices, use a sharp knife dipped in hot water. Wipe the knife clean with a paper towel between each slice to prevent smearing the filling or jam.
The top should now be golden from the crumble, with vibrant blueberry streaks running through each wedge. Serve it as-is, or if you’d like, you can add a dollop of whipped cream or a few fresh blueberries on each plate to complement the fruity flavor.
Remember, this Blueberry Crumble Cheesecake is rich and dense, so thinner slices go a long way. A small piece packs a big punch of flavor and texture.
Best Practices for Storing Leftovers
If you have leftovers—and that’s a big if—wrap them tightly in plastic wrap or store them in an airtight container. Cheesecake can be stored in the refrigerator for up to 5 days. The crust and crumble topping will soften slightly over time, but the flavor remains incredible.
For longer storage, you can freeze individual slices. Wrap each piece in plastic wrap, then aluminum foil, and store in an airtight container or freezer bag. They’ll keep well for up to two months. When ready to eat, thaw overnight in the fridge.
Avoid microwaving frozen cheesecake, as it may ruin the texture. Letting it defrost slowly will maintain the silky consistency that makes it so special.
Making It Ahead for Events or Gatherings
This cheesecake is ideal for make-ahead prep. In fact, it tastes even better the day after baking, once the flavors have had time to settle. You can prepare the entire dessert up to two days in advance, keeping it covered in the refrigerator until ready to serve.
If you’re planning to travel with it, keep the cheesecake in the springform base for stability and place it in a cooler with ice packs for transport. This helps maintain its structure and temperature without risk of melting.
Whether it’s for a birthday, a holiday, or just a weekend treat, serving this cheesecake guarantees compliments. The layered textures, fresh blueberry jam, and rich filling make every bite unforgettable.
Conclusion
This Blueberry Crumble Cheesecake recipe is more than just a dessert—it’s an experience in layers. From the buttery graham cracker crust to the luscious cream cheese filling, fruity blueberry jam, and golden cinnamon crumble, every element plays its part in creating a rich, satisfying slice of heaven.
With careful mixing, smart layering, and the right baking technique, you’ll have a dessert that’s not only delicious but also beautiful and sturdy enough for any occasion. Whether you’re making it for guests or saving it all for yourself, this cheesecake is sure to impress.
It’s comforting yet elevated, simple to prepare yet bakery-worthy. So preheat that oven, gather your ingredients, and get ready to bake one of the best cheesecakes you’ll ever taste. Because this dessert isn’t just about blueberries and cream—it’s about creating a sweet memory in every bite.