If you’re on the hunt for a showstopping dessert that’s both rich and elegant, this Black Forest Cheesecake Recipe is exactly what you need. With its luscious layers of chocolate cheesecake, crisp Oreo crust, and a crown of cherry pie filling, this dessert is a modern take on the classic Black Forest cake. Every bite offers a blend of creamy, chocolaty decadence and tart fruitiness, making it a perfect centerpiece for holidays, dinner parties, or indulgent weekend treats.
This guide breaks down everything from the crust to the toppings in six essential parts. You’ll get step-by-step instructions, tips to avoid common mistakes, and answers to FAQs. Whether you’re an experienced home baker or a kitchen newbie, you’ll be able to follow this recipe and create a cheesecake that wows every time.
Contents
- 1 Crafting the Perfect Oreo Crust for Black Forest Cheesecake
- 2 Black Forest Cheesecake Recipe
- 3 Making the Rich and Creamy Chocolate Cheesecake Filling
- 4 Baking the Black Forest Cheesecake with a Foolproof Water Bath Method
- 5 Cherry Topping and Whipped Cream – Finishing the Black Forest Cheesecake
- 6 Troubleshooting Common Issues with Black Forest Cheesecake
- 7 Essential Equipment, Prep Tips, and Time-Saving Techniques
- 8 Conclusion
Crafting the Perfect Oreo Crust for Black Forest Cheesecake
Why the Crust Matters
The crust isn’t just a base, it’s the textural contrast that enhances the richness of the cheesecake. A well-made crust supports the filling without becoming soggy or overpowering. Oreo cookies, with their bittersweet flavor and crunchy texture, make an ideal choice.
Ingredients and Proportions
To make this crust, you’ll only need two ingredients:
- 20 Oreo cookies, crushed finely
- 3 tablespoons of unsalted butter, melted
This simple combination provides a deep chocolate flavor and a structure that holds firm, even under the weight of a dense cheesecake.
Crushing and Mixing the Crumbs
Using a food processor, pulse the cookies until they resemble fine crumbs. If you don’t have a processor, place the cookies in a sealed plastic bag and crush them with a rolling pin. Mix the melted butter with the crumbs until every bit is coated. This ensures the crust stays compact and flavorful.
Pressing and Baking the Crust
Lightly spray a 9-inch springform pan with nonstick spray. Pour in the crumb mixture and press it firmly into the bottom using a flat-bottomed glass or the back of a spoon. Aim for an even thickness across the base. Pre-bake this crust at 350°F for 8 minutes, then place it on a wire rack to cool completely.
This pre-bake helps the crust set, which prevents it from mixing with the cheesecake filling and keeps it crisp throughout the chilling process.
Tips for a Leak-Proof Setup
Because you’ll be baking this cheesecake in a water bath, tightly wrap the outside of the springform pan in heavy-duty aluminum foil. You can also use an oven bag for added protection. This creates a barrier that prevents water from seeping into the crust, which can make it soggy or collapse entirely.
Print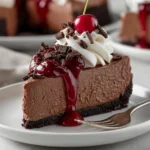
Black Forest Cheesecake Recipe
- Total Time: 10 hours 35 minutes
- Yield: 12
- Diet: Vegetarian
Description
A rich and creamy Black Forest Cheesecake Recipe topped with cherry pie filling, whipped cream, and chocolate shavings. Perfect for holidays or any special dessert craving.
Ingredients
Crust:
20 Oreo cookies, crushed into fine crumbs
3 tablespoons unsalted butter, melted
Cheesecake Filling:
32 ounces cream cheese, softened
½ cup granulated sugar
4 large eggs, room temperature
2 teaspoons pure vanilla extract
½ cup heavy cream
2 cups semisweet chocolate chips
2 tablespoons all-purpose flour
Topping:
Homemade cherry pie filling
Whipped cream
Chocolate shavings
Instructions
1. Preheat oven to 350°F. Wrap a 9-inch springform pan in heavy-duty foil and lightly spray with nonstick spray.
2. Mix crushed Oreo cookies and melted butter. Press into the bottom of the pan and bake for 8 minutes. Let cool.
3. Boil water for a water bath. In a saucepan, heat heavy cream until hot, then pour over chocolate chips. Let sit for 3–4 minutes and whisk until smooth.
4. In a stand mixer, beat cream cheese until smooth. Add sugar and mix until combined.
5. Add eggs one at a time, fully mixing between each addition. Add vanilla and mix.
6. Pour in chocolate ganache and mix until fully incorporated. Add flour and mix again until smooth.
7. Pour batter over crust in springform pan. Place it in a roasting pan and pour boiling water into the outer pan halfway up the sides.
8. Bake for 60–70 minutes. The edges should be set with a slight jiggle in the center. Turn off the oven, crack the door, and let it rest for 1 hour.
9. Remove from oven and water bath. Let cool completely, then refrigerate for at least 8 hours or overnight.
10. Before serving, top with cherry pie filling, whipped cream, and chocolate shavings.
Notes
To prevent leaks in the water bath, use an oven bag or place your springform inside a 10-inch cake pan before placing into the roasting pan.
Let ingredients come to room temperature before mixing for a smoother batter.
For added depth of flavor, you can stir 2 tablespoons of kirsch into the cherry filling or cheesecake mixture.
- Prep Time: 25 minutes
- Cook Time: 1 hour 10 minutes
- Category: Cheesecake
- Method: Baking
- Cuisine: German-American
Making the Rich and Creamy Chocolate Cheesecake Filling
Why Quality Ingredients Matter
To achieve that signature velvety texture and deep chocolate flavor in your Black Forest Cheesecake Recipe, it’s crucial to use high-quality ingredients. The richness of cream cheese, the smoothness of melted chocolate, and the balance of sweetness all play essential roles in crafting a luxurious filling that’s both dense and silky.
Here’s what you’ll need for the filling:
- 32 ounces cream cheese, softened to room temperature
- ½ cup granulated sugar
- 4 large eggs, also at room temperature
- 2 teaspoons pure vanilla extract
- ½ cup heavy cream
- 2 cups semisweet chocolate chips
- 2 tablespoons all-purpose flour
Room temperature ingredients blend more evenly, ensuring a smooth and lump-free batter.
Melting the Chocolate for Maximum Smoothness
Start by heating the heavy cream in a small saucepan over medium heat. It should be very hot but not boiling. Once hot, pour it over the semisweet chocolate chips placed in a heat-safe bowl. Let it sit undisturbed for 3 to 4 minutes. This waiting time allows the chocolate to soften fully.
After resting, whisk the chocolate and cream together until the mixture becomes completely smooth and glossy. This chocolate ganache adds not just flavor, but a silky consistency that takes your cheesecake filling to the next level.
Blending the Cheesecake Base
In the bowl of a stand mixer fitted with a paddle attachment, beat the cream cheese until completely smooth. This step is important – any lumps here will be impossible to fix later. Next, add the sugar and mix until fully combined.
Now, add the eggs one at a time. Mix each one thoroughly before adding the next. Scrape down the bowl in between to keep the texture even. After the eggs are in, add the vanilla extract and mix until combined.
Adding the Chocolate Ganache
Pour the cooled chocolate ganache into the cheesecake batter. Mix on medium speed until the chocolate is fully incorporated. The batter should be uniformly dark, rich, and slightly glossy. Finally, add in the flour and mix again. This small amount of flour gives the cheesecake a bit more structure without making it cakey.
Final Mix and Texture Check
Scrape down the sides and bottom of the bowl to ensure every bit of the batter is combined. Mix one final time until the batter is smooth and lump-free. The result should be a thick, chocolatey batter that pours smoothly into the prepared crust.
Baking the Black Forest Cheesecake with a Foolproof Water Bath Method
Why Use a Water Bath?
Baking a cheesecake in a water bath might sound intimidating, but it’s one of the most reliable ways to ensure a creamy texture and prevent cracks on the surface. The water bath helps regulate the temperature around the cheesecake, preventing sudden changes that can cause the filling to puff, split, or dry out.
Assembling the Water Bath
First, place your springform pan—already filled with cheesecake batter—into a larger roasting pan. You have two options for protecting the pan from leaks:
- Traditional Method: Wrap the entire outside of the springform pan in heavy-duty foil, ensuring no seams are exposed. Place the foil-wrapped pan inside an oven-safe roasting bag if desired. This adds extra protection from water leaks.
- Alternative Leak-Free Method: Place your 9-inch springform pan inside a 10-inch round cake pan. Then place both pans inside the roasting pan. This creates a barrier against water without using foil or a bag.
Next, boil a pot or kettle of water. Once boiling, carefully pour the hot water into the roasting pan until it reaches halfway up the sides of the cheesecake pan. Be careful not to splash any water into the batter.
Baking to Perfection
Place the entire setup into a preheated oven at 350°F. Bake for 60 to 70 minutes. The cheesecake is done when the edges appear set but the center still has a slight jiggle. Avoid opening the oven door during baking to maintain consistent heat.
When the baking time is up, turn the oven off but leave the door slightly open. Let the cheesecake rest inside for 1 hour. This gradual cooling prevents cracking by allowing the cheesecake to settle gently.
Cooling and Chilling
After an hour in the oven, remove the pan from the water bath and place the cheesecake on a wire rack. Let it cool completely at room temperature. Once cooled, refrigerate for at least 8 hours or overnight. This chilling time firms up the texture and makes slicing easier.
Cherry Topping and Whipped Cream – Finishing the Black Forest Cheesecake
Why Cherries Are Essential
The signature of any Black Forest dessert is its beautiful balance of chocolate and cherries. The tartness of the cherry topping cuts through the richness of the chocolate cheesecake, creating a vibrant flavor contrast that makes every bite unforgettable. For this cheesecake, homemade cherry pie filling is your best bet. It delivers freshness and avoids the overly sweet, artificial taste of some canned varieties.
Homemade Cherry Pie Filling Basics
Although the base recipe calls for cherry pie filling without detailed instructions, a quick homemade version generally involves simmering pitted cherries with sugar, cornstarch, and lemon juice until thickened. If you’re going this route, be sure your topping is completely cool before adding it to the cheesecake to avoid melting or disturbing the surface.
You can also prepare it ahead of time and store it in the refrigerator for up to a week. If using store-bought filling, try to choose one with whole fruit and minimal added syrup for a more natural taste.
Applying the Cherry Topping
Once your cheesecake has fully chilled and set, carefully remove it from the springform pan. Spoon the cherry pie filling directly onto the center of the cheesecake and gently spread it outward, leaving about a half-inch margin around the edge for a clean look. Use as much or as little as you like, but a generous layer really elevates the visual appeal and flavor.
Adding Whipped Cream and Chocolate Shavings
For the whipped cream, you can pipe decorative swirls around the edges using a piping bag fitted with a star tip, or simply dollop with a spoon for a rustic finish. Use stabilized whipped cream if you need the decoration to hold for longer periods.
Top the whipped cream and cherries with chocolate shavings to complete the dessert. To make the shavings, take a block of semisweet chocolate and use a vegetable peeler to create delicate curls. Keep the chocolate cold before shaving for better control.
Presentation Tips
For a polished final look:
- Chill the cheesecake again for 15–20 minutes after adding toppings to help everything set.
- Use a hot, clean knife to slice and wipe the blade between cuts for sharp, restaurant-quality slices.
Troubleshooting Common Issues with Black Forest Cheesecake
Why Cheesecakes Sometimes Crack
Even experienced bakers occasionally deal with cracks on the surface of their cheesecakes. Most of the time, cracking is caused by either overbaking or sudden temperature changes. Luckily, these issues are completely avoidable when you follow a few simple techniques.
Here’s how to keep your Black Forest Cheesecake Recipe smooth and flawless:
- Use a water bath to regulate heat and maintain moisture in the oven.
- Don’t overmix the batter after adding the eggs. Overmixing can incorporate excess air, which leads to puffing and cracking.
- Avoid opening the oven door during baking, especially during the first 45 minutes.
- Cool the cheesecake gradually by letting it rest in the turned-off oven for an hour.
Even if a crack forms, remember — the cherry topping and whipped cream can cover any imperfections and still look beautiful.
Dealing with Soggy Crusts
A soggy crust often results from water seeping into the springform pan during the water bath process. To avoid this, double-wrap the bottom of the pan with foil or use the alternative method mentioned earlier with a second cake pan. Also, pre-bake the crust as instructed to create a solid, sealed base that resists moisture.
If you notice some moisture on the bottom after baking, let the crust rest uncovered in the fridge for an extra few hours. It will firm up as it chills.
Preventing a Sunken Center
A slight jiggle in the center when the cheesecake is done baking is completely normal. However, if your cheesecake sinks too much in the middle, it may be due to underbaking or rapid cooling.
Tips to avoid this:
- Bake until the edges are set but the center is still slightly wobbly.
- Cool the cheesecake gradually in the oven with the door cracked open.
- Refrigerate for at least 8 hours, which helps the filling stabilize completely.
How to Know When It’s Done
The most reliable way to tell if your cheesecake is ready is by gently shaking the pan. The edges should be firm while the center should move slightly like gelatin. Another method is to check internal temperature. Insert a thermometer into the center – it should read between 150°F and 155°F.
Essential Equipment, Prep Tips, and Time-Saving Techniques
Must-Have Tools for the Best Results
Making the Black Forest Cheesecake Recipe doesn’t require a professional kitchen, but having the right equipment will significantly improve your outcome. Here are the essential tools you’ll need:
- 9-inch Springform Pan: This is non-negotiable. It allows easy removal of the cheesecake without damaging the sides.
- Roasting Pan: Needed for the water bath. It should be large enough to hold the springform pan with space around it.
- Heavy-Duty Foil or 10-inch Cake Pan: Either wrap the springform tightly with foil to prevent leaks or place it in a larger cake pan before putting it into the water bath.
- Stand Mixer with Paddle Attachment: Ensures a smooth batter with minimal effort and prevents overbeating.
- Rubber Spatula: For scraping down the bowl and ensuring every bit of batter is incorporated.
- Kitchen Scale (optional but helpful): For accurate measurements, especially when working with chocolate or flour.
Smart Prep Tips to Save Time
Although this cheesecake takes time to chill, you can prep in stages to simplify your workflow.
Day Before Baking:
- Set your cream cheese and eggs out on the counter to reach room temperature.
- Crush the Oreo cookies and store them in an airtight container.
- Prepare your cherry topping and refrigerate.
Baking Day:
- Make your crust and filling in the morning.
- Bake by midday to give the cake plenty of time to cool and chill by night.
- Whip cream and shave chocolate just before serving for freshness.
Chill Time is Crucial
One of the most important factors in this recipe is patience. The cheesecake needs at least 8 hours to chill, but overnight is better. This resting time allows the texture to fully develop and makes slicing cleaner and easier.
You can make the cheesecake up to two days in advance, and it will still taste fresh. Simply add the toppings just before serving.
Serving Tips
- Use a hot knife (run under hot water and wiped clean) for slicing. This keeps the edges sharp and smooth.
- Slice into 12 even pieces for the best portion control. Each slice is rich, so smaller servings are satisfying.
- Serve chilled and store leftovers covered in the fridge for up to 5 days.
Conclusion
The Black Forest Cheesecake Recipe is more than just a dessert – it’s a decadent experience that combines deep chocolate richness, silky texture, and the sweet-tart pop of cherries in every bite. With careful preparation and the right techniques, you can achieve a show-stopping cheesecake that not only looks stunning but also delivers incredible flavor.
Whether you’re baking for a celebration, the holidays, or just to indulge in something extraordinary, this cheesecake will exceed every expectation. With simple ingredients and step-by-step instructions, even novice bakers can bring this iconic dessert to life in their own kitchen.