My journey with baking began in my grandma’s warm kitchen, where flour dusted the counters and love was folded into every recipe. She passed down more than just her cinnamon rolls—she passed down the joy of homemade treats and the comfort they bring. That joy stuck with me.
As time passed, I found comfort in baking—it turned into my go-to for marking milestones, healing hard days, and sharing moments with others. From stress-baking in college to sharing late-night brownies with friends, it’s always been my creative escape. Now, as a mom of two always-hungry kids, it’s become something even bigger—our favorite family tradition.
At Wish-Cake.com, I share recipes that are rooted in those real, everyday moments. And today, I’m excited to bring you one of my absolute favorites: the Baseball Cake Recipe. It’s a sweet way to combine creativity, nostalgia, and celebration all in one.
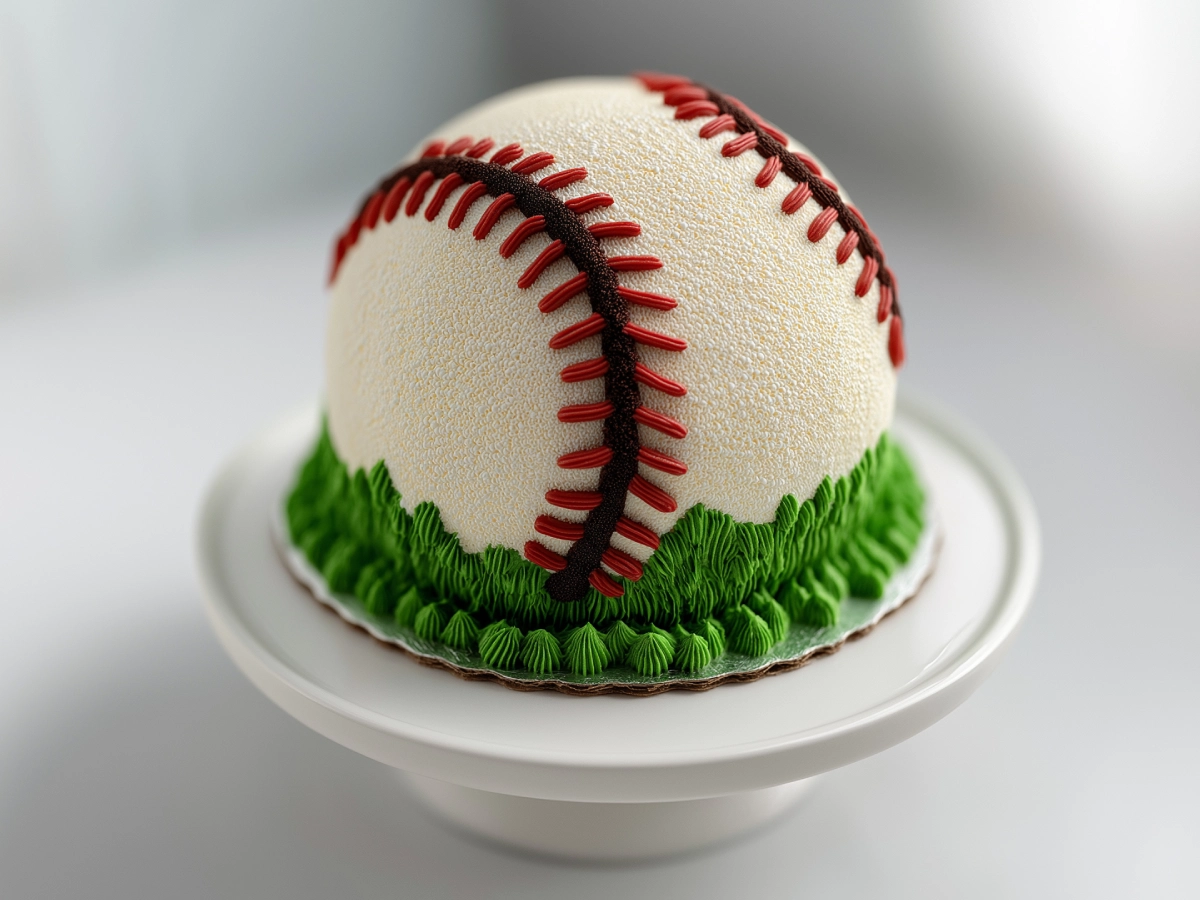
Whether you’re planning a celebration for a young athlete’s victory, looking to surprise a sports-loving friend, or simply want a unique baking project, this Baseball Cake Recipe fits the bill. Designed to mirror a classic baseball with bold red stitches and a field-inspired green frosting base, this cake is both playful and impressive.
Simple to follow and fun to decorate, this Baseball Cake Recipe is perfect for beginners and seasoned bakers alike. It’s more than dessert—it’s a memory in the making, just waiting to be shared at your next gathering.
Contents
- 1 Understanding the Basics of a Baseball Cake Recipe
- 2 Baseball Cake Recipe
- 3 Ingredients and Tools You’ll Need for the Perfect Baseball Cake Recipe
- 4 Step-by-Step Guide to Baking the Cake Base
- 5 Whipping Up the Dreamiest Frosting
- 6 Assembling and Layering the Baseball Cake Recipe for Stability
- 7 Piping the Baseball Stitch Design
- 8 Adding the Finishing Touches—Grass Border and More
- 9 Serving, Storing & Transporting Your Baseball Cake Recipe
- 10 Baseball Cake Recipe Variations and Customizations
- 11 Frequently Asked Questions – Baseball Cake Recipe FAQs
Understanding the Basics of a Baseball Cake Recipe
Why a Baseball Cake Recipe Stands Out
A Baseball Cake Recipe isn’t just about baking—it’s about creating something fun and memorable. Shaped like a baseball, complete with red stitched frosting and a grassy green base, this cake turns a simple treat into a playful centerpiece.
What makes it special? Its unique round shape and realistic design. Using a half-sphere pan and simple decorating tools, you can craft a dessert that looks just like the real thing. It’s eye-catching, easy to customize, and always a hit with sports fans.
When to Make a Baseball Cake
This cake is perfect for:
- Baseball-themed birthdays
- Little League wins or team parties
- Father’s Day for baseball-loving dads
- Game-day desserts
- Any celebration for a baseball fan
You don’t need a big reason, though. Sometimes, the joy of making a Baseball Cake Recipe is reason enough.
Print
Baseball Cake Recipe
- Total Time: 2 hours 10 minutes
- Yield: 1 cake (8–10 servings) 1x
- Diet: Vegetarian
Description
Surprise a baseball lover with a fun, round cake that looks just like the real thing—perfect for game day parties or sports-themed birthdays. Complete with red stitch piping and green grass frosting, this Baseball Cake Recipe is perfect for birthdays, team parties, or game-day celebrations. Easy to follow and fun to decorate—this cake is a home run!
Ingredients
Cake:
1 box cake mix (your choice, French vanilla recommended)
½ cup melted butter (cooled)
3 large eggs
1 cup buttermilk (or 1 cup milk + 2 tsp lemon juice)
1 tsp vanilla extract
Frosting:
¾ cup butter (room temp)
¾ cup shortening
5 cups powdered sugar
1 Tbsp clear vanilla extract
2 Tbsp frosting whitener (optional)
1–3 Tbsp milk (as needed)
Red gel food coloring
Green gel food coloring
Equipment:
6-inch half-sphere cake pan
Flower nail (for even baking)
Cake leveler or serrated knife
Cake turntable (optional)
Piping bags
Round piping tip (Wilton #2)
Grass piping tip
Acetate sheet or flexible plastic scraper
Instructions
1. Turn on your oven and set it to 350 degrees Fahrenheit (or 177°C) so it can warm up. Meanwhile, lightly coat your baking dish with non-stick spray, and position a metal flower nail right in the center of the pan to help distribute heat evenly.
2. Start by combining: all the liquids in one bowl until they blend smoothly. Once done, gradually add the dry cake mixture and whisk it thoroughly for about two minutes to get a smooth, airy texture.
3. Pour into pan, leaving 1 cm space at the top. Bake for 35–45 minutes. Cool for 10 minutes, then remove from pan.
4. Make frosting: Beat butter & shortening, add sugar and vanilla, adjust with milk as needed. Tint small portions red and green.
5. Assemble cake: Level layers if desired. Stack with frosting between. Crumb coat, chill, then final coat and smooth.
6. Decorate: Pipe red stitches using round tip. Use grass tip to add green border.
7. Serve & enjoy your Baseball Cake masterpiece!
Notes
This Baseball Cake Recipe is best made fresh but can be prepared 1 day ahead. For easier decorating, chill the cake before piping stitches and borders. Nutritional values are estimates based on standard cake mix and frosting.
- Prep Time: 30 minutes
- Cook Time: 40 minutes
- Category: Cakes Recipes
- Method: Baking
- Cuisine: American
Nutrition
- Serving Size: 1 cake (serves 8–10)
- Calories: 516 kcal
- Sugar: 56g
- Sodium: 320mg
- Fat: 24g
- Saturated Fat: 10g
- Unsaturated Fat: 12g
- Trans Fat: 1g
- Carbohydrates: 71g
- Fiber: 0.5g
- Protein: 2g
- Cholesterol: 75mg
Ingredients and Tools You’ll Need for the Perfect Baseball Cake Recipe
Essential Ingredients for the Baseball Cake Recipe
The base of this Baseball Cake Recipe is a moist, fluffy cake—made simple with a cake mix and a few rich add-ins to give it that from-scratch flavor. Here’s what you’ll need:
For the Cake:
- 1 box cake mix (French vanilla works great, but any flavor works!)
- ½ cup melted butter (cooled)
- 3 eggs
- 1 cup buttermilk (or 1 cup milk + 2 tsp lemon juice)
- 1 tsp vanilla extract
For the Frosting:
- ¾ cup butter (room temp)
- ¾ cup shortening
- 5 cups powdered sugar
- 1 Tbsp clear vanilla extract
- 2 Tbsp frosting whitener (optional for a whiter base)
- 1–3 Tbsp milk (for texture)
- Red gel food coloring (for the stitches)
- Green gel food coloring (for the grass)
Each element plays a role. The butter and buttermilk add richness, while the shortening in the frosting gives it structure—important for piping those clean red stitches and grass edges.
Tools You’ll Need to Bring This Baseball Cake Recipe to Life
The right tools make this decorating process easy and fun. Here’s what you should have on hand:
| Tool | Purpose |
|---|---|
| 6-inch half-sphere cake pan | Gives the cake its signature round baseball shape |
| Baker’s floured cooking spray | Ensures easy release from the pan |
| Flower nail | Helps the cake bake evenly in the center |
| Cake leveler or serrated knife | Slices the cake into layers if desired |
| Cake turntable (optional) | Makes smoothing and decorating easier |
| Small acetate sheet or flexible plastic | For smooth frosting application |
| Piping bag with round tip (Wilton #2) | For red stitch piping |
| Grass piping tip | To create the green grassy base |
Each of these tools will help you achieve that professional finish while keeping the decorating process manageable—even for beginners.
Step-by-Step Guide to Baking the Cake Base
Prepping the Pan and Mixing the Batter
To kick off your Baseball Cake Recipe, start by prepping your half-sphere pan properly. This shape helps mimic a real baseball—but only if baked evenly.
Here’s how to do it right:
- Preheat your oven to 350°F (177°C).
- Spray your 6-inch half-sphere pan generously with baker’s floured cooking spray, or grease and flour it thoroughly.
- Place a flower nail in the center of the pan, flat side down. This helps distribute heat and prevent an undercooked middle.
Now, onto the batter:
- In a large mixing bowl, combine the melted butter, buttermilk, eggs, and vanilla.
- Whisk until smooth, then add the cake mix and stir just until combined (about 30 seconds).
- Beat the mixture on medium speed for 2 minutes until fluffy and uniform.
Don’t overfill your pan. You want the batter to sit about 1 cm below the rim to prevent overflow while baking. To prevent any unexpected drips, you can slide a pan onto the lower oven rack as a backup.
Baking and Cooling the Cake for Best Results
After you’ve poured the batter in, let it bake for about 30 to 50 minutes, though the exact time may vary with your oven. You’ll know it’s done when a toothpick inserted into the center comes out clean.
Here’s the process at a glance:
| Step | What to Do |
|---|---|
| Bake Time | 30–50 minutes |
| Cool in Pan | 10 minutes after baking |
| Final Cool | Transfer to rack or plate to cool completely |
Allow the cake to cool in the pan for about 10 minutes before turning it out onto a wire rack or plate. Don’t rush this part. Decorating a warm cake leads to melting frosting and frustration.
Tip: Place the cooled cake in the fridge to chill—it’s easier to frost and decorate when firm.
Whipping Up the Dreamiest Frosting
Making the Perfect Buttercream for Your Baseball Cake Recipe
A good frosting can make or break a cake—especially when you’re decorating something as detailed as a Baseball Cake Recipe. For this cake, you’ll want a buttercream that’s both smooth and sturdy enough for piping.
Start by beating together:
- ¾ cup butter (softened to room temperature)
- ¾ cup shortening
Once combined, gradually add:
- 5 cups powdered sugar
- 1 tablespoon clear vanilla extract
Beat the mixture until light and fluffy. When your frosting feels too thick to spread easily, gently mix in a little milk—start with a small splash and add more gradually, checking the texture as you go, until it’s smooth enough to work with.
Want a brighter white base? Add 2 tablespoons of frosting whitener before tinting. This is optional but gives a cleaner baseball look.
Coloring Your Frosting for Stitching and Grass
Once your base frosting is done, divide it into three parts:
- Base frosting – Leave this white or brighten it with whitener. This covers the cake entirely.
- Red frosting – Transfer a small portion to a bowl and mix in a few drops of red gel food coloring. This part is meant to replicate the classic red threading seen on traditional baseballs..
- Green frosting – Tint another small portion with green gel food coloring for the grass border around the cake.
Pro tip: Use gel colors rather than liquid. They’re more concentrated and won’t thin out your frosting, which is especially important for clean piping work.
Assembling and Layering the Baseball Cake Recipe for Stability
How to Layer Your Baseball Cake for a Clean Finish
Once your cake has cooled and the frosting is prepped, it’s time to start building your Baseball Cake Recipe into a show-stopping centerpiece. This step is key to ensuring your cake looks like a real baseball while holding its shape.
If you plan to add filling, gently slice the dome into two or three layers using a serrated knife or cake leveler. Sphere cakes are a bit trickier to work with, so take your time.
Here’s how to build it:
- Apply a small dab of frosting to the center of your cake stand or dish to help anchor the cake in place. This will help anchor your cake.
- Center the bottom layer, then apply an even layer of frosting between each slice.
- Stack the layers carefully, keeping the rounded ball shape intact.
Avoid using too much frosting inside—it may squeeze out when stacking and make decorating harder later on.
Creating a Smooth Frosting Base
To finish this stage of your Baseball Cake Recipe, you’ll want a flawless outer coat to build on. That starts with a crumb coat—a thin layer that traps crumbs so your final frosting stays clean.
Follow these steps:
- Apply a light layer of white frosting using an offset spatula or acetate smoother.
- Pop the cake in the fridge for a short while—just enough time for the icing to harden slightly and hold its shape.
- Apply a thicker coat over the crumb layer and smooth it out evenly.
- Chill again for best results before you begin decorating.
The goal is to create a solid, smooth base that makes the rest of your design—especially those iconic red stitches—look crisp and professional.
After this coating firms up, you’re all set to dive into the fun part—decorating your baseball-themed treat.
Piping the Baseball Stitch Design
Marking Your Guide for the Stitches
With the cake chilled and your frosting base smoothed out, it’s time to decorate the signature feature of your Baseball Cake Recipe—those iconic red stitches.
Before you pipe anything, you’ll want to mark stitching lines on the cake to guide your piping. Here’s how:
- Grab a toothpick and gently drag it across the surface in a curved arc to mimic the shape of baseball stitches.
- Do this on both sides of the cake to mirror the look of a real ball.
- These light imprints serve as your stencil, helping keep the stitches uniform and in place.
Chilling the cake beforehand makes this process much easier—cold frosting won’t smudge as easily, and if you make a mistake, you can gently scrape it off without damaging the surface.
Using the Right Piping Technique for Clean Stitching
Now that your guides are in place, it’s time to pipe. Fill a small icing bag with the red frosting, and attach a fine circular nozzle—something like size #2 is perfect for this.
Follow the toothpick lines and pipe a series of small, shallow “V” shapes to replicate the baseball’s stitching pattern. Keep the pressure even and move slowly. You’re aiming for uniformity, not speed.
After decorating one half, turn the cake around and do the same on the other side, flipping the V shapes so they form a balanced, mirror-like design
Tips for success:
- Keep the bag steady and use your wrist, not your whole hand, for control.
- Clean the tip frequently with a damp cloth to maintain sharp lines.
- Work in sections, especially if you’re new to piping—there’s no rush.
If any part of the design doesn’t look quite right, pop the cake back in the fridge for a bit. Then, carefully nudge the frosting with a toothpick and go over that spot again—it’s easy to correct.
When done right, this stitch detailing gives your Baseball Cake Recipe its authentic, sporty charm. It’s the part that gets the most “wows”—so have fun with it and don’t worry about perfection.
Adding the Finishing Touches—Grass Border and More
How to Pipe a Realistic Grass Border for Your Baseball Cake Recipe
With the stitches complete and the cake nicely chilled, it’s time to give your Baseball Cake Recipe its finishing touch—a realistic grass border that adds color and brings the design to life.
Here’s how to do it:
- Fill a piping bag with your green-colored frosting.
- Attach a grass tip (like Wilton #233).
- Hold the bag upright and gently squeeze to pipe short bursts that resemble blades of grass.
- Release pressure and lift the tip to complete each tuft cleanly.
Work your way around the entire base of the cake, overlapping slightly as you go. Add a fun twist to your baseball cake with a bumpy edge design that ties into the sporty vibe and makes the cake look extra neat and cheerful.
Want to add a little more fun? Try pressing in mini edible baseballs, fondant gloves, or tiny player figures into the frosting mounds to create a game-day scene.
Cake Toppers and Custom Decor Ideas
You’ve nailed the basics—now take your cake up a notch with personalized details. These are perfect for themed parties, team celebrations, or birthday events.
Here are some fun ideas to top your Baseball Cake Recipe:
- Try adding a small scoreboard that shows the birthday kid’s name or how old they’re turning—it’s a fun way to keep with the game-day feel
- Fondant baseball bats, mitts, or caps
- Edible team logos or number jerseys
- Pennant flags or printable player cutouts
Whether you go all out or keep it simple, these extra touches give your cake personality and charm. Best of all, they make your Baseball Cake Recipe a showstopper that feels as fun as the game itself.
Now your dessert is game-ready—snap a photo, share a slice, and celebrate like a champ!

Serving, Storing & Transporting Your Baseball Cake Recipe
Serving Tips Without Smudging Your Design
You’ve worked hard on your Baseball Cake Recipe, and now it’s time to serve it with style—without messing up all that detail. Start by making the first cut with a sharp, serrated knife. Begin from the back or base, away from the stitches and decorative elements, especially if you want to preserve the look for photos or second servings.
For clean slices:
- After each slice, gently clean the blade using a soft cloth moistened with warm water to keep your cuts neat and smooth.
- Slice in a zig-zag motion rather than pushing down to avoid cracking the dome.
Want even layers? Chill the cake for 10–15 minutes before slicing—it helps the frosting stay firm and the layers cut cleanly.
If you’ve layered it with filling, use a small cake server or spatula to lift the slices neatly. Serve on individual plates and watch the smiles spread.
How to Store and Transport Your Baseball Cake Recipe Safely
Proper storage matters if you’re prepping your Baseball Cake Recipe ahead of time—or saving leftovers.
Short-Term Storage:
- Store at room temperature in a cake dome or airtight container for up to 24 hours, especially if not using perishable fillings.
- For warmer environments, or if decorated with dairy-based frosting, refrigerate and let it sit out 15–20 minutes before serving to soften.
Long-Term Storage:
- For leftovers, wrap individual slices in plastic wrap and store in an airtight container in the fridge for up to 4 days.
- Before freezing, seal the item by first wrapping it twice in plastic to lock in moisture, then cover with foil to guard against freezer burn. Freeze up to 1 month.
Transporting:
- Use a sturdy cake board and box to support the cake’s weight and shape.
- Add a non-slip mat beneath the board in your car to prevent sliding.
- Keep the cake chilled until departure, especially in warmer weather.
Transporting a dome-shaped cake like this one requires a bit of care—but when done right, your Baseball Cake Recipe will arrive perfectly intact and ready to impress.
Baseball Cake Recipe Variations and Customizations
Flavor Swaps to Make Your Baseball Cake Recipe Unique
The beauty of a Baseball Cake Recipe is that it’s flexible. It’s easy to adjust the taste to match different preferences or special events. While vanilla is classic (and makes decorating a breeze), here are a few fun swaps:
- Chocolate cake mix for a richer, bolder base
- Funfetti or birthday cake flavor for kid-friendly parties
- Red velvet for a bold surprise when sliced
- Strawberry or lemon for a fruity, summery vibe
Want to go fully homemade? Replace the cake mix with your favorite from-scratch batter recipe—but keep the proportions the same to fit the dome pan.
For added flair, try flavored fillings between the layers:
- Chocolate ganache
- Whipped cream cheese
- Strawberry jam
- Nutella or peanut butter frosting
Each adds a delicious twist without changing the decorating process.
Adapting This Recipe for Other Sports Themes
Once you’ve mastered the Baseball Cake Recipe, it’s easy to tweak it for other sports fans. Just change the shape, colors, or piping design:
| Sport | Shape Idea | Frosting Design |
|---|---|---|
| Basketball | Use orange frosting and black piped lines | Curved segments |
| Soccer | White base with black pentagon shapes | Piped hexagons |
| Tennis | Bright green or yellow with white curved lines | Simple arcs |
These variations keep the spirit of the cake while letting you personalize it for any team or sport.
With every variation, the joy of decorating remains the same—fun, creative, and full of team spirit.
For More Delicious And Easy Recipes Follow Me In Facebook And Pinterest.
Frequently Asked Questions – Baseball Cake Recipe FAQs
What is the baseball term “cake”?
In baseball slang, the term “cake” isn’t officially defined within the sport’s rules, but informally, players might use it to describe something that’s “a piece of cake”—meaning easy. It’s not directly related to food or desserts. In the context of a Baseball Cake Recipe, it’s all about combining your love for the game with a creative, edible centerpiece.
What makes a smash cake different from a regular cake?
It’s a tiny, playful cake prepared especially for toddlers to dig into during their very first birthday celebration. It’s meant to be smashed, touched, and enjoyed messily—no utensils required! Unlike a traditional cake, smash cakes are usually lighter on sugar and frosting. While the Baseball Cake Recipe is designed for visual appeal and detailed decoration, a baseball-themed smash cake could be a fun mini version!
Can you make a ball cake?
Yes! That’s exactly what a Baseball Cake Recipe is—a cake baked in a half-sphere pan to mimic the round shape of a baseball. With the right pan, a flower nail for even baking, and some decorating tools, making a ball-shaped cake is easier than it looks.
What are the three methods for preparing cake batters?
There are three classic methods used in cake baking:
Creaming method – Butter and sugar are creamed first before adding eggs and dry ingredients.
All-in-one method – All ingredients are mixed together at once.
Whisking method – Eggs and sugar are whisked to incorporate air (often used in sponge cakes).
The Baseball Cake Recipe uses a semi-homemade version of the creaming method, where melted butter and buttermilk are mixed with a boxed cake mix for an easy, moist result.
What is a pancake in baseball?
“Pancake” in baseball isn’t a common term. However, pancake glove refers to a flat training glove used by infielders to improve fielding skills. While it has no connection to baking, it’s a fun coincidence if you’re making baseball pancakes for breakfast!
What is the fourth batter called?
The fourth person to bat in a baseball game is usually the one trusted to clear the bases, often referred to as the team’s power hitter. This player is typically one of the strongest hitters on the team, positioned to drive in base runners ahead of them. While it has nothing to do with dessert, it’s a fun title to assign to whoever finishes off the last slice of your Baseball Cake!
