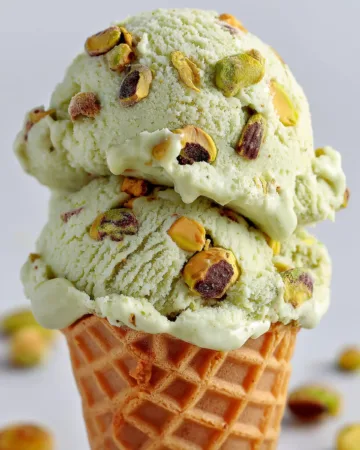


Looking for a creamy frozen dessert that’s both indulgent and better for you? This healthier pistachio ice cream is exactly what you need. Made with plant-based milk, raw nuts, and just a touch of natural sweetness, it’s a rich, nutty, and dreamy treat that’s entirely dairy-free. Whether you’re vegan, lactose-intolerant, or simply want a lighter version of your favorite green ice cream, this recipe delivers on all fronts.
Unlike traditional pistachio ice cream loaded with cream, egg yolks, and artificial flavoring, this version keeps it real with wholesome ingredients and a quick, no-fuss method. Plus, it’s versatile enough to work with an ice cream maker, a Ninja Creami, or even a standard blender if that’s all you have.
In this article, we’ll cover how to make it step-by-step, tips to perfect the texture, variations you can try, and why each ingredient plays a key role. Ready to upgrade your dessert game without sacrificing flavor? Let’s dive in.
The Benefits of Making Your Own Healthier Pistachio Ice Cream
Why Homemade Ice Cream Is Better for You
Making your own ice cream at home gives you full control over every ingredient. There are no preservatives, additives, or food dyes, which makes this pistachio ice cream a clean dessert option. Store-bought versions often include things like hydrogenated oils, artificial pistachio flavor, and corn syrup. When you make it yourself, you’re skipping all of that.
The Power of Plant-Based Ingredients
Using oat or soy milk in place of dairy makes this dessert easier on digestion and suitable for vegans. Cashews add a natural creaminess that mimics the rich texture of traditional ice cream, while pistachios bring that unique nutty flavor and a dose of healthy fats. Almond extract enhances the pistachio notes, creating a balanced and sophisticated flavor profile.
Nutritional Highlights of Pistachios
Pistachios are more than just delicious. They’re rich in antioxidants, fiber, protein, and heart-healthy fats. Compared to other nuts, they’re also relatively low in calories. Incorporating them into your desserts adds flavor and nutrition without the guilt.
Print
Healthier Pistachio Ice Cream Recipe (Dairy-Free & Delicious)
- Total Time: 30 minutes
- Yield: 6 servings
- Diet: Vegan
Description
A creamy and healthier pistachio ice cream made with plant-based milk, raw nuts, and natural extracts. No dairy or refined ingredients.
Ingredients
1 ½ cups plant-based milk (such as oat or soy)
¾ cup shelled raw unsalted pistachios
½ cup raw cashews
¼ cup white sugar
1 teaspoon vanilla extract or vanilla bean paste
¼ teaspoon almond extract
1 pinch salt
½ cup shelled roasted unsalted pistachios roughly chopped (optional)
Instructions
1. Prepare your ice cream maker according to the manufacturer’s instructions.
2. Add the plant-based milk, pistachios, cashews, sugar, vanilla, almond extract, and salt to your blender. Blend until completely smooth and creamy.
3. Pour the mixture into your ice cream maker and churn for about 25 minutes until it reaches a soft-serve consistency.
4. If using chopped pistachios, add them during the last 5 minutes of churning.
5. Enjoy right away, or freeze for at least 2 hours for a firmer texture. Scoop and enjoy!
Notes
If you don’t have an ice cream maker, use a blender method by freezing the base and blending before serving.
The Ninja Creami works great with this recipe. Use the Gelato or Ice Cream setting and re-spin with a splash of milk if crumbly.
- Prep Time: 30 minutes
- Cook Time: 0 minutes
- Category: Dessert
- Method: Churned
- Cuisine: American
Key Ingredients and Their Purpose
Plant-Based Milk Choices: Oat vs. Soy
The base of any creamy vegan ice cream is a good non-dairy milk. Oat milk tends to give a slightly sweet, mellow flavor and silky consistency, while soy milk offers a neutral base with a little more protein. Either option works well, depending on what you have on hand or prefer.
Cashews: The Secret to Creaminess
Cashews are a staple in dairy-free recipes for a reason. When soaked and blended, they become incredibly smooth and lend a rich texture to the ice cream. In this recipe, they pair perfectly with pistachios to create a creamy base that doesn’t require coconut milk or oils.
Raw Pistachios vs. Roasted for Flavor and Texture
Using raw pistachios in the blending step ensures the base retains a soft green color and mild flavor. Adding chopped roasted pistachios at the end brings contrast and crunch, making every bite interesting. If you prefer smooth ice cream, feel free to skip the chopped ones.
Flavor Enhancers: Vanilla and Almond Extract
Vanilla extract adds warmth, while a tiny bit of almond extract deepens the pistachio flavor without overpowering it. Just a quarter teaspoon is all you need to elevate the entire batch.
Sweetener: Why White Sugar Works Best
While alternatives like maple syrup or coconut sugar are popular in clean eating, white sugar dissolves easily, has a neutral taste, and doesn’t interfere with the delicate nutty flavor of the pistachios. It also helps keep the texture light and scoopable.
How to Make Healthier Pistachio Ice Cream Step-by-Step
Step 1: Prep Your Equipment
First, make sure your ice cream maker bowl is frozen (if required by the manufacturer). For the Ninja Creami method, pour the mixture into a pint container and freeze it for 24 hours before spinning.
Step 2: Blend the Base Until Smooth
In a high-speed blender, combine the plant-based milk, raw pistachios, cashews, sugar, vanilla extract, almond extract, and a pinch of salt. Blend until completely smooth. This step is crucial—any small nut pieces left unblended can affect the final texture.
Step 3: Churn It to Soft-Serve Perfection
Transfer the smooth mixture to your ice cream maker and churn for about 25 minutes. You’ll know it’s ready when it looks like soft-serve. If you’re adding chopped roasted pistachios, sprinkle them in during the last few minutes of churning.
Step 4: Freeze for a Firmer Texture
If you like your ice cream scoopable, transfer it to a freezer-safe container and freeze for at least 2 hours. Overnight freezing is best for a classic ice cream texture.
Step 5: Scoop and Enjoy
Once frozen, let the container sit at room temperature for 5-10 minutes before scooping. This makes it easier to serve and gives it that perfect creamy consistency.
Tips for Perfect Texture and Flavor Every Time
Soaking Nuts for a Smoother Blend
For an ultra-smooth ice cream base, soaking the pistachios and cashews ahead of time can make a noticeable difference. While high-speed blenders can usually handle raw nuts just fine, soaking them in hot water for 15 to 30 minutes softens them up, helping your mixture turn out even creamier. If your blender struggles with whole nuts, this step is especially useful.
Taste the Base Before Churning
Don’t skip the taste test after blending. This is your chance to adjust the flavor. If you want it sweeter, add a tablespoon more sugar. If you want a deeper nutty flavor, a drop more almond extract can do the trick. Since the flavors slightly dull when frozen, a slightly bolder base ensures the final result stays rich and vibrant.
Avoiding Ice Crystals
To prevent a grainy texture, make sure the base is completely smooth before churning. Also, churn the mixture while it’s still cool, not warm, to help it freeze more evenly. If you’re freezing it after churning, press a piece of parchment paper against the surface before sealing the lid. This reduces air exposure, which can cause ice crystals to form.
Storage Tips for Homemade Ice Cream
Store your pistachio ice cream in a shallow, airtight container for best results. Shallow containers freeze faster and maintain a better texture. If your ice cream becomes too hard after days in the freezer, just let it thaw on the counter for a few minutes before scooping. Homemade varieties tend to freeze firmer than store-bought ones since they lack artificial softeners.
Ninja Creami and Blender Methods Explained
Using the Ninja Creami for This Recipe
If you’re using the Ninja Creami, the process is just as easy. After blending your base as instructed, pour it into the Creami pint container, making sure not to go over the max fill line. Freeze it flat for 24 hours. When ready, spin it using the “Gelato” or “Ice Cream” setting. If the texture is crumbly after the first spin, add a splash of plant-based milk and re-spin.
For a crunchy texture, use the “Mix-In” feature to fold in chopped roasted pistachios after spinning. This gives you the best of both worlds — creamy and crunchy — in one scoop.
Making Ice Cream Without a Machine
No ice cream maker? No problem. After blending, pour the base into a freezer-safe loaf pan or container. Let it freeze for about 30 minutes, then stir vigorously with a fork or whisk to break up any crystals. Repeat this process every 30 minutes for about 3 hours. This manual churning method gives a decent consistency, especially if you start with a very smooth blend.
For smoother results, some people freeze the mixture in ice cube trays, then blend the frozen cubes until creamy right before serving. This trick works particularly well for single-serve scoops and keeps the texture soft and scoopable.
Flavor Variations and Add-In Ideas
Chocolate Swirl
Melt some dairy-free dark chocolate and swirl it through the churned ice cream just before freezing. The contrast between rich chocolate and nutty pistachio is incredibly satisfying.
Cardamom and Rose Water Twist
Add a pinch of ground cardamom and a tiny splash of rose water to the base before blending. These two ingredients add a Middle Eastern flair and pair beautifully with pistachios. Be conservative — a little goes a long way.
Fruit Infusions
For a fruity layer, blend in a few tablespoons of fresh mango or cherry puree into the base before churning. Alternatively, layer fruit puree into the churned ice cream before freezing to create ribbons of flavor.
Crunchy Mix-ins
Besides roasted pistachios, you can fold in bits of dairy-free chocolate, crushed cookies, or granola clusters. These add texture and make the ice cream feel like a store-bought mix-in treat but without the junk.
Why This Healthier Pistachio Ice Cream Stands Out
Cleaner Ingredients, Better Taste
By sticking to raw nuts, plant-based milk, and simple extracts, this ice cream highlights the natural richness of pistachios without any of the artificial fillers found in commercial brands. The result is a dessert that not only tastes great but is better for your body.
Versatile and Customizable
This recipe isn’t rigid. You can easily adapt it based on dietary needs or flavor preferences. Want it lower in sugar? Reduce the sweetener slightly. Need it nut-free? Try sunflower seed butter and hemp milk for a similar texture and creaminess.
Ideal for All Seasons
Though perfect for hot summer days, this ice cream feels indulgent enough for holidays or special events. It’s rich, smooth, and elegant — a dessert you can serve at dinner parties or enjoy casually on a weeknight.
Serving Suggestions and Creative Presentation Ideas
Classic Cones and Cups
Once your healthier pistachio ice cream is frozen and ready to scoop, the most straightforward way to enjoy it is in a cone or a cup. Choose sugar-free or gluten-free cones for a lighter option. For presentation, a small sprinkle of chopped roasted pistachios on top adds visual appeal and a satisfying crunch.
Pair with Fresh Fruit
Serve a scoop alongside a medley of fresh berries like raspberries, blueberries, or sliced strawberries. The bright acidity of the fruit balances the rich nuttiness of the ice cream and brings color to your dessert plate.
Pistachio Ice Cream Sandwiches
Use soft vegan cookies to sandwich a scoop of pistachio ice cream between them. Oatmeal or almond-based cookies work particularly well. Wrap each sandwich in parchment paper and store in the freezer for a grab-and-go treat.
Mini Dessert Jars
Layer the ice cream in small mason jars with crushed dairy-free graham crackers and a drizzle of maple syrup or melted dark chocolate. It’s a no-bake parfait that’s fun for parties, easy to serve, and customizable with extra toppings.
Elegant Plating for Special Occasions
For a more upscale dessert experience, plate a quenelle of ice cream on a chilled dish with a dusting of pistachio crumbs and edible flowers. You can also drizzle a touch of fruit reduction or vegan caramel sauce around the plate to elevate the look.
How to Store and Refresh Leftovers
Proper Storage for Longevity
Homemade pistachio ice cream keeps best in an airtight, freezer-safe container. Flatten the surface with a spatula and place a piece of parchment paper directly on top before sealing the lid. This step helps block out air, reducing freezer burn and ice crystal formation.
Best Containers to Use
Opt for shallow, wide containers over deep ones. Shallow containers freeze faster and more evenly, and they’re easier to scoop from. Silicone or metal pans are excellent choices if you prefer an easy release.
Refreshing Texture After Freezing
If the ice cream gets too firm after several days in the freezer, let it rest on the counter for 5–10 minutes before scooping. For an even creamier result, you can toss scoops back into the blender with a splash of plant-based milk and pulse until soft and smooth again.
Shelf Life and Safety
Your healthier pistachio ice cream is best enjoyed within two weeks for optimal taste and texture. While it may technically last longer, the flavors can start to dull and the texture may become icy after extended freezing. Be sure to keep it tightly sealed and avoid repeated thawing and refreezing.
Common Mistakes to Avoid When Making Plant-Based Pistachio Ice Cream
Using Roasted Pistachios for the Base
Roasted pistachios have a stronger, sometimes bitter flavor and can affect the color of your ice cream. For a smooth, vibrant green and mild nutty taste, always start with raw, unsalted, shelled pistachios in the blending step. Roasted pistachios are best reserved for toppings only.
Skipping the Blending Time
A quick blend isn’t enough. You need to fully emulsify the nuts into the plant-based milk until absolutely no chunks remain. Any grit in the base will carry over into the frozen texture, making the final product less creamy. Take your time during blending and scrape down the sides as needed.
Not Freezing the Ice Cream Maker Bowl
For those using an ice cream maker with a removable bowl, forgetting to freeze the bowl ahead of time is a common issue. The bowl needs to be completely frozen for at least 24 hours to work properly. If it’s not cold enough, your ice cream won’t churn—it will just stay liquid.
Overfilling the Creami Container
If you’re using a Ninja Creami, make sure to stay below the max fill line. Going over that line can affect the spinning performance and cause a crumbly texture. It’s better to divide the batch between two pints if needed and process one at a time.
Overcomplicating the Flavor
It can be tempting to add a lot of extra flavors, but too many additions can overpower the natural pistachio profile. Keep it simple with vanilla and a touch of almond extract to complement the pistachios without stealing the spotlight.
Not Allowing Time for Proper Freezing
For those looking for scoopable ice cream, patience is key. After churning, freezing the mixture for at least 2 hours or overnight helps it solidify properly. If you try to scoop it right out of the churn, it’ll be too soft to hold its shape unless you’re serving it immediately like soft-serve.
Conclusion
Healthier pistachio ice cream doesn’t have to be complicated or flavorless. With the right ingredients and simple techniques, you can create a dairy-free dessert that’s indulgent, nutritious, and absolutely satisfying. Whether you use an ice cream maker, a Ninja Creami, or just a blender, this recipe adapts to your lifestyle and equipment.
From its naturally sweet, nutty base to its ultra-creamy texture, this frozen treat is proof that better-for-you desserts can still taste like a splurge. Plus, you’ll enjoy the peace of mind that comes from knowing exactly what’s in every bite.
So next time you’re craving a cool, creamy treat, skip the store-bought tub and make this healthy pistachio ice cream at home. Once you try it, you’ll never go back.