


There’s something heartwarming about the simplicity of Easy Jam Drops Cookies. With their buttery base and sweet jam center, these nostalgic treats have graced cookie jars across generations. Whether you’re baking for a family gathering, holiday treat box, or just a quiet afternoon snack, these cookies deliver comfort in every bite.
In this article, you’ll learn everything from the essential ingredients to expert tips for perfect results. We’ll break down each step so even beginners can bake like pros, covering variations, troubleshooting, and more.
Understanding the Magic of Jam Drops Cookies
What Are Jam Drops Cookies?
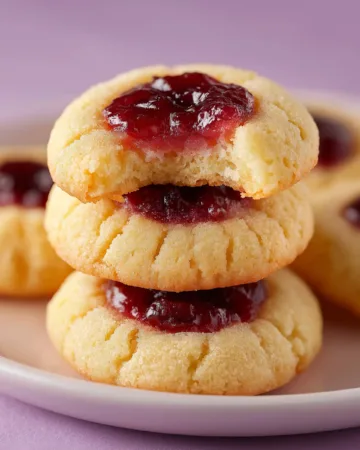
Jam Drops, also known as thumbprint cookies in some parts of the world, are small, round cookies made from a buttery dough. Their defining feature is a small well in the center filled with jam. This little touch transforms a plain biscuit into something visually appealing and flavor-packed. The combination of sweet, fruity jam and soft, slightly crisp cookie makes them irresistible to both kids and adults.
Traditionally made with raspberry jam, you can also find them with strawberry, apricot, or even lemon curd. While they may seem simple, their elegance lies in the balance of textures — the soft, crumbly base and the sticky, shiny jam center.
Origins and Popularity
Though widely known in Australia, Easy Jam Drops Cookies have variations across different cultures. In Sweden, similar cookies are called hallongrotta (meaning “raspberry cave”), and in America, they’re often just called thumbprint cookies.
The reason for their popularity? Simplicity. These cookies use pantry staples and come together without complicated techniques. And the end result is so pretty, they’re perfect for tea parties, bake sales, and holiday gifts.
Key Flavor Profile
The beauty of these cookies is in their basic yet satisfying flavor profile:
- Buttery Base: Soft, melt-in-the-mouth texture
- Jam Filling: A burst of fruity sweetness
- Vanilla Note: Just enough to lift the flavor without overpowering
- Slight Saltiness: Balances the sweetness perfectly
Even with just a handful of ingredients, the flavor complexity is delightful. The balance is so satisfying that you rarely stop at just one.
Benefits of Making Them at Home
- Customizable Fillings – You control what jam or filling to use.
- Freshness – Nothing beats cookies right out of the oven.
- Free From Additives – No preservatives or artificial flavors.
- Budget-Friendly – Uses everyday ingredients you likely already have.
Whether you’re a seasoned baker or a first-timer, this recipe offers a low-risk, high-reward experience.
Print
Easy Jam Drops Cookies Recipe
- Total Time: 1 hour 31 minutes
- Yield: 12 cookies
- Diet: Vegetarian
Description
These Easy Jam Drops Cookies are soft, buttery, and filled with sweet raspberry jam. Perfect for afternoon snacks, tea time, or gifting.
Ingredients
115 grams (1/2 cup / 1 stick) unsalted butter, room temperature
100 grams (1/2 cup) caster sugar or granulated sugar
2 teaspoons vanilla extract
1 egg yolk
175 grams (1 and 1/4 cups) plain flour or all-purpose flour
1/4 teaspoon baking powder
1/8 teaspoon salt
65 grams (1/4 cup) raspberry jam
Instructions
1. Line two cookie sheets with parchment paper.
2. In a large mixing bowl, beat the butter and sugar using an electric mixer until creamy.
3. Add vanilla and egg yolk. Beat briefly until combined.
4. Add flour, baking powder, and salt. Mix until a soft dough forms.
5. Scoop 1.5 tablespoons of dough and roll into balls. Place on trays.
6. Use your thumb to make a shallow indent in each cookie.
7. Fill each hole with about 1/4 teaspoon of jam.
8. Refrigerate the cookie trays for 30 minutes.
9. Preheat oven to 180°C (350°F) standard or 160°C (320°F) fan-forced.
10. Bake cookies for 11–12 minutes until lightly golden on edges.
11. Cool on trays for 5–10 minutes, then move to wire racks to cool completely.
12. Add more jam to the centers if desired.
Notes
You can use any jam flavor such as strawberry, apricot, or blueberry.
If cookies spread too much, chill dough longer and bake again.
Cookies can be stored in an airtight container for up to 5 days.
Freeze unbaked dough balls or fully baked cookies for longer storage.
- Prep Time: 80 minutes
- Cook Time: 11 minutes
- Category: Cookies
- Method: Baking
- Cuisine: Australian
Ingredients and Tools You Need for Easy Jam Drops Cookies
Essential Ingredients and Their Role
Every ingredient in Easy Jam Drops Cookies plays a specific part in achieving that signature soft, buttery texture and sweet fruity center. Here’s a breakdown:
- Unsalted Butter (115g / 1 stick)
This is the heart of the cookie. It creates a tender, rich base. Make sure it’s at room temperature so it creams smoothly with sugar. - Caster Sugar or Granulated Sugar (100g)
Caster sugar dissolves easily and provides sweetness and structure. Granulated works just fine, though caster sugar gives a smoother dough. - Vanilla Extract (2 teaspoons)
Adds depth and warmth to the flavor. Don’t skip this ingredient, even though it seems small. It enhances the cookie’s aroma and taste. - Egg Yolk (1 only)
Keeps the dough rich and tender. Using only the yolk makes the cookies softer than if the whole egg was included. - All-Purpose Flour (175g)
This is the main structure. It holds everything together. Too much flour, and the cookies will be dry. Stick to the measurement closely. - Baking Powder (1/4 teaspoon)
Helps the cookies rise slightly and maintain a light texture. - Salt (1/8 teaspoon)
Just a touch brings out all the flavors, especially balancing the sweetness. - Raspberry Jam (65g)
The highlight of the cookie. Raspberry is classic, but you can use any flavor. Look for a jam that’s thick and not too runny to prevent it from leaking out.
Optional Ingredient Substitutes
- Butter substitute: Use margarine only if necessary, but it may change the flavor and texture slightly.
- Jam varieties: Strawberry, apricot, blueberry, or even lemon curd for a twist.
- Flour alternatives: While all-purpose flour works best, you can use a 1:1 gluten-free blend for a gluten-free version.
Recommended Kitchen Tools
- Electric Mixer: Speeds up the creaming process and ensures even mixing.
- Mixing Bowl: Large enough to hold all ingredients comfortably without spilling.
- Spatula: Helps fold the dough together when it gets crumbly.
- Measuring Cups and Scale: Accurate measurements are critical, especially for baking.
- Baking Trays: Two trays, lined with parchment or baking paper.
- Spoon or Cookie Scoop: To portion the dough evenly.
- Wire Rack: For cooling the cookies without sogginess on the bottom.
- Teaspoon or Thumb: To make that iconic indentation for the jam.
Setting Up Your Baking Station
Organization makes the process smoother and more enjoyable. Set out all your ingredients measured and ready to go before you start mixing. Pre-line your baking trays and clear space for rolling dough and forming the cookies. Have your fridge space ready since the dough will chill before baking.
By ensuring everything is prepped before starting, you’ll cut down on baking stress and prevent ingredient mix-ups.
Why Room Temperature Ingredients Matter
Room temperature butter and egg yolk blend more easily, creating a smoother dough. Cold butter won’t cream properly with sugar, and cold eggs can curdle when added to the mix. Let them sit out for at least 30 minutes before using.
Now that we’re all set with ingredients and tools, it’s time to dive into the actual process of making these delightful cookies. In the next section, we’ll walk through each step, from creaming the butter to baking the perfect batch.
Step-by-Step Instructions to Make Easy Jam Drops Cookies
Step 1: Creaming Butter and Sugar
Start by placing the room temperature butter and caster sugar into a large mixing bowl. Using an electric mixer on medium speed, beat the mixture until it becomes light and creamy. This should take about 2–3 minutes. You’re looking for a pale yellow color and fluffy texture. This step is key to getting soft and tender cookies.
Tip: Don’t rush this part. Proper creaming traps air in the butter, giving the cookies structure and lightness.
Step 2: Add Vanilla and Egg Yolk
Once your butter and sugar are well combined, add in the vanilla extract and egg yolk. Beat briefly until they’re just incorporated into the creamed mixture. Avoid over-mixing here — the goal is to mix just enough so the egg yolk blends evenly.
Why only yolk? The yolk brings richness and tenderness without making the dough too wet. It also helps the cookies hold their shape during baking.
Step 3: Add Dry Ingredients
Next, add the all-purpose flour, baking powder, and salt directly into the bowl. Using your mixer on low speed, mix until everything starts to come together. The dough might seem a bit dry or crumbly at first. Don’t worry — this is normal.
Finishing the Dough: Use a spatula or your hands to gently knead and press the dough together. It should form a soft, smooth dough. If it feels sticky, let it rest for 5 minutes. If it still feels dry, press it together firmly without adding extra liquid.
Step 4: Forming the Cookie Balls
Scoop about 1.5 tablespoons of dough and roll it into a ball using your hands. Repeat until all the dough is used up. You should get around 11–12 cookie balls.
Place the dough balls on your prepared baking trays, leaving enough space between each one for spreading during baking.
Tip: To get evenly sized cookies, use a small cookie scoop or weigh each ball for consistency.
Step 5: Create the Thumbprint Indents
Now comes the signature move. Using your thumb or the back of a small spoon, press a shallow indent into the center of each cookie ball. Don’t press too deep — just about one third of the way down.
Jam Placement: Add about 1/4 teaspoon of jam into each indent. Don’t overfill. The jam should sit snugly inside the cavity, not spill out.
Jam Tip: If your jam is thick, give it a gentle stir before using so it’s easier to scoop.
Step 6: Chill the Dough
Place the filled cookie trays into the refrigerator for 30 minutes. This helps the dough firm up, preventing the cookies from spreading too much in the oven.
If you’re short on time, even 15–20 minutes of chilling helps — but 30 minutes gives the best results.
Step 7: Bake the Cookies
While your cookies are chilling, preheat the oven to:
- 180°C (350°F) standard oven, or
- 160°C (320°F) fan-forced oven
Once chilled, place the trays directly into the preheated oven and bake for 11–12 minutes. The cookies will spread slightly and become light golden on the edges.
Don’t overbake. They should still look soft in the center when they come out. They’ll continue to firm up as they cool.
Step 8: Cooling and Optional Jam Topping
Let the cookies sit on the tray for 5–10 minutes, then carefully transfer them to a wire rack to cool completely. Once cool, you can top up the jam in the center if needed for a more polished look or stronger fruit flavor.
Final Texture Check:
- Edges: Slightly crisp
- Center: Soft and tender
- Jam: Sticky and glossy
Customizing and Troubleshooting Easy Jam Drops Cookies
Fun and Easy Variations to Try
While the classic Easy Jam Drops Cookies are hard to beat, there are many creative twists you can explore to make them your own. Whether you’re looking to add different flavors or switch up textures, here are some popular and easy ideas:
- Jam Flavors
Try swapping raspberry for:- Strawberry for a classic sweet touch
- Apricot for a bright, citrusy pop
- Blueberry for a deeper, richer taste
- Mixed berry for an all-in-one fruity combo
Make sure your jam is thick to avoid leakage during baking.
- Nutty Additions
Add a small pinch of chopped toasted almonds, pecans, or hazelnuts to the center after the jam for a crunchy bite. You can also roll the dough balls in finely chopped nuts before indenting for a textured coating. - Coconut Coating
Roll each dough ball in desiccated coconut before pressing and filling. This adds flavor and a nice chew. - Chocolate Filling
If you don’t have jam on hand or prefer a more indulgent cookie, you can fill the centers with a small spoonful of Nutella, caramel, or a simple chocolate ganache after baking. Let the cookies cool completely before piping in the filling. - Lemon Curd
For a tart variation, use a thick lemon curd instead of jam. The brightness contrasts beautifully with the buttery base.
Troubleshooting Common Baking Issues
Even with a straightforward recipe like this one, a few things can go wrong. Let’s look at the most common problems and how to fix them:
- Cookies Spread Too Much
Cause: Warm dough or too much butter
Fix: Make sure to chill the dough for at least 30 minutes. If you’re baking in a warm kitchen, increase chilling time. You can also bake one tester cookie first to check the spread. - Cookies Didn’t Spread Enough
Cause: Too much flour or cold dough
Fix: Lightly press the dough balls before baking or reduce the flour slightly if you’re measuring by volume instead of weight. - Jam Overflowing or Disappearing
Cause: Using too much or very runny jam
Fix: Use no more than 1/4 teaspoon per cookie. Stir jam before using to thicken it slightly. You can also pre-cook the jam a bit to reduce moisture if needed. - Crumbly Dough
Cause: Not enough mixing or slightly off flour-to-fat ratio
Fix: After mixing, use your hands or a spatula to bring the dough together. Don’t add liquid unless it’s absolutely too dry — this dough is meant to be soft but not sticky. - Flat Cookies Without Texture
Cause: Overmixing or under-chilling
Fix: Beat only until ingredients are just combined and always chill before baking. Overworked dough can cause dense, flat cookies.
Pro Tips for Perfect Results Every Time
- Use Room Temperature Ingredients
This makes mixing smoother and helps everything blend evenly. - Measure with a Digital Scale
Weight-based measurements are more accurate than cups, especially for baking. - Use Quality Jam
Pick a jam that has real fruit and isn’t too runny or sugary. It’s the main flavor burst in the cookie. - Make in Batches
If your oven doesn’t heat evenly, bake one tray at a time. Rotate the tray halfway through baking for even color and texture. - Cool on the Tray First
Transferring hot cookies right away can cause them to fall apart. Letting them sit for a few minutes helps them firm up.
By applying these tweaks and tips, you can turn a simple batch into something show-stopping.
Storing, Freezing, and Serving Easy Jam Drops Cookies
Best Ways to Store Jam Drops
Easy Jam Drops Cookies are best enjoyed fresh, but with proper storage, you can keep them tasting great for several days.
- Room Temperature Storage
Once the cookies have completely cooled, place them in an airtight container. They’ll stay fresh for up to 5 days at room temperature. Store them in a single layer or separate layers with parchment paper to prevent the jam from sticking to other cookies. - Avoid Refrigeration
Refrigerating these cookies is not recommended. The cold temperature can dry them out and harden the jam center. - Humidity Warning
If you live in a humid area, consider placing a small piece of paper towel in the container to absorb excess moisture and keep the cookies from going soggy.
Can You Freeze Jam Drops?
Yes, both the unbaked dough and fully baked cookies can be frozen successfully.
- Freezing Unbaked Dough Balls
Form the dough into balls, press the indentations, and freeze them on a tray. Once solid, transfer to a freezer-safe bag. When ready to bake, fill with jam and bake directly from frozen — just add an extra 2 minutes to the bake time. - Freezing Baked Cookies
Let cookies cool completely before freezing. Place them in a freezer-safe container with parchment paper between layers. Thaw at room temperature when ready to serve.
Shelf life in the freezer:
- Unbaked dough: up to 3 months
- Baked cookies: up to 2 months
How to Refresh Stored Cookies
If your cookies have lost their crisp edge or feel a bit stale:
- Quick Oven Refresh
Place them in a preheated oven at 300°F (150°C) for 3–5 minutes. Let them cool slightly before eating. This can revive their texture and bring back some of that just-baked feel. - Jam Top-Up
If the jam center has dried out or sunk, add a small fresh dab of jam in the middle just before serving.
Best Ways to Serve Jam Drops
These cookies are a joy to serve in almost any setting. Here’s how to present them with a bit of flair:
- Cookie Trays and Gift Boxes
Include them in a cookie assortment with a variety of fillings. Wrap in wax paper and tie with string for a charming homemade gift. - Afternoon Snack
Pair them with hot tea or a glass of milk for a simple, satisfying treat. - Holiday Treats
Their vibrant jam centers and round shape make them ideal for holiday cookie boxes. Consider using red and golden jams for festive color. - Kids’ Parties or Picnics
Easy to transport and eat with fingers, they’re a hit with children and adults alike. No frosting, no mess.
Ideal Serving Temperature
These cookies are best enjoyed at room temperature, where the jam is soft and the cookie has its classic tender texture. If stored in a cool place, let them sit out for 15 minutes before serving.
With the right storage techniques and presentation ideas, your Easy Jam Drops Cookies can shine at any occasion.
Nutritional Facts, Dietary Tips, and Allergy-Friendly Alternatives
Nutritional Breakdown (Per Cookie – Approximate Values)
Based on a batch of 12 cookies using standard ingredients, here’s the estimated nutritional profile for each Easy Jam Drops Cookie:
| Nutrient | Amount per Cookie |
|---|---|
| Calories | ~130 kcal |
| Total Fat | ~7g |
| Saturated Fat | ~4g |
| Cholesterol | ~25mg |
| Sodium | ~50mg |
| Total Carbohydrates | ~16g |
| Sugars | ~7g |
| Protein | ~1.5g |
| Fiber | ~0.3g |
These cookies fall into the “treat” category, best enjoyed in moderation. The key ingredients—butter, sugar, and jam—make them rich and satisfying even in small servings.
Making Health-Conscious Adjustments
If you want to enjoy these cookies with a lighter touch or accommodate specific dietary needs, here are a few tweaks you can make:
- Lower Sugar Option
Use a low-sugar jam and reduce the added sugar in the dough by 20%. The cookies may spread a bit less, but they’ll still be delicious. - Whole Wheat Version
Swap up to half of the all-purpose flour with whole wheat flour. This adds a bit of fiber and gives the cookie a slightly nuttier flavor. Avoid using 100% whole wheat as it can make the texture too dense. - Dairy-Free Alternative
Substitute the butter with plant-based margarine or a vegan baking butter. Make sure the alternative is labeled for baking, not just spreading. - Gluten-Free Jam Drops
Use a 1:1 gluten-free baking flour blend that includes xanthan gum for best texture. Almond flour is not a suitable direct substitute here as it changes the structure too much. - Egg-Free Variation
The egg yolk can be replaced with 1 tablespoon of plain Greek yogurt, unsweetened applesauce, or a commercial egg replacer. Keep in mind this may slightly alter the texture.
Allergy Notes and Warnings
- Contains Dairy: Due to butter.
- Contains Eggs: Only the yolk is used, but still a concern for egg allergies.
- Contains Gluten: From the all-purpose flour.
- Nut-Free: This recipe contains no nuts unless you intentionally add them. It’s a great base for nut-free baking.
Always double-check ingredient labels, especially for jam, butter alternatives, and flour blends, when cooking for someone with allergies.
Portion Control and Serving Sizes
Because these cookies are rich in butter and sugar, they’re best consumed in small servings. One cookie is generally satisfying due to its dense, buttery nature and sweet jam center. Serve them in batches of two at most if you’re offering them at events or with tea.
A Good Choice for Kids?
Absolutely. The size and texture make them ideal for young kids. They’re soft, easy to bite into, and the jam adds just enough sweetness to feel like a treat. Just be mindful of the sugar content and avoid giving too many in one sitting.
Conclusion
Easy Jam Drops Cookies are a delightful blend of nostalgia and simplicity, delivering comfort in every bite. With just a few pantry staples and minimal baking experience, you can create a treat that’s beautiful, delicious, and endlessly customizable.
Whether you’re using raspberry jam, lemon curd, or a swirl of chocolate, these cookies adapt to your taste and occasion. They’re perfect for holiday trays, afternoon snacks, or just because.
With the tips, tricks, and variations in this guide, you now have everything you need to make the best jam drop cookies every time. Don’t be surprised if they become a regular favorite in your baking rotation — they’re just that good.