


French salted butter cookies, also known as Sablés Bretons, are a timeless staple in French baking. They embody the essence of simplicity and elegance — a crumbly texture, a rich buttery flavor, and just the right touch of salt to balance the sweetness.
These cookies are perfect for those who enjoy a delicate, melt-in-your-mouth treat that doesn’t rely on fancy flavors or complicated techniques. In this article, we’ll guide you through every detail of how to make French salted butter cookies perfectly from scratch.
You’ll learn how the right butter, flour, and technique make all the difference, plus we’ll explore the cultural background, variations, baking tips, and even how to store them for lasting freshness.
Whether you’re baking for a cozy afternoon or preparing a batch for guests, this classic French cookie recipe will quickly become a go-to favorite. Let’s start by uncovering what makes this cookie uniquely French.
The Charm of French Salted Butter Cookies
What Are French Salted Butter Cookies?
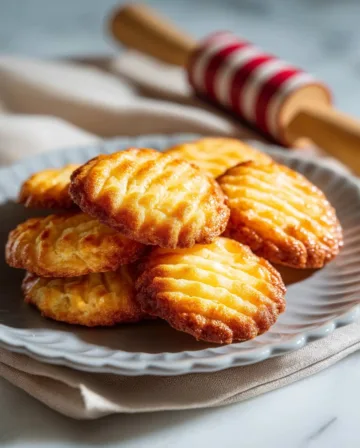
French salted butter cookies, or Sablés Bretons, are traditional cookies from the Brittany region of France, known for its high-quality salted butter. These cookies are rich, tender, and slightly crumbly with a hint of saltiness that cuts through the sweet buttery flavor. They typically feature a golden, shiny finish achieved by brushing the tops with egg yolk before baking.
The use of salted butter isn’t just a modern trend — it’s rooted in French culinary traditions, especially in Brittany, where dairy farms have long produced exceptional salted butter. These cookies reflect the region’s love for balanced, rustic, yet indulgent desserts.
Why Salted Butter Makes the Difference
Salted butter adds more than just flavor. It affects the cookie’s texture, tenderness, and even the color. Salt naturally enhances sweetness, which might seem surprising, but it’s a flavor booster. In this recipe, it makes the buttery notes pop while preventing the cookie from becoming overly sugary.
If you’re using unsalted butter, it’s essential to adjust the salt amount in your dough. Generally, a half-cup of salted butter includes around 1/4 teaspoon of salt. So if you opt for unsalted butter, be sure to add just under 1/2 teaspoon of salt to maintain balance.
The Signature Texture and Appearance
French salted butter cookies are rolled out and cut into round shapes, then decorated with a simple crosshatch pattern made with a fork. This pattern not only gives the cookies a charming, rustic look but also contributes to their crisp texture on top. Their deep golden color comes from the high butter content and the final egg yolk glaze.
These cookies bake quickly and cool beautifully, making them ideal for spontaneous bakes or gifts. When stored well, they maintain their delicate texture for days, offering the perfect accompaniment to tea or coffee.
Print
French Salted Butter Cookies
- Total Time: 30 minutes
- Yield: 20 servings
- Diet: Vegetarian
Description
Classic French salted butter cookies (Sablés Bretons) with rich, crumbly texture and buttery flavor — perfect for tea time or gifting.
Ingredients
1/2 cup + 1 tbsp granulated sugar
1/2 cup + 5 tbsp salted butter
3 egg yolks, separated
1 tsp vanilla extract
2 cups + 2 tbsp all-purpose flour, plus more for dusting
Instructions
1. Preheat oven to 375°F (190°C) and line a baking sheet with parchment paper.
2. Beat butter and sugar on medium speed until light and fluffy, about 1 minute.
3. Add 2 egg yolks and vanilla extract, mixing until fully incorporated. Scrape down the bowl.
4. Add flour and mix on low speed just until the dough begins to clump together.
5. Lightly flour a work surface and shape the dough into a ball. Sprinkle flour on top and roll to 1/4-inch thickness.
6. Cut out cookies with a 2.25″ round cutter. Use a spatula to transfer rounds to the baking sheet.
7. Beat the remaining egg yolk and use a fork to make cross-hatch marks on each cookie. Brush tops with the beaten yolk.
8. Bake for 12–15 minutes until cookies are a deep golden color.
9. Transfer cookies to a wire rack and allow to cool completely.
Notes
If using unsalted butter, add a scant 1/2 tsp of salt to the dough.
Dough can be chilled for easier rolling or to prepare ahead.
Cookies store well in airtight containers for up to a week.
- Prep Time: 15 minutes
- Cook Time: 15 minutes
- Category: Cookies
- Method: Baking
- Cuisine: French
Key Ingredients Behind Perfect French Salted Butter Cookies
Understanding the Role of Each Ingredient
The secret to exceptional French salted butter cookies lies in the simplicity and balance of its ingredients. Each component has a purpose, contributing to the taste, texture, and visual appeal of the finished product. Let’s break down the roles of each one.
Salted Butter: The Star Ingredient
Salted butter gives these cookies their rich depth and slightly savory note. The salt in the butter amplifies the sweetness of the sugar while enriching the overall flavor profile. Its high fat content also leads to a tender crumb that practically melts in your mouth. Using high-quality salted butter from a reputable source can elevate the result immensely.
If you only have unsalted butter, you can still make the cookies — just remember to add a scant ½ teaspoon of salt to the dough to simulate the flavor profile of traditional salted butter.
Granulated Sugar: Sweetness with Texture
Sugar in this recipe provides sweetness, but it also helps with the structure. Creaming sugar with butter introduces air into the dough, creating a lighter texture. The sugar also encourages a golden exterior during baking, contributing to the cookie’s visual appeal.
Egg Yolks: Richness and Shine
Egg yolks add richness, color, and moisture to the dough. Two yolks are mixed directly into the dough to bind it and provide tenderness. A third yolk is reserved for brushing on top of the cookies before baking. This gives them that beautiful golden sheen and slightly crisp top layer.
All-Purpose Flour: Structure and Body
All-purpose flour serves as the structural base. Its moderate protein content makes it ideal for these cookies. It’s sturdy enough to hold shape when cut with a cookie cutter but soft enough to crumble slightly with each bite. You’ll also need some extra flour for dusting your surface and rolling out the dough to prevent sticking.
Vanilla Extract: A Gentle Background Note
Vanilla enhances the overall flavor of the cookie. While subtle, it rounds out the richness of the butter and adds a delicate warmth that elevates the entire recipe.
Why Precision Matters
Even though the ingredient list is short, precision in measurement is critical. Too much flour can make the cookies dry. Too little butter, and they’ll lose their signature tenderness. That’s why measuring carefully and following each step intentionally is essential for success. Use a scale if possible for best accuracy.
Ingredient List Recap (Standard Batch)
| Ingredient | Measurement |
|---|---|
| Granulated sugar | ½ cup + 1 tbsp |
| Salted butter | ½ cup + 5 tbsp |
| Egg yolks | 3 (2 for dough, 1 for brushing) |
| Vanilla extract | 1 tsp |
| All-purpose flour | 2 cups + 2 tbsp, plus extra for rolling |
These simple pantry staples, when used with care and balance, are all you need to make a cookie that’s indulgent, elegant, and unmistakably French.
Step-by-Step Guide to Making French Salted Butter Cookies
Step 1: Preparing the Dough
The first step to success is ensuring that your ingredients are at room temperature. This is especially important for butter and egg yolks, which mix more smoothly and create a more cohesive dough when not cold.
Start by placing the salted butter and granulated sugar into a mixing bowl. Using a stand mixer or hand mixer, beat them together on medium speed for about one minute until the mixture becomes light, fluffy, and pale in color. This creaming process introduces air, setting the stage for a soft texture.
Next, add two egg yolks along with the vanilla extract. Mix again on medium speed until everything is fully incorporated. Stop the mixer and use a rubber spatula to scrape down the sides and bottom of the bowl. This ensures even mixing, which prevents dense spots in the finished dough.
With the mixer on low speed, gradually add the all-purpose flour. Avoid overmixing, and stop as soon as the dough starts to clump together. At this stage, it should look a little crumbly but hold together when pinched.
Step 2: Rolling Out the Dough
Lightly flour a clean surface such as a wooden board or countertop. Turn the dough out onto the surface and use your hands to press it into a cohesive ball. Sprinkle a small amount of flour over the top of the dough to prevent sticking.
With a rolling pin, gently roll the dough out to a uniform 1/4-inch thickness. If your rolling pin starts to stick, dust the dough with a bit more flour. Be careful not to add too much, or the cookies may turn out dry.
Try to work swiftly but carefully. Overhandling the dough can warm the butter too much, causing the cookies to spread excessively in the oven.
Step 3: Shaping the Cookies
Use a medium-sized round cookie cutter (around 2.25 inches or 5.75 cm) to cut the dough into neat rounds. A sharp-edged cutter works best for clean edges. Gently lift the cookies with a thin spatula and place them onto a parchment-lined baking sheet.
Space the cookies slightly apart to allow for even baking. You can typically fit 12 cookies per standard baking tray.
Step 4: Decorating with a Traditional Touch
Now take the third egg yolk and beat it in a small bowl. This will be your glaze. Use a fork to create a cross-hatch pattern on the top of each cookie by dragging the fork vertically, then horizontally. This classic design not only adds a rustic French look but also helps the glaze adhere.
After making the pattern, brush each cookie lightly with the beaten yolk. This step gives them that signature golden finish after baking.
Step 5: Baking to Perfection
Preheat your oven to 375°F (190°C). Bake the cookies for 12 to 15 minutes, or until they turn a rich golden color. The edges should be firm, and the tops should have a slight sheen from the egg glaze.
Watch them carefully in the final few minutes, as they can darken quickly. Every oven is a little different, so keep an eye on color rather than just time.
Once baked, transfer the cookies to a wire rack and allow them to cool completely. This cooling step is crucial, as it firms up the texture and enhances their crisp, crumbly character.
Baking Tips and Troubleshooting for Perfect French Salted Butter Cookies
Mastering the Baking Process
Baking French salted butter cookies is as much about technique as it is about ingredients. Even with the perfect dough, a few missteps during baking can affect the outcome. Below are expert tips to help you avoid common pitfalls and ensure your cookies come out flawless every time.
Use a Light-Colored Baking Sheet
Dark pans absorb more heat, which can cause the bottoms of your cookies to brown too quickly or unevenly. A light or silver-colored sheet ensures even baking and keeps the cookies tender.
Don’t Skip the Parchment Paper
Line your baking sheet with parchment paper or a silicone baking mat. This prevents the cookies from sticking and helps them bake evenly, without developing too much color underneath.
Chill if Needed
If your dough becomes too soft while working, don’t hesitate to chill it for 15 to 20 minutes before rolling again. Warm dough spreads more in the oven, leading to misshapen or overly flat cookies.
Rotate the Pan Mid-Bake
Ovens often have hot spots. For even color and texture, rotate your cookie sheet halfway through baking. This ensures all the cookies bake uniformly and achieve that classic golden hue.
Common Issues and How to Fix Them
Even experienced bakers can run into a few hiccups when making French salted butter cookies. Here’s how to troubleshoot the most common problems:
| Problem | Likely Cause | Solution |
|---|---|---|
| Cookies Spread Too Much | Dough was too warm or soft | Chill the dough before rolling and baking |
| Cookies Are Too Dry | Too much flour was added | Spoon and level flour rather than scooping, and avoid overmixing |
| Pale Color, No Shine | Skipped the egg yolk glaze | Always brush cookies with egg yolk before baking |
| Tough Texture | Overmixed the dough | Mix just until the ingredients are combined |
Tips for Even Rolling and Cutting
To get uniform cookies that bake consistently, make sure your dough is rolled evenly. If needed, use rolling pin guide rings or roll between two pieces of parchment paper to maintain the correct thickness throughout.
Also, dip your cookie cutter in flour before each cut. This prevents sticking and helps maintain the clean round shape traditional to French salted butter cookies.
When Are They Done?
The cookies should have a rich golden brown edge and slightly deeper color on top. They may still feel soft right out of the oven, but they will firm up as they cool. Letting them cool completely on a wire rack is key to developing their final texture.
Creative Variations of French Salted Butter Cookies
Adding Your Own Twist to a Classic
French salted butter cookies are beloved for their simplicity, but they also offer a perfect canvas for experimentation. Whether you’re baking for the holidays, gifting, or just trying something new, a few subtle additions can give this traditional treat a creative spin without losing its essence. Let’s explore some popular and easy-to-execute variations.
Flavor Enhancements
Adding just one or two ingredients can introduce a whole new flavor profile while still honoring the original texture and structure of the cookie.
Citrus Zest
Add finely grated lemon, orange, or grapefruit zest to the dough for a refreshing and aromatic finish. About 1 teaspoon of zest is enough to brighten the flavor without overpowering the butter’s richness.
Spices
Warm spices like cinnamon, nutmeg, or cardamom blend beautifully with the buttery dough. Try adding ½ teaspoon of your favorite spice to the flour before mixing.
Almond or Hazelnut Extract
Swapping half of the vanilla extract with almond or hazelnut extract creates a nutty, fragrant variation. This version pairs well with the richness of salted butter and adds a bakery-style twist.
Texture Variations
While the original cookie is tender and crumbly, slight changes in the ingredients can adjust the texture to suit different preferences.
Finely Ground Nuts
Mix in ¼ cup of finely ground almonds or hazelnuts with the flour. This adds a subtle crunch and extra depth of flavor while still maintaining a delicate bite.
Coarse Sugar Topping
After brushing the cookies with egg yolk, sprinkle a pinch of turbinado or demerara sugar on top before baking. This gives the cookies a slight crunch and an attractive, sparkly finish.
Fun with Shapes and Designs
The traditional round shape and cross-hatch pattern are beautiful and recognizable, but feel free to adapt the look of your cookies to fit any occasion.
Cookie Cutter Shapes
Use seasonal or themed cookie cutters for holidays, birthdays, or celebrations. Keep the dough thickness consistent to ensure even baking across shapes.
Stamped Designs
Cookie stamps leave decorative patterns in the dough. These work especially well with this recipe since the dough holds its shape during baking.
Filled and Layered Ideas
Want to elevate these cookies into a fancier treat? Consider these filling and layering ideas:
Jam-Filled Sandwich Cookies
Make thinner rounds, bake them as usual, and then sandwich a dollop of raspberry or apricot jam between two cookies. Dust the top with powdered sugar for a beautiful finish.
Chocolate-Dipped Edges
Once baked and cooled, dip half of each cookie into melted dark or white chocolate. Let them set on parchment paper. This adds a luxurious touch without altering the dough.
Storing, Serving, and Make-Ahead Tips for French Salted Butter Cookies
How to Store for Freshness
French salted butter cookies are known for their buttery flavor and delicate texture, and storing them correctly is key to maintaining their quality. When stored properly, these cookies can stay crisp and flavorful for several days.
Room Temperature Storage
After the cookies have completely cooled on a wire rack, place them in an airtight container. Store them at room temperature in a cool, dry place. Avoid areas with direct sunlight or moisture, as both can impact the texture. The cookies will stay fresh for up to 5–7 days.
Layering with Care
If you’re stacking cookies in a container, place a sheet of parchment or wax paper between each layer. This prevents the egg yolk glaze from sticking to other cookies and helps maintain their beautiful golden finish.
Can They Be Frozen?
Absolutely. French salted butter cookies freeze exceptionally well, both before and after baking.
Freezing the Dough
After preparing the dough, shape it into a flattened disc and wrap it tightly in plastic wrap. Place the wrapped dough inside a freezer-safe bag or container. It can be stored for up to 2 months.
When ready to bake, let the dough thaw in the refrigerator overnight. Then roll it out, cut, decorate, and bake as directed.
Freezing Baked Cookies
You can also freeze the fully baked cookies. Let them cool completely, then wrap them in layers of parchment and seal in a freezer-safe container. Thaw at room temperature when ready to serve.
Serving Suggestions for Every Occasion
These cookies are incredibly versatile when it comes to presentation and pairing.
Everyday Snack
Serve them with a warm cup of tea, hot chocolate, or coffee for a cozy afternoon treat. Their crisp texture and rich flavor make them perfect for dipping.
Elegant Dessert Platter
Arrange the cookies on a decorative tray with fruit slices or dark chocolate squares. You can even add small bowls of jam or whipped cream for dipping.
Gift-Worthy Treat
Pack them in small parchment-lined tins or boxes tied with twine or ribbon. Add a small handwritten tag and you’ve got a charming and thoughtful homemade gift.
Make-Ahead Tips for Busy Bakers
Preparing these cookies in advance is not only convenient but actually improves some of the results.
- Dough holds well in the refrigerator for up to 3 days if wrapped tightly.
- You can roll, cut, and place the cookies on a tray, then refrigerate the unbaked rounds for 24 hours before baking. This helps control spreading and enhances flavor.
- Bake larger batches and store the extras in airtight containers or the freezer so you always have a batch ready for guests or cravings.
Conclusion: Why French Salted Butter Cookies Deserve a Place in Your Recipe Collection
French salted butter cookies are proof that true indulgence lies in simplicity. With just a few pantry staples and a bit of care, you can create a treat that feels both rustic and refined. Their rich, buttery flavor balanced with a touch of salt creates a cookie that’s not overly sweet, but deeply satisfying with every bite.
Whether you’re baking them to enjoy at home, to gift to a friend, or to serve at a gathering, these cookies never fail to impress. They store well, adapt beautifully to variations, and offer a foolproof way to bring a little French elegance into your kitchen.
Mastering this recipe means gaining a dependable go-to dessert that looks lovely, tastes even better, and brings comfort with every golden, flaky bite. Once you try them, you’ll understand why French salted butter cookies have been beloved for generations — and why they’ll quickly become a favorite in your baking rotation too.