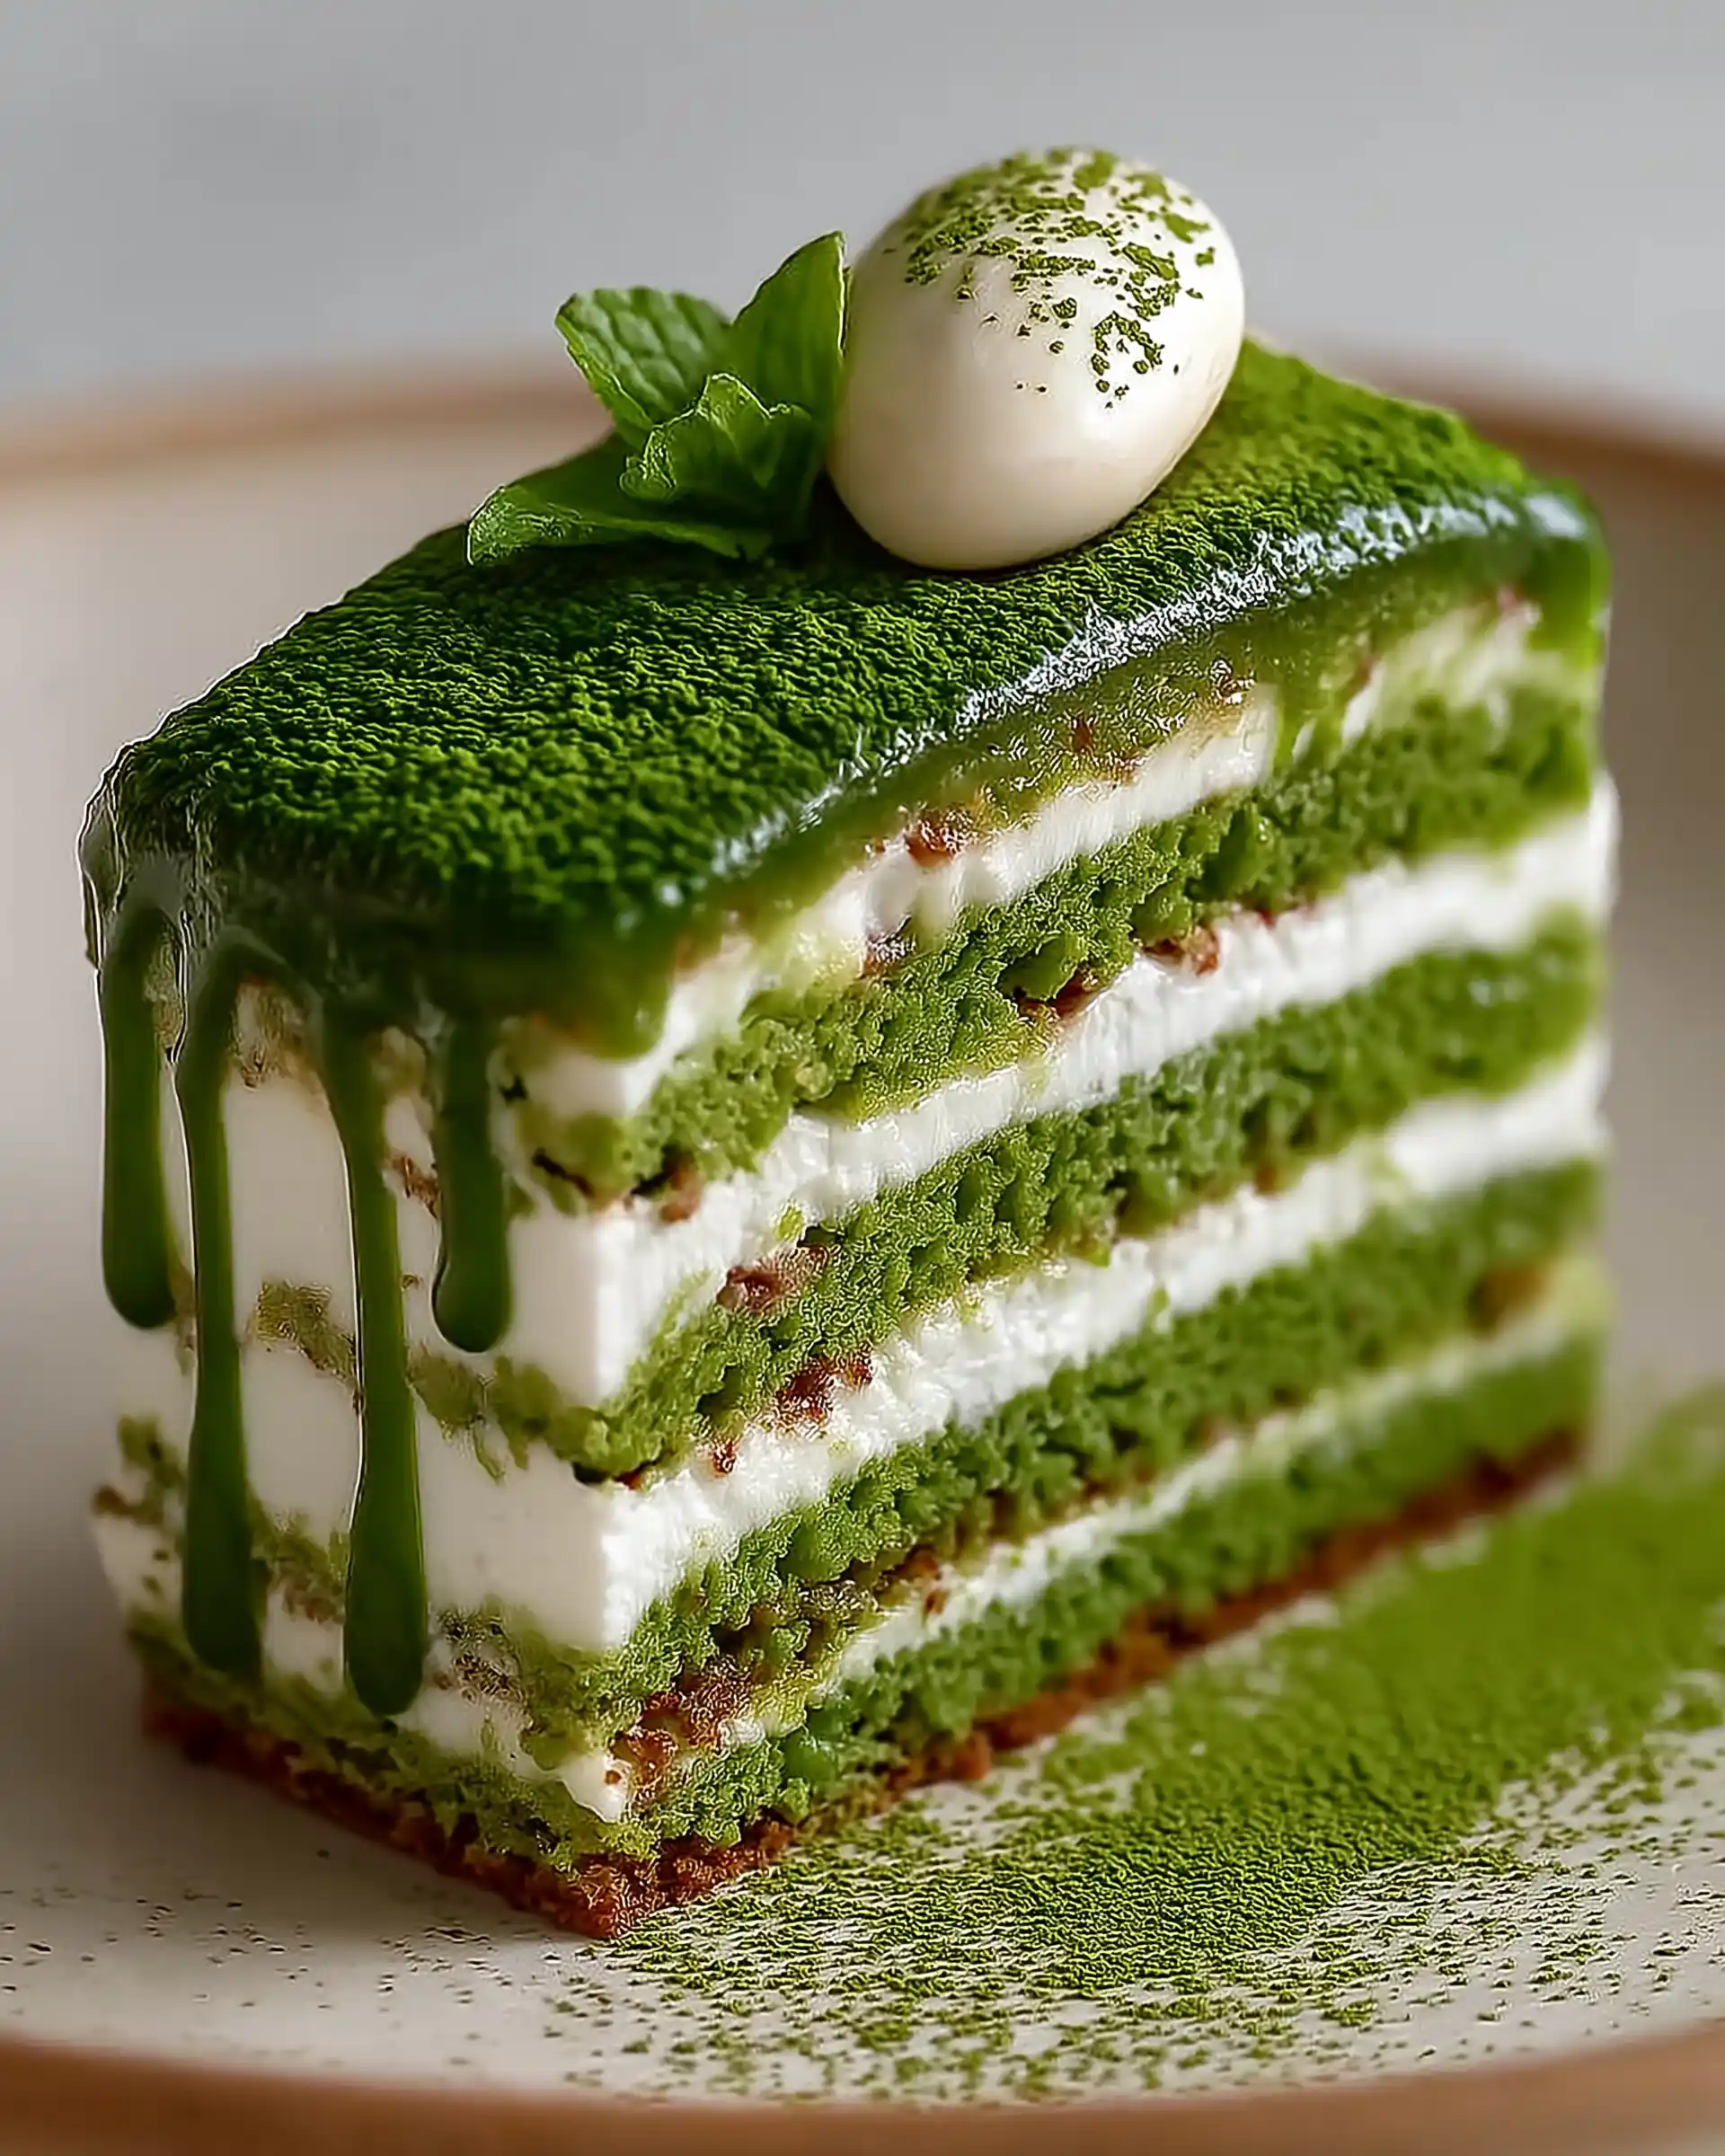
If you’re searching for a dessert that blends sophistication, tradition, and modern flair, the Matcha-Almond Génoise Layer Cake delivers all that and more. Inspired by the airy elegance of French sponge cake and infused with the earthy tones of Japanese matcha, this cake is the perfect example of how international flavors can merge into a single, luxurious bite.
The cake’s texture is light as air thanks to the classic génoise method, while the almond flour and matcha powder create a rich, nutty depth that’s both complex and comforting.
In this article, we’ll break down how to create this stunning dessert in five focused parts. From preparing the delicate green tea sponge to whipping up a luscious cream filling and finishing with a smooth matcha ganache, you’ll have every step detailed for delicious success. You’ll also find key tips on assembly, garnish, and presentation for that perfect bakery-style finish. Let’s begin with the foundation of this creation-the matcha-almond génoise.
Crafting the Green Tea Génoise
The Role of a Classic Génoise in Layer Cakes
Génoise is a type of sponge cake that gains its structure not from chemical leaveners, but from properly whipped eggs. This makes it ideal for multi-layered cakes, especially those requiring a refined texture. In the Matcha-Almond Génoise Layer Cake, the génoise is the carrier of delicate green tea and almond notes, which are amplified through gentle folding and precise baking.
Ingredients That Build Flavor and Texture
What makes this génoise unique is its careful blend of almond flour and matcha powder. Almond flour adds a tender, almost buttery crumb, while matcha introduces a bold yet smooth grassy undertone that defines this dessert.
Here’s what you’ll need for the sponge:
- 2 whole eggs
- ½ cup confectioners’ sugar
- ½ cup almond flour
- 1½ teaspoons matcha powder
- ⅛ cup all-purpose flour
- 2 egg whites
- ⅛ teaspoon cream of tartar
- 2 tablespoons granulated sugar
These components work together to balance richness and airiness. The eggs, both yolks and whites, are critical to the lift and overall structure. The almond flour gives substance, while the matcha powder brings both color and a distinctive aroma that matcha lovers recognize instantly.
Mixing Technique for the Perfect Lift
To make the batter properly, begin by combining the two whole eggs with the confectioners’ sugar and almond flour. Beat this mixture until it becomes pale yellow, almost fluffy. This step introduces air and volume, crucial for that light génoise texture.
Once the mixture is sufficiently whipped, sift in the matcha powder on low speed. The sifting ensures even distribution of matcha, avoiding dark green clumps that can affect both appearance and flavor.
In a separate bowl, whip the egg whites with cream of tartar until frothy. Gradually add the granulated sugar and continue beating until stiff peaks form. This creates the volume needed to help the batter rise without baking powder or soda.
The next step is delicate. Carefully fold in a third of the egg whites into the main batter. This loosens the mixture. Then fold in the rest, along with the sifted all-purpose flour. The folding technique must be gentle to retain the air you worked so hard to beat into the eggs.
Baking a Thin, Even Layer
Pour the batter into a greased, parchment-lined sheet pan—either 11×17 or 12×16 inches. Smooth it out with an offset spatula, creating a thin, even layer. This thinness is intentional, as you’ll be slicing and stacking these layers later. Bake in a preheated oven at 425°F for about 5 to 8 minutes. Keep a close eye, because the cake can go from golden to burnt in a flash.
Once baked, turn it out immediately onto a cooling rack, carefully peel away the parchment, and let it cool slightly. Then, cut it into four even rectangles. These will form the structured, crisp-edged layers that give the cake its striking layered appearance.
Whipping the Crème Filling to Perfection
The Simplicity Behind Rich Flavor
A Matcha-Almond Génoise Layer Cake relies on balance. The sponge is earthy and nutty, so the filling should be light, clean, and just sweet enough to tie everything together. That’s where this simple two-ingredient crème filling comes into play. It’s not only effortless, but it also delivers the lift and creaminess needed to elevate each layer.
All you need for the filling are:
- 1 cup heavy cream
- 4 tablespoons granulated sugar
Though simple, the success of this filling lies in the method, not just the ingredients.
How to Achieve the Ideal Texture
Whipped cream should be soft, but not runny. It needs to hold its shape between cake layers without seeping out or collapsing. To get this, chill your mixing bowl and beaters ahead of time. Cold equipment helps the cream whip faster and stay stable longer.
Begin whipping the heavy cream on medium speed until it begins to thicken and soft peaks form. Slowly sprinkle in the granulated sugar, allowing it to dissolve gradually into the cream. This step ensures that the sweetness is evenly distributed.
Once the sugar is added, increase the speed slightly and continue whipping until stiff peaks form. You’ll know you’re there when the cream stands upright on the beater when lifted. Be careful not to overwhip, or you’ll end up with butter instead of filling.
Assembling the Layers with Precision
Once the sponge cake has cooled and been cut into four equal rectangles, you’re ready to start assembling. Place the first cake layer on your serving board or platter. Using an offset spatula, spread an even layer of whipped cream over the surface, getting close to the edges without spilling over.
Repeat this process with the second and third layers, spreading whipped cream between each. The final, fourth layer should remain bare on top at this stage, acting as a smooth foundation for the ganache topping.
Chill for Clean Slices and Stable Structure
Once stacked, refrigerate the cake for at least 1 hour. This step is vital. It allows the cream to firm up slightly, making it easier to slice later. It also stabilizes the cake structure, especially if you plan to serve the cake as individual finger slices, as recommended.
The chilling period also prepares the cake for the next step: adding the matcha ganache topping, which should only be applied to a cold, firm cake. Otherwise, the warm ganache can melt the filling and compromise the presentation.
Creating the Matcha Ganache Topping
Why Matcha and White Chocolate Work Beautifully Together
Matcha and white chocolate form a pairing that’s both visually striking and flavorfully balanced. The sweetness of white chocolate offsets the slightly bitter, earthy notes of matcha, making this topping not just decorative but delicious. It also adds a luxurious, velvety texture to the top of the cake, sealing in the layers below and acting as a perfect base for garnish.
Here’s what you’ll need:
- ½ cup white chocolate chips
- ¼ teaspoon matcha powder
- 1 tablespoon heavy cream
These few ingredients come together quickly, but timing and technique are key.
How to Melt and Combine Ingredients Properly
You can melt the white chocolate chips and cream together using either a double boiler or a microwave. The microwave method is fast and efficient: simply combine the chips and cream in a microwave-safe bowl and heat in 15 to 30-second intervals, stirring each time until smooth.
Once the chocolate and cream are fully melted and combined into a glossy ganache, sift in the matcha powder. Stir gently and thoroughly to ensure even color and flavor distribution. Sifting is important—it prevents lumps of powder that can give the ganache an uneven hue or bitter patches of flavor.
The resulting ganache should be smooth, light green, and pourable but not runny.
Applying the Ganache with Finesse
Remove the chilled cake from the refrigerator just before frosting. Use a small offset spatula to spread the ganache over the top layer evenly. The spatula allows for control and precision, helping you achieve a clean, professional finish. Be gentle and smooth the ganache across the entire surface. You can allow it to drip slightly over the edges if desired, though a clean, crisp top often complements the stacked look better.
Be sure to apply the ganache while it’s still warm enough to spread but not so hot that it melts the cream filling. If it begins to thicken while you’re working, you can rewarm it gently for a few seconds.
Chill Again for a Clean Finish
Once frosted, return the cake to the refrigerator briefly so the ganache can set. This helps create a firm, shiny surface that looks polished and elegant, enhancing both the flavor and the final presentation.
Finishing Touches and Elegant Garnishes
Elevating Simplicity with Strategic Garnish
After the ganache has set, it’s time to turn your layered cake into a work of art. Garnishes might seem minor, but they play a crucial role in presentation. For the Matcha-Almond Génoise Layer Cake, the garnish adds texture, contrast, and a refined appearance that makes each slice look like it came from a pâtisserie display.
The recommended garnishes include:
- 6 to 8 white Jordan almonds or yogurt-covered almonds
- Extra matcha powder for sprinkling
These additions don’t just enhance aesthetics. They also introduce extra layers of texture and flavor—crunch from the almonds and a burst of earthy bitterness from the matcha dusting.
Cutting and Plating Like a Pro
Before garnishing, slice the cake into individual portions. Cut into 6 to 8 rectangular “fingers,” using a sharp knife wiped clean between cuts to maintain tidy edges. This slicing format highlights the layers, showcasing the contrast between the green sponge, white filling, and glossy topping.
Once sliced, gently press a single Jordan almond into the center of each portion. For an added effect, slightly angle the almond for a more dynamic, intentional appearance.
Using a small sieve or fine mesh strainer, dust the tops with a light sprinkle of matcha powder. The green powder settles over the white ganache and almond, creating a professional finish. Don’t overdo it—a subtle dusting is all that’s needed to evoke the flavor and style of matcha without overpowering the sweetness of the topping.
Presentation and Serving Tips
This cake is best served chilled or slightly cool. The cold temperature keeps the whipped cream firm and the ganache glossy. Serve each finger on a flat plate with minimal decoration to keep the focus on the cake’s layers.
For special occasions or events, consider placing each slice in a small paper cake tray or wrapping the base in parchment for an upscale, clean look. This makes them easy to pick up, share, and serve at gatherings or tea parties.
Storage-wise, leftovers should be kept in an airtight container in the refrigerator and enjoyed within 2 to 3 days for optimal texture and flavor.
Expert Baking Tips for Success
Mastering the Sponge: Avoiding Common Mistakes
The génoise method is delicate, and even a small error can affect the outcome. One of the most common mistakes is overmixing the batter after adding the egg whites. This can deflate the air you carefully whipped in, leading to a dense, flat cake. When folding the egg whites into the yolk mixture, use a wide rubber spatula and a slow, sweeping motion. Think of it more as lifting than stirring.
Another frequent issue is uneven baking. Because the batter is spread very thin in the pan, it’s especially prone to overbaking or burning. Always preheat your oven and set a timer for five minutes. Check early, and pull it out as soon as the cake is firm to the touch. If you wait until it turns golden brown, it’s already gone too far.
Also, be sure to use room-temperature eggs. Cold eggs won’t whip properly, which can prevent the batter from achieving the necessary volume and airiness.
Getting the Whipped Cream Just Right
Overwhipping cream can quickly turn it grainy or, worse, into butter. To prevent this, stop mixing as soon as stiff peaks form. If you’re unsure, lift your beaters out of the cream—if the tips stand straight up without curling, you’re done. For added insurance, chill your bowl and beaters beforehand. This helps maintain stability and results in a firmer whip, ideal for stacking between layers.
Sugar should be added gradually as you whip, not all at once. Adding it too quickly can weigh down the cream and prevent proper aeration.
Assembling with Stability
Layer cakes require more than just flavor—they need structure. After spreading the whipped cream between each génoise slice, apply gentle, even pressure when stacking to prevent shifting. Don’t worry about pressing the layers too tightly. Just make sure everything sits evenly so the finished cake doesn’t tilt or lean.
Chilling between steps is essential. It allows each component to firm up, ensuring clean lines and easy slicing. You can even freeze the cake briefly before applying the ganache for extra stability.
Slicing for Visual Appeal
To get perfect slices, use a long, sharp knife dipped in hot water and wiped dry between each cut. This technique glides through the layers without dragging cream or tearing sponge. The result is a crisp, defined look that shows off every tier of green and white.
For the final garnish, use precision. A sieve makes for a soft, even dusting of matcha. And when placing the almonds, a light press is all you need to set them securely without cracking the ganache layer.
Conclusion
The Matcha-Almond Génoise Layer Cake is a stunning fusion of light texture, refined flavor, and elegant presentation. From its airy green tea sponge to the delicately sweet whipped crème filling and silky matcha ganache, each element complements the next in perfect harmony. It’s a dessert that feels both special and approachable, ideal for gatherings, celebrations, or simply indulging in something extraordinary at home.
Mastering this cake doesn’t require professional training—just a bit of patience, precision, and a love for matcha. Whether you’re drawn to its Japanese-French influences or its elegant visual appeal, this cake offers an unforgettable experience in every bite. With the techniques and tips in this guide, you’re ready to create a dessert that looks as good as it tastes, every time.