


If you’re a fan of Kinder Bueno and thick, gooey cookies, you’re in for a treat. The Kinder Bueno Cookie Pie is the decadent dessert mashup you’ve been dreaming of. With its golden cookie crust, creamy white chocolate hazelnut filling, and bursts of Kinder chocolate, this pie isn’t just a dessert, it’s a full-on experience. Perfect for celebrations or simply satisfying a sweet tooth, it combines classic cookie dough with your favorite candy bar in a pie format that’s rich, chewy, and utterly irresistible.
In this article, we’ll walk you through everything you need to know to make this showstopping Kinder Bueno Cookie Pie at home. From crafting the perfect cookie dough and handling the gooey filling, to chilling, baking, and slicing it just right, we’ve got it covered. We’ll also give you expert tips on substitutions, troubleshooting common issues, and storing leftovers the smart way. Let’s dive into the first step of making your new favorite dessert.
Building the Perfect Cookie Dough Base
Choosing the Right Ingredients for Flavor and Texture
A great Kinder Bueno Cookie Pie starts with stellar cookie dough. The foundation of this recipe combines both light brown soft sugar and white granulated sugar. This dual-sugar blend adds depth—brown sugar brings moisture and a subtle caramel flavor, while granulated sugar adds sweetness and crisp edges.
Using 200 grams of unsalted butter is key for a rich, melt-in-the-mouth texture. Room temperature butter will cream more easily with the sugars, creating a fluffy mixture. For structure and richness, a medium egg plus an extra yolk adds fat and moisture, which is essential for that classic chewy cookie bite.
Vanilla extract is optional but highly recommended. Just one teaspoon enhances all the other flavors and gives the cookie dough a warm, bakery-style aroma.
Mixing Method: Achieving the Ideal Dough Consistency
Start by beating the butter and sugars together until light and creamy. This step incorporates air and ensures even sugar distribution. A stand mixer with a beater attachment works best, but a hand mixer can also do the job with a bit more effort.
Once creamy, add in the egg and extra yolk. Beat until fully combined. The dough might look slightly curdled at this stage, but that’s normal—it smooths out once you add the dry ingredients.
In a separate bowl, combine 425 grams of plain flour, 2 tablespoons of cornflour, 1.5 teaspoons of bicarbonate of soda, and ½ teaspoon of sea salt. The cornflour helps keep the cookie dough tender, while bicarbonate of soda gives it that slight rise and chewy bite. Blend the dry mix into the wet ingredients until a thick dough forms.
Adding the Chocolate Chips
Fold in 400 grams of milk chocolate chips for that melty, rich chocolate hit in every bite. Mixing them at the end ensures they’re well-distributed but not overworked. You can use a spoon, spatula, or keep using your mixer on low speed until they’re evenly spread throughout the dough.
Dividing the Dough for Layering
Now split the dough into three equal portions, about 475 grams each. This helps form the structured layers of the pie: the base, the sides, and the top. Using a digital kitchen scale here ensures you get evenly sized portions, which is important for balanced baking.
Press the first third into the bottom of an 8-inch springform cake tin lined with parchment paper. Use your fingers or the back of a spoon to flatten the dough smoothly. Next, take the second third and press it around the sides of the tin, creating a cookie “wall” that will hold the filling. Try to make the thickness as even as possible to prevent uneven baking.
Print
Kinder Bueno Cookie Pie Recipe
- Total Time: 9 hours 30 minutes
- Yield: 12 slices
Description
A gooey, rich Kinder Bueno Cookie Pie packed with white chocolate hazelnut spread, chocolate chips, and chunks of Kinder bars. Perfectly chewy and decadent for all dessert lovers.
Ingredients
Cookie Dough:
200 g unsalted butter
225 g light brown soft sugar
100 g white granulated sugar
1 medium egg
1 egg yolk
1 tsp vanilla extract (optional)
425 g plain flour
2 tbsp cornflour
1.5 tsp bicarbonate of soda
1/2 tsp sea salt
400 g milk chocolate chips
Filling:
750 g white chocolate hazelnut spread
150 g Kinder chocolate/Kinder Bueno
Instructions
1. Beat together the butter, light brown sugar, and white sugar until creamy.
2. Add in the egg, egg yolk, and vanilla extract, then mix again.
3. Mix in the plain flour, cornflour, bicarbonate of soda, and sea salt until dough forms.
4. Stir in the chocolate chips until well distributed.
5. Divide the cookie dough into three equal parts (approx. 475g each).
6. Press the first third into the bottom of an 8-inch springform tin.
7. Use the second third to press along the sides to create a cookie shell.
8. Slightly loosen the hazelnut spread by microwaving it for 20 seconds, then pour into the base.
9. Press Kinder chocolate/Kinder Bueno pieces into the filling.
10. Freeze for 1 hour to set the filling.
11. Cover the pie with the final third of dough, sealing the edges.
12. Freeze again for 1 hour.
13. Preheat oven to 200°C (or 180°C for fan ovens).
14. Bake for 30 minutes or until the top is golden.
15. Cool in the tin for 1 hour.
16. Refrigerate for 5–6 hours or overnight.
17. Remove from the tin and slice to serve.
Notes
If your oven runs hot, reduce the baking temperature by 10°C.
You can reduce the spread to 500g to cut costs, but the filling layer will be thinner.
Replace cornflour with 50g more plain flour if needed.
Best stored in the fridge and lasts 3–4+ days.
Freeze individual slices for up to 2 months for future indulgence.
- Prep Time: 1 hour
- Cook Time: 30 minutes
- Category: Cookies
- Method: Baking
- Cuisine: Dessert
Creating the Creamy Kinder Filling
Selecting the Right White Chocolate Hazelnut Spread
The heart of this Kinder Bueno Cookie Pie is the silky white chocolate hazelnut spread. You’ll need 750 grams of it for the full experience. Look for a spread that’s creamy and smooth—not too thick, not too runny. While the original recipe uses a brand like Black Milk Cereal’s hazelnut cream, any good-quality white chocolate hazelnut spread will work. If you’re aiming to reduce costs, you can lower the quantity to 500 grams, but be prepared for a thinner filling layer.
Before pouring, slightly warm the spread in the microwave for about 20 seconds. This makes it easier to pour and spread evenly without disrupting the cookie dough base. If you prefer not to use a microwave, just stir it briskly in a bowl until loosened.
Layering the Filling with Kinder Chocolate
Once the cookie dough base and sides are in place, pour the white chocolate hazelnut spread into the center. The spread should reach close to the top edge of the dough walls. Smooth it out gently using the back of a spoon or a silicone spatula to create an even surface.
Then comes the fun part—pressing in the Kinder chocolate and Kinder Bueno pieces. Break them into bite-sized chunks and gently push them into the spread. Don’t overdo it by stuffing in too many bars. Around 150 grams is the perfect amount to ensure you get creamy chocolatey bites throughout without overwhelming the texture.
Why Freezing Is Essential
After assembling the filling, the entire pie must be frozen before adding the top layer. This prevents the filling from seeping into the top crust and helps the cookie dough keep its shape during baking.
Place the tin in the freezer for at least one hour. This brief chill gives the filling enough firmness to support the final dough layer and keeps everything neatly contained.
Sealing, Chilling, and Baking to Golden Perfection
Applying the Top Layer of Cookie Dough
Once the filled base has been frozen for at least one hour, it’s time to complete your Kinder Bueno Cookie Pie with the final dough layer. Take the last third of your prepared cookie dough and gently flatten it between your palms or on a piece of parchment paper to roughly match the diameter of your cake tin.
Carefully place it over the frozen filling. Press down gently around the edges to seal the top crust with the cookie dough walls. Be sure there are no gaps—this helps lock in the gooey filling during baking. A firm, even seal ensures the pie maintains its shape and prevents any filling from leaking out.
Freezing Again: Why Double Chilling Matters
Once sealed, freeze the entire pie again for another hour. This second freeze helps solidify the top layer and ensures it holds up during the initial heat shock of baking. It also allows the filling to remain thick and fudgy rather than melting too quickly into the crust. Skipping this step can cause uneven baking and soggy centers.
While the pie is chilling again, this is the perfect time to preheat your oven.
Preheating the Oven: Temperature Tips
Set your oven to 200°C for conventional ovens or 180°C if you have a fan oven. Always allow enough time for the oven to reach full temperature before placing your pie inside. This ensures even baking from the get-go.
If your oven runs hotter than average, lower the temperature by about 10°C to prevent the top from browning too fast while the middle stays underbaked. This pie is thick, and even heat is essential.
Baking Your Kinder Bueno Cookie Pie
Once preheated and the pie is fully chilled, place it on the center rack and bake for 30 minutes. During this time, the cookie dough will rise and turn a beautiful golden brown. The aroma will be rich and buttery with hints of toasted chocolate.
You’ll know it’s ready when the top is firm to touch and golden in color. Don’t worry if the center looks slightly soft—it will continue to firm up during the cooling and chilling process.
Cooling Instructions: Patience Pays Off
Remove the pie from the oven and let it cool in the tin for one hour at room temperature. Don’t try to take it out too soon—doing so may cause the structure to collapse or the filling to ooze out. After this rest, transfer the pie to the fridge and let it chill for 5 to 6 hours, though overnight is best. This extended cooling time allows the filling to set fully and the cookie to firm up, making it much easier to slice cleanly.
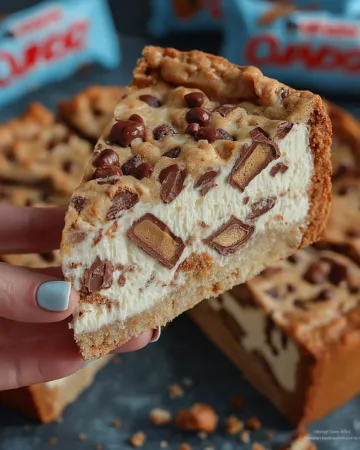
Slicing, Serving, and Customizing Your Kinder Cookie Pie
Slicing Tips for a Perfect Presentation
Once your Kinder Bueno Cookie Pie has chilled for at least 5–6 hours—or ideally overnight—it’s ready to slice. Carefully remove it from the springform tin by unlocking the sides and lifting the ring away. You may need to run a butter knife along the edge to release any stuck dough.
For clean, professional-looking slices, use a large, sharp knife. Run the knife under hot water before each cut, then wipe clean. This prevents the rich filling from smudging and helps the blade glide through the thick layers without pulling. You should get about 12 generous slices from an 8-inch pie, making it ideal for parties or special gatherings.
Serving Suggestions: Enjoy It Your Way
This pie is indulgent on its own, but you can elevate your dessert game with a few simple additions:
- Warm it up: Microwave a slice for 10–15 seconds to soften the filling and make the chocolate chips gooey again.
- Add a scoop: Serve with a scoop of vanilla or hazelnut ice cream for a contrast of temperatures and textures.
- Top it off: A drizzle of melted chocolate or a dollop of whipped cream adds extra flair for special occasions.
This cookie pie is rich and sweet, so smaller portions are perfectly satisfying. Whether you’re serving it on a dessert platter or enjoying a midnight treat, each bite is packed with layers of flavor and texture.
Customizing the Recipe for Variety
One of the best things about this Kinder Bueno Cookie Pie is how easily you can adapt it based on your cravings or what’s in your pantry.
- Chocolate variations: Swap milk chocolate chips for white, dark, or a blend for a more complex taste.
- Nutty twist: Add crushed hazelnuts to the filling for extra crunch and a stronger nutty flavor.
- Stuffed surprises: Try adding chunks of other candy bars inside the filling—think caramel-filled chocolates or mini cookies.
- Flavorful swaps: Use a chocolate hazelnut spread instead of white chocolate for a darker, richer filling.
Each version brings a unique spin while keeping that soft, chewy cookie base and gooey center intact. Just be sure to balance your ratios—too many mix-ins can affect the bake.
Storage, Shelf Life, and Make-Ahead Tips
Storing Your Kinder Bueno Cookie Pie the Right Way
After all that effort, you’ll want to make sure your Kinder Bueno Cookie Pie stays fresh and delicious for as long as possible. The good news? This dessert keeps surprisingly well—if you can resist eating it all in one go.
The best way to store it is in the refrigerator. Place the leftover slices in an airtight container or wrap the entire pie tightly in plastic wrap and foil. This keeps the cookie dough moist while preventing the filling from softening too much. Stored this way, the pie lasts for 3 to 4 days, possibly longer if your fridge runs cool.
Avoid leaving it at room temperature for long periods, especially in warmer environments. The high fat content in both the filling and dough can cause it to soften or go oily if not properly chilled.
Can You Freeze Kinder Bueno Cookie Pie?
Absolutely. If you’re prepping ahead or want to save extra slices for a future sweet craving, freezing is a great option. Here’s how to do it:
- Slice the pie first, then wrap each piece tightly in plastic wrap and place them in a freezer-safe bag or container.
- Label and date the container to track freshness.
- When you’re ready to eat, thaw slices in the refrigerator overnight or microwave for 20–30 seconds if you prefer it warm and gooey.
Frozen cookie pie slices can last for up to two months without a noticeable loss of quality.
Making the Pie Ahead for Events
If you’re hosting a party, prepping the pie ahead of time is a real lifesaver. You can:
- Assemble the entire pie (base, filling, and top layer) and store it in the freezer before baking. Simply bake it straight from frozen, adding 5–10 minutes to the baking time.
- Bake it the day before and store it in the fridge overnight. The flavor actually develops more after chilling, and slicing is much easier.
- Bake and freeze it weeks ahead, then thaw and reheat slices as needed. This makes it a stress-free dessert for birthdays, holidays, or potlucks.
Planning ahead lets you enjoy this decadent dessert without any last-minute kitchen chaos. It also ensures that the texture stays ideal and the pie remains structurally sound even after reheating.
Troubleshooting and Expert Tips for Perfect Results
Common Mistakes and How to Avoid Them
Even with a detailed recipe, it’s easy to run into small issues that can affect the outcome of your Kinder Bueno Cookie Pie. Here’s what to watch out for:
- Overmixing the dough: Once you add the flour, only mix until combined. Overmixing develops gluten, making the cookie base tough instead of chewy and soft.
- Skipping the chilling steps: Both freezing stages are crucial. If you skip freezing before baking, the filling can melt into the dough, creating a sunken or soggy center.
- Baking at the wrong temperature: Double-check your oven settings. A fan oven should be at 180°C, while a standard oven needs 200°C. Hotter temperatures can brown the top too quickly while leaving the middle undercooked.
- Removing from the tin too soon: Always let the pie cool for one hour at room temperature and then chill for at least 5–6 hours before slicing. Removing it early can cause it to fall apart.
Avoiding these missteps makes all the difference between a decent pie and a showstopper dessert.
Dough Too Dry or Too Sticky? Fix It Easily
- Too dry: If your dough feels crumbly, it may need just a splash (1–2 teaspoons) of milk or water to help it come together. Also, be sure you’re using the correct amount of butter and egg yolk—these add fat and moisture.
- Too sticky: If the dough is overly soft or sticky, refrigerate it for 15–20 minutes before shaping. You can also lightly flour your hands when pressing it into the tin.
These small adjustments help you maintain that perfect cookie dough texture.
Expert Tips for the Best Texture and Flavor
- Use quality chocolate chips: Since the dough is loaded with chocolate, choose a milk chocolate that melts well and tastes smooth. Skip overly sweet or waxy chips for best results.
- Don’t skip the cornflour: This ingredient adds a soft, tender texture that makes the cookie base feel like a bakery-style dessert. If you must substitute, use 50 grams more of plain flour.
- Let it rest overnight: The cookie pie tastes even better the next day. Chilling allows all the flavors to settle and blend, while the filling becomes denser and more satisfying.
Bonus: How to Slice Like a Pro
A clean slice makes your presentation pop. Heat your knife under hot water, wipe it clean between cuts, and slice straight down—don’t drag the knife through. This technique prevents the soft filling from spreading or pulling the crust.
Conclusion: Time to Bake Your Showstopper
Kinder Bueno Cookie Pie is more than just a treat—it’s a celebration of texture, flavor, and indulgence. With its buttery, chewy cookie crust and that unforgettable gooey hazelnut center loaded with Kinder chunks, it’s the kind of dessert that people remember.
It’s perfect for birthdays, holidays, or just a weekend baking project that guarantees compliments. Whether you enjoy it chilled straight from the fridge or warmed up with a scoop of ice cream, this pie delivers on every level.
Now that you’ve got the full guide, it’s time to preheat that oven, gather your ingredients, and treat yourself (and your lucky guests) to the ultimate cookie pie experience.