


Apple cranberry pie is one of those timeless desserts that delivers comfort in every bite. Combining the cozy sweetness of apples with the tart punch of cranberries, this pie is a perfect addition to your holiday table or any seasonal gathering.
With a flaky homemade crust and a spiced fruit filling, it’s both rustic and elegant. In this article, we’ll walk you through everything you need to make a flawless apple cranberry pie-from crafting the perfect crust to assembling the lattice topping. You’ll learn expert tips, ingredient swaps, and how to prepare it ahead of time. Whether you’re a seasoned baker or a beginner, this guide is designed for easy reading and great results.
Crafting the Perfect Homemade Pie Crust
Why Homemade Pie Crust Makes All the Difference
When it comes to pie, the crust isn’t just a container—it’s part of the experience. A flaky, buttery crust balances the fruity filling and adds the texture needed to elevate each bite. Store-bought crusts can work in a pinch, but making it from scratch gives you complete control over flavor and flakiness.
Key Ingredients for a Foolproof Pie Crust
To make a crust that holds its shape and still melts in your mouth, you’ll need:
- All-purpose flour for structure
- Cold unsalted butter to create pockets of steam for flakiness
- Ice water to bring the dough together without overhydrating
- A pinch of salt to enhance the flavor
You’ll be making two discs of dough—one for the base and one for the top. If you plan to get creative with braids or apple-shaped decorations, consider preparing an extra crust.
How to Roll and Shape Your Dough
Once your dough is chilled, roll one disc out into a 12-inch circle on a floured surface. Turning the dough slightly with each roll ensures an even circle. Carefully transfer it into a 9-inch pie dish, pressing gently to eliminate air bubbles. Let the crust rest in the refrigerator while you prep the filling.
Tips for Success
- Keep everything cold: butter, water, and even your rolling pin if possible.
- Don’t overwork the dough. Handle it just enough to bring it together.
- If the dough tears, patch it gently with extra dough or pinch it closed.

Apple Cranberry Pie Recipe
- Total Time: 7 hours (includes cooling)
- Yield: 8-10 servings
Description
This apple cranberry pie recipe combines sweet apples, tart cranberries, warm spices, and a buttery homemade crust. It’s perfect for holidays or any cozy gathering.
Ingredients
2 homemade pie crusts (1 for bottom, 1 for top)
3 large apples, cored, peeled, and sliced (6–7 cups or 750–875g)
1 1/2 cups (187g) fresh or frozen cranberries
3/4 cup (150g) granulated sugar
2 tablespoons (14g) cornstarch
1 teaspoon fresh orange zest
1 1/2 teaspoons ground cinnamon
1/4 teaspoon ground cloves
1/4 teaspoon ground nutmeg
2 tablespoons (30g) unsalted butter, cold and cubed
1 large egg, beaten with 1 tablespoon (15ml) milk (for egg wash)
Instructions
1. Prepare pie crust through step 5 of your preferred recipe.
2. In a large bowl, mix apples, cranberries, sugar, cornstarch, orange zest, cinnamon, cloves, and nutmeg.
3. Preheat oven to 400°F (204°C).
4. Roll out one dough disc to 12 inches, line a 9-inch pie dish, and tuck in edges.
5. Spoon filling into crust, discarding excess liquid. Dot with cold butter cubes.
6. Roll out second dough disc and cut into 1–2 inch strips. Create lattice pattern on top.
7. Seal edges, trim, and crimp. Brush top with egg wash.
8. Place pie on baking sheet. Bake for 20 minutes.
9. Without removing pie, lower oven to 350°F (177°C) and bake 30–35 more minutes.
10. Shield crust edges after first 20 minutes if browning too fast.
11. Remove from oven and cool at room temperature for 3 hours before serving.
Notes
Make ahead: The crust can be made up to 5 days ahead or frozen for 3 months. Fully baked pie freezes well for 3 months.
To freeze filling: Combine ingredients and freeze for up to 3 months. Thaw before use.
Decorate with braided crust or apple cutouts if desired.
Almond Variation: Place 7 oz almond paste as a disc over the bottom crust before adding the filling.
- Prep Time: 3 hours
- Cook Time: 1 hour
- Category: Dessert
- Method: Baking
- Cuisine: American
Building the Apple Cranberry Filling
Choosing the Right Apples for Balance and Texture
Apples are the heart of this pie, so choose varieties that strike a balance between sweet and tart. You want firm apples that won’t turn mushy during baking. Good choices include:
- Honeycrisp for their juicy crunch
- Granny Smith for a bright tartness
- Braeburn or Fuji for sweet, stable flesh
You’ll need about 6 to 7 cups of peeled, cored, and sliced apples, cut into 1/4-inch slices to ensure even cooking.
Why Cranberries Make This Pie Shine
Fresh or frozen cranberries add a tart contrast that balances the natural sweetness of apples. Their acidity and vibrant color transform this pie into a festive, flavor-packed dessert. You’ll need 1½ cups of cranberries. Frozen berries work just as well as fresh ones—no need to thaw them before mixing.
Spices and Citrus: Layering Warmth and Brightness
The secret to a standout filling lies in the seasoning. This recipe includes:
- 1½ teaspoons of ground cinnamon for warmth
- ¼ teaspoon each of ground cloves and nutmeg for a deeper spice profile
- 1 teaspoon of fresh orange zest to brighten the flavors and tie the fruits together
The orange zest isn’t optional—it enhances both the apple and cranberry notes, giving the pie a citrusy lift.
Thickening with Cornstarch for a Sliceable Finish
No one wants a runny pie. Cornstarch acts as the thickening agent in this filling. Two tablespoons will help the juices from the apples and cranberries set into a sliceable texture as the pie cools. Be sure to discard any excess liquid from the bowl before filling the crust to avoid sogginess.
Putting It All Together
In a large mixing bowl, toss the sliced apples, cranberries, sugar, spices, zest, and cornstarch until evenly coated. The mix should look glossy and well-seasoned. Spoon this mixture into the prepared pie crust, leaving behind any pooled juice in the bowl. Dot the top with cubes of cold unsalted butter—these will melt into the filling, adding richness and smoothness.
Assembling and Decorating the Pie Top
Rolling Out and Cutting the Top Crust
Once the filling is nestled in the bottom crust, it’s time to add the top. Use the second chilled dough disc and roll it into a 12-inch circle on a floured surface. For a classic look, cut the dough into strips that are 1 or 2 inches wide using a pastry wheel, pizza cutter, or sharp knife. These strips will be woven into a beautiful lattice pattern.
If lattice work feels intimidating, don’t worry—you can opt for a full top crust instead. Just lay the circle of dough over the filling, cut slits in the center for steam to escape, and proceed as normal.
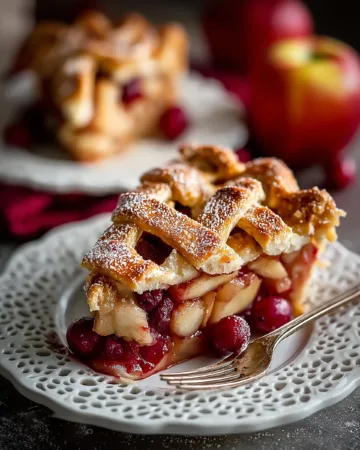
Weaving the Lattice Like a Pro
To form a lattice, lay half of the dough strips across the pie in one direction. Then, fold back every other strip halfway and begin weaving strips in the opposite direction. Continue folding back and layering until a full woven top is formed. Press the edges of the strips into the bottom crust to seal everything together.
Use a small knife to trim off any excess dough hanging over the edges, then crimp or flute the edges for a finished look. The goal is to lock in that juicy filling while adding visual appeal.
Adding Braids or Apple-Shaped Cutouts
If you’ve prepared extra dough, this is where you can get creative. Use small cookie cutters to make apple shapes and arrange them on top of the lattice. For a braided edge, cut thin strips of dough and gently braid them, then press the braid around the outer edge of the pie.
These additions aren’t just for looks—they give your pie a beautiful artisan finish that impresses every time.
Brushing with Egg Wash for Golden Color
Before baking, whisk one large egg with a tablespoon of milk to create a simple egg wash. Lightly brush this mixture over the top crust, including any braids or cutouts. This step ensures a golden, glossy finish after baking.
You can skip sprinkling sugar on top to keep the flavor profile balanced, as the filling already brings plenty of sweetness.
Why the Top Crust Matters
The top crust does more than cover the pie—it helps hold in the heat and moisture while the filling bakes. Whether you go with a full crust, a lattice, or decorative cutouts, a well-crafted top ensures the perfect balance between crispy and tender textures in every bite.
Baking the Pie to Golden Perfection
The Right Temperature and Timing for Success
To start, preheat your oven to 400°F (204°C). This high heat helps set the crust and jumpstarts the bubbling process in the filling. Place the assembled pie onto a large baking sheet to catch any drips—fruit pies often bubble over slightly while baking.
Bake the pie for 20 minutes at this high temperature. Then, without opening the oven, reduce the heat to 350°F (177°C) and continue baking for another 30 to 35 minutes. This two-stage baking method ensures the crust browns without overbaking the fruit inside.
Protecting the Edges from Over-Browning
To keep the edges of your crust from getting too dark, use a pie crust shield. Place it gently over the edges after the first 20 minutes of baking. If you don’t have a shield, you can use strips of aluminum foil instead. Protecting the edges helps them bake evenly with the rest of the crust.
How to Tell When It’s Done
You’ll know your pie is ready when:
- The top crust is deeply golden and glossy
- The filling is visibly bubbling through the lattice or steam vents
- The bottom crust (if visible) appears browned and set
If the crust looks done but the filling isn’t bubbling yet, give it a few more minutes. The bubbling is crucial—it means the cornstarch has reached the right temperature to activate and thicken the juices.
Cooling: Don’t Skip This Step
Once baked, remove the pie from the oven and allow it to cool on a wire rack at room temperature for at least 3 full hours. This cooling period allows the filling to thicken properly so it doesn’t spill out when sliced. Cutting too soon can leave you with a runny mess, even if the flavor is still great.
The scent of warm apples, spice, and cranberry will be hard to resist, but patience pays off. Serve it at room temperature or slightly warmed for the best experience.
Make-Ahead Tips and Storing Your Pie
Planning Ahead: How to Save Time Without Compromising Quality
Baking a pie from scratch doesn’t have to be a last-minute project. You can break the process into manageable steps over several days. Here’s how to get ahead without sacrificing flavor or texture:
- Pie dough: Prepare and refrigerate up to 5 days in advance or freeze for up to 3 months. Wrap it tightly to prevent drying out.
- Filling: Mix and freeze the apple cranberry mixture for up to 3 months. Thaw overnight in the fridge before using.
- Fully baked pie: Bake the pie, let it cool completely, then wrap and freeze for up to 3 months. Thaw in the refrigerator overnight, then let it come to room temperature before serving.
These make-ahead strategies allow you to enjoy the homemade touch without the day-of stress.
Storing Leftovers the Right Way
Once the pie is cut, it’s important to store leftovers properly to keep them fresh and flavorful:
- At room temperature: Cover the pie tightly and store for up to 1 day if your kitchen is cool.
- In the refrigerator: Store tightly wrapped or in a sealed container for up to 5 days.
- Reheating: Warm slices in the oven at 300°F (149°C) for 10–15 minutes to restore a fresh-baked texture. Avoid the microwave, as it can make the crust soggy.
Best Practices for Freezing
Freezing the entire baked pie is an excellent way to preserve it for later events. Use this method:
- Let the baked pie cool fully.
- Wrap tightly in plastic wrap, then aluminum foil.
- Label with the date and freeze.
- To serve, thaw in the fridge overnight, then bring to room temperature or reheat gently.
A Quick Note on Freezing Unbaked Pies
You can also freeze the assembled, unbaked pie. Just skip the egg wash until baking day. When ready, bake directly from frozen at 400°F for 25 minutes, then reduce to 350°F and bake for 40–50 minutes, shielding the edges as needed.
Creative Variations and Customization Ideas
Adding a Nutty Twist with Almond Paste
One standout variation of the classic apple cranberry pie includes a layer of almond paste. This version adds a subtle sweetness and nutty richness that pairs beautifully with tart cranberries and sweet apples.
To try it:
- Flatten 7 ounces (about 198g) of almond paste into an 8-inch disc.
- Place the almond paste on top of the bottom pie crust before adding the fruit filling.
- Assemble and bake as usual.
This small addition completely transforms the flavor profile, making the pie feel a little more decadent and bakery-worthy.
Pie Crust Decorations for a Professional Finish
Want your pie to look as good as it tastes? Pie crust decorations can turn a simple dessert into a centerpiece. Here are a few ideas:
- Apple cutouts: Roll out extra dough and use an apple-shaped cutter to create decorations. Place them on top of the pie before baking, or bake them separately and place on top just before serving.
- Braided crust edge: For a detailed finish, cut 1/4-inch-wide dough strips and braid them. Attach the braid around the pie’s edge with a bit of egg wash.
These extras require just a little more time and dough but make a big impact.
Optional Toppings and Flavor Boosters
Although the pie is perfect on its own, you can serve it with a variety of toppings depending on your taste:
- A dollop of whipped cream
- A scoop of vanilla ice cream
- A sprinkle of coarse sugar before baking for added crunch
Keep in mind, the filling is already rich with cinnamon, nutmeg, and cloves, so light toppings work best.
Dietary Swaps and Adjustments
Looking to adapt the pie for different needs? Try these options:
- Dairy-free: Use plant-based butter for the filling and crust.
- Lower sugar: Cut the granulated sugar to 1/2 cup if you prefer a tarter flavor or are using sweeter apples.
- Gluten-free: Use a 1:1 gluten-free flour blend in your homemade crust.
These variations let you customize the pie for family preferences, dietary needs, or just to try something new.
Conclusion
Apple cranberry pie is more than just a seasonal dessert-it’s a celebration of flavor, texture, and tradition. With a buttery, flaky homemade crust and a vibrant filling packed with sweet apples, tart cranberries, warm spices, and a hint of citrus, each slice delivers the perfect bite of cozy comfort. Whether you stick to the classic recipe or experiment with almond paste, decorative crusts, or dietary tweaks, this pie offers versatility without sacrificing simplicity.
By following the step-by-step process laid out in this guide-from preparing the dough to mastering the bake-you’re well on your way to creating a pie that’s not only visually stunning but rich in homemade goodness. Serve it at a holiday dinner, bring it to a potluck, or enjoy it at home with your loved ones. Either way, this apple cranberry pie will be remembered long after the last slice disappears.