


There’s something incredibly nostalgic and satisfying about a slice of fresh strawberry pie—especially when it’s made without artificial gelatin or additives. This Fresh Strawberry Pie (No Jello!) is a beautiful showcase of the season’s ripest berries, layered in a crisp graham cracker crust and stabilized naturally with agar-agar instead of gelatin. If you’ve been searching for a pie recipe that feels wholesome, tastes fresh, and delivers a bright, tangy-sweet punch, this is it.
This article will guide you step-by-step through how to make the perfect fresh strawberry pie without using Jello, covering the best berries to use, how to prepare your crust, the magic of agar-agar, storage tips, and topping suggestions. Plus, we’ll finish off with answers to some commonly asked questions and a few pro tips to keep your pie slice-worthy and irresistibly good.
Choosing the Best Strawberries for Fresh Strawberry Pie
Picking the Freshest Strawberries
Fresh strawberries are the soul of this pie, so selecting the best ones is key. Choose berries that are fully red, firm, and fragrant. Avoid strawberries with white or green tips, as they may not be fully ripe and could taste sour. Organic strawberries often deliver a richer flavor, especially in pies where they shine as the main ingredient.
How to Prep Strawberries for Maximum Flavor
After rinsing the berries gently in cold water, pat them dry thoroughly with a clean towel. Divide your berries by size. For this recipe, you’ll need about 7 cups total, with 5 ½ cups quartered and 1 ½ cups pureed. The key here is consistency—slice your berries so they’re similar in size. This helps them macerate evenly and look neat when served.
Macerating for Sweetness and Juice Extraction
Macerating the strawberries involves tossing the chopped ones in granulated sugar and letting them sit for about 25 minutes. During this time, the sugar draws out the juices and intensifies the berry flavor. Stir them occasionally, and once you collect ¾ cup of juice, you’re ready for the next step. If you get more than that, you can reduce the amount of water added later.
Maceration not only boosts flavor but is crucial for creating the base syrup that binds the filling without Jello. It’s a simple trick with big impact.
Print
Fresh Strawberry Pie Recipe (No Jello!)
- Total Time: 1 hour 5 minutes
- Yield: 8 slices
- Diet: Vegetarian
Description
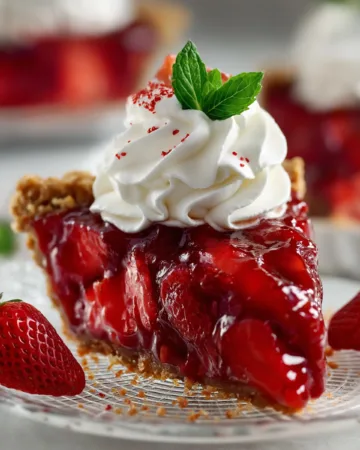
This Fresh Strawberry Pie (No Jello!) is made with juicy strawberries, a crisp graham cracker crust, and a natural agar-agar thickener. It’s a refreshing summer dessert that’s easy to make, gelatin-free, and incredibly delicious.
Ingredients
1 graham cracker crust, storebought or homemade
7 cups strawberries, divided
1 cup granulated sugar
3/4 cup strawberry juice (from macerated strawberries)
3/4 cup water
3 tablespoons agar-agar flakes
Whipped cream, for serving
Instructions
1. If using homemade graham cracker crust, prepare and chill it for 1–2 hours. If using store-bought, proceed to the next step.
2. Quarter 5 1/2 cups of the strawberries. Smaller strawberries may only need to be halved.
3. Place chopped strawberries in a bowl and mix with sugar. Let them sit for 25 minutes to release juices. Measure out 3/4 cup juice for the next step.
4. Puree the remaining 1 1/2 cups strawberries using a food processor or mash by hand.
5. In a saucepan, combine 3/4 cup strawberry juice, 3/4 cup water, and agar-agar flakes. Boil for 8–10 minutes, whisking occasionally.
6. Remove from heat and let it cool slightly. Stir in pureed and quartered strawberries until well combined.
7. Pour the strawberry mixture into the prepared crust. Spread evenly and chill for at least 4 hours.
8. Top with whipped cream before serving and enjoy!
Notes
You’ll need 1 1/2 cups total liquid between strawberry juice and water. Adjust water quantity based on how much juice your berries yield.
For best texture and presentation, serve the pie the same day it’s made.
Store leftovers in the refrigerator for up to 2–3 days, but note that crust may soften slightly over time.
- Prep Time: 55 minutes
- Cook Time: 10 minutes
- Category: Dessert
- Method: Chilling
- Cuisine: American
Creating the Perfect Graham Cracker Crust
Store-Bought vs. Homemade Crust Options
When it comes to the base of your Fresh Strawberry Pie (No Jello!), the graham cracker crust adds a sweet, toasty contrast to the vibrant fruit filling. You can go the easy route with a store-bought crust, which works just fine for a quick prep. But if you want deeper flavor and a more satisfying crunch, a homemade crust is worth the few extra steps.
To make it yourself, combine crushed graham crackers with melted butter and a bit of sugar. Press the mixture firmly into a 9-inch pie plate, then chill for at least 1-2 hours. This helps the crust firm up, making it easier to slice once filled. A well-set crust also prevents sogginess from the juicy strawberries.
Tips for a Crisp, No-Bake Pie Base
Even if you opt for a no-bake approach, it’s critical to chill the crust long enough. This allows the butter to solidify and hold everything in place. Here’s a tip: use the back of a measuring cup to press the crust evenly across the bottom and up the sides. For added crunch, some like to bake it briefly at 350°F for 8-10 minutes and let it cool completely—but this is optional.
Don’t forget to choose a sturdy 9-inch pie plate. The graham cracker crust is more delicate than traditional pastry dough, so using a plate with sloped sides and no-stick coating can help when serving.
Assembling the Crust with the Filling
Once your strawberry filling is ready and slightly cooled (more on that in Part 3), pour it into your prepared crust, smoothing it gently with a spatula. The filling should nestle into the crust and spread evenly. Be careful not to overfill—it should reach just below the top edge of the crust to avoid spillage during chilling.
Chill the whole pie in the fridge for at least 4 hours. This final step ensures the filling sets fully and the crust stays crisp under the moisture from the fruit.
Making the Filling Without Jello – Using Agar-Agar
Why Skip the Jello?
Traditional strawberry pies often rely on Jello to hold the filling together, but using it introduces artificial ingredients, added colors, and flavors that can overpower the natural taste of fresh strawberries. By making this Fresh Strawberry Pie (No Jello!) with agar-agar, you keep the pie vegetarian, cleaner, and full of real fruit flavor.
Agar-agar is a plant-based thickener made from seaweed. It works similarly to gelatin but is firmer, holds its shape better at room temperature, and sets faster without refrigeration. This makes it ideal for fresh fruit pies where the texture and freshness of the berries need to shine.
Understanding Agar-Agar for Beginners
Agar-agar flakes are easy to use, but they require boiling to activate. You’ll need 3 tablespoons of flakes, combined with ¾ cup strawberry syrup from the macerated berries and ¾ cup water. Bring this mixture to a boil in a medium saucepan and whisk occasionally to fully dissolve the flakes. Let it boil for about 8 to 10 minutes until the liquid is slightly thickened and clear.
If you end up with more than ¾ cup of strawberry juice, reduce the water so the total liquid equals 1 ½ cups. Getting this balance right ensures the filling firms up without being rubbery.
Combining with Pureed and Quartered Berries
While the agar mixture cools slightly, puree 1 ½ cups of fresh strawberries in a food processor or mash them manually if you prefer a chunkier texture. Once the agar base is ready but still warm, stir in the strawberry puree and the macerated, quartered berries.
This blend of textures—the smooth puree and juicy chunks—gives the pie a bright, satisfying bite. Stir gently to avoid crushing the berries. Now, the filling is ready to be poured into the chilled graham cracker crust.
Chilling and Setting the Pie to Perfection
Pouring and Leveling the Filling
Once your strawberry mixture is fully combined, carefully pour it into your prepared graham cracker crust. Use a spatula or the back of a spoon to gently smooth the top. Try to distribute the berries evenly throughout the crust so that every slice holds its shape and looks uniform when cut. Don’t press down too hard—let the filling settle naturally into place.
This pie looks beautiful with the fresh strawberry chunks peeking through the smooth base. Keep in mind, the filling will firm up as it chills, so you want it to sit nice and even before refrigeration.
Minimum Chilling Time
Place the assembled pie in the refrigerator and allow it to chill for at least 4 hours. This chilling step is non-negotiable. It gives the agar-agar time to set fully and lock the strawberries into a soft yet sliceable gel. For best results, make the pie early in the day and let it rest until you’re ready to serve.
Don’t rush the chill time. Cutting into the pie too soon could result in a loose, unstable filling. If you have the time, letting it rest overnight can lead to even better texture. Just be sure to cover it lightly with plastic wrap to keep it fresh.
Serving Suggestions
This Fresh Strawberry Pie (No Jello!) is best served cold and on the same day it’s made. Right before serving, top it generously with freshly whipped cream. You can pipe decorative swirls or simply dollop it across the surface.
Want to elevate the presentation? Garnish with whole strawberries or a few mint leaves for a bright, eye-catching finish. Serve it as-is or alongside a scoop of vanilla ice cream for a classic summer dessert experience.
Storage and Make-Ahead Tips for Fresh Strawberry Pie (No Jello!)
How Long Will It Last?
This pie is freshest the day it’s made, but it can be stored in the refrigerator for up to 2 to 3 days. After that, the strawberries begin to soften too much, and the crust can absorb moisture from the filling, making it less crisp. That said, it still tastes great, especially if you’re eating leftovers within 24 hours.
To store, cover the pie loosely with plastic wrap or foil and place it in the coldest section of your fridge. Avoid sealing it in an airtight container, as this could trap moisture and make the crust soggy faster.
Can You Freeze It?
While freezing may seem like a good option for leftovers, it’s not recommended for this pie. The fresh strawberries have high water content, and freezing can cause them to become mushy once thawed. Also, agar-agar may not retain its firm texture after freezing, leading to a watery, inconsistent filling.
If you must freeze it, do so without the whipped cream topping. Wrap it in several layers of plastic wrap and foil. Then thaw in the fridge overnight before serving, but expect a change in texture.
Best Practices for Make-Ahead
If you’re preparing for a gathering or dinner party, here’s the best way to plan ahead:
- Day before: Make your graham cracker crust and store it in the fridge.
- Morning of: Prepare and assemble the filling.
- Afternoon: Chill the pie for 4 hours.
- Evening: Top with whipped cream right before serving.
Whipped Cream Toppings and Creative Serving Ideas
The Perfect Whipped Cream for Strawberry Pie
There’s no denying it—the light, creamy texture of whipped cream is the perfect match for a chilled slice of Fresh Strawberry Pie (No Jello!). Its subtle sweetness and airy consistency complement the natural flavor of the berries without overpowering them.
To make your own whipped cream, beat cold heavy cream with a splash of vanilla extract and sugar to taste until soft peaks form. For a firmer hold (especially if the pie will sit out for a bit), whip until medium peaks form. Avoid overwhipping, which turns it grainy.
Add the whipped cream just before serving. You can spoon it over the entire pie, pipe elegant rosettes around the edge, or serve it on the side so everyone can customize their slice.
Garnish Ideas to Elevate Your Presentation
A little garnish goes a long way in making your dessert feel extra special. Here are a few elegant yet simple ways to finish your pie:
- Whole strawberries with green tops intact for a rustic, farm-stand look
- Mint leaves for a pop of color and freshness
- Thin lemon zest curls to brighten the flavor and add contrast
- Crushed graham cracker crumbs sprinkled lightly over the whipped cream for texture
Use a sharp knife when slicing your pie to keep the layers clean. Wipe the blade between cuts for a neat presentation.
Serving Tips for Clean Slices
To slice the pie without crushing the crust or pulling the filling, use a sharp, thin-bladed knife. Dip the knife in hot water and wipe it clean before each cut. Use a flat pie server to lift each slice gently onto the plate.
Pair each slice with a spoonful of whipped cream or a drizzle of strawberry syrup (if you have any extra from macerating). The contrast between the creamy topping and juicy berries makes every bite more indulgent.
Conclusion: Why You’ll Love This Fresh Strawberry Pie (No Jello!)
This Fresh Strawberry Pie (No Jello!) is more than just a pretty dessert. It’s a celebration of real ingredients, peak-season fruit, and simple techniques that come together for a showstopping result. The use of agar-agar instead of artificial gelatin lets the strawberries take center stage while delivering a pie that slices beautifully and tastes even better.
Whether you’re planning a summer barbecue, hosting a dinner party, or simply craving something fresh and sweet, this pie is sure to satisfy. With its bright flavor, juicy filling, and buttery graham cracker crust, it’ll become a favorite you return to every berry season.
Serve it cold, top it generously with whipped cream, and enjoy every forkful of fruity goodness.