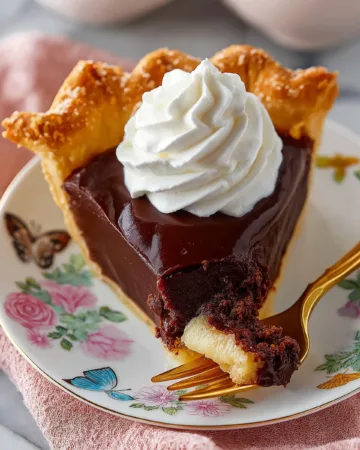


Old-Fashioned Chocolate Pie is the kind of dessert that evokes memories of cozy kitchens, hand-written family recipes, and sweet indulgence after a Sunday meal. This nostalgic treat has stood the test of time with its rich, creamy filling and buttery crust. Unlike many modern desserts, this pie keeps things simple and traditional, using pantry staples and straightforward techniques.
In this article, we’ll walk you through everything you need to know about making the perfect old-fashioned chocolate pie. From choosing the right crust to mastering the velvety cocoa filling, we’ll break it all down. You’ll also find tips for avoiding common mistakes, customizing your pie, and storing it for later. Whether you’re a seasoned baker or trying it for the first time, you’ll come away confident and inspired to recreate this timeless dessert.
Understanding the Essence of Old-Fashioned Chocolate Pie
What Makes This Pie “Old-Fashioned”?
The term “old-fashioned” in baking often refers to recipes that rely on simple, unprocessed ingredients and traditional methods. Old-fashioned chocolate pie uses real cocoa, fresh egg yolks, and milk, cooked into a pudding-like filling from scratch. There are no artificial flavorings or shortcuts. This style of pie dates back generations, often appearing in Southern and Midwestern kitchens where it became a staple dessert.
Unlike store-bought pies or instant mixes, this homemade chocolate pie is about taking your time. The cooking process is gentle and requires attention, especially when tempering the eggs and thickening the filling. Each step, from baking the crust to chilling the finished pie, contributes to the final texture and flavor.
Why People Still Love It Today
Despite a world full of new and trendy desserts, old-fashioned chocolate pie remains a favorite for many. It’s comforting, nostalgic, and incredibly satisfying. The rich chocolate custard paired with a flaky crust creates a contrast of textures and flavors that’s hard to beat.
It’s also incredibly versatile. You can dress it up with whipped cream, chocolate shavings, or even a drizzle of ganache. Prefer it simpler? Let the cocoa shine on its own. The balance of ingredients gives you just the right amount of sweetness and richness without overwhelming the palate.
This pie is also a go-to for holidays, potlucks, or just a cozy weekend treat. It’s easy to make ahead and stores well in the fridge, making it ideal for planning in advance. Whether served at a family reunion or a quiet dinner at home, old-fashioned chocolate pie brings warmth and joy to the table.
Essential Ingredients for Old-Fashioned Chocolate Pie
The Building Blocks of Flavor
Creating an unforgettable old-fashioned chocolate pie starts with selecting the right ingredients. Each one contributes to the texture, flavor, and overall experience of the pie. Using quality and fresh ingredients can make a noticeable difference.
- Granulated Sugar (1½ cups): This is the primary sweetener in the recipe. It balances the bitterness of cocoa and enhances the creaminess of the custard.
- Unsweetened Cocoa Powder (½ cup): Cocoa is the star of the show here. It delivers that deep, chocolate flavor. Opt for a good-quality cocoa powder for a rich taste and smooth texture.
- Milk (2 cups total): Milk acts as the liquid base, helping dissolve the cocoa and sugar while giving body to the filling. Whole milk is preferred for creaminess, but evaporated milk can also be used for a slightly more intense flavor.
- Egg Yolks (4 large): The yolks are key for thickening the filling and giving it a custard-like consistency. They also add richness and a silky finish.
- All-Purpose Flour (3 tablespoons): This works as a thickening agent. Combined with the egg yolks, it ensures the pie filling holds its shape while remaining smooth.
- Salt (½ teaspoon): A small amount of salt brings out the chocolate flavor and balances the sweetness. Never skip it.
- Unsalted Butter (¼ cup): Added at the end, butter adds richness and helps smooth out the texture of the custard.
- Vanilla Extract (1 teaspoon): Vanilla enhances all the flavors and rounds out the chocolate. Even a small amount can elevate the entire pie.
Crust Options: Homemade or Store-Bought?
- Homemade Crust: If you enjoy baking from scratch, a homemade pie crust made with flour, butter, and a touch of salt will yield a flaky and flavorful base. You’ll need to prebake (or blind bake) the crust before filling it.
- Store-Bought Crust: For a quicker option, store-bought crusts work just fine. Just be mindful that thinner crusts bake faster and may need close monitoring in the oven.
Optional Additions for Topping
- Whipped Cream: A dollop of whipped cream adds lightness to each bite and complements the dense chocolate custard.
- Shaved Chocolate or Ganache: For a fancier touch, chocolate shavings or a drizzle of ganache create visual appeal and extra decadence.
Why Freshness Matters
Old-fashioned desserts like this pie rely heavily on the purity of ingredients. Stale cocoa or aging eggs can affect the texture and taste. Using fresh dairy and quality vanilla ensures your pie tastes just like Grandma’s—or even better.
Print
Old-Fashioned Chocolate Pie
- Total Time: 5 hours
- Yield: 8 servings
Description
Old-Fashioned Chocolate Pie is a rich, creamy, homemade dessert made with simple pantry ingredients and a buttery pie crust. Perfect for holidays or everyday indulgence.
Ingredients
1 pie crust, homemade or store-bought
1½ cups granulated sugar (300g)
½ cup unsweetened cocoa powder (50g)
2 cups milk (480ml)
4 large egg yolks
3 tablespoons all-purpose flour
½ teaspoon salt
¼ cup unsalted butter, cubed (57g)
1 teaspoon vanilla extract
Whipped cream, for serving
Instructions
1. Preheat the oven to 400°F.
2. Line a 9-inch pie pan with pie crust and crimp the edges. Line with parchment paper and fill with pie weights.
3. Bake for 20 minutes. Remove parchment and weights, bake 10–15 minutes more until golden and dry. Let cool completely.
4. In a medium saucepan, whisk together sugar and cocoa powder.
5. Slowly whisk in 1½ cups of milk. Heat over medium-high, stirring frequently, until it simmers.
6. In a mixing bowl, whisk together remaining ½ cup milk, egg yolks, flour, and salt.
7. Slowly whisk hot milk mixture into the egg mixture to temper.
8. Return to the saucepan and cook over medium-low heat, stirring constantly until thickened and bubbling, about 5 minutes.
9. Remove from heat. Stir in butter and vanilla until smooth.
10. (Optional) Strain pudding through a sieve for a silkier filling.
11. Pour filling into cooled crust. Refrigerate at least 4 hours or overnight.
12. Serve chilled with whipped cream. Store leftovers covered in the refrigerator for up to 1 week.
Notes
Whole or evaporated milk both work in this recipe.
Be careful when tempering eggs — pour the hot milk mixture slowly.
Cold egg yolks are easier to separate than room temperature ones.
To slice cleanly, warm a knife under hot water and wipe between cuts.
Swap crust with a graham cracker or Oreo crust for a no-bake version.
Top with shaved chocolate or ganache for added decoration.
- Prep Time: 30 minutes
- Cook Time: 30 minutes
- Category: Pies
- Method: Baking
- Cuisine: American
Mastering the Chocolate Custard Filling
Step-by-Step: From Powder to Pudding
The heart of any old-fashioned chocolate pie is its filling — rich, creamy, and chocolatey with a silky-smooth texture. Making it from scratch might sound intimidating, but it’s surprisingly manageable when broken down into clear steps. Here’s how to master it.
1. Start with the Dry Ingredients in the Saucepan
Begin by whisking together the granulated sugar and cocoa powder in a medium saucepan. This step ensures the cocoa is evenly distributed and prevents lumps.
2. Slowly Add the Milk
Gradually whisk in 1½ cups of milk. This slow incorporation is key. It helps prevent clumping and allows the sugar to dissolve properly. Heat the mixture over medium-high, stirring often, until it begins to simmer.
3. Prepare the Egg Mixture Separately
While the cocoa mixture heats, whisk the remaining ½ cup of milk in a large heat-proof bowl with the egg yolks, flour, and salt. Whisk until everything is fully combined. This mixture will thicken the custard later on.
The Art of Tempering Eggs
Tempering is a crucial technique in custard-making. It prevents the eggs from scrambling when hot liquid is added. Here’s how to do it right:
- Slowly pour the hot milk mixture into the egg yolk mixture while whisking constantly.
This brings the eggs up to temperature gradually without shocking them. - Once tempered, return the mixture to the saucepan.
Now that everything is combined, cook it over medium-low heat, stirring constantly. This ensures even thickening and avoids scorching.
Signs of Perfect Consistency
The filling should be thick and bubbling — not runny, not rubbery. It usually takes about 5 minutes to reach the right texture. You’ll know it’s ready when the custard coats the back of a spoon and a line drawn with your finger holds its shape.
Once thickened, remove from heat and stir in the cubed butter and vanilla extract. The butter makes the filling luxuriously smooth, while the vanilla adds warmth and depth.
Optional But Recommended: Strain for Silkiness
For the smoothest result, run the pudding through a fine mesh sieve before pouring it into the pie crust. This step removes any tiny bits of cooked egg or lumps, leaving behind a silky filling.
Pour and Chill
Transfer the filling into the pre-baked pie crust. Smooth the top with a spatula and refrigerate it uncovered for at least 4 hours or overnight. This gives the custard time to fully set and allows the flavors to develop.
Crafting the Perfect Pie Crust Base
Blind Baking Done Right
Before you can add the decadent chocolate filling, your pie crust must be properly baked. This step ensures it stays crisp and doesn’t get soggy under the custard. Whether you’re using a homemade or store-bought crust, blind baking is essential.
Step 1: Preheat and Prepare
Preheat your oven to 400°F. Place your crust into a 9-inch deep-dish pie pan. Crimp the edges or shape them however you like — decorative touches add a rustic, homemade charm.
Step 2: Line and Weigh
To keep the crust from puffing up or shrinking, line it with parchment paper and fill it with pie weights or dried beans. This keeps the bottom flat and the sides in place during baking.
Step 3: Partial and Full Bake
Bake the crust with the weights for 20 minutes. Then, remove the parchment and weights and continue baking for another 10 to 15 minutes, or until the crust is golden and appears dry. Let it cool completely before filling.
Homemade vs. Store-Bought: Pros and Tips
Homemade Crust:
Making your own crust gives you full control over flavor and texture. A buttery, flaky crust pairs beautifully with the creamy chocolate. Chill your dough before rolling to avoid shrinkage, and don’t overwork it — that can make it tough.
Store-Bought Crust:
If you’re short on time, store-bought crusts can save the day. However, they tend to be thinner, so they bake faster. Follow the directions on the package closely and watch carefully to prevent burning.
Preventing a Soggy Bottom
Even with a perfect custard, a soggy crust can ruin the experience. Here’s how to avoid that:
- Bake the crust completely before filling. This is non-negotiable for custard pies.
- Cool it fully before adding the filling. Pouring warm pudding into a hot crust can lead to steaming and softening.
- Don’t skip the pie weights. They help the crust maintain its shape, especially around the edges.
Optional Crust Alternatives
If you want a no-bake option or something different, consider using a graham cracker or cookie crust. A crust made with finely crushed graham crackers or even Oreo cookies can be pressed into the pie pan and chilled rather than baked. While this shifts the texture slightly, it adds a delicious twist without straying too far from tradition.
Expert Tips and Troubleshooting for a Foolproof Chocolate Pie
Avoiding Curdled Eggs: Go Slow and Steady
One of the most common mistakes when making an old-fashioned chocolate pie is curdling the eggs. This happens when the hot milk mixture is added too quickly to the egg yolks, cooking them on contact. To avoid this:
- Temper the eggs slowly by whisking constantly and adding the hot milk mixture in a thin stream.
- Keep the heat moderate when returning the mixture to the saucepan. Too much heat can also scramble the eggs.
- Use a mesh sieve before filling the pie crust. This extra step removes any small bits of cooked egg and ensures a silky-smooth custard.
Achieving the Right Texture: Thick but Not Stiff
The perfect filling should be creamy, not runny or rubbery. If your custard ends up too loose, it likely wasn’t cooked long enough. Conversely, if it becomes too thick or gelatinous, it may have overcooked.
To find the sweet spot:
- Stir constantly once the mixture returns to the saucepan.
- Look for a bubbling surface and a pudding-like consistency. This typically takes about 5 minutes.
- Remove from heat promptly after reaching the right thickness.
Best Practices for a Clean Slice
Chocolate pies can be tricky to cut if the filling is too soft or the knife isn’t prepared properly. Here’s how to get clean, bakery-style slices every time:
- Chill the pie for at least 4 hours, preferably overnight.
- Run a sharp knife under hot water before slicing.
- Wipe the knife between cuts with a damp paper towel for neat edges.
Whipped Cream & Toppings: Keep It Cool
To serve with style:
- Use freshly whipped cream, or chilled canned whipped topping.
- Spoon or pipe it onto the pie right before serving to avoid melting or collapsing.
- For visual appeal, add chocolate curls or a dusting of cocoa powder just before serving.
Storing Leftovers: Keep It Fresh
This pie stores well, which is another reason it’s so beloved. After slicing:
- Cover loosely with plastic wrap or foil.
- Refrigerate for up to 7 days.
- Avoid freezing, as it can affect the custard texture and make the crust soggy.
Customizing Your Old-Fashioned Chocolate Pie
No-Bake Crust Alternatives
If you’re short on time or prefer a twist on tradition, a no-bake crust can be a game-changer. Instead of using a classic pie crust, you can go with a graham cracker crust or even an Oreo cookie crust. Both offer a delicious flavor contrast to the creamy chocolate filling.
To make a graham cracker crust:
- Combine 1½ cups of crushed graham crackers with 6 tablespoons of melted butter and ¼ cup of sugar.
- Press firmly into a 9-inch pie pan.
- Chill in the fridge for at least 30 minutes before filling.
To make an Oreo cookie crust:
- Mix 24 crushed Oreo cookies (with filling) and 5 tablespoons of melted butter.
- Press into your pan, chill, and you’re done.
These crusts don’t require baking and add a slightly crunchy texture that works well with the smooth filling.
Flavor Enhancements and Toppings
Want to personalize your pie while still keeping it traditional at heart? Here are a few ways to enhance the flavor and presentation:
- Espresso Powder: Adding a half teaspoon of espresso powder to the cocoa-sugar mix intensifies the chocolate flavor without making it taste like coffee.
- Chocolate Ganache Drizzle: Melt ½ cup of chocolate chips with 2 tablespoons of cream and drizzle it over the chilled pie. It adds richness and looks stunning.
- Chocolate Curls: Use a vegetable peeler to create chocolate curls from a bar of chocolate. Sprinkle over whipped cream for a professional touch.
- Crushed Pecans or Toasted Coconut: Add texture by sprinkling nuts or coconut on top just before serving.
Dietary Adjustments
This pie is naturally nut-free but can also be modified for other dietary needs:
- Dairy-Free Option: Use plant-based milk like oat or almond. Substitute butter with a dairy-free spread. The texture will remain smooth, though the flavor will shift slightly.
- Gluten-Free Version: Swap all-purpose flour with a gluten-free baking blend and use a gluten-free crust option.
Presentation Tips
Sometimes the best part of a homemade pie is how beautiful it looks when served. A few simple tricks can elevate the presentation:
- Use a piping bag to swirl whipped cream around the edge.
- Serve slices on decorative plates and garnish with a dusting of cocoa or powdered sugar.
- Pair with a hot drink like coffee or tea to balance the richness of the chocolate.
With all these tweaks and enhancements, the soul of the old-fashioned chocolate pie stays intact — comforting, simple, and timeless.
Now that we’ve covered everything from ingredients to variations, let’s wrap up with a powerful conclusion and address some common questions about this beloved dessert.
Conclusion: Why This Pie Stands the Test of Time
Old-fashioned chocolate pie is more than a dessert. It’s a bite of tradition, a reminder of simpler times, and a guaranteed crowd-pleaser. With its creamy, rich chocolate filling and flaky crust, it offers a perfect balance of flavors and textures that never goes out of style.
This pie is versatile enough to suit any occasion — from family dinners to festive holidays. It’s easy to make with pantry staples and forgiving enough for beginner bakers. Whether you follow the classic method or add your own twist, the result is always indulgent and nostalgic.
Keep this recipe close and pass it down, because old-fashioned chocolate pie is one of those desserts that will always feel like home.