


Creamy, golden, and delicately sweet, honey pie is a comforting dessert that has stood the test of time. This luscious custard-based pie blends the natural sweetness of honey with a buttery, flaky crust to create a dessert that’s as nostalgic as it is satisfying. Whether you’re baking for a cozy family gathering or looking to impress guests with something unique yet simple, this honey pie recipe delivers that perfect blend of rustic charm and indulgent flavor.
In this article, we’ll walk through everything you need to know about making the perfect honey pie at home. You’ll learn how to prepare a foolproof crust, create a velvety-smooth honey custard, and bake it all to golden perfection. We’ll also include expert tips, topping ideas, and variations to keep things fresh. By the end, you’ll be ready to whip up this delicious dessert with confidence and flair.
Crafting the Perfect Pie Crust
Choosing Between Homemade and Store-Bought Dough
The first step in mastering this honey pie recipe is deciding on your pie crust. While a store-bought refrigerated dough will work in a pinch, making a homemade crust elevates the flavor and texture of your dessert. A flaky, buttery base pairs beautifully with the smooth honey filling, creating a well-balanced bite every time.
Homemade crusts give you more control over the thickness, richness, and even the shape of your pie. If time allows, opt for a traditional all-butter crust chilled thoroughly before baking. However, don’t hesitate to use a high-quality store-bought crust if you’re short on time. Just make sure it fits a standard 9-inch pie dish.
Rolling Out and Fitting the Dough
Start by lightly flouring your work surface and rolling out the dough to fit your dish. It should be about ⅛-inch thick, with enough overhang to form a decorative edge. Carefully lay the dough into the pie dish and press it gently into the corners, trimming any excess from the edges.
Fluting the edge with your fingertips not only adds a charming, rustic look but also helps prevent shrinkage during baking. Don’t forget to prick the base with a fork to allow steam to escape and prevent bubbles from forming.
Blind Baking to Ensure a Crisp Base
To avoid a soggy bottom—a common issue with custard pies—blind baking is essential. Line the crust with parchment paper and fill it with pie weights or dried beans. Bake at 350°F for 20 minutes. Then, remove the weights and parchment and return it to the oven for an additional 8 minutes.
Blind baking partially cooks the crust, giving it a head start before the custard is added. This ensures your base stays crisp even with the creamy filling.
Once baked, allow the crust to cool slightly if you’re prepping the custard right away. If you plan to bake the custard later, you can reheat the crust in a 375°F oven for 5 minutes before filling.
Print
Honey Pie Recipe
- Total Time: 3 hours 15 minutes
- Yield: 8 servings
- Diet: Vegetarian
Description
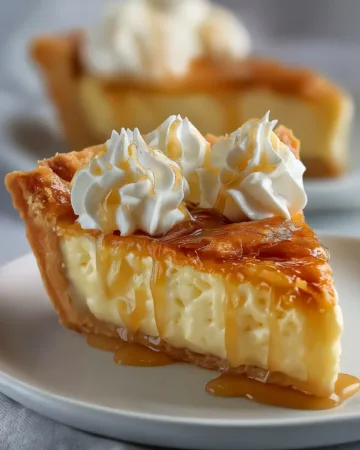
This honey pie recipe is creamy, silky, and infused with natural sweetness from pure honey. Baked into a buttery crust and topped with whipped cream and a drizzle of honey, it’s the perfect dessert for holidays or any cozy occasion.
Ingredients
½ homemade pie crust, or store-bought refrigerated pie dough
2 cups (480 ml) milk
1 cup (240 ml) heavy cream
3 large eggs
½ cup (170 g) pure honey
⅓ cup (73 g) light brown sugar, packed
⅓ cup (79 g) granulated sugar
3 tablespoons cornstarch
1 teaspoon vanilla extract
⅛ teaspoon salt
Whipped cream for garnish, optional
Honey for garnish, optional
Instructions
1. Prepare the pie crust according to the recipe and chill for at least 1 hour. You need only half the dough.
2. Preheat the oven to 350ºF.
3. On a lightly floured surface, roll the pie crust to fit a 9-inch pie dish. Place it in the pie dish and flute the edges. Prick the bottom with a fork.
4. Line the crust with parchment paper and fill with pie weights. Bake for 20 minutes.
5. Remove the weights and parchment, and bake for an additional 8 minutes.
6. Heat the milk and cream in a saucepan over medium-low heat until steaming.
7. In a bowl, whisk together eggs, honey, both sugars, cornstarch, vanilla, and salt.
8. Slowly drizzle the hot milk mixture into the egg mixture, whisking constantly to temper the eggs.
9. Return the mixture to the saucepan and cook over medium-low heat, stirring constantly, until the custard thickens and coats the spoon, about 8 minutes.
10. Increase the oven temperature to 375°F.
11. Strain the custard through a fine-mesh sieve into the warm pie crust.
12. Bake for 12–15 minutes, until the edges are set but the center is slightly jiggly.
13. Cool the pie completely on a wire rack for about 2 hours.
14. Serve at room temperature or chilled. Garnish with whipped cream and honey before serving if desired.
Notes
The pie crust can be baked ahead of time and stored. Rewarm it in a 375°F oven for 5 minutes before adding the custard.
Use mild honey for the best balance of flavor.
Allow the pie to cool completely for clean slices.
- Prep Time: 25 minutes
- Cook Time: 50 minutes
- Category: Pies
- Method: Baking
- Cuisine: American
Building the Silky Honey Custard Filling
Understanding the Role of Each Ingredient
The custard is the heart of any honey pie recipe, and each ingredient plays a crucial role in its texture, flavor, and structure. Here’s a breakdown of what you’ll need and why it matters:
- Milk and Heavy Cream: This duo forms the base of the custard, adding creaminess and body. The milk keeps it light, while the heavy cream brings richness and a luxurious mouthfeel.
- Eggs: Acting as the primary thickening agent, the eggs help the custard set into a smooth, sliceable filling. Whisking them well ensures a uniform texture throughout.
- Pure Honey: The star of the show. Honey brings a floral sweetness that is more nuanced than plain sugar. Using good-quality, mild honey will yield the best results.
- Brown Sugar and Granulated Sugar: These provide a touch of depth and structure. Brown sugar adds a hint of molasses, which pairs beautifully with the honey’s natural flavor.
- Cornstarch: This thickens the custard further, ensuring it holds together once sliced. It also prevents the eggs from curdling during cooking.
- Vanilla Extract and Salt: These two may be minor in volume but major in impact. Vanilla adds warmth and complexity, while salt balances the sweetness and brings all the flavors into harmony.
Heating and Combining the Mixture
Start by gently heating the milk and cream together in a medium saucepan over medium-low heat. You don’t want to boil it—just heat it until it’s steaming. This step warms the dairy so it blends smoothly with the egg mixture later.
While that’s heating, whisk the eggs, honey, both sugars, cornstarch, vanilla extract, and salt together in a medium bowl. The mixture should look smooth and slightly thick. Whisking thoroughly now helps prevent lumps and ensures the sugars start to dissolve into the eggs.
Tempering the Eggs for a Smooth Finish
Tempering is a key technique in custard-making. It means slowly adding the hot milk to the eggs while whisking constantly. This raises the temperature of the eggs gradually so they don’t scramble.
Start by drizzling a small amount of the warm milk mixture into the egg mixture while whisking continuously. Keep adding more in a slow, steady stream until it’s all combined. Once tempered, return the custard to the saucepan and cook over medium-low heat.
Stir constantly with a wooden spoon. You’ll notice the custard thickening after about 7 to 8 minutes. You’ll know it’s ready when it coats the back of the spoon and leaves a trail when you run your finger across it.
Straining the Custard for Ultimate Smoothness
For the silkiest texture, strain the cooked custard through a fine-mesh sieve directly into the prepared pie crust. This removes any bits of cooked egg or undissolved starch, leaving behind a perfectly smooth filling.
Baking the Honey Custard to Perfection
Adjusting the Oven Temperature for the Final Bake
After blind baking the crust and preparing your custard, the next step is to turn up the oven temperature. Increase the heat to 375°F, which is ideal for setting the custard without overcooking it. This higher temperature helps the filling firm up around the edges while allowing the center to remain tender and slightly jiggly—exactly what you want in a honey pie.
Pouring and Smoothing the Custard
Once your custard is strained and smooth, pour it gently into the still-warm crust. Using a spatula or back of a spoon, smooth out the top if needed to create an even layer. At this stage, be careful not to disturb the crust, which should be firmly in place from the earlier blind bake.
The custard should fill the crust nearly to the top, but leave about ¼ inch of space to prevent spills during baking.
Watching for Signs of Doneness
Bake the pie for 12 to 15 minutes. You’re not looking for a fully firm filling—just for the edges to be set and the center to have a gentle jiggle when you nudge the pan. This jiggle means the custard is cooked but still soft and creamy.
Overbaking can cause the custard to crack or develop a rubbery texture. To avoid this, begin checking at the 12-minute mark. If the center still appears liquid, give it a few more minutes but avoid baking it until firm.
Cooling for the Perfect Texture
Remove the pie from the oven and place it on a wire rack. It’s essential to let it cool completely, which takes about 2 hours at room temperature. This gradual cooling process helps the custard firm up and makes slicing easier later on.
Resist the temptation to cut into the pie too soon. While it may smell irresistible, slicing before it’s fully set can result in a runny filling. Once cooled, you can serve it right away or refrigerate it for a firmer texture and easier slicing.
Optional Garnishes for a Finishing Touch
Right before serving, consider adding a swirl of whipped cream or a light drizzle of honey over the top. These simple touches enhance both the presentation and flavor. The whipped cream adds a cool contrast to the rich custard, while a drizzle of honey ties the whole dessert together visually and tastefully.
Serving, Storing, and Savoring Honey Pie
Best Practices for Slicing and Serving
Once your honey pie has cooled completely, it’s ready to serve. For clean slices, use a sharp knife dipped in warm water, wiping it clean between each cut. This prevents the custard from sticking to the blade and ensures tidy, bakery-style wedges.
Serve each slice on a dessert plate, optionally topped with a dollop of whipped cream or a light drizzle of honey. These garnishes add a touch of elegance without overpowering the pie’s delicate sweetness.
This pie pairs beautifully with a cup of hot tea, a glass of cold milk, or even a splash of espresso. The mild floral notes from the honey and the richness of the custard are perfectly balanced, making each bite feel special.
How to Store Leftovers
Honey pie stores exceptionally well, making it a convenient make-ahead dessert. After it’s fully cooled, cover it loosely with plastic wrap or foil and refrigerate. It will keep for up to 3 days without losing texture or flavor.
For the best experience, let refrigerated slices sit at room temperature for about 15 minutes before serving. This takes the chill off and brings out the custard’s creamy consistency.
Avoid freezing, as the custard may separate or develop a grainy texture once thawed. Fresh is best, and this pie is usually gone long before storage becomes a concern.
Tips for Making Ahead
You can streamline your prep by baking the crust a day or two in advance. As noted earlier, if the crust has been chilled or stored at room temperature, reheat it in a 375°F oven for 5 minutes before adding the custard to ensure it’s crisp and ready to go.
Likewise, the entire pie can be made a day in advance. Simply store it in the fridge and garnish just before serving. This makes honey pie a perfect option for holidays, dinner parties, or any event where you want a low-stress dessert that still impresses.
When and Where to Serve Honey Pie
Honey pie fits seamlessly into both casual and formal occasions. It’s a standout option for:
- Thanksgiving and holiday spreads
- Spring brunches and tea parties
- Mother’s Day and family get-togethers
- Birthdays or potlucks
Its simple ingredients and homey appeal make it universally loved. Unlike heavier desserts, honey pie is light and satisfying, making it a pleasant finish to almost any meal.
Creative Variations and Flavor Twists
Adding Citrus for a Bright Note
A classic honey pie is delicious on its own, but adding a splash of citrus can elevate the flavor beautifully. Lemon or orange zest stirred into the custard adds a subtle brightness that balances the rich sweetness of the honey. About ½ teaspoon of fresh zest is enough to add complexity without overpowering the custard.
Alternatively, a squeeze of lemon juice in the whipped cream topping can provide a tangy contrast that wakes up the entire slice.
Infusing with Herbal or Floral Flavors
If you want a more sophisticated twist, try infusing the milk and cream mixture with herbs or edible flowers. Gently steeping lavender, rosemary, or chamomile while heating the dairy adds an earthy or floral depth that pairs beautifully with honey’s natural profile.
Strain out the solids before combining with the egg mixture to keep the texture smooth. This infusion technique is easy to execute and turns a traditional honey pie into something truly special.
Making It Nutty
For those who enjoy texture, consider sprinkling finely chopped toasted almonds, pecans, or walnuts on top of the pie before baking. Nuts bring a satisfying crunch and earthy richness that complements the silky custard.
Alternatively, you can mix about ¼ cup of ground nuts into the crust dough before rolling it out. This adds a nutty base that enhances every bite.
Using Spices to Create Warmth
Spices like cinnamon, nutmeg, or ginger can be incorporated into the custard for a warm, spiced variation. A pinch of any of these spices—no more than ¼ teaspoon—goes a long way in adding seasonal flair, especially during the cooler months.
You can even sprinkle a dusting of cinnamon on top of the finished pie or on the whipped cream for an eye-catching finish.
Mini Honey Pies for Individual Servings
For a party or special gathering, consider turning this recipe into mini pies using a muffin tin or individual tart pans. Adjust the baking time to account for the smaller size—blind bake the crusts for 12 minutes and bake the custard-filled pies for about 8 to 10 minutes.
Mini honey pies are not only adorable but also easy to serve without slicing, making them ideal for buffets, weddings, or baby showers.
Expert Baking Tips and Troubleshooting
Avoiding a Runny Custard
One of the most common issues with custard pies is a runny filling. If your honey pie doesn’t set properly, it’s usually due to one of two things—undercooking or insufficient thickening. To avoid this:
- Make sure the custard is cooked on the stovetop until thick before it even goes into the pie crust. It should coat the back of a spoon and leave a clean line when you swipe your finger across it.
- Don’t skip the cornstarch. Even a tablespoon less can affect the custard’s ability to firm up.
- Watch the oven bake time carefully. The custard should have set edges but still jiggle slightly in the center when done.
Letting the pie cool completely is also essential. It continues to firm as it cools, so don’t rush the process.
Preventing a Cracked Top
A cracked surface is usually a sign of overbaking. While the temptation to leave it in “just a few more minutes” is strong, remember that custard pies finish setting as they cool. To prevent cracks:
- Remove the pie from the oven while the center still has a gentle wobble.
- Don’t open the oven door too frequently while baking, as temperature swings can cause cracks.
If cracks do happen, don’t worry. A layer of whipped cream or honey drizzle will easily cover them and still look beautiful.
Keeping the Crust from Shrinking
Shrinking pie crusts are often due to dough that hasn’t rested or been properly chilled. To prevent this:
- Chill your crust for at least 1 hour before rolling it out.
- Once it’s in the pie dish, place it in the fridge for another 15 to 30 minutes before blind baking.
- Always use pie weights during the blind bake step to help maintain the crust’s shape.
How to Know When the Custard is Ready
Visual cues are key. You’re looking for:
- A set, golden edge that doesn’t move when you wiggle the dish.
- A slightly jiggly center, like set gelatin.
- A uniform golden color on the surface without browning too much.
The internal temperature of the pie should be around 170°F at the center if you’re using a kitchen thermometer.
Final Touches for a Polished Look
Once cooled, slice the pie with a sharp, clean knife and wipe between cuts. Add a swirl of whipped cream or a delicate drizzle of honey before serving. If you’re serving for guests, a few edible flowers or finely chopped nuts on top add visual appeal and texture.
Conclusion: A Sweet Slice of Homemade Comfort
Honey pie is a delightful dessert that marries simple ingredients with a smooth, custardy texture and warm, floral sweetness. With a buttery crust, silky filling, and optional garnishes that elevate without complicating, it’s a treat that feels both nostalgic and gourmet.
Whether you follow the recipe step-by-step or experiment with a few creative twists, honey pie is versatile enough to adapt to any occasion. From holiday tables to everyday cravings, it brings a comforting warmth that’s always welcome.
Now that you’re armed with expert tips, variations, and a foolproof recipe, it’s time to get baking. With its melt-in-your-mouth texture and golden sweetness, this honey pie might just become your new signature dessert.