If you’re looking for a rich, indulgent dessert that delivers a perfect balance of creamy, crunchy, sweet, and salty, the Daim cheesecake recipe is a dream come true. This no-bake treat combines the smoothness of a classic cheesecake with the irresistible crunch and toffee flavor of crushed Daim candies. It’s an ideal make-ahead dessert that will wow guests at gatherings, dinner parties, or even a casual weekend indulgence.
In this article, you’ll discover everything you need to know about preparing the perfect Daim cheesecake from scratch. We’ll guide you step-by-step through the cookie crust, the creamy filling, and the silky chocolate topping. You’ll also get expert tips on preparation, texture control, and presentation. Whether you’re a baking enthusiast or a newbie in the kitchen, this recipe is straightforward and rewarding.
Contents
Crafting the Perfect Daim Cookie Crust
Choosing the Right Base: Digestive or Graham Crackers?
The base of this Daim cheesecake starts with either Digestive biscuits or Graham crackers, both offering a slightly sweet, crumbly structure that balances out the rich filling. Digestive cookies have a more neutral flavor with a denser texture, while Graham crackers lean sweeter and lighter. Whichever you choose, the crust must be finely crushed and well-bound with melted butter for stability.
You’ll need:
- 250 grams of Digestive biscuits or Graham crackers
- 50 grams of crushed Daim bars (for that signature caramel crunch)
- 90 grams of melted butter
How to Blend and Bind for Structure
Start by finely blending the Digestive cookies until they resemble sand. Then, add in 50 grams of your previously crushed Daim candies. The butter is then introduced to moisten the mixture and allow it to bind well. Use a food processor or blend manually — just ensure all components are evenly mixed.
Next, prepare a 22 cm springform pan by lining the base and sides with parchment paper. Pour the crumb mixture into the pan and press it firmly using the base of a glass or flat cup. This helps create an even surface and ensures your crust stays intact during slicing.
Freezing the Base for Stability
Once pressed, freeze the crust while preparing the filling. This helps solidify the structure and makes it easier to spread the filling without disrupting the base. A frozen crust also contributes to the final chilled texture of the cheesecake, giving it a cleaner finish when sliced.
Print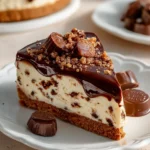
Daim Cheesecake Recipe
- Total Time: 8 hours 30 minutes
- Yield: 12 slices
- Diet: Vegetarian
Description
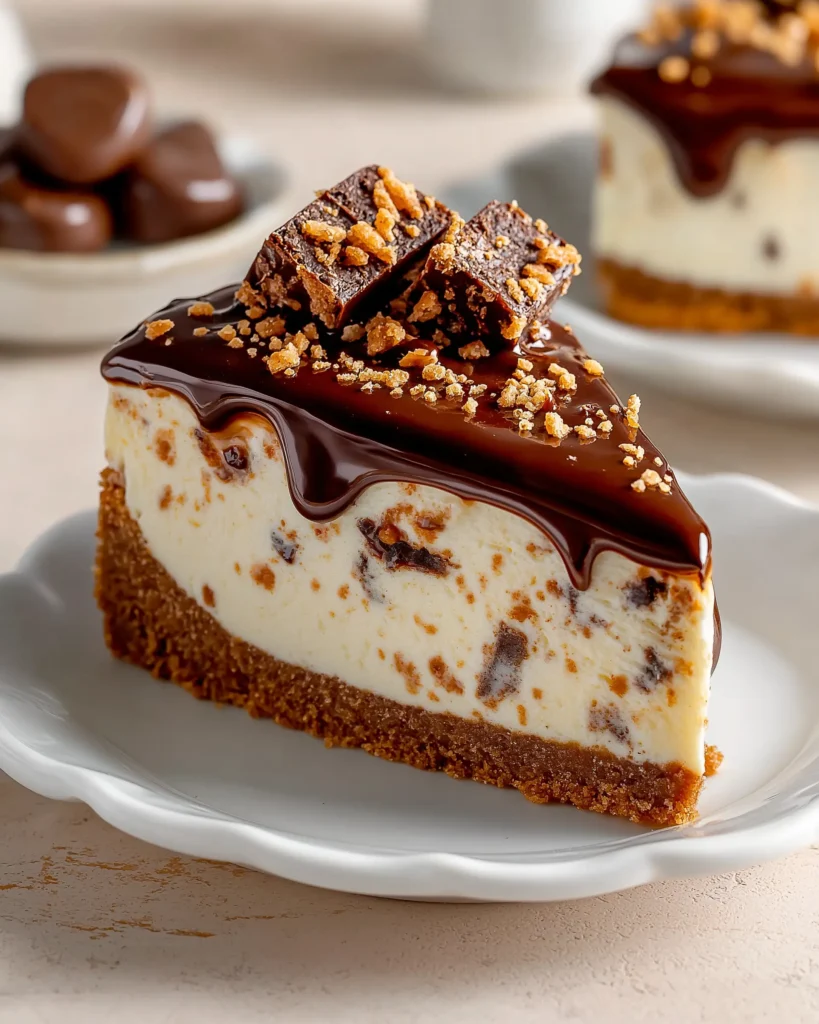
A no-bake Daim cheesecake recipe made with a crunchy cookie crust, a creamy caramel filling, and topped with milk chocolate and crushed Daim bars. Perfect for any celebration.
Ingredients
COOKIE CRUST:
250 g Digestive cookies or Graham Crackers
50 g Daim, blended
90 g butter, melted
CHEESECAKE FILLING:
400 g cream cheese
150 g Daim, blended
100 g powdered sugar
1 teaspoon vanilla extract
240 g heavy cream
TOPPING:
100 g milk chocolate
50 g heavy cream
18 Mini Daims for decoration
Instructions
1. Blend all Daim bars and set aside.
2. In a food processor, blend the cookies until finely crushed. Add 50 g of Daim and melted butter, then blend to combine.
3. Press the mixture into a lined 22 cm springform pan. Freeze while preparing the filling.
4. Whip the cream cheese until smooth. Add 150 g Daim, powdered sugar, and vanilla. Mix until well combined.
5. In a separate bowl, whip the heavy cream to stiff peaks.
6. Gently fold the whipped cream into the cream cheese mixture.
7. Pour filling over the crust and smooth the top. Cover and refrigerate for at least 8 hours.
8. Heat cream to a boil, pour over chopped milk chocolate, wait 2 minutes, then stir until smooth.
9. Spread ganache over chilled cheesecake.
10. Chop 18 Mini Daims and sprinkle around the edge.
11. Refrigerate until ready to serve. For clean slices, warm your knife under hot water and dry before slicing.
Notes
Make the cheesecake the night before for best results.
For a gluten-free version, use certified gluten-free biscuits and check Daim labels.
Avoid overwhipping the cream to prevent a grainy texture.
Always chill for 8+ hours to ensure a clean slice.
- Prep Time: 30 minutes
- Cook Time: 0 minutes
- Category: Cheesecake
- Method: No-Bake
- Cuisine: American
Making the Creamy Daim Cheesecake Filling
Whipping the Cream Cheese to Silky Perfection
The key to a smooth, luxurious Daim cheesecake lies in how well you treat the cream cheese. Start by using 400 grams of full-fat cream cheese. Let it sit at room temperature for 20–30 minutes before mixing. This softens it, making it easier to whip and incorporate other ingredients evenly.
Using a stand mixer or hand mixer with a whisk attachment, whip the cream cheese for about a minute until it becomes creamy and fluffy. This step helps prevent lumps and ensures a consistent texture throughout the cheesecake.
Infusing the Daim Flavor: Blended Candy Crunch
Next, add the remaining 150 grams of crushed Daim, 100 grams of powdered sugar, and 1 teaspoon of vanilla extract to the whipped cream cheese. Mix until smooth. The powdered sugar blends better than granulated sugar, ensuring no gritty texture. The vanilla extract enhances the toffee and caramel notes in the Daim without overpowering them.
Scrape the sides of the bowl frequently to make sure no cream cheese clings unblended. Mix slowly at this point to avoid overbeating, which can lead to a dense texture.
Folding in Whipped Cream for Airiness
In a separate clean bowl, whip 240 grams of cold heavy cream until stiff peaks form. You’ll know it’s ready when you can turn the bowl upside down without the whipped cream moving. Be careful not to overwhip — you want it stiff but still smooth, not clumpy or buttery.
Using a rubber spatula, gently fold the whipped cream into the cream cheese mixture. Don’t stir aggressively. Fold with smooth motions, going around the sides and cutting through the center, until fully combined. This folding process preserves the air in the whipped cream, giving your cheesecake a light, mousse-like texture.
Spreading and Chilling to Set
Once combined, pour the filling into the chilled crust. Use an offset spatula to spread it evenly, smoothing out the top. Tap the pan lightly on the counter to remove any air bubbles that might be trapped in the mixture.
Cover the cheesecake with plastic wrap or cling film, making sure it doesn’t touch the surface of the filling. Refrigerate for at least 8 hours, preferably overnight. This chilling time is essential for the cheesecake to set properly, creating a firm yet creamy consistency that slices cleanly.
Adding the Perfect Chocolate Topping
Creating a Smooth Chocolate Ganache
The topping is where your Daim cheesecake transforms from delicious to dazzling. We’re going with a simple milk chocolate ganache, which adds richness and a glossy finish that ties all the flavors together.
To make the ganache, you’ll need:
- 100 grams of milk chocolate
- 50 grams of heavy cream
Start by breaking or chopping the milk chocolate into small pieces and placing them in a heat-safe bowl. In a separate pan or microwave-safe cup, heat the heavy cream just until it begins to boil. Be careful not to overboil — you want it hot enough to melt the chocolate smoothly.
Pour the hot cream over the chocolate and let it sit undisturbed for two minutes. This resting period helps the heat from the cream gently melt the chocolate without needing to stir right away.
After the wait, gently stir the mixture in a circular motion from the center outward. In less than a minute, the chocolate and cream will come together into a velvety ganache. It should be thick, smooth, and glossy.
Pouring the Ganache for a Flawless Finish
Once your cheesecake has set in the fridge for at least 8 hours, remove it from the springform pan and transfer it to a serving dish or cake stand. Slowly pour the ganache over the center of the cheesecake and use a spatula to spread it out toward the edges. You can either let it cover the entire surface or stop just before the edges for a border effect.
The ganache will firm up slightly as it cools, creating a luscious chocolate layer that contrasts with the airy cheesecake filling underneath. It also acts as the perfect base for your final decoration — chopped mini Daim bars.
Decorating with Mini Daims
For the finishing touch, grab 18 mini Daim bars and roughly chop them into small bite-sized chunks. Sprinkle them generously around the edge of the cheesecake in a ring pattern. The bits will stick easily to the soft ganache and add that final layer of crunchy caramel delight.
You can chill the cake for another 30 minutes to let everything set or serve immediately if the ganache has firmed up.
Pro Tips for a Perfect Daim Cheesecake Every Time
Get the Texture Right with Proper Whipping
One of the most common cheesecake mistakes is over- or under-whipping the cream. For this Daim cheesecake recipe, whipping the heavy cream to stiff peaks is essential. If it’s too soft, the cheesecake won’t hold its shape. If it’s overwhipped, it becomes grainy and starts turning into butter. A good test? Lift your whisk, and if the peaks hold without curling or falling, you’re good to go.
Also, don’t skip softening your cream cheese. Cold cream cheese creates lumps that are hard to smooth out, leading to a gritty texture. Always let it come to room temperature first, then beat until creamy before adding other ingredients.
Use Quality Ingredients for Better Flavor
While Daim candies steal the spotlight, the other ingredients matter just as much. Choose a high-quality cream cheese, as it’s the main body of the filling. Full-fat versions give the best richness and structure. When selecting milk chocolate for the ganache, avoid baking chips, which often contain stabilizers. Use real milk chocolate bars for a smoother, glossier result.
Digestive biscuits or Graham crackers should be fresh and crisp. Stale cookies won’t create that crunchy, buttery base you’re aiming for. And don’t substitute margarine for butter — it changes both the flavor and texture of your crust.
The Importance of Chilling
No-bake cheesecakes rely on time in the fridge, not the oven. So patience is non-negotiable here. Once the cheesecake is assembled, it must chill for at least 8 hours. Overnight is best. This resting time allows the fat to solidify and the filling to set into a firm, sliceable consistency. Cutting it too early results in a messy, unstable texture.
If you’re making it for an event, prepare it the night before and store it chilled in the fridge until you’re ready to decorate and serve.
Cutting Clean, Professional Slices
A gorgeous cheesecake deserves a clean slice. To achieve those perfect cuts:
- Run a sharp knife under hot water, then dry it before slicing.
- Clean the knife between each slice to prevent smudging.
- Use a long, thin-bladed knife for better control.
These simple tips can make a homemade cheesecake look like it came straight from a bakery. Clean edges, creamy layers, and a professional presentation — every slice is a showstopper.
Serving, Storing, and Making Ahead
Serving Suggestions for the Best Experience
The Daim cheesecake is a rich and indulgent dessert, so serving it correctly helps elevate the entire eating experience. Once chilled and decorated, let the cheesecake sit at room temperature for 10 to 15 minutes before slicing. This short waiting period softens the texture slightly, allowing the creamy filling to shine through without being too firm or icy.
Each slice is already packed with sweet, buttery caramel and chocolate notes, so consider pairing it with simple accompaniments — a glass of cold milk, a cup of black coffee, or a plain herbal tea to cleanse the palate.
One cheesecake yields 12 slices, making it a great dessert for family dinners, holidays, or birthday celebrations.
How to Store Daim Cheesecake
This is a no-bake dessert, so proper storage is key to maintaining freshness and texture. Store the cheesecake in the refrigerator, covered with cling film or in an airtight container, for up to 5 days. Avoid storing it uncovered, as that can dry out the topping and cause the filling to absorb fridge odors.
If you want to prep ahead even further, this cheesecake freezes very well. Once fully set in the fridge:
- Remove it from the springform pan.
- Wrap it tightly in two layers of plastic wrap and one layer of foil.
- Freeze for up to 1 month.
To serve from frozen, let the cheesecake thaw in the fridge overnight, then decorate with the ganache and chopped Daims before serving. Avoid freezing the ganache topping, as the texture can become grainy once thawed.
Make-Ahead Tips for Events
Planning to serve this dessert at a special event or gathering? You’re in luck — this cheesecake is ideal for making ahead. Prepare the crust and filling the day before, let it chill overnight, and then add the ganache and topping a few hours before serving.
By splitting the steps, you reduce same-day kitchen stress and ensure the flavors have enough time to set and develop. Plus, decorating closer to serving time keeps the Daim topping crunchy instead of softening in the fridge.
Conclusion: Why This Daim Cheesecake Recipe Is a Must-Try
If you’re searching for the perfect no-bake dessert that combines creamy, crunchy, chocolatey, and caramel flavors all in one, this Daim cheesecake recipe is exactly what you need. With its buttery biscuit crust, velvety cheesecake filling infused with crushed Daim candies, and glossy milk chocolate ganache topping crowned with crunchy mini Daim pieces, it’s a full sensory experience in every bite.
This recipe is also incredibly beginner-friendly. No water baths, no baking stress, and no complicated techniques. It only requires a bit of patience while the cheesecake sets in the fridge. Whether you’re hosting a dinner party, planning a birthday surprise, or just treating yourself, this dessert stands out on any table.
Not only is it a crowd-pleaser, but it also stores and travels well. You can make it ahead, freeze it, or store leftovers for later indulgence. The presentation is just as impressive as the taste, making it ideal for both casual gatherings and special celebrations.
By following the tips and steps outlined above, your Daim cheesecake will come out perfectly every time. It’s rich without being overly heavy, indulgent but not cloying — and most importantly, it always leaves people asking for seconds.