If you’re craving a decadent, creamy dessert that doesn’t require an oven, this Mini No-Bake Kit Kat Cheesecakes Recipe is your dream come true. Made with layers of smooth dairy-free cream cheese, rich dark chocolate, and the satisfying crunch of Vegan Kit Kats, these mini cheesecakes strike the perfect balance between indulgence and ease.
Whether you’re new to vegan baking or a seasoned dessert lover looking for something effortless and impressive, this recipe offers all the joy of cheesecake without the stress of baking.
In this article, we’ll walk through the entire process step by step—from the crisp chocolate biscuit base to the luscious filling and that final swirl of chocolate cream. We’ll also provide essential tips on ingredients, consistency, and decoration that will make your no-bake creations stand out. By the end, you’ll know exactly how to create a dessert that’s both visually stunning and absolutely delicious.
Contents
- 1 Building the Perfect No-Bake Cheesecake Base
- 2 Mini No-Bake Kit Kat Cheesecakes Recipe
- 3 Creating the Creamiest Vegan Cheesecake Filling
- 4 Whipping Up the Perfect Chocolate Swirl Topping
- 5 Preparation, Storage, and Serving Tips for Flawless Results
- 6 Ingredient Substitutions and Dietary Flexibility
- 7 Presentation Ideas and Celebration-Worthy Serving Styles
- 8 Conclusion: Easy, Elegant, and Delicious Every Time
Building the Perfect No-Bake Cheesecake Base
Choosing the Right Biscuit Texture and Flavor
The base is the first flavor and texture that hits the palate, so getting it just right is essential. For this recipe, digestive biscuits offer a mildly sweet, crumbly structure that blends beautifully with cocoa powder and melted dairy-free butter. You want your biscuit mixture to resemble wet sand, able to hold its form when pressed between your fingers. This texture ensures your mini cheesecakes stay intact from start to finish.
Digestive biscuits are preferred for their balanced taste and texture, but if you’re feeling creative, graham crackers or oat biscuits can be swapped in. The key is to keep the flavor neutral so that the cheesecake filling and Kit Kat topping shine.
Step-by-Step Method for a Stable Crust
Once your ingredients are gathered-150g digestive biscuits, 1 tablespoon cocoa powder, and 50g dairy-free butter-it’s time to begin.
Start by melting the dairy-free butter over low heat. Avoid boiling. You just want it liquefied enough to mix smoothly with your crumbs. Once melted, combine it with the blended biscuits and cocoa powder. Stir until all crumbs are coated evenly. The mixture should cling together but not be overly wet.
Spoon approximately 50g of this mixture into each cheesecake mold or cookie cup tin. Compact it well using your hands or the back of a spoon. A firm press at this stage will ensure the base holds its shape during freezing and serving. Then, pop your crust-filled tins into the freezer while you prepare the luscious filling.
Pro Tips for Success
- Always chill the crust before adding the filling. This prevents sogginess.
- If your crust seems too dry, add a bit more melted butter one teaspoon at a time.
- Use a silicone mold or push-up tins for easy release later.
This foundational layer isn’t just a base-it’s the crunchy contrast that elevates every bite of these mini no-bake Kit Kat cheesecakes. Up next, we’ll explore the smooth, chocolate-infused filling that makes these little desserts so rich and memorable.
Print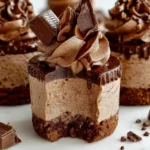
Mini No-Bake Kit Kat Cheesecakes Recipe
- Total Time: 4 hours
- Yield: 6-8 mini cheesecakes
- Diet: Vegan
Description
Creamy, rich, and fully dairy-free, these Mini No-Bake Kit Kat Cheesecakes are packed with chocolate, crunchy Kit Kats, and topped with a fluffy chocolate swirl. Perfect for any occasion, completely vegan, and no oven required.
Ingredients
Base:
150g digestive biscuits
1 tbsp cocoa powder
50g dairy-free butter or margarine
Filling:
260ml dairy-free whipping cream (Elmlea Plant-Based Double Cream)
160g dairy-free cream cheese
50g dairy-free dark chocolate (70%)
2 Vegan Kit Kats, roughly chopped
Extra Vegan Kit Kats for the sides
Chocolate Swirl:
100g dairy-free block butter
200g icing sugar
100g dairy-free dark chocolate (melted)
50ml aquafaba (chickpea brine)
Decoration:
Roughly chopped Vegan Kit Kats
Half Kit Kat for each cheesecake top
Instructions
1. Melt dairy-free butter over low heat, then remove from heat.
2. Blend biscuits and cocoa powder until fine crumbs.
3. Mix crumbs into melted butter until mixture resembles wet sand.
4. Press approx. 50g of mixture into each tin. Freeze while preparing filling.
5. In a bowl, whip dairy-free cream and cream cheese until thick.
6. Melt dark chocolate and let cool slightly, then fold into cream mixture.
7. Fold in chopped Kit Kats.
8. Cut extra Kit Kats in half and place around edges of each tin.
9. Pipe filling into center of each tin. Tap to level.
10. Freeze for 4 hours or overnight until firm.
11. Remove from freezer, allow to soften before serving.
12.
13. **Chocolate Swirl**
14. Whip butter until creamy.
15. Sift in icing sugar and mix until smooth.
16. Add aquafaba and melted chocolate. Whip until light and fluffy.
17. Pipe swirl on each cheesecake.
18. Decorate with chopped Kit Kats and a halved Kit Kat.
Notes
Let cheesecakes thaw slightly before serving for best texture.
Store in airtight container in fridge, enjoy within 3 days.
Use silicone molds or push-up tins for easy release.
- Prep Time: 5 minutes
- Cook Time: 0 minutes
- Category: Cheesecake
- Method: No-Bake
- Cuisine: American
Creating the Creamiest Vegan Cheesecake Filling
Selecting the Right Dairy-Free Creams and Cheeses
The magic of a cheesecake lies in its creamy, melt-in-your-mouth texture. For this Mini No-Bake Kit Kat Cheesecakes Recipe, using the right plant-based products ensures a silky filling without compromising on flavor or consistency.
Begin with 260ml of dairy-free whipping cream—Elmlea Plant Based Double Cream works wonderfully for this. Pair it with 160g of dairy-free cream cheese. The ideal dairy-free cream cheese should be thick and slightly tangy, mimicking traditional cream cheese. Avoid runny spreads as they might prevent the filling from setting properly.
Whip both the cream and cheese together using a stand mixer or hand whisk. Start slow to avoid splashing, then increase the speed. In about five minutes, the mixture should thicken significantly. You’re aiming for a firm, mousse-like texture that can hold shape when piped.
Infusing the Filling with Rich Dark Chocolate
Next comes the indulgent twist—dark chocolate. Melt 50g of high-quality dairy-free dark chocolate using a bain-marie. This method ensures gentle melting without scorching. Allow it to cool slightly before incorporating it into your whipped mixture.
Once added, whip briefly just to blend. The chocolate adds depth and richness, balancing the creaminess with a satisfying cocoa note. It also helps firm up the mixture slightly once chilled.
Adding Chopped Vegan Kit Kats for Crunch
To enhance both texture and flavor, fold in two roughly chopped Vegan Kit Kats. These pieces add delightful crunch and that unmistakable chocolate wafer taste throughout the filling.
Use a spatula to fold them in gently. Overmixing can break down the crunch or deflate the whipped mixture. Your goal is even distribution without compromising the lightness.
Assembly and Layering: Kit Kat Rings and Piping Technique
Before filling your tins, take a moment to prepare the Kit Kat border. Cut additional Vegan Kit Kats in half and stand five halves upright around the inner rim of each mold or tin. These chocolate-covered wafers will become a decorative edge and a delicious crunch with every bite.
Now, transfer your filling into a piping bag fitted with a large round nozzle. Pipe the mixture into the center of each tin, letting it spread naturally and fill the gaps between the Kit Kats. Tap the tin gently against the counter to settle the mixture evenly.
This step is where presentation meets texture. Not only do the piped cheesecakes look professional, but the technique also helps remove air pockets for a smoother final product.
Chilling Time: Patience Makes Perfect
Place your assembled cheesecakes into the freezer for at least four hours, preferably overnight. The chill time allows the filling to firm up and makes removal from the molds much easier.
For best results, let the cheesecakes sit at room temperature for about 30 minutes or in the fridge for 1 to 2 hours before serving. This brings them to the perfect creamy texture—firm but not frozen.
The filling is where richness and texture unite. Next up, we’ll focus on the third component that takes this dessert over the top: the chocolate swirl topping.
Whipping Up the Perfect Chocolate Swirl Topping
Creating a Fluffy Vegan Chocolate Swiss Meringue Buttercream
The finishing touch on these Mini No-Bake Kit Kat Cheesecakes is a gorgeous swirl of chocolate buttercream. But not just any buttercream—this one is airy, light, and 100% dairy-free. The result? A rich, chocolatey crown that melts in your mouth and looks professionally piped.
Start with 100g of dairy-free block butter. The block-style gives structure and stability compared to tub spreads. Whip the butter on high speed until it becomes light and creamy. This usually takes about two minutes and lays the foundation for the buttercream’s smooth texture.
Next, sift in 200g of icing sugar gradually while continuing to whip. Sifting helps avoid lumps and gives the buttercream a velvety finish. Whip the mixture for a few more minutes until it becomes thick, pale, and smooth.
Incorporating Aquafaba and Melted Chocolate
The star ingredient in this vegan meringue-style buttercream is aquafaba—the viscous liquid found in a can of chickpeas. You’ll need 50ml. It works like egg whites, adding structure and airiness.
In a separate bowl, melt 100g of dairy-free dark chocolate and allow it to cool slightly. Then, add both the melted chocolate and aquafaba into your whipped mixture. Whip again for about five minutes, or until the buttercream becomes glossy and holds soft peaks.
Be careful not to over-whip. If the mixture turns runny, don’t panic. Simply add more icing sugar, a tablespoon at a time, until the desired consistency returns. Conversely, if it’s too stiff, a tiny splash of aquafaba can loosen it up.
Piping the Chocolate Swirl Like a Pro
Once the buttercream is perfectly whipped, transfer it into a piping bag fitted with an open star tip nozzle. This nozzle shape gives you those beautiful, café-style swirls that sit proudly on top of each mini cheesecake.
Pipe a generous swirl onto each chilled cheesecake, starting from the outer edge and moving inwards. Don’t worry about perfection—each one will have its own charm. The key is to maintain even pressure and go slow.
Finishing Touch: Kit Kat Garnish and Visual Appeal
To elevate the visual and textural appeal, decorate each cheesecake with extra Vegan Kit Kat pieces. Sprinkle a few chopped pieces around the buttercream swirl and top it off with half a Kit Kat standing upright or tilted artistically.
These finishing touches add that irresistible crunch and chocolatey allure that makes these mini cheesecakes hard to resist. The swirl isn’t just for show—it provides another layer of flavor and contrast against the cool, dense filling below.
In the next part, we’ll explore preparation and storage tips that ensure your cheesecakes remain fresh, flavorful, and presentation-ready every time you serve them.
Preparation, Storage, and Serving Tips for Flawless Results
Make-Ahead Strategy for Stress-Free Entertaining
One of the best things about this Mini No-Bake Kit Kat Cheesecakes Recipe is how well it fits into a make-ahead routine. With no baking required, you can prepare these entirely in advance and store them until you’re ready to wow your guests—or simply indulge yourself.
Ideally, prepare the cheesecakes the day before you plan to serve them. Once the piped filling is in the molds, freeze them overnight. This ensures they become firm enough to hold their shape when removed, especially if you’re using push-up tins or silicone molds.
The next day, simply transfer them from the freezer to the fridge about one to two hours before serving. This gradual defrosting brings the texture to that perfect, creamy consistency while keeping the Kit Kats crisp.
How to Store Vegan Mini Cheesecakes the Right Way
Once decorated, store your mini cheesecakes in an airtight container in the fridge. The key is to keep them cold but not frozen after their initial set. They’ll stay fresh and firm for up to 3 days, retaining both texture and taste.
Avoid stacking them or placing anything heavy on top. Because they’re topped with delicate chocolate buttercream and a Kit Kat garnish, gentle handling is a must. If transporting, use a container with separate compartments or parchment between each dessert.
Keep them away from direct sunlight or warm environments for long periods. Even though they’re firm, dairy-free fillings soften more quickly than traditional ones.
Serving Suggestions and Creative Presentation
For serving, a chilled dessert plate is ideal. The moment you place these little masterpieces down, the contrast of cool cheesecake against a crisp plate adds an elegant touch. If you’re serving guests, consider placing each cheesecake in a cupcake liner or on a mini dessert pedestal for added charm.
Drizzle a light line of melted dark chocolate on the plate for a restaurant-style presentation, or dust with a pinch of cocoa powder to highlight the chocolate notes. But remember, these mini cheesecakes already look and taste amazing on their own.
Pair them with a glass of cold almond milk or a scoop of dairy-free vanilla ice cream to create a mini dessert trio. The balance of textures and temperatures takes the tasting experience to a whole new level.
Ingredient Substitutions and Dietary Flexibility
Making It Nut-Free, Soy-Free, or Gluten-Free
This Mini No-Bake Kit Kat Cheesecakes Recipe already caters to a dairy-free and vegan lifestyle, but it can easily be adapted further for other dietary needs. Whether you’re avoiding nuts, soy, or gluten, thoughtful substitutions can make this dessert inclusive without sacrificing flavor or texture.
To make it nut-free, ensure that the dairy-free butter and cream cheese are nut-free versions. Some brands use cashews or almonds in their formulas, so look closely at labels. Opt for coconut oil-based or soy-based alternatives if safe for the individual.
For a soy-free version, choose dairy-free products labeled as soy-free, such as oat-based cream cheese or coconut-based alternatives. Be mindful of the Kit Kat alternatives you use as well, as some vegan versions may contain soy lecithin. Choose chocolate bars that are explicitly soy-free or make your own chocolate-covered wafers at home.
To go gluten-free, simply swap out the digestive biscuits for gluten-free biscuits or cookies. Many gluten-free brands offer options that mimic the flavor and texture of traditional digestives. Make sure the Vegan Kit Kats or their substitutes are also certified gluten-free.
Substituting Key Ingredients Without Losing Texture
If you can’t find Elmlea Plant-Based Double Cream, you can use another high-fat, dairy-free whipping cream. Coconut cream works if you chill it beforehand and scoop only the solid part. However, it will add a coconut undertone to the final flavor.
Instead of standard Vegan Kit Kats, use any vegan-friendly chocolate wafer bars available in your region. Make sure they’re crisp and sturdy, as softer bars may dissolve into the filling.
Aquafaba, which comes from a can of chickpeas, can be replaced with other bean brines like cannellini or white bean water if needed. Just ensure it’s unsalted and thick enough to whip. You can also reduce it over low heat to concentrate it.
Customizing the Chocolate Intensity and Sweetness
This recipe leans into the rich, bittersweet notes of dark chocolate, which balances the sweetness of the filling and Kit Kats. However, if you prefer a milder chocolate flavor, you can use a semi-sweet vegan chocolate instead of the 70% dark chocolate. Just be aware that this may slightly affect the firmness of the filling and swirl.
To adjust the sweetness level, increase or reduce the icing sugar in the buttercream to taste. For a healthier twist, consider using powdered coconut sugar or a sugar substitute designed for baking.
Adding Natural Flavors and Enhancements
Want to add your own flair? Stir in a dash of pure vanilla extract or a sprinkle of instant coffee granules into the melted chocolate before folding it into the filling. This deepens the flavor and complements the chocolate layers beautifully.
You could also add a bit of citrus zest—like orange or lemon—for a refreshing note that contrasts the rich chocolate. Just keep these flavors subtle so they don’t overpower the creamy base and chocolatey crunch.
Presentation Ideas and Celebration-Worthy Serving Styles
Turning Simple Cheesecakes into Party Showstoppers
While this Mini No-Bake Kit Kat Cheesecakes Recipe is perfect for everyday treats, it’s also a stellar choice for parties, birthdays, or holiday gatherings. Their mini size makes them ideal for sharing, and the layered look with Kit Kat borders and chocolate swirls is already eye-catching. But with just a few extra touches, you can elevate these into centerpiece-worthy desserts.
Use individual mini dessert stands or clear glass domes to showcase each cheesecake. Their neat size and structure hold up beautifully on tiered dessert trays too. Adding small name tags or flavor labels can also personalize them for themed events or weddings.
For an elegant event, serve each cheesecake on a white plate with a light dusting of cocoa powder or powdered sugar. Add a mint leaf or an edible flower next to the chocolate swirl for a pop of color that enhances visual appeal.
Fun Decorating Ideas for Kids and Themed Occasions
For birthdays or kids’ parties, this recipe opens the door to tons of creative options. Try using colorful vegan sprinkles, edible glitter, or mini vegan marshmallows to jazz up the swirl. The key is to keep the toppings light so they don’t weigh down the buttercream.
You can also shape the Kit Kat toppings differently—cut them into fun shapes using a sharp knife or alternate them with other vegan wafer candies in various colors for a festive effect.
Another fun idea is to create seasonal themes. For Halloween, add spooky toppers or orange and black sprinkles. At Christmas, dust with edible gold or crushed peppermint candies. For Valentine’s Day, heart-shaped vegan chocolates add the perfect touch.
Customizing Sizes for Different Events
Although this recipe makes mini cheesecakes, you can easily scale it up or down. For bite-sized treats, use mini cupcake molds and adjust the biscuit base to about 25g per mold. These become one-bite wonders that are perfect for buffet tables or dessert samplers.
On the flip side, if you want to create a show-stopping centerpiece, triple the recipe and use a large springform pan lined with Kit Kats around the sides. The freezing time will need to be extended, but the result will be a full-sized no-bake cheesecake that slices beautifully.
Packaging and Gifting Ideas
If you’re making these as gifts, consider placing each cheesecake into a small paper cupcake box or wrapping the base with parchment and ribbon. Label each one with ingredients and storage instructions for an extra thoughtful touch.
Use recyclable containers with secure lids if transporting to avoid smudging the chocolate swirl. Always keep them cool, especially during warm weather or long commutes.
Conclusion: Easy, Elegant, and Delicious Every Time
This Mini No-Bake Kit Kat Cheesecakes Recipe blends irresistible flavor with no-fuss preparation. It’s proof that desserts don’t have to be baked to be decadent. With a crunchy chocolate biscuit base, silky whipped filling, bold chocolate notes, and that iconic Kit Kat crunch, these mini treats deliver both comfort and flair.
Whether you’re hosting a celebration, surprising your family with a fun treat, or indulging in a solo dessert night, this recipe has you covered. Plus, its adaptability makes it perfect for a wide range of diets and occasions.
With just a few simple ingredients, a bit of creativity, and zero oven time, you’ll have an elegant vegan dessert that tastes as amazing as it looks.