There’s something magical about the combination of coffee and cheesecake. It’s where smooth, velvety creaminess meets the bold, deep flavor of espresso. This coffee cheesecake recipe is the perfect indulgence for dessert lovers who crave a rich, cafe-inspired treat. Whether you’re hosting a cozy dinner party, celebrating a special occasion, or simply enjoying a quiet night in, this dessert offers the perfect balance of texture and taste.
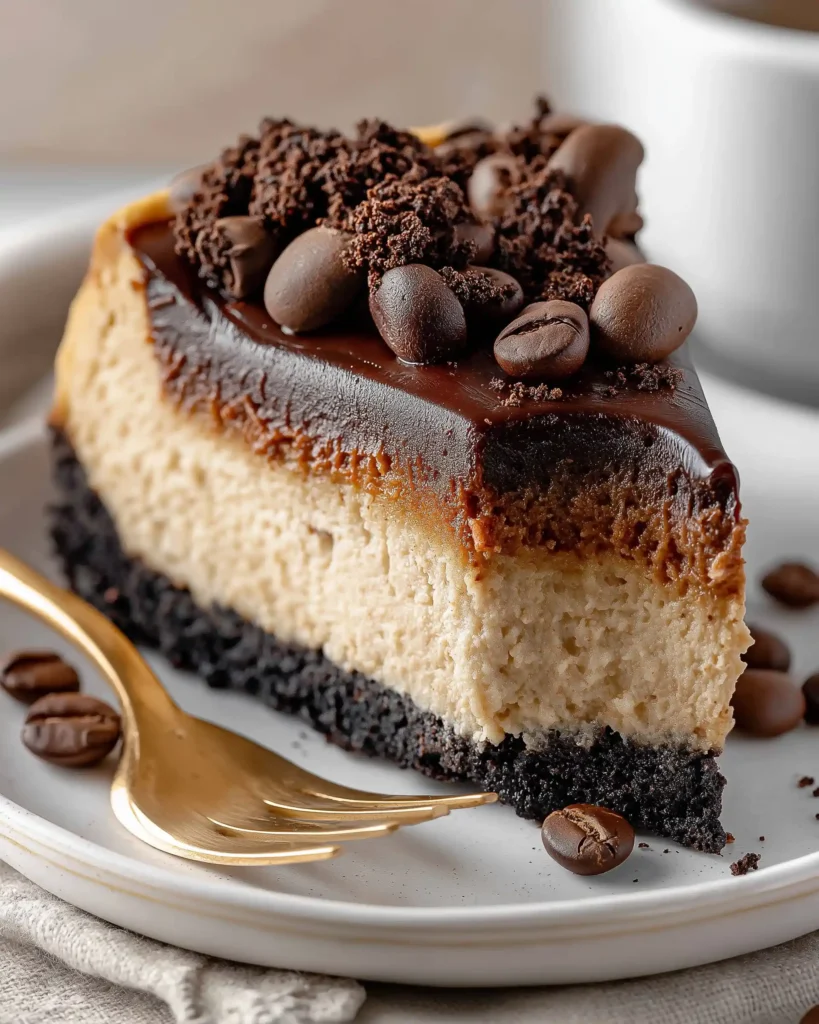
Made with a crunchy Oreo-espresso crust, a creamy coffee-infused cheesecake filling, and a luscious chocolate ganache topping, this recipe brings together classic and modern elements in every slice. It’s designed to be baked in a simple loaf pan, making it ideal for smaller gatherings or personal indulgence. In the following sections, we’ll guide you step-by-step through each component of the recipe. From preparing the crust to perfecting the chocolate topping, we’ve got all the essential tips and techniques you need to make a flawless coffee cheesecake.
Contents
- 1 Crafting the Perfect Espresso Oreo Crust
- 2 Coffee Cheesecake Recipe
- 3 Mixing a Creamy, Coffee-Infused Cheesecake Filling
- 4 Baking and Cooling the Cheesecake to Perfection
- 5 Preparing the Luxurious Chocolate Ganache Topping
- 6 Presentation and Serving Suggestions for the Best Coffee Cheesecake Experience
- 7 Conclusion: A Slice of Coffee Bliss in Every Bite
Crafting the Perfect Espresso Oreo Crust
Choosing the Right Cookie Base for Maximum Flavor
To build a cheesecake that holds together beautifully and delivers a satisfying bite, you need a firm and flavorful crust. For this recipe, we use whole Oreo cookies. The chocolate cookies combined with the espresso powder create a slightly bitter edge that pairs wonderfully with the sweet cheesecake filling. You don’t need to remove the filling from the cookies; it helps bind the crust and adds a creamy texture.
When crushing the Oreos, you can use a food processor to achieve a fine crumb texture. If you prefer a more rustic, slightly chunkier texture, a rolling pin and plastic bag will do the job. Either way, the key is consistency. Uneven crumbs can lead to an uneven crust, and that can affect how the cheesecake sets.
Blending Espresso and Butter for a Firm Yet Smooth Base
Once your cookies are crushed, add ½ teaspoon of instant espresso powder to enhance the flavor. Espresso powder deepens the chocolate notes and introduces that classic coffee aroma that ties the entire dessert together. Then, stir in 3 tablespoons of melted unsalted butter. The butter acts as the glue, binding the ingredients together while adding a rich, toasty flavor once baked.
The crust mixture will be thick and paste-like. That’s exactly what you want. It should hold its shape when pressed into the pan but still be soft enough to spread easily. Use the back of a spoon or the bottom of a glass to press it evenly across the base of your parchment-lined loaf pan. Make sure the layer is firm and level, which provides a stable foundation for the filling and ensures uniform baking.
Print
Coffee Cheesecake Recipe
- Total Time: 4 hours 45 minutes
- Yield: 6
- Diet: Vegetarian
Description
This creamy, rich coffee cheesecake recipe is layered with a bold espresso Oreo crust, a smooth coffee-infused filling, and a luscious chocolate ganache topping. The perfect dessert for coffee lovers!
Ingredients
For the crust:
14 whole Oreos
1/2 teaspoon instant espresso powder
3 tablespoons unsalted butter, melted
For the cheesecake filling:
2 (8-ounce) packages cream cheese, at room temperature
1/2 cup sugar
1 teaspoon vanilla extract
1 tablespoon instant espresso powder
1 large egg, at room temperature
For the topping:
1 cup chocolate chips
1 cup heavy cream
Instructions
1. Preheat the oven to 300°F. Line a 9 x 5 x 3-inch loaf pan with parchment paper on the two long sides and lightly oil the exposed sides.
2. Crush the Oreos in a food processor or in a bag using a rolling pin. In a bowl, combine crushed cookies, espresso powder, and melted butter. Press firmly into the bottom of the loaf pan.
3. In a mixing bowl, beat the cream cheese and sugar with an electric mixer until smooth and fluffy.
4. Dissolve espresso powder in 1 tablespoon of warm water. Add to cream cheese mixture along with vanilla. Mix until combined.
5. Add the egg and mix just until incorporated—do not overmix.
6. Pour the batter over the crust and bake for 30–35 minutes, or until the center is set and a toothpick comes out mostly clean.
7. Cool cheesecake slowly near the oven, then refrigerate for at least 4 hours.
8. Heat the heavy cream until simmering. Pour it over chocolate chips in a bowl, let sit for 1 minute, then stir until smooth.
9. Spread ganache over chilled cheesecake. Chill briefly to set the topping. Slice and serve.
Notes
Let cream cheese and egg come to room temperature before mixing.
Do not overbake the cheesecake-check doneness with a toothpick.
Cool gradually to avoid cracks on the surface.
Use hot water and a clean knife for perfect slices.
- Prep Time: 15 minutes
- Cook Time: 30 minutes
- Category: Cheesecake
- Method: Baking
- Cuisine: American
Mixing a Creamy, Coffee-Infused Cheesecake Filling
Bringing Cream Cheese to the Right Texture
A smooth, creamy filling is the heart of every great cheesecake. To achieve the perfect texture, start with two 8-ounce blocks of full-fat cream cheese at room temperature. Room temperature is key. Cold cream cheese tends to clump when beaten, leading to a lumpy batter that doesn’t bake evenly. Let it sit out for at least 30–60 minutes before mixing.
Place the cream cheese in a mixing bowl and beat it on medium speed using an electric mixer. Once it begins to soften, gradually add ½ cup of granulated sugar. Continue to beat the mixture until it becomes light and fluffy. This process typically takes 2 to 3 minutes and ensures a smooth texture that sets beautifully in the oven.
Flavoring with Vanilla and Espresso
After the cream cheese and sugar are well combined, it’s time to infuse the cheesecake with flavor. Stir in 1 teaspoon of vanilla extract, which adds warmth and balances the richness of the cream cheese.
Next comes the star of the show: 1 tablespoon of instant espresso powder, dissolved in 1 tablespoon of warm water. Dissolving the espresso first is essential, as it ensures a smooth distribution throughout the batter without clumps. When added to the mixture, the espresso brings a deep, roasted coffee flavor that enhances the creaminess without overpowering it.
Mix until everything is fully incorporated, but don’t overbeat. Overmixing at this stage can introduce too much air, which often causes cracks during baking.
Adding the Egg for Structure
Now it’s time to incorporate the final ingredient: 1 large egg at room temperature. Add it to the mixture and beat just until it disappears into the batter. This step is delicate. Overmixing after adding the egg can lead to air bubbles, which rise to the top during baking and cause unsightly cracks.
Once your batter is smooth and evenly mixed, you’re ready to pour it over the crust in the loaf pan. Use a spatula to spread the filling evenly and smooth out the surface. At this stage, your cheesecake is ready for the oven.
Baking and Cooling the Cheesecake to Perfection
Baking at a Low, Gentle Temperature
One of the most important elements in achieving a flawless cheesecake is temperature control. This recipe calls for baking at 300°F, which is significantly lower than standard cake recipes. The lower heat allows the cheesecake to bake gently and evenly, reducing the risk of cracking, browning, or drying out.
After pouring the espresso-infused filling over the crust in the prepared loaf pan, place the pan on the middle rack of your preheated oven. Bake for 30 to 35 minutes, keeping a close eye during the last 5 minutes. You’ll know it’s ready when the entire surface is set, with no jiggle in the center, and a toothpick inserted in the center comes out mostly clean-just a few moist crumbs are fine, but there should be no wet batter.
Monitoring for Signs of Doneness
It’s tempting to open the oven door often, but resist the urge. Sudden temperature shifts can cause cracks. If you must check for doneness, open the oven gently and briefly. The edges should look slightly puffed, while the center remains flat and even in color.
One common mistake is overbaking. Cheesecakes continue to set as they cool, so removing it slightly early can actually be a good thing. Once baked to perfection, turn off the oven and let the cheesecake cool inside with the door cracked open. This slow transition helps the structure stabilize and reduces the risk of surface cracking due to rapid cooling.
Chilling for Ideal Texture and Flavor
After the cheesecake reaches room temperature, transfer it to the refrigerator for at least 4 hours, preferably overnight. This step is essential, as chilling not only improves the texture but also deepens the flavor. The espresso and chocolate notes mellow and blend, making each bite smoother and more indulgent.
Preparing the Luxurious Chocolate Ganache Topping
Heating the Cream Gently for a Silky Base
The final touch to this coffee cheesecake recipe is a smooth, rich chocolate ganache topping. Ganache may sound fancy, but it’s surprisingly simple to make. You only need two ingredients: heavy cream and chocolate chips. The key lies in technique.
Start by pouring 1 cup of heavy cream into a small saucepan. Set it over low to medium heat and let it come to a gentle simmer. Do not let it boil. Boiling cream can separate or scorch, resulting in a grainy texture. You’re aiming for small bubbles around the edge of the pan and steam rising from the surface.
While the cream is heating, place 1 cup of chocolate chips in a heatproof bowl. You can use semisweet or dark chocolate depending on your preference. Semisweet offers a nice balance to the coffee cheesecake, giving it a classic dessert profile without being overly bitter.
Combining Chocolate and Cream to Create Ganache
Once the cream is hot, immediately pour it over the chocolate chips. Let the mixture sit undisturbed for 1 minute. This step softens the chocolate gradually, allowing it to melt evenly without the need for direct heat. After a minute, use a whisk or rubber spatula to stir the mixture slowly from the center outward. You’ll notice the chocolate and cream start to blend into a glossy, thick ganache.
If you see small unmelted chunks, keep whisking gently. Avoid overmixing, which can introduce air and create bubbles in the smooth finish. The final ganache should be shiny, pourable, and free from lumps.
Spreading the Ganache Over the Cheesecake
Now comes the most satisfying part—topping the cheesecake. Remove the chilled cheesecake from the refrigerator and gently spread the ganache over the surface using an offset spatula or the back of a spoon. Make sure it covers the top completely in a smooth layer. You can allow a bit to drip over the edges for a rustic look, or keep it neat for a clean finish.
Once covered, chill the cheesecake again for about 15 to 20 minutes to allow the ganache to set slightly. This will give it a glossy finish and a firmer texture for slicing. At this stage, your coffee cheesecake is almost ready to serve, but let’s enhance your experience even more in Part 5 with presentation tips and serving suggestions.
Presentation and Serving Suggestions for the Best Coffee Cheesecake Experience
Slicing for Clean, Professional Results
Now that your coffee cheesecake is fully assembled and chilled, it’s time to slice and serve. A clean cut makes a world of difference when presenting this rich dessert. To achieve bakery-style slices, use a sharp knife dipped in hot water, and wipe the blade clean between each cut. This keeps the slices neat and prevents the ganache or filling from dragging.
Because the cheesecake is made in a loaf pan, it naturally forms rectangular slices that look elegant on a plate. If you’re serving at a dinner party or for a special occasion, you can even trim the ends slightly for an extra polished appearance.
Pairing with Complementary Flavors
This dessert is full of bold, deep flavors from coffee and chocolate. To highlight its richness, consider serving it with light, simple accompaniments. A dollop of unsweetened whipped cream or a few fresh berries can offer balance without competing for attention. A sprinkle of finely grated chocolate or cocoa powder just before serving adds a touch of flair and ties in the ganache topping beautifully.
While some may be tempted to serve this with a sweet drink, the cheesecake truly shines on its own. Let its espresso-laced filling and smooth chocolate ganache take center stage.
Best Occasions for Serving Coffee Cheesecake
This coffee cheesecake recipe is wonderfully versatile. It’s rich and satisfying enough to serve on holidays like Thanksgiving or Christmas, yet simple and elegant for more intimate occasions like birthdays or anniversaries. Because it sets in a loaf pan, it’s also a perfect small-batch dessert for when you want something indulgent without overwhelming leftovers.
Its balance of textures—from the firm Oreo crust to the creamy filling and glossy topping—makes every bite memorable. And for anyone who loves the taste of a creamy latte or mocha, this cheesecake is sure to become a go-to dessert.
Conclusion: A Slice of Coffee Bliss in Every Bite
This coffee cheesecake recipe brings together the bold richness of espresso, the smooth creaminess of cheesecake, and the decadence of a silky chocolate topping—all layered over a perfectly textured Oreo crust. It’s a dessert designed not just to impress but to truly satisfy, making it ideal for any coffee lover or cheesecake enthusiast.
From the careful blending of cream cheese and espresso to the precision of low-temperature baking and the glossy ganache finish, every step in this recipe was crafted with flavor and texture in mind. You’ve learned how to build each layer, avoid common cheesecake pitfalls, and even store or freeze it for later indulgence. Whether you’re preparing it as a gift, a party centerpiece, or a personal treat, this cheesecake offers a beautiful balance of deep coffee notes and creamy sweetness.