If you’re in the mood for something refreshingly tart and sweet yet completely gluten free, you’re in for a treat. This raspberry curd lemon cookies recipe (gluten free) combines the brightness of citrus with the richness of homemade raspberry curd. Perfectly soft lemon cookies cradle a jewel-like center of raspberry curd, making these cookies not only delicious but also visually stunning.
Gluten free baking can be tricky, but this recipe simplifies the process without sacrificing flavor or texture. From preparing the fruit curd to baking the cookies to perfection, we’ll walk through each essential step in a straightforward, no-fuss way.
These cookies are perfect for weekend baking, special occasions, or simply treating yourself to something special. Whether you’re gluten sensitive or just looking for a new twist on classic cookies, this guide will show you how to get amazing results every time.
Ingredients for Raspberry Curd Lemon Cookies Recipe (Gluten Free)
Essential ingredients for raspberry curd
To create the rich, tangy center for these cookies, we start with a simple but flavorful homemade raspberry curd. This luscious filling sets the tone for the entire recipe and adds a vibrant, fruity contrast to the zesty lemon base.
- Fresh or frozen raspberries (150 g or 1¼ cups)
These provide the base flavor for the curd. Frozen berries work just as well as fresh ones, especially when raspberries are out of season. - Freshly squeezed lemon juice (30 g or 2 tablespoons)
Enhances the tartness of the berries and balances the sugar. - Sugar (75 g or a little over ¼ cup)
Caster sugar or granulated sugar works best for a smooth curd texture. - Egg + egg yolk
One whole egg and one extra yolk (room temperature) help thicken the curd and add richness. - Salt (¼ teaspoon)
A small amount boosts flavor and rounds out the acidity. - Unsalted butter (55 g or ½ stick)
Butter adds creaminess and helps the curd firm up once chilled. - Vanilla bean paste or extract
A touch of vanilla smooths out the tart flavors and adds depth.
These ingredients work together to make a curd that’s tangy, rich, and spreadable. The trick is cooking the mixture gently and with care to avoid curdling while still achieving that silky finish.
Key ingredients for lemon cookie dough
The cookie base of this recipe is equally important. Soft, chewy, and packed with citrus aroma, these gluten free lemon cookies are the perfect match for raspberry curd.
- Caster or granulated sugar (150 g or ¾ cup)
Sweetens the cookies and helps create a slightly crisp exterior. - Lemon zest from two lemons
This adds powerful natural flavor. Organic, unwaxed lemons are preferred for a more vibrant taste. - Melted unsalted butter (115 g or 1 stick)
Butter provides richness and helps make the dough soft and tender. - Eggs (2 large, room temperature)
Bind the dough and add structure. - Fresh lemon juice (30 g or 2 tablespoons)
Reinforces the lemon flavor and keeps the cookies moist. - Vanilla bean paste or extract
A small amount enhances the sweetness without overpowering the lemon. - Plain gluten free flour blend (240 g or 2 cups)
A blend without xanthan gum is ideal. You can also mix your own for full control over the texture. - Xanthan gum (½ teaspoon)
If your flour doesn’t already include it, this ingredient mimics gluten and improves cookie structure. - Baking powder (½ teaspoon)
Adds lift to the dough and makes the cookies puff slightly during baking. - Salt (¼ teaspoon)
Balances out all the sweetness and enhances the other flavors. - Powdered/icing sugar (90 g or ¾ cup)
Used for rolling the dough before baking. It gives the cookies a classic cracked surface and helps keep them from sticking to your hands.
Each ingredient in the lemon cookie dough has a specific role, especially when working with gluten free flours. These ingredients ensure a soft, chewy texture with just the right amount of spread and a perfectly balanced lemon flavor.
Optional items for better flavor and structure
These aren’t required, but they’re worth considering if you want to tweak or enhance your final results:
- A digital food scale
Precision is key in gluten free baking, and using weights ensures accuracy, especially for flour. - Organic ingredients
Especially for lemons, as you’ll be using the zest. - Vanilla bean paste over extract
This gives a more intense and aromatic vanilla flavor. - Fine mesh sieve
Essential for straining raspberry seeds from the curd. - Cookie or ice cream scoop
Helps portion the dough evenly so all your cookies bake the same. - ½ tablespoon measuring spoon
Makes consistent indents for the raspberry curd centers.
These thoughtful tools and ingredients make the recipe easier to execute and elevate your baking results from good to truly great.
How to Make Raspberry Curd for Cookies
Cooking raspberries to extract fresh juice
Start by placing your raspberries in a small saucepan over medium heat. Stir gently and let them cook down until they fully soften and release their natural juices. This usually takes around 4–6 minutes. Whether you use fresh or frozen raspberries, the goal is the same: create a thick, flavorful base by extracting the juice and breaking down the fruit.
Once softened, pour the mixture through a fine mesh sieve into a bowl or jug. Use the back of a spoon or spatula to press the pulp and release as much juice as possible. This step is crucial to eliminate the seeds and solids, leaving behind about 80 grams or roughly ⅓ cup of smooth raspberry juice. Discard the solids and set the strained juice aside.
Preparing the egg-sugar mix for curd base
In a separate heatproof bowl, combine the sugar, one whole egg, one egg yolk, and salt. Whisk the mixture by hand until it becomes slightly fluffy and turns a paler yellow. There’s no need to use a stand mixer here — a balloon whisk does the job just fine.
Meanwhile, return the raspberry juice to the same saucepan and stir in the freshly squeezed lemon juice. Gently warm the mixture until it just begins to boil. As soon as it starts bubbling, remove it from the heat to avoid evaporating too much moisture. The heat should be moderate, not aggressive, to prevent the juice from scorching or over-reducing.
Tempering and thickening the curd mixture
Now comes a key step in preventing scrambled eggs from ruining your curd. Slowly drizzle the hot raspberry-lemon juice mixture into the bowl with the whisked egg and sugar, whisking constantly. This technique is called tempering. It gradually brings the temperature of the eggs up without cooking them too quickly.
Once all the juice is mixed in, pour the entire mixture back into the saucepan. Cook over low heat, stirring constantly with a spatula. The mixture will thicken gradually over 4 to 6 minutes. It’s done when it thickly coats the back of a spoon. You should never let it boil — curd should be smooth, not bubbly.
Once thickened, remove the pan from the heat. Stir in the cubed butter one piece at a time until completely melted. Add the vanilla bean paste (or extract) and mix well.
Transfer the finished curd to a clean bowl or container. Immediately press a sheet of plastic wrap directly against the surface of the curd. This prevents a skin from forming as it cools. Let the curd come to room temperature, then refrigerate for at least one hour, or overnight for best results. Once chilled, the curd will set up into a creamy, spreadable consistency perfect for cookie filling.
Cooling and Storing Raspberry Curd
How to prevent a skin from forming
After you’ve cooked your raspberry curd to the right thickness and stirred in the butter and vanilla, it’s important to cool it the right way. As the curd cools, a skin can form on the surface if exposed to air. To prevent this, place a sheet of plastic wrap or cling film directly onto the surface of the curd while it’s still warm. The wrap should make full contact with the entire surface, not just cover the container. This barrier keeps the texture smooth and prevents the top from hardening.
Best practices for cooling and chilling curd
Let the covered curd sit at room temperature until it is no longer warm to the touch. This usually takes around 30 to 45 minutes depending on the temperature of your kitchen. Once cooled, transfer the container to the refrigerator and allow the curd to chill for at least one hour. The chilling time allows the curd to thicken to a creamy, spoonable texture that’s ideal for filling cookies.
For the best flavor and consistency, consider chilling the curd overnight. This gives all the flavors time to develop and allows the butter and eggs to fully set, resulting in a firmer yet still silky finish.
Storing raspberry curd for longer shelf life
Raspberry curd stores very well when kept properly. You can refrigerate it in an airtight glass jar or food-safe container for up to 10 days. Always use a clean spoon when serving to avoid contamination and preserve freshness.
While this recipe doesn’t require all the raspberry curd, the leftovers are incredibly versatile. You can spread it on toast, spoon it over yogurt or pancakes, swirl it into frosting, or even use it as a filling for cakes and muffins. Its intense fruity flavor and tangy bite make it a valuable addition to any dessert repertoire.
Raspberry curd also freezes well. If you want to make a larger batch and save some for later, portion it into smaller containers, leaving a bit of space for expansion. Freeze for up to 3 months and thaw in the fridge before use.
Creating the Lemon Cookie Dough (Gluten Free)
Mixing wet ingredients with citrus zest
To begin, add your sugar and freshly grated lemon zest to a large mixing bowl. Use your fingertips to rub the zest into the sugar until it becomes fragrant and slightly moist. This step may seem simple, but it helps release the essential oils in the zest, which will enhance the lemon flavor throughout the cookies.
Next, pour in the melted, slightly cooled butter, followed by the room temperature eggs, fresh lemon juice, and vanilla bean paste or extract. Whisk everything together until the mixture is well combined and slightly creamy. The lemon zest, butter, and vanilla will form a beautifully aromatic base that sets these cookies apart.
Combining dry ingredients the gluten free way
In a separate bowl, whisk together your dry ingredients. That includes:
- Plain gluten free flour blend
- Xanthan gum, if your flour mix doesn’t already include it
- Baking powder
- Salt
It’s important to mix these dry ingredients thoroughly so that the baking powder and xanthan gum are evenly distributed throughout the flour. This ensures an even rise and consistent texture.
Now, add the dry mixture to the wet ingredients. Use a wooden spoon or rubber spatula to gently fold everything together. The mixture should become thick and sticky. Unlike traditional cookie dough, this version will resemble more of a batter at this stage, and that’s completely normal.
Why your dough should look like batter
Don’t be tempted to add more flour, even if the dough seems too soft. Gluten free doughs often appear loose and sticky before chilling. The texture will firm up during the refrigeration process, making it much easier to handle later.
This soft texture is key to achieving cookies that spread slightly, crack attractively, and remain tender on the inside. Adding more flour will only make them dry and dense, which defeats the purpose of a light, melt-in-your-mouth cookie.
Once the dough is fully mixed, cover the bowl tightly and place it in the refrigerator. You’ll need to chill it for at least 2 hours, but longer is better — even overnight if you prefer to break up the process.
Chilling the Dough for Best Texture
Why chilling is non-negotiable
Chilling the lemon cookie dough is an essential step that should never be skipped. Since the dough is quite soft and sticky right after mixing, chilling firms it up into a manageable texture. This allows you to roll it into balls without it sticking to your hands or spreading too much during baking.
Refrigerating the dough also enhances the flavor. As it rests, the lemon zest and vanilla infuse more deeply into the dough, giving each cookie a fuller, more complex taste.
Tips for overnight chilling
If you’re short on time, two hours in the fridge will be enough to firm the dough. However, for the best structure and flavor development, overnight chilling is ideal. Just make sure the dough is covered tightly with plastic wrap or sealed in an airtight container to prevent it from drying out or absorbing odors from the fridge.
You can even make the dough one day ahead of time and bake the cookies fresh the next day. This makes the recipe more flexible, especially if you’re baking for an event or want to pace your prep over two days.
How to manage sticky dough after chilling
After chilling, the dough should be firm to the touch but still slightly pliable. Scoop it using a 2-tablespoon cookie scoop or a standard ice cream scoop for even-sized cookies. If the dough feels sticky while scooping, you can lightly dust your hands with powdered sugar to make handling easier.
Once scooped, drop each dough portion directly into a bowl of powdered sugar. Roll it around until fully coated. This not only gives the cookies their signature crinkle look, but also makes it easy to shape them into smooth balls. The sugar layer acts as a barrier, preventing the dough from sticking to your palms.
At this stage, your dough balls are ready to be filled and baked — and chilling will have made all the difference in how beautifully they’ll hold their shape in the oven.
Shaping and Filling the Cookies
Scooping and rolling cookie dough in sugar
After your dough has chilled properly, it’s time to shape the cookies. Using a 2-tablespoon cookie scoop, portion out the dough into even-sized mounds. If you don’t have a scoop, you can use two regular tablespoons to approximate the size, but consistency matters for even baking.
Drop each dough portion directly into a bowl of powdered or icing sugar. Roll the dough gently in the sugar until it’s fully coated. This step is important not just for that classic crinkle-cookie look, but also because it helps you handle the sticky dough more easily. The sugar coating creates a dry outer layer that keeps the dough from sticking to your hands or baking surface.
Once coated, roll each dough ball between your palms to form a smooth, round shape. Repeat until you’ve shaped all the dough — you should get about 16 cookies total.
Place the dough balls onto parchment-lined baking sheets, spacing them well apart. These cookies will spread slightly as they bake, so leave at least 2 inches between each one.
Creating the perfect center indent
Next, it’s time to create space for the raspberry curd. Use a ½-tablespoon measuring spoon to gently press an indent into the center of each dough ball. Be careful not to press all the way through — just about halfway down is perfect. This will form a little well to hold the curd without it leaking or spilling during baking.
Take your chilled raspberry curd from the fridge and use a teaspoon to fill each indent. You’ll want to use about 1 generous teaspoon of curd per cookie. Spoon it in gently so it stays within the edges of the indentation and doesn’t overflow onto the cookie surface.
Not all of the curd will be used in this step, and that’s by design. The remaining curd can be stored and enjoyed in other ways, like spreading on toast or swirling into whipped cream.
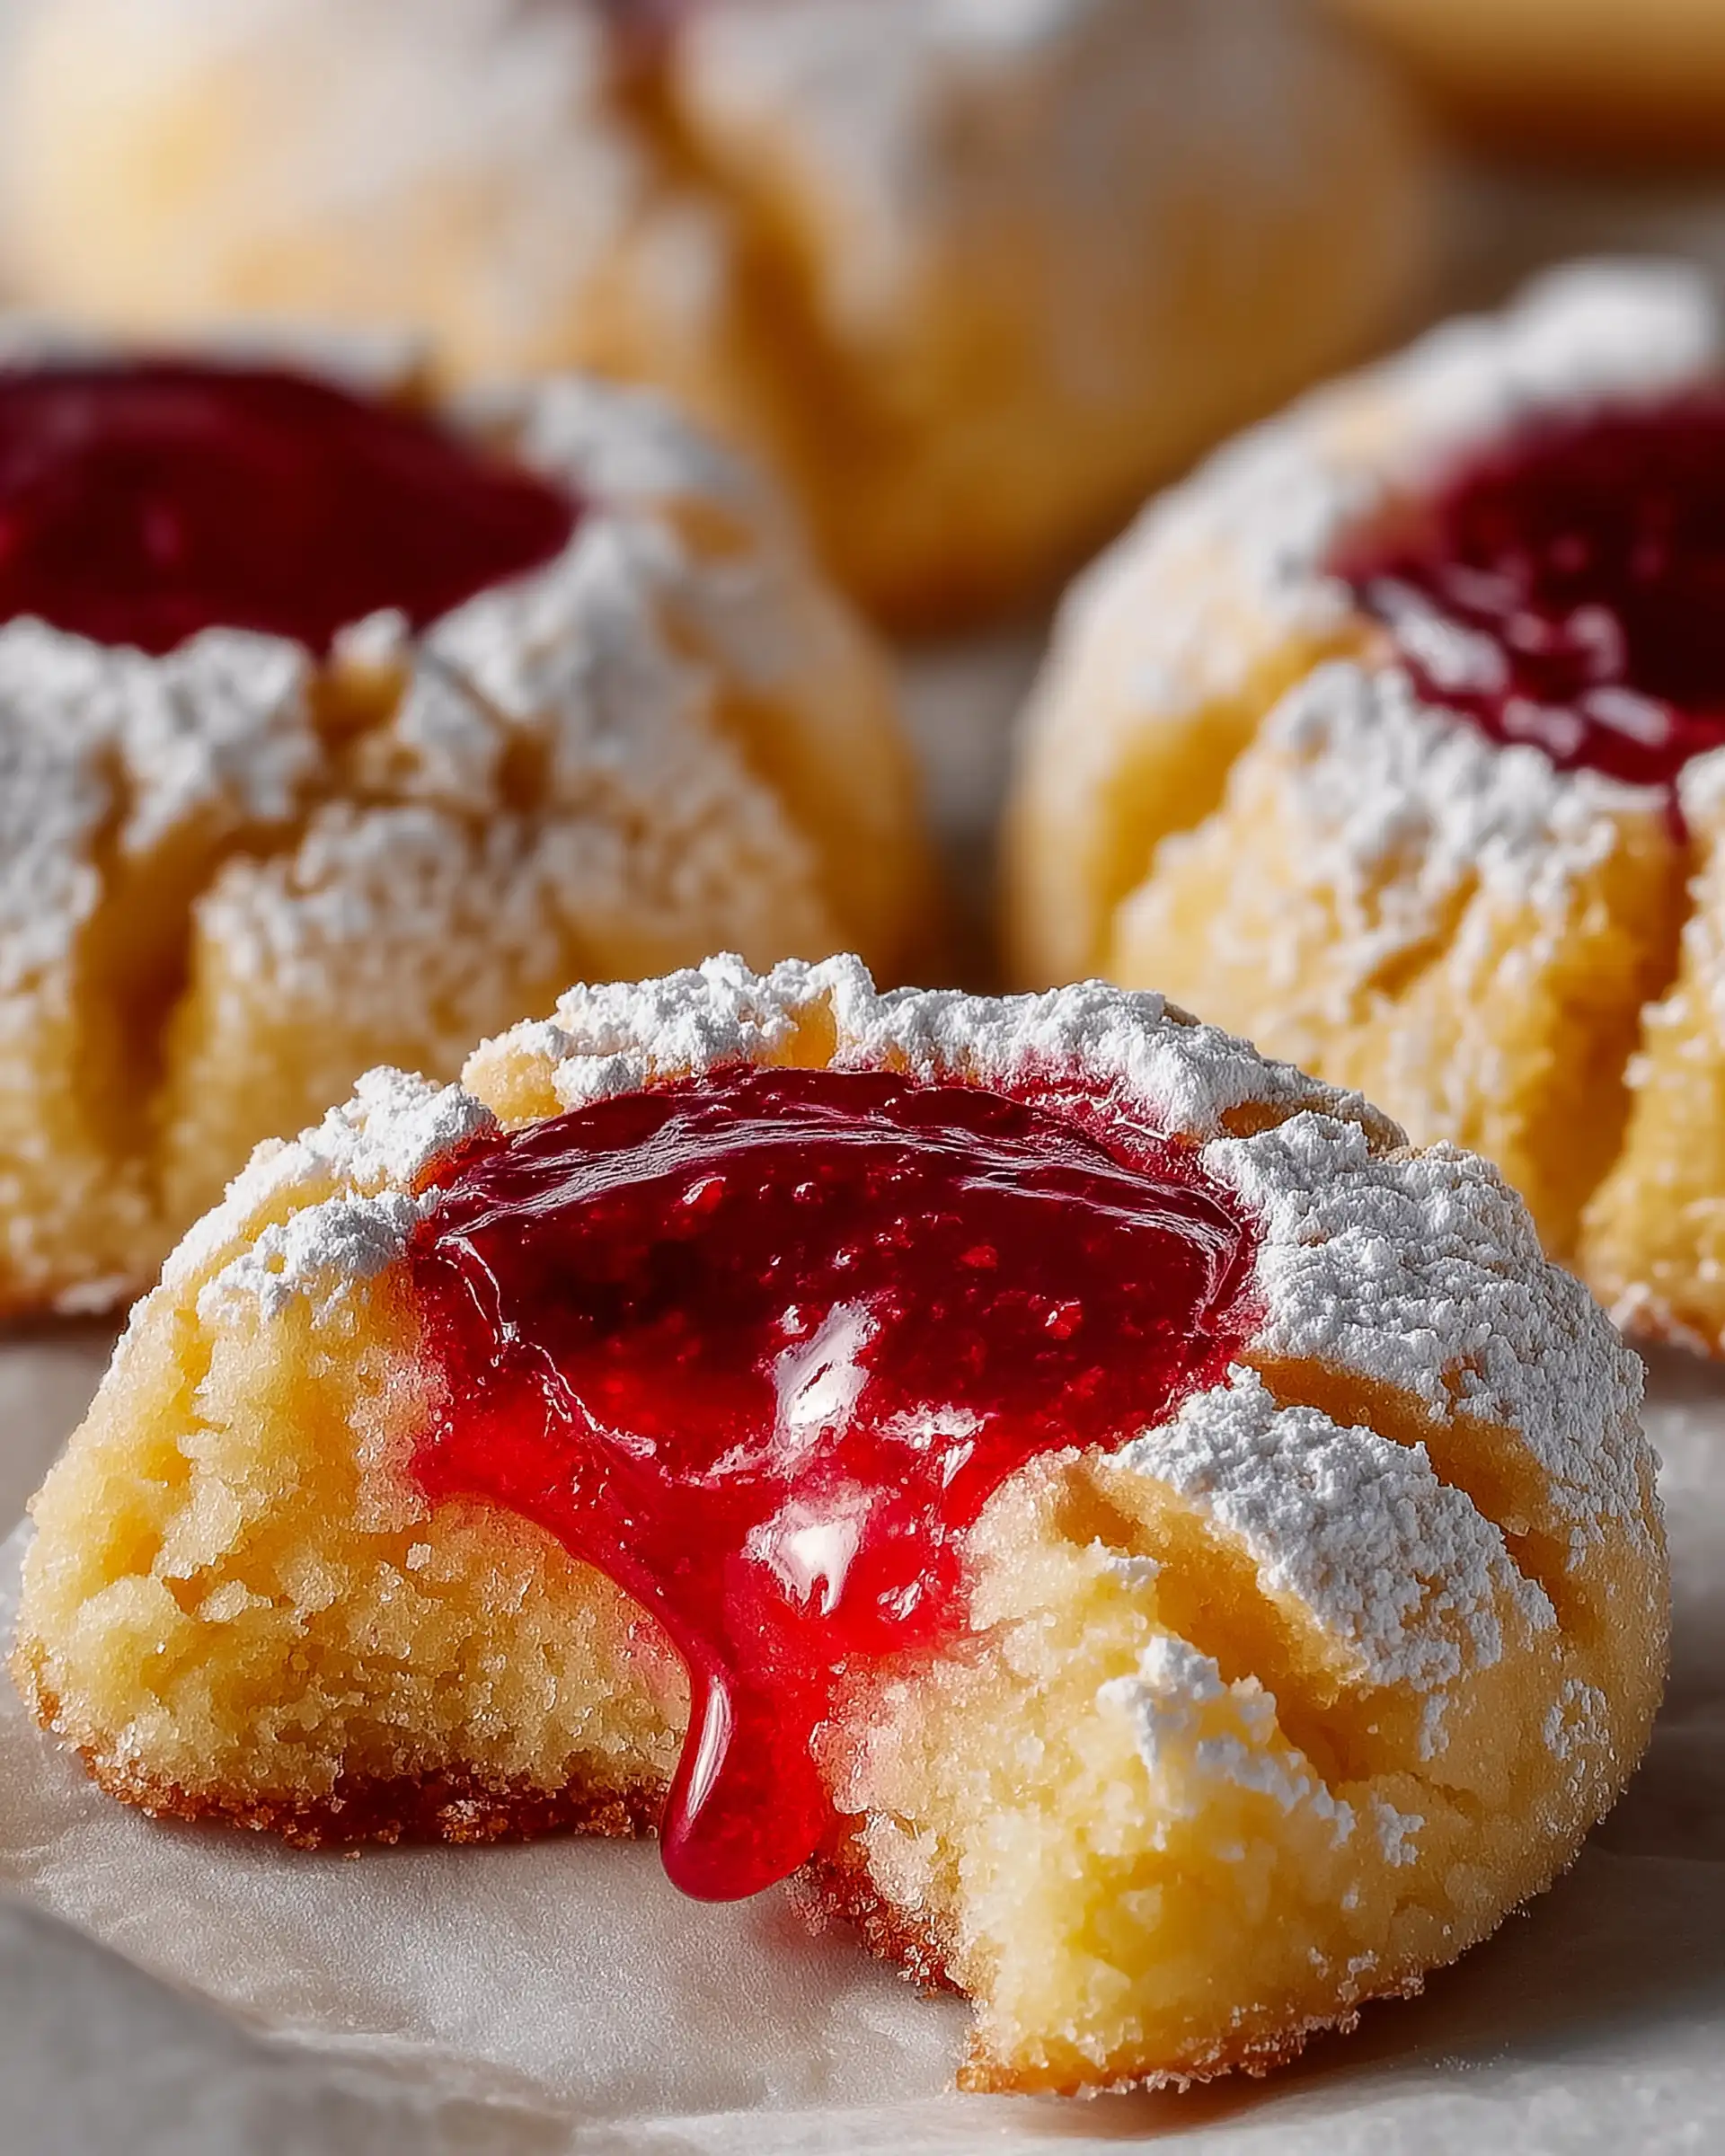
With your cookies shaped, coated, and filled, they’re now ready for the oven. The visual contrast between the powdered sugar coating and the rich red curd makes these cookies beautiful even before they bake.
Baking Gluten Free Raspberry Lemon Cookies
Oven prep and baking temperatures
Before baking, adjust your oven rack to the center position and preheat the oven to 350ºF (180ºC). This moderate temperature ensures the cookies spread gently while baking, allowing the lemon dough to crack beautifully around the raspberry center without drying out or burning.
Line two large baking sheets with parchment paper. If you only have one baking sheet, no problem — just bake in two batches, and let the tray cool completely before reusing it for the second round. Keeping the unbaked cookie dough balls chilled while the first batch bakes helps maintain their shape.
How to prevent over-baking
Bake the cookies for 9 to 12 minutes, depending on your oven. You’ll know they’re ready when the edges are set and lightly golden, and the cookies have cracked around the powdered sugar. The raspberry curd center should look slightly puffed but not bubbling — bubbling means it’s overcooking, which can ruin the smooth, creamy texture.
It’s better to slightly underbake than overbake. The cookies will continue to set as they cool on the tray. If the centers still look soft, that’s exactly how they should be. Let the first tray cool on the baking sheet for about 5 to 10 minutes before gently transferring the cookies to a wire rack to cool completely.
While the first batch cools, bake the second tray following the same method. Keep any remaining dough in the fridge until you’re ready to scoop and bake.
Letting cookies cool without falling apart
These cookies are very soft right out of the oven and can break if moved too soon. Give them time to firm up on the tray before transferring to a cooling rack. Once completely cooled, the cookies develop their full flavor and chewy-soft texture.
Though they’re tasty warm, these cookies are especially delicious when served chilled from the refrigerator. The raspberry curd firms up slightly and creates a rich, smooth contrast to the lemon cookie base. For the best texture, refrigerate the cookies after cooling and enjoy them cold.
Best Ways to Store and Serve
Room temperature vs refrigerated storage
Once your cookies have cooled completely, you can choose how to store them based on when you plan to eat them. If you’re serving them within a day or two, storing them at room temperature in an airtight container is perfectly fine. They’ll stay soft and fresh for up to 2 to 3 days on the counter.
However, these cookies truly shine when they’re chilled. The raspberry curd firms up slightly in the fridge, becoming creamier and more luxurious in texture. If you prefer a slightly denser bite with a cool fruit center, keep them refrigerated. In a sealed container, they’ll stay fresh in the fridge for up to 1 week.
How long the cookies stay fresh
Gluten free cookies often dry out faster than regular cookies, but thanks to the butter, eggs, and fruit curd in this recipe, these cookies stay moist longer than most. Be sure to store them in an airtight container to prevent them from becoming crumbly or absorbing moisture from the fridge.
If you need to store them for longer, freezing is a great option. Once cooled, place them in a single layer on a baking sheet and freeze for 1 to 2 hours. Then transfer them to a freezer-safe container or zip-top bag. Store for up to 2 months. To serve, thaw in the fridge overnight or let them sit at room temperature for about 30 minutes.
What to do with extra raspberry curd
You’ll likely have some leftover raspberry curd after filling the cookies — and that’s a good thing. This vibrant, tangy spread is versatile and can be used in many ways:
- Spread it on toast, pancakes, or waffles
- Swirl it into yogurt or whipped cream
- Layer it in cakes or cupcakes
- Spoon it over cheesecake
- Serve it as a topping for ice cream or pudding
It keeps well in the fridge for up to 10 days when stored in an airtight container. The flavor may even intensify slightly over time, making it even more delicious.
Bonus Tips for Perfect Gluten Free Cookies
Avoiding common gluten free baking mistakes
Gluten free baking often comes with a unique set of challenges. One of the biggest mistakes is overcompensating for soft dough by adding more flour. This leads to dry, dense cookies that don’t spread properly. Trust the process — the dough will firm up after chilling, and the cookies will bake into the perfect soft texture.
Another common issue is skipping xanthan gum or using the wrong flour blend. If your blend doesn’t contain xanthan gum, adding it yourself ensures the cookies hold their shape and don’t crumble. Be sure to weigh your flour if possible rather than relying solely on cups, especially with gluten free flours that can vary in density.
Tools that make the job easier
Using the right tools can elevate your baking experience:
- A digital food scale helps achieve accurate measurements, especially for flour
- A cookie scoop ensures consistent size and even baking
- A fine mesh sieve keeps the raspberry curd seed-free and silky
- Parchment paper or reusable baking mats prevent sticking and make cleanup easier
- A cooling rack helps cookies firm up evenly without becoming soggy underneath
These tools don’t just save time, they also improve the texture and appearance of your cookies.
Flavor tweaks and variations to try
Once you’ve mastered the base recipe, feel free to experiment:
- Switch up the fruit curd: Try using strawberry, blueberry, or even passionfruit for a twist
- Add a touch of almond extract to the cookie dough for a more complex citrus-almond profile
- Dust the cookies with extra powdered sugar after baking for a snowy finish
- Use orange zest instead of lemon for a milder citrus flavor
These variations keep things interesting and let you tailor the recipe to your taste or the season.
Whether you’re baking these for a party, a gift, or just your own treat stash, the raspberry curd lemon cookies are sure to be a gluten free hit. Their vibrant appearance, bold citrus-fruit flavor, and soft, chewy texture make them a standout dessert that feels as good as it tastes.
Conclusion
This raspberry curd lemon cookies recipe (gluten free) delivers a perfect balance of bright citrus and tangy berry flavors in a chewy, tender cookie that’s totally gluten free. From the fresh homemade raspberry curd to the zesty lemon dough, every component is carefully crafted to bring out the best in each bite. Whether served chilled for a refreshing twist or warm from the oven, these cookies are bound to impress.
Ideal for both seasoned bakers and beginners, this recipe proves that gluten free treats can be just as indulgent and delicious as traditional ones. The steps are simple, the ingredients are clean, and the results are beautiful and bold in flavor. Once you try these, they’re sure to become a go-to dessert for any occasion — or just because.