There’s nothing quite like a warm, homemade chocolate chip cookie. This article breaks down the ultimate chocolate chip cookies recipe from the best ingredients and tools to baking tips and storage tricks. You’ll learn how to get soft centers, golden edges, and a rich flavor every time.
Contents
- 1 Ingredients for the Perfect Chocolate Chip Cookies
- 2 Equipment Essentials for Flawless Cookie Baking
- 3 Chocolate Chip Cookies Recipe
- 4 Step-by-Step Instructions for Making Chocolate Chip Cookies
- 5 Baking Chocolate Chip Cookies to Golden Perfection
- 6 Storing and Freezing Your Chocolate Chip Cookie Dough
- 7 How to Bake Frozen Cookie Dough Perfectly
- 8 Ingredient Substitutions for Every Baker
- 9 Expert Tips for Baking the Best Chocolate Chip Cookies
- 10 Chocolate Chip Cookies Nutrition Facts and Serving Ideas
- 11 Conclusion
Ingredients for the Perfect Chocolate Chip Cookies
Butter, Sugar, and Eggs: The Foundation of Flavor
This chocolate chip cookies recipe uses 1 cup salted butter, 1 cup granulated sugar, and 1 cup light brown sugar for a sweet, rich base. Salted butter brings out the flavor, while brown sugar adds moisture. Two large eggs help bind the dough and add softness.
Flour, Leavening, and Salt: Building Texture
You’ll need 3 cups all-purpose flour, 1 tsp baking soda, ½ tsp baking powder, and 1 tsp sea salt. These give your cookies a light lift, structure, and that crave-worthy bite.
Choosing Your Chocolate: Chips, Chunks, or Chopped Bars
Go with 2 cups (12 oz) of chocolate chips, or try chunks or chopped bars for variety. Dark, semi-sweet, or milk chocolate all work great—pick your favorite or mix them for extra depth.
Equipment Essentials for Flawless Cookie Baking
Must-Have Tools: Mixers, Mats, and Measuring Gear
The right equipment makes all the difference when baking chocolate chip cookies. For best results, use a KitchenAid stand mixer or hand mixer to cream butter and sugar evenly. You’ll also need measuring cups, measuring spoons, and a spatula to handle and scrape your dough properly.
To scoop dough consistently, a cookie scoop is a smart choice—it helps maintain uniform size, so every cookie bakes evenly. Don’t forget a cooling rack for airflow underneath your cookies after baking.
Parchment Paper vs Silicone Mats: Which Is Better?
Lining your three baking sheets properly helps with cleanup and even baking. Parchment paper is disposable, easy to use, and prevents sticking. Silicone baking mats are reusable, eco-friendly, and help distribute heat evenly across the pan. Either one works well, so it comes down to preference.
Discover great ideas like this list of baking essentials on trusted kitchen blogs and baking resources to gear up for cookie success.
Print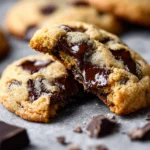
Chocolate Chip Cookies Recipe
- Total Time: 30 minutes
- Yield: 36 cookies
- Diet: Vegetarian
Description
These chocolate chip cookies are soft in the center, golden on the edges, and full of rich chocolate flavor. A perfect homemade treat made in under 30 minutes.
Ingredients
1 cup salted butter, softened
1 cup granulated sugar
1 cup light brown sugar, packed
2 teaspoons pure vanilla extract
2 large eggs
3 cups all-purpose flour
1 teaspoon baking soda
½ teaspoon baking powder
1 teaspoon sea salt
2 cups chocolate chips (12 oz)
Instructions
1. Preheat oven to 375°F. Line three baking sheets with parchment paper and set aside.
2. In a medium bowl, mix flour, baking soda, baking powder, and salt.
3. Cream together butter and both sugars until fully combined.
4. Beat in eggs and vanilla extract until light and smooth.
5. Mix in the dry ingredients until a soft dough forms.
6. Fold in the chocolate chips evenly.
7. Roll 2-3 tablespoons of dough into balls and place spaced on prepared baking sheets.
8. Bake for 8–10 minutes or until the edges are golden and centers still look soft.
9. Let cookies rest on the baking sheet for 5 minutes, then transfer to a cooling rack.
Notes
Do not overbake—the cookies should look slightly doughy when removed from the oven.
For convection ovens, reduce baking temperature by 25°F.
For substitutions, use vegan butter, flax eggs, or gluten-free flour as needed.
Cookie dough can be frozen for up to 2 months.
Baked cookies stay fresh in an airtight container for up to 5 days.
- Prep Time: 10 minutes
- Cook Time: 8 minutes
- Category: Cookies Recipes
- Method: Baking
- Cuisine: American
Step-by-Step Instructions for Making Chocolate Chip Cookies
How to Mix Ingredients Like a Pro
Start by preheating your oven to 375°F. While the oven heats, line your three baking sheets with parchment paper or silicone baking mats and set them aside.
In a separate bowl, whisk together your 3 cups of flour, 1 teaspoon baking soda, ½ teaspoon baking powder, and 1 teaspoon sea salt. This dry mix ensures even distribution of leavening agents and salt.
In your mixing bowl, cream the softened butter with both white and brown sugar until light and fluffy. This step is key to a tender cookie texture. Beat in the eggs and vanilla extract for about one minute, just until the mixture is smooth and light.
Gradually add your dry ingredients into the wet mixture. Mix until just combined. Overmixing can toughen the dough, so keep it gentle.
Proper Dough Handling: Scooping and Shaping Tips
Once the dough is ready, fold in the chocolate chips evenly. Using a cookie scoop or two tablespoons, scoop 2 to 3 tablespoons of dough per cookie and roll into balls.
Space them evenly on your prepared baking sheets to allow for spreading—around 2 inches apart is ideal. This prevents cookies from merging during baking.
Baking Chocolate Chip Cookies to Golden Perfection
Best Temperature and Time to Bake Cookies
Once your dough is portioned and placed on the baking sheets, it’s time to bake. Place your trays in the preheated oven at 375°F and bake for 8 to 10 minutes. The key is to remove the cookies just when the edges begin to turn golden brown, even if the centers still look slightly doughy.
This slight underbaking is what gives these chocolate chip cookies their soft and chewy centers. Avoid the temptation to wait for them to look fully baked—cookies continue cooking on the baking sheet after they’re removed from the oven.
If you’re using a convection oven, reduce the temperature to 350°F to avoid overbaking. Always bake on the center rack for the most even results.
Avoiding Overbaking: When to Pull Cookies Out of the Oven
The cookies should look puffy with lightly golden edges and very soft centers when removed. They’ll settle and firm up as they cool. Let them sit on the baking sheet for about 5 minutes before transferring them to a cooling rack.
Remember, overbaking leads to dry, crumbly cookies, while pulling them early creates that signature chewy texture. If in doubt, pull them sooner rather than later. The residual heat will do the rest.
Storing and Freezing Your Chocolate Chip Cookie Dough
How to Store Cookies to Maintain Freshness
Once cooled, your chocolate chip cookies can be kept fresh for days with proper storage. Place them in an airtight container at room temperature. They’ll stay soft and chewy for up to 5 days. If you live in a humid area, you can place a slice of bread in the container to help retain moisture.
For longer storage, keep the cookies in a sealed freezer-safe container or bag and store them in the freezer for up to 2 months. Just be sure to let them come to room temperature before enjoying.
To maintain the best texture and flavor, avoid refrigerating the cookies, as it can dry them out more quickly than freezing.
Freezing Cookie Dough: Step-by-Step Storage Guide
Prefer to bake fresh cookies on demand? Freeze the unbaked dough instead. Here’s how:
- Portion the dough using a cookie scoop or tablespoons.
- Roll into balls and arrange in a single layer on a parchment-lined baking sheet.
- Place the tray in the freezer for about 1 hour, or until the dough balls are solid.
- Transfer the frozen dough into an airtight container or zip-top bag.
- Label with the date. The dough will last for up to 2 months.
This method allows you to bake just a few cookies at a time without making a full batch. It’s perfect for spontaneous cravings or prepping ahead for guests.
How to Bake Frozen Cookie Dough Perfectly
Thawing Dough Balls for Best Results
If you prefer the traditional baking method, thawing your frozen cookie dough before baking is a smart choice. Simply remove the portioned dough balls from the freezer and place them on a parchment-lined baking sheet. Cover them lightly with a clean towel or plastic wrap and let them sit at room temperature for about 1 hour.
Once thawed, bake the cookies at 375°F for 8 to 10 minutes, just like with fresh dough. This approach gives you the same soft texture and even spread as freshly mixed dough.
Baking from Frozen: Temperature and Timing Tips
Want to skip thawing? No problem. Baking cookie dough straight from the freezer works well too. Here’s how:
- Preheat your oven to 350°F instead of 375°F.
- While the oven is preheating, place the frozen dough balls directly on a parchment-lined baking sheet.
- Put the cookies in the oven at the beginning of the preheat—yes, before it hits full temperature.
- Set your timer for 15 minutes.
- Remove the cookies once the edges are golden and the centers still look slightly soft.
Baking from frozen might yield slightly puffier cookies with less spread, but they’ll still taste just as amazing.
Ingredient Substitutions for Every Baker
Dairy-Free, Egg-Free, and Gluten-Free Options Explained
Not everyone bakes with the same pantry staples, and that’s okay. This chocolate chip cookies recipe is flexible enough to work with various substitutions.
- Butter: You can swap salted butter with unsalted butter, vegan butter, or even coconut oil. For a deep, nutty flavor, try browned butter.
- Eggs: No eggs? No problem. Use alternatives like flax eggs (1 tbsp ground flaxseed + 3 tbsp water per egg), applesauce, or mashed banana. These keep the dough moist and binding.
- Flour: While all-purpose flour works best, gluten-free all-purpose flour blends perform surprisingly well as a 1:1 replacement.
- Chocolate Chips: Use any variety—milk, semi-sweet, dark, or even dairy-free chocolate chunks. You can also chop up your favorite chocolate bars for texture.
This flexibility makes the recipe suitable for a range of dietary needs, including vegan and gluten-free lifestyles. You’ll still get delicious, chewy cookies every time.
Alternative Sugars and Flours for Customizing Your Cookies
For a richer flavor, try dark brown sugar in place of light brown—it adds a deeper molasses note. If you’re aiming for less refined options, use organic cane sugar instead of white granulated sugar.
Want to experiment with flour types? Here’s a quick overview:
| Substitute | Flavor | Notes |
|---|---|---|
| Oat Flour | Mild, nutty | Soft, cake-like texture |
| Almond Flour | Rich, buttery | Best mixed with other flours |
| Coconut Flour | Sweet, dense | Absorbs lots of moisture—adjust liquids accordingly |
Using these substitutions can change texture and taste slightly, but they also let you customize your cookies without sacrificing quality.
Expert Tips for Baking the Best Chocolate Chip Cookies
The Secret to Chewy Centers and Crispy Edges
If you’ve ever wondered how bakeries get that perfect texture, here’s the secret: don’t overbake. Pull your cookies from the oven when they still look soft in the middle. The residual heat from the pan will finish the job.
Want crisp edges with chewy centers? Use a blend of granulated and brown sugar—the white sugar creates structure while the brown sugar adds moisture. Also, letting your dough rest for 30 minutes before baking allows the flour to absorb moisture, leading to a deeper flavor and thicker cookie.
Another pro tip: room-temperature ingredients mix more evenly. Cold eggs or butter can cause the dough to clump and bake unevenly.
Common Mistakes to Avoid in Cookie Baking
To make sure your chocolate chip cookies come out perfectly every time, avoid these common mistakes:
- Overmixing the dough: This activates too much gluten, making cookies tough.
- Skipping the oven preheat: An unready oven can lead to undercooked centers and uneven baking.
- Not measuring flour correctly: Always spoon flour into your measuring cup and level it off. Scooping packs it down, leading to dense cookies.
- Crowding the baking sheet: Leave room between dough balls for proper spreading.
- Using warm cookie sheets: Always cool trays between batches. A hot tray will start baking the next round of dough too soon.
Mastering these little details takes your baking from good to bakery-level, giving you consistent, delicious cookies every single time.
Chocolate Chip Cookies Nutrition Facts and Serving Ideas
Calorie and Nutrient Breakdown Per Cookie
This chocolate chip cookies recipe makes 36 cookies, using around 2 tablespoons of dough each. Here’s the nutritional breakdown per cookie:
| Nutrient | Per Cookie (Approx.) |
|---|---|
| Calories | 183 kcal |
| Carbohydrates | 26 g |
| Protein | 2 g |
| Fat | 8 g |
| Saturated Fat | 5 g |
| Cholesterol | 27 mg |
| Sodium | 153 mg |
| Potassium | 31 mg |
| Fiber | 1 g |
| Sugar | 18 g |
| Vitamin A | 197 IU |
| Vitamin C | 1 mg |
| Calcium | 24 mg |
| Iron | 1 mg |
These cookies are vegetarian-friendly, and with a few simple substitutions, they can be made vegan or gluten-free without compromising flavor or texture.
Fun Ways to Serve and Enjoy Your Homemade Cookies
Fresh out of the oven or cooled down, there are plenty of ways to enjoy these treats:
- Classic style: Serve warm with a cold glass of milk or your favorite non-dairy alternative.
- Cookie stack: Layer three or four cookies with a thin spread of nut butter or chocolate ganache between each.
- Cookie platter: Mix them with other varieties for parties or holiday trays.
- Gift-ready: Wrap in parchment and tie with a ribbon for an easy homemade gift.
- Freeze and grab: Pop frozen cookies in lunchboxes for an afternoon treat that’s ready by midday.
These cookies are not only simple and quick to make, but they’re also incredibly versatile for any occasion.
Conclusion
Making the perfect chocolate chip cookies is easier than you think when you follow the right recipe, use quality ingredients, and apply a few expert techniques. This chocolate chip cookies recipe delivers bakery-style results—chewy centers, crisp edges, and a rich, satisfying chocolate flavor.
Whether you’re baking a fresh batch for family, freezing dough for later, or customizing ingredients to fit your dietary needs, this guide gives you everything you need to succeed. From mixing to baking to storing, every step is crafted to help you make cookies that are delicious, dependable, and downright irresistible.