When it comes to indulgent desserts, nothing beats a homemade caramel cake recipe straight from the heart of Southern kitchens. With its soft, buttery layers and rich golden icing, caramel cake has become a timeless treat across generations. In this guide, we’ll walk you through everything you need to know to make the perfect caramel cake from scratch — from ingredients to expert tips, and even how to avoid common pitfalls.
Whether you’re baking for a special occasion or simply treating yourself, you’ll discover step-by-step methods, secrets to silky-smooth caramel icing, and how to create a moist, crowd-pleasing cake every time. If you’re looking for something with soul and sweetness, this caramel cake delivers.
Contents
- 1 What Makes a Caramel Cake Truly Irresistible
- 2 Caramel Cake Ingredients Breakdown and Why They Matter
- 3 Caramel Cake Recipe
- 4 Step-by-Step Instructions for the Perfect Caramel Cake
- 5 Creating the Creamiest Homemade Caramel Icing
- 6 Expert Tips for Avoiding Common Mistakes
- 7 Pro Assembly: Stacking and Frosting for a Showstopper Cake
- 8 Serving Suggestions and Creative Variations
- 9 Storage Tips and How to Keep Caramel Cake Fresh
- 10 Conclusion
What Makes a Caramel Cake Truly Irresistible
Understanding the Southern Roots of Caramel Cake Recipes
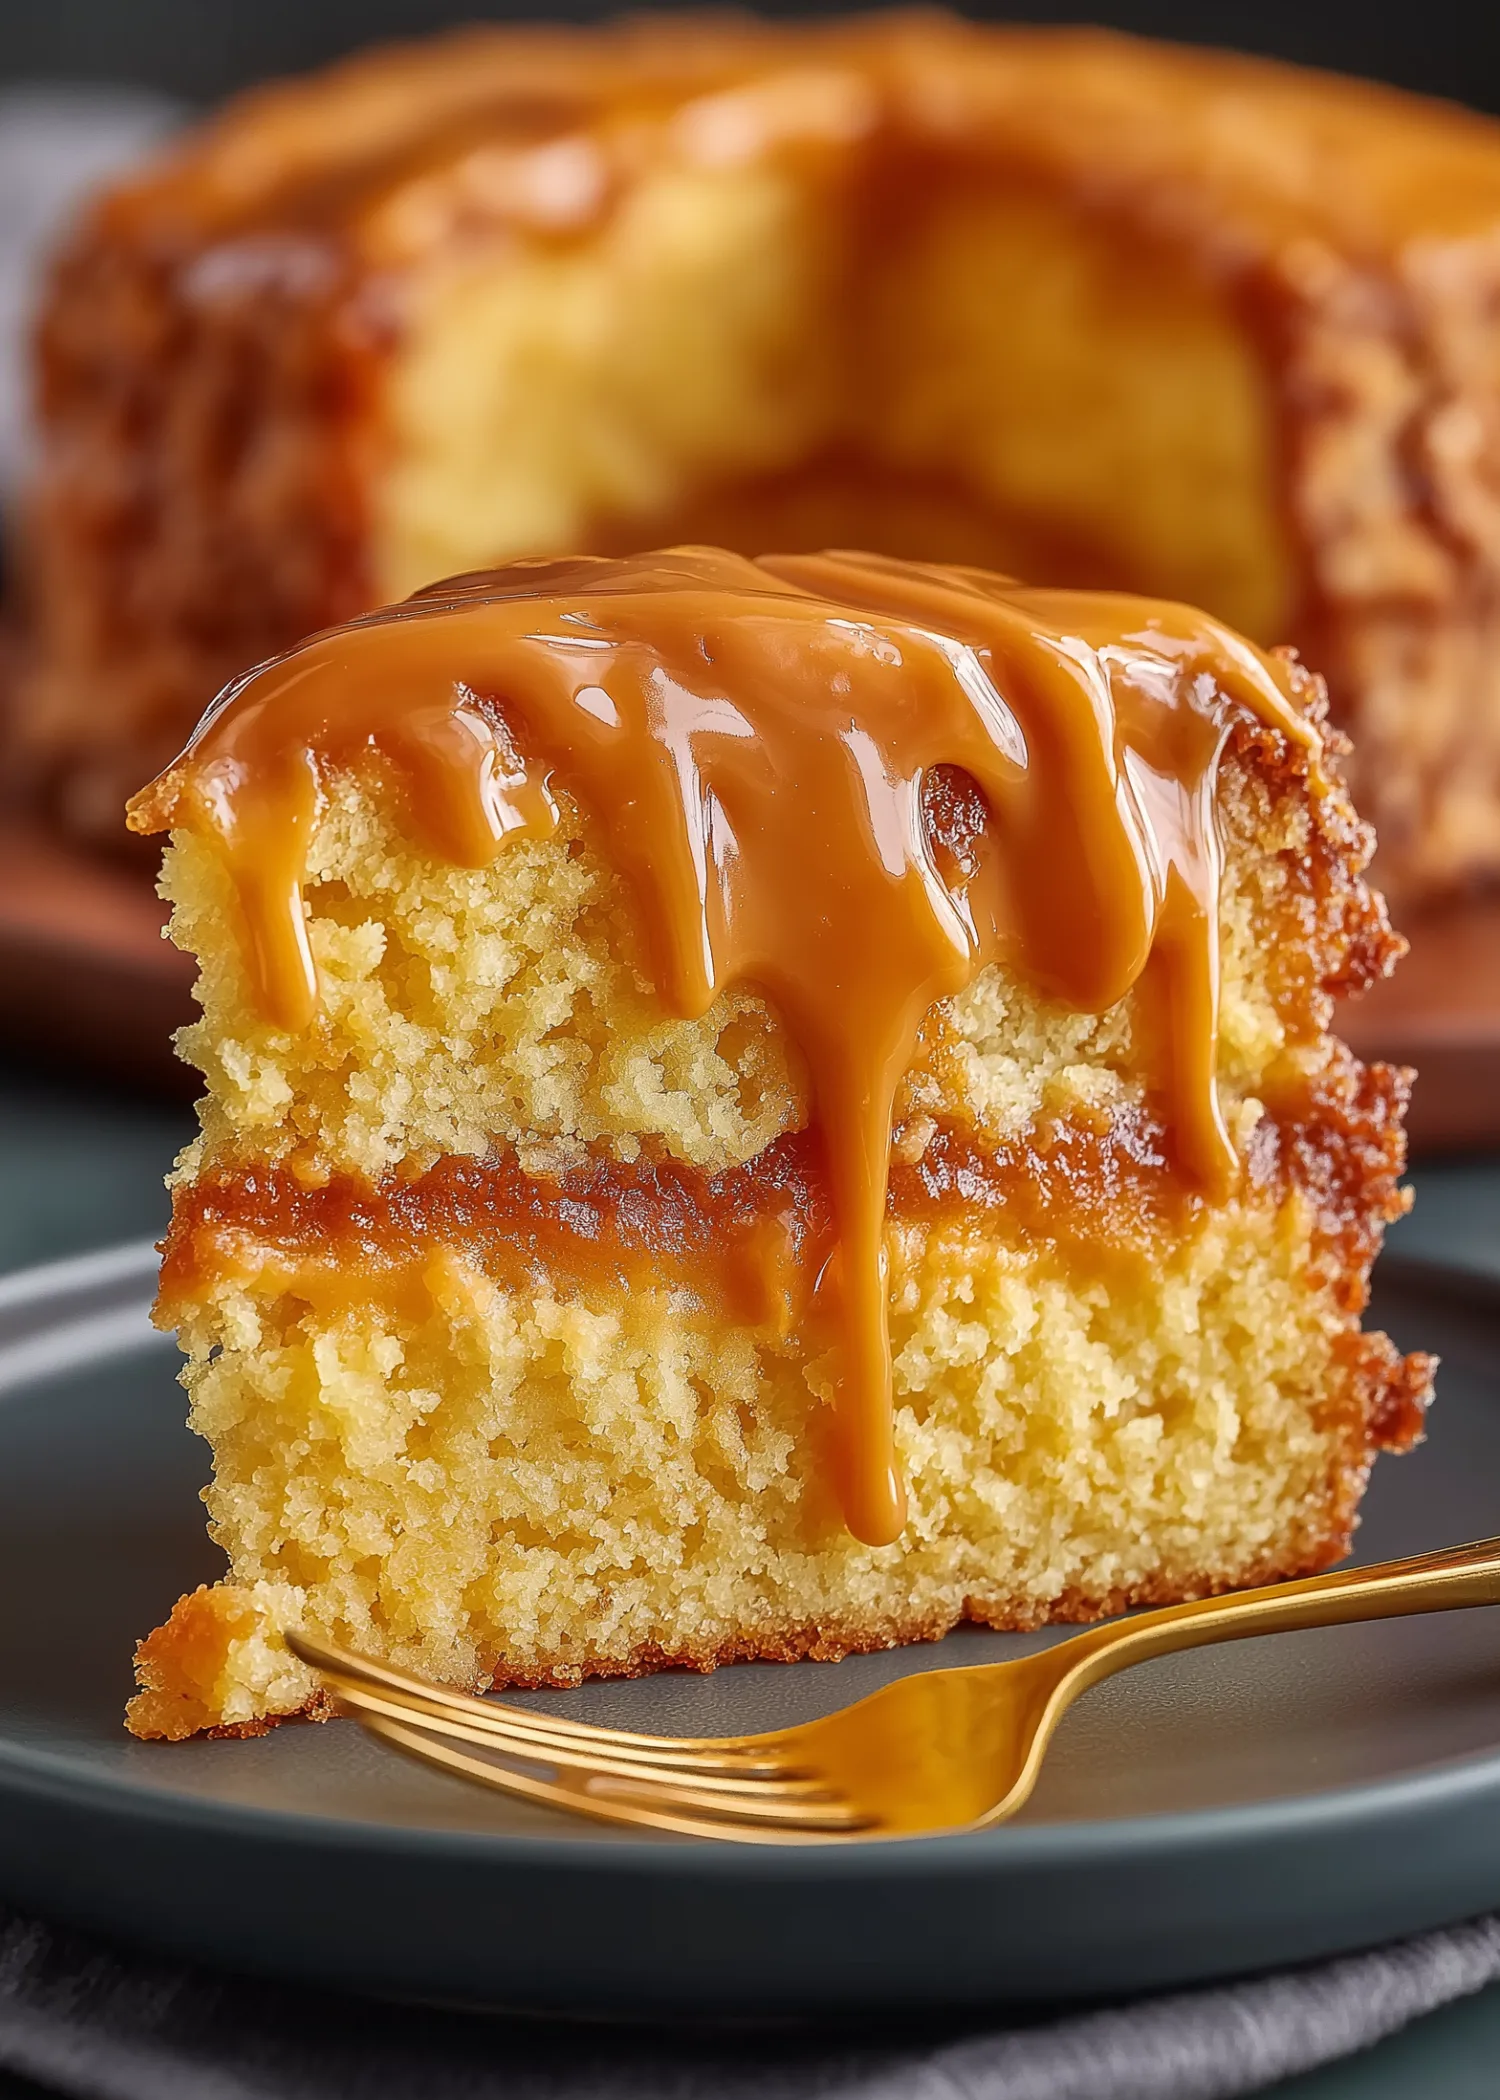
The caramel cake recipe isn’t just another dessert, it’s a beloved part of Southern culinary tradition. Originally passed down through handwritten cookbooks and family memories, caramel cake has long been the centerpiece of Sunday dinners, birthdays, and holiday gatherings. What sets it apart is its bold flavor — a balance of sweet, buttery cake and deep, slightly salty caramel icing.
Many Southern bakers insist on using evaporated milk, real butter, and long-cooked caramel to get that authentic flavor. While recipes may vary, the essence remains the same: a moist yellow cake topped with a rich caramel glaze that seeps into every layer.
How Flavor, Texture, and Presentation Come Together
A standout caramel cake balances fluffy, tender cake layers with a smooth, golden-brown caramel glaze. The texture should feel light but rich, with icing that clings and slightly drips over the sides — a visual cue of indulgence.
The flavor is all about depth. The sweetness from the sugar is balanced by the warm, cooked notes of the caramel. The use of vanilla and buttermilk in the batter brings complexity, while whipped egg whites keep the cake light and airy.
Presentation also plays a role. Smooth icing with a gentle sheen, slightly domed layers, and neat slices all add to the irresistible appeal. Garnishes like chopped pecans or a sprinkle of sea salt can elevate both flavor and appearance — just be sure not to overpower the caramel.
Caramel Cake Ingredients Breakdown and Why They Matter
Essential Cake Base Ingredients and Their Role
To get that perfect southern-style caramel cake recipe, each ingredient plays a critical part in shaping the cake’s taste, texture, and structure. Let’s break down the core components:
- Cake Flour (2 ½ cups): This type of flour has a lower protein content than all-purpose flour. That means it gives your cake a soft, tender crumb. It’s essential for creating a light and airy base that absorbs the caramel without becoming dense.
- Baking Powder & Baking Soda (2 ½ tsp + ¼ tsp): These leavening agents are what give your cake rise and fluffiness. Using both ensures balanced lifting and helps prevent a flat, heavy result.
- Kosher Salt (½ tsp): Salt enhances all the flavors, especially in sweet recipes. It balances the richness of sugar and butter, and in this case, it helps amplify the caramel flavor.
- Granulated White Sugar (2 cups): This isn’t just for sweetness — sugar adds moisture, aids in browning, and helps tenderize the batter.
- Unsalted Butter (1 cup): Softened butter contributes to flavor and texture. Its fat helps trap air during mixing, giving the cake structure and richness.
- Egg Yolks (4 large): These add color, fat, and emulsifying properties. They give the cake a luscious, velvety consistency.
- Egg Whites (2 large): Whipping the whites and folding them in helps lighten the batter, keeping the cake from becoming too dense.
- Vanilla Extract (1 tbsp): It’s a small touch that brings out the deep buttery caramel flavor in both the cake and the icing.
- Buttermilk (1 cup): Buttermilk makes the cake tangy and ultra-moist. Its acidity reacts with baking soda to give the cake a tender crumb.
The Science Behind the Rich Caramel Icing
What truly sets this cake apart is the homemade caramel icing — a mixture of butter, evaporated milk, sugar, and salt, slow-cooked until golden and thick. Here’s how the ingredients work together:
- Unsalted Butter (¾ cup): Melted butter forms the base. Its fat helps blend the sugar and milk smoothly while giving the caramel cake a rich finish.
- Evaporated Milk (2 cans): Unlike regular milk, evaporated milk has less water, making it ideal for a creamy and thick caramel without extra boiling time.
- Granulated Sugar (2 cups): When slowly cooked with milk and butter, the sugar caramelizes and turns golden brown. This process brings out nutty, deep flavors that define a classic caramel cake.
- Vanilla Extract (optional): Adds a fragrant finish to the icing and enhances complexity.
- Salt (½ tsp): A little salt sharpens the caramel cake flavor, balancing sweetness and boosting overall taste.
This icing takes time, about 80 minutes of slow cooking — but the payoff is worth it. Keep stirring, monitor the heat, and don’t rush it. If you’re tempted to speed up the process, remember: burnt sugar can ruin the entire batch.
Print
Caramel Cake Recipe
- Total Time: 3 hours 30 minutes
- Yield: 12 servings 1x
- Diet: Vegetarian
Description
This homemade Southern caramel cake recipe features fluffy, tender cake layers and a rich, golden caramel icing made from scratch. Perfect for holidays, birthdays, or anytime you want to impress.
Ingredients
2 1/2 cups cake flour
2 1/2 teaspoons baking powder
1/2 teaspoon Diamond Crystal kosher salt (or 1/4 tsp other salt)
1/4 teaspoon baking soda
2 cups granulated white sugar
1 cup unsalted butter, room temperature
4 large egg yolks, room temperature
1 tablespoon vanilla extract
1 cup buttermilk, room temperature
2 large egg whites
Caramel Icing:
3/4 cup unsalted butter
1/2 teaspoon Diamond Crystal kosher salt (or 1/4 tsp other salt)
2 cans (12 oz each) evaporated milk
2 cups granulated white sugar
1 tablespoon vanilla extract (optional)
Instructions
1. Preheat your oven to 350°F (177°C).
2. Grease and flour two 8- or 9-inch round cake pans.
3. Whisk together cake flour, baking powder, baking soda, and salt in a medium bowl. Set aside.
4. In a large bowl or stand mixer, cream the butter and sugar on high for 3 minutes.
5. Lower speed, add egg yolks one at a time, then mix in vanilla extract.
6. Alternate adding dry ingredients and buttermilk to the creamed mixture. Mix until just combined.
7. In a clean bowl, beat egg whites to stiff peaks. Gently fold into the batter.
8. Divide batter between prepared pans. Bake for 22–25 minutes until a toothpick comes out clean.
9. Cool cakes completely before icing.
10. To make caramel icing, melt butter in a large saucepan over low heat.
11. Add evaporated milk, sugar, and salt. Stir well.
12. Cook over low to low-medium heat, whisking often, for 1 to 1.5 hours until golden brown and thick.
13. Remove from heat. Stir in vanilla (if using).
14. Let caramel cool 15–20 minutes before pouring over cooled cake layers.
Notes
Make sure all ingredients are at room temperature for best texture.
Do not overmix the batter to avoid a dense cake.
Caramel should be whisked frequently to prevent burning.
Let cakes cool fully before icing to avoid melting.
Caramel icing will thicken as it cools — pour while still spreadable.
- Prep Time: 25 minutes
- Cook Time: 25 minutes
- Category: Cakes Recipes
- Method: Baking
- Cuisine: Soul Food
Nutrition
- Serving Size: 1 slice
- Calories: 629
- Sugar: 68g
- Sodium: 342mg
- Fat: 30g
- Saturated Fat: 18g
- Unsaturated Fat: 9g
- Trans Fat: 1g
- Carbohydrates: 87g
- Fiber: 1g
- Protein: 6g
- Cholesterol: 138mg
Step-by-Step Instructions for the Perfect Caramel Cake
Preparing Your Cake Batter Like a Pro
If you want a flawless caramel cake recipe, it all starts with the batter. Don’t rush this part — small techniques make a big difference.
- Preheat the Oven
Set your oven to 350°F (177°C). Preheating ensures the cakes bake evenly right from the start. - Prepare Your Pans Properly
Use two 8- or 9-inch round pans. Grease them with butter or cooking spray. Then lightly flour the pans, tapping out the excess. This prevents sticking and helps the cakes release cleanly. - Mix Dry Ingredients First
In a medium mixing bowl, whisk together:
- 2½ cups cake flour
- 2½ teaspoons baking powder
- ¼ teaspoon baking soda
- ½ teaspoon kosher salt
Set this aside for now — you’ll add it later in parts.
- Cream Butter and Sugar
In a large bowl or stand mixer, beat 1 cup unsalted butter (room temperature) with 2 cups granulated sugar. Use high speed for about 3 minutes. The mix should look light and fluffy. Scrape the bowl as needed to ensure even blending. - Add Egg Yolks and Vanilla
Lower your speed and add 4 egg yolks, one at a time. This creates a smooth, silky mixture. Then add 1 tablespoon of vanilla extract and blend again until fully incorporated. - Alternate Dry Ingredients with Buttermilk
Add the flour mix and 1 cup of room-temperature buttermilk to the batter in stages. Always start and end with the dry mix. Mix on low speed, just until blended. Overmixing can make the cake dense. Once combined, stir gently with a spatula to eliminate any hidden flour pockets.
Baking Tips for Moist, Evenly Risen Layers
- Whip the Egg Whites Separately
In a clean bowl, beat 2 egg whites on high speed for about 3 minutes until stiff, fluffy peaks form. This extra air helps keep your cake light and tender. - Gently Fold in the Egg Whites
Don’t stir — fold. Use a spatula to gently combine the whipped whites into your batter. This preserves the air and keeps the batter from deflating. - Divide and Bake
Pour the batter evenly into your prepared pans. Smooth the tops with a spatula. Bake for 22 to 25 minutes, or until a toothpick inserted in the center comes out clean. - Cool Completely
Once baked, remove the cakes and let them cool in their pans for 10–15 minutes. Then, transfer them to a wire rack to cool completely before adding caramel icing. Icing a warm cake can cause it to melt and slip off.
Creating the Creamiest Homemade Caramel Icing
Caramel Cooking Techniques Without Burning
A proper caramel cake recipe isn’t complete without thick, silky, golden caramel icing. But here’s the truth — making caramel icing takes patience. It’s all about low heat, constant stirring, and close attention.
- Start With the Right Tools
Use a heavy-bottomed saucepan and a sauce whisk for even heating and smooth stirring. This prevents hot spots that cause the sugar to burn or lump. - Melt the Butter
Add ¾ cup unsalted butter to the saucepan over low heat. Let it melt fully before adding the other ingredients. This creates a rich, buttery base for your caramel cake. - Add Sugar, Evaporated Milk, and Salt
Once the butter melts, stir in:
- 2 cups granulated white sugar
- 2 cans (12 oz each) of evaporated milk
- ½ teaspoon kosher salt
Stir to combine everything. Then, cook over low to low-medium heat, keeping your whisk moving frequently.
- Cook Slowly, Stir Frequently
This is the part where patience pays off. Cook the caramel for about 1 hour to 1 hour 20 minutes. On a gas stove, keep the dial between low and medium — never let it get too hot.
Every few minutes, give it a vigorous whisk. This avoids scorching, promotes even cooking, and helps you achieve a smooth, lump-free consistency.
- Watch the Color Closely
You’re aiming for a rich golden brown. If it’s too light, the flavor won’t be bold enough. Too dark, and it may turn bitter. Stay close — don’t walk away during this stage.
How to Reach the Perfect Caramel Color and Thickness
Once the caramel thickens and coats the back of a spoon, it’s ready. You can test it by dipping a metal spoon into the mixture — the caramel cake should cling slightly and feel smooth.
- Add Vanilla (Optional)
Remove the pot from heat and stir in 1 tablespoon of vanilla extract, if desired. This adds a layer of warmth and depth to the flavor. - Let It Cool Before Pouring
Let your caramel icing rest for 15 to 20 minutes. It will thicken further as it cools. Pour it over your fully cooled cakes, using a rubber spatula to spread it gently. Let it drip slightly over the edges for that rustic, irresistible look. - Timing Matters
If you wait too long, the caramel cake will harden and become difficult to spread. Work while it’s thick but still pourable.
Expert Tips for Avoiding Common Mistakes
How to Prevent Overbaking or Dry Layers
Even the best caramel cake recipe can fall flat if you overbake the layers. Here’s how to ensure your cake stays moist and fluffy every time:
- Don’t guess bake time: Always set a timer. Most ovens vary, so check your cake at 22 minutes, then every 2 minutes after. Use a toothpick test — if it comes out clean or with just a few moist crumbs, it’s ready.
- Use room-temperature ingredients: Cold butter, eggs, or buttermilk don’t mix as well and may result in a dense or uneven crumb. Let all ingredients sit at room temp for about 30 minutes before mixing.
- Avoid overmixing the batter: After adding the flour and buttermilk, mix on low speed only until combined. Overworking the batter can break down the structure, leading to a tough cake.
- Level your oven rack: Always bake cakes on the center rack for even heat distribution. Uneven layers are often caused by pans being too close to the heat source.
Troubleshooting Grainy or Separated Caramel
A silky, spreadable icing is the heart of any homemade caramel cake. If your caramel is grainy, gritty, or separating, don’t panic. Use these tips to save it or prevent the problem next time:
- Low and slow is key: High heat causes the sugar to cook too fast and form crystals. Stick to low-medium heat, even if it takes longer.
- Whisk frequently with a sauce whisk: Stirring prevents hot spots and keeps the sugar dissolving evenly. If you let it sit too long, sugar may caramelize unevenly and clump.
- Add a pinch of salt early on: Salt helps stabilize caramel and prevent crystal formation. Don’t skip this ingredient — it’s not just for taste.
- Avoid adding cold vanilla at the end: If you’re using vanilla extract, make sure the caramel has cooled just slightly before adding. Cold liquid into hot caramel can cause sudden separation.
- If it splits, try this fix: Remove from heat and whisk vigorously for several minutes. Add a splash of warm evaporated milk while whisking to bring it back together.
Pro Assembly: Stacking and Frosting for a Showstopper Cake
Cooling, Trimming, and Layering Your Cakes
After baking the perfect layers for your caramel cake recipe, assembly is where everything comes together. These simple steps ensure your cake looks as good as it tastes.
- Cool Completely Before Assembling
It may be tempting to ice your cake while warm, but resist. Warm cake will cause the caramel icing to slide right off. Make sure the layers are fully cooled — ideally for at least 1 hour. - Trim for Flat Layers (Optional)
If your cakes domed during baking, use a serrated knife to level the tops. This helps with stacking and ensures your cake doesn’t tilt. - Layer with Precision
Place your first layer on a serving plate or cake board. Add a generous scoop of caramel icing to the center. Use a rubber spatula to gently spread it to the edges. Then, place the second layer on top.
Press down gently to secure the top layer but don’t push too hard — you don’t want the icing to squeeze out or the cake to crack.
- Chill Before Final Coating (Optional)
If your kitchen is warm or the icing is very soft, refrigerate the stacked cake for 15–20 minutes. This firms everything up and makes the final coating smoother.
Smoothing on the Icing and Finishing Touches
- Final Frosting
Pour the rest of the caramel icing over the top. Let it flow naturally over the edges. Use your spatula to spread it evenly across the top and sides.
The goal isn’t perfection. Caramel icing is meant to look homemade and rustic — a little drip or swirl adds charm.
- Decorative Ideas (Optional)
While classic caramel cake doesn’t need extra frills, you can elevate presentation with:
- A light sprinkle of sea salt flakes on top
- A rim of chopped toasted pecans around the base
- A drizzle of leftover caramel over the top
- Let It Set
Allow the iced cake to rest for at least 30 minutes at room temperature before slicing. This lets the caramel firm up just enough for clean cuts.
Serving Suggestions and Creative Variations
Pairing with Toppings or Additions (Fruit, Nuts, etc.)
Once your caramel cake is assembled and beautifully iced, it’s time to think about presentation and extras that elevate the experience. A classic caramel cake recipe stands strong on its own, but these additions can enhance both flavor and visual appeal:
- Toasted pecans or walnuts: Sprinkle around the outer edge or top. Their crunch adds texture and balances the sweetness.
- Thinly sliced bananas or apples: Add as a side garnish or on top for a fruity contrast.
- Sea salt flakes: A small pinch on the caramel icing can enhance the depth of flavor and bring out the buttery notes.
- Vanilla whipped cream: Serve on the side for a lighter contrast, especially helpful after a hearty meal.
Make sure these additions complement, not overpower, the rich caramel and moist cake layers. Keep it balanced and let the cake shine.
Mini Caramel Cakes and Cupcake Versions
If you want to take your caramel cake recipe beyond traditional slices, try scaling it down into smaller versions. These are great for parties, holidays, or gifting.
- Mini Caramel Cakes
Use mini cake pans (4 or 6-inch rounds). Follow the same recipe, divide the batter accordingly, and reduce baking time to about 15–20 minutes. Ice and layer them like full-sized cakes. These make perfect single-serving desserts. - Caramel Cupcakes
Pour the batter into cupcake liners, filling each about 2/3 full. Bake for 18–20 minutes. Once cooled, spoon caramel icing over each cupcake and let it drip slightly over the edges. - Caramel Sheet Cake
If you’re baking for a crowd, pour the batter into a 9×13-inch pan and bake for 30–35 minutes. Pour the caramel icing directly on top and spread evenly. Slice into squares for easy serving.
Each variation keeps the rich flavor of the original recipe but adds convenience and flexibility depending on the occasion. Try adapting it for birthdays, weddings, or bake sales — the options are endless.
Storage Tips and How to Keep Caramel Cake Fresh
Best Practices for Storing Leftovers
A delicious caramel cake recipe deserves to be enjoyed beyond day one. With the right storage methods, your cake will stay moist and flavorful for days.
- Room Temperature Storage
If your kitchen is cool and the cake will be eaten within two days, you can store it covered at room temperature. Use a cake dome, airtight container, or even a large overturned bowl to protect it from air and dust. - Refrigerator Storage
To keep the cake fresh for 3–5 days, store it in the refrigerator. Wrap the cake tightly in plastic wrap or place it in a sealed cake container to prevent the caramel cake from absorbing fridge odors or drying out.
Before serving refrigerated cake, let it sit at room temperature for about 30 minutes. This softens the butter and caramel icing, restoring that melt-in-your-mouth texture.
- Single Slices Tip: Wrap individual slices in plastic wrap and foil for quick, grab-and-go servings that stay moist.
Freezing Tips for Make-Ahead Convenience
Want to prepare your caramel cake recipe ahead of time? Freezing works surprisingly well — you just need to handle it carefully.
- Freezing Cake Layers (Unfrosted)
Wrap cooled cake layers tightly in plastic wrap, then again in aluminum foil. Freeze for up to 3 months. To thaw, place the layers in the fridge overnight, then bring to room temperature before frosting. - Freezing the Whole Cake (Frosted)
It’s possible to freeze the entire iced cake, but you’ll need to flash-freeze it first:- Place the finished cake on a tray in the freezer for about 1 hour to firm up the icing.
- Once solid, wrap the entire cake in plastic and foil, or place in a cake box and wrap the box.
- Label and freeze for up to 2 months.
To thaw, unwrap the cake and let it sit in the fridge overnight. Then bring to room temperature before serving for the best flavor and texture.
- Cupcake Freezing Tip: Freeze caramel cupcakes individually. Wrap tightly and freeze in airtight containers. Perfect for future snacking.
Conclusion
If you’ve been searching for a rich, soul-satisfying caramel cake recipe, this guide has everything you need — from ingredient breakdowns to expert baking tips and silky-smooth caramel icing techniques. This cake is more than just a dessert, it’s a statement of tradition, flavor, and home-baked love.
By using real butter, buttermilk, whipped egg whites, and slow-cooked caramel, you’re not just making any cake — you’re crafting a classic that will leave your family and guests asking for seconds. Whether you go with the full-size version, mini cakes, or cupcakes, this recipe adapts beautifully to every occasion.
For More Delicious And Easy Recipes Follow Me In Facebook And Pinterest.
