Contents
- 1 Understanding the Basics of a Triple Berry Pie Recipe
- 2 Berry Pie Recipe
- 3 Selecting and Preparing Your Berries
- 4 Making the Perfect Berry Filling
- 5 Crafting the Berry Pie Crust from Scratch
- 6 Assembling and Styling Your Triple Berry Pie
- 7 Baking the Pie to Golden Perfection
- 8 Storage, Make-Ahead, and Freezing Tips
- 9 Conclusion
Understanding the Basics of a Triple Berry Pie Recipe
What Makes a Triple Berry Pie Unique?
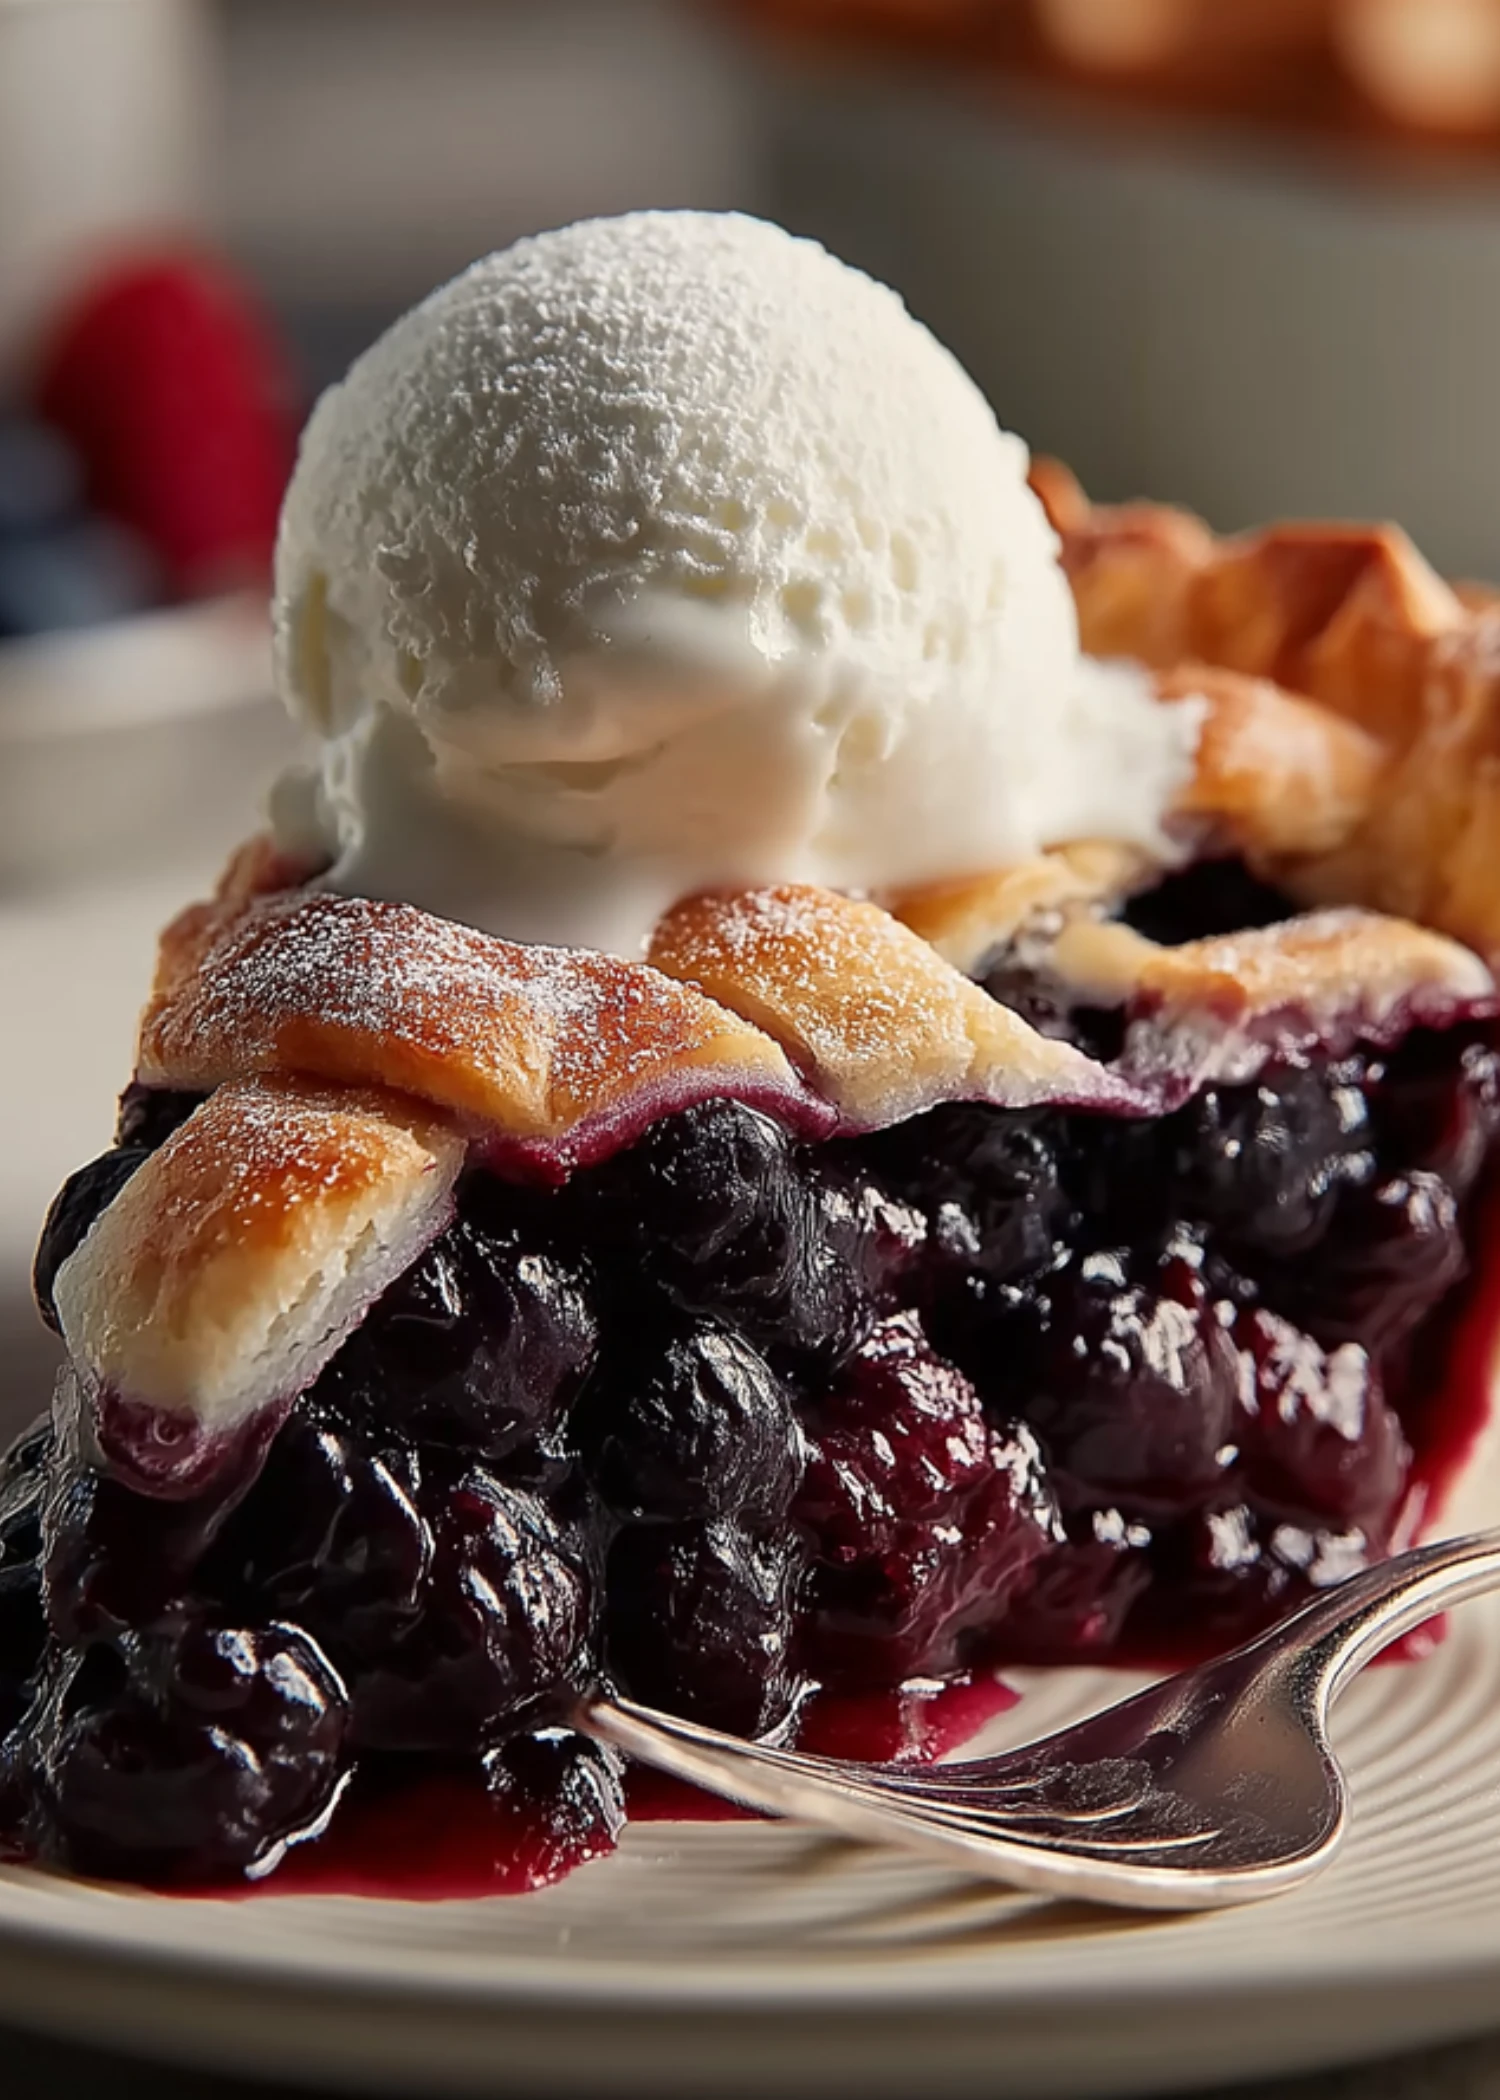
A triple berry pie blends raspberries, blueberries, and blackberries into a sweet, tangy, and juicy filling. Each berry adds something special raspberries bring brightness, blueberries add sweetness, and blackberries provide depth. This balance of flavors creates a refreshing dessert that’s not overly sugary.
What makes this Berry Pie stand out is its natural complexity. The mix of textures and tartness from the berries means you get layers of flavor in every bite. It also works great with a scoop of vanilla ice cream or a dollop of whipped cream.
Importance of Using a Homemade Pie Crust
The crust is just as important as the filling. A homemade crust offers better flavor and texture—flaky, golden, and rich. This recipe uses a double crust, perfect for a lattice or full top.
Deep-dish pans are essential because this pie is loaded with fruit. A shallow pan won’t handle the volume. The cold dough, when handled right, bakes up flaky and crisp, keeping the filling in place without becoming soggy.
Print
Berry Pie Recipe
- Total Time: 1 hour 5 minutes
- Yield: 12 servings
- Diet: Vegetarian
Description
A homemade triple berry pie filled with raspberries, blueberries, and blackberries in a buttery, flaky crust. Perfect for summer gatherings, make-ahead dinners, or any sweet craving.
Ingredients
Homemade pie crust for a 9-inch deep dish pie (top and bottom)
7 cups fresh or frozen berries (2⅓ cups each: raspberries, blueberries, blackberries)
1 cup granulated sugar (plus extra for topping)
1 tablespoon lemon juice
4 tablespoons cornstarch
2 tablespoons butter
1 egg white, beaten
Instructions
1. Add berries, sugar, and lemon juice to a large saucepan over medium heat. Simmer for 5–10 minutes until juicy.
2. Spoon ½ cup juice into a bowl. Stir in cornstarch until smooth.
3. Return to simmer, then slowly stir in cornstarch mixture. Gently cook until thick, about 2–5 minutes.
4. Stir in butter and remove from heat. Let cool 15 minutes.
5. Roll out bottom crust and place in 9″ deep dish pie pan. Pour in cooled filling.
6. Roll out second crust. Cut into strips and create lattice top or full crust with slits.
7. Pinch edges to seal. Brush top with beaten egg white. Sprinkle with sugar.
8. Bake at 400°F for 40–45 minutes. Cover loosely with foil if browning too fast.
9. Cool completely on wire rack for several hours before serving.
Notes
Use Costco frozen berries for convenience and quality.
Can be made a day ahead or frozen for up to 3 months.
Let cool completely before slicing to avoid a runny filling.
- Prep Time: 20 minutes
- Cook Time: 45 minutes
- Category: Pie Recipes
- Method: Baking
- Cuisine: American
Selecting and Preparing Your Berries
Choosing Between Fresh vs Frozen Berries
When making a triple berry pie, one of the first choices is whether to use fresh or frozen berries. Both have their advantages.
Fresh berries offer vibrant flavor and firmer texture. They’re ideal when berries are in peak season during the summer months. However, they can be pricey and spoil quickly.
Frozen berries, on the other hand, are convenient and available year-round. They’re often flash-frozen at peak ripeness, locking in flavor and nutrients. A popular and cost-effective option is Costco’s frozen triple berry blend, which includes all three berries in generous portions. This makes it easy to measure out the needed 7 cups with minimal prep.
When using frozen berries, it’s important not to thaw them before cooking. Thawing releases too much liquid, which can make the filling runny. Instead, cook them straight from frozen to help preserve texture and avoid excess moisture.
How to Prep Berries for Baking
Proper prep is key to getting the most out of your berries. Whether you’re working with fresh or frozen fruit, here’s how to get them ready:
For fresh berries:
- Rinse gently under cool water and allow them to dry completely on a paper towel.
- Remove any stems, leaves, or soft spots.
- Measure carefully—about 2⅓ cups of each berry type works best.
For frozen berries:
- Use them directly from the freezer.
- Do not thaw beforehand.
- Pick through to remove any large ice crystals or damaged pieces before cooking.
Because berries release juices as they cook, the recipe calls for simmering them with sugar and lemon juice. This process helps reduce moisture and intensifies flavor. After simmering, a portion of the juice is mixed with cornstarch to create a thick, glossy filling that won’t turn soupy.
Using the right prep technique makes a big difference. It improves texture, helps your Berry Pie hold its shape, and keeps the crust from turning soggy.
Pro Tip: Always taste the berry mix before thickening. If it’s too tart for your liking, add an extra ¼ cup of sugar. Just be careful not to over-sweeten it—this Berry Pie is best when the berries are the star.
Making the Perfect Berry Filling
Simmering the Berries to Unlock Flavor
Start by adding your raspberries, blueberries, and blackberries to a large saucepan with 1 cup of sugar and 1 tablespoon of lemon juice. Cook over medium heat, stirring gently for 5 to 10 minutes, until the berries are warm and juicy. Taste the mixture—add up to ¼ cup more sugar if you prefer it sweeter.
This step helps soften the fruit slightly while enhancing its natural flavor without breaking it down too much.
Using Cornstarch for the Ideal Texture
Scoop out ½ cup of juice from the pan and stir in 4 tablespoons of cornstarch until smooth. Pour the mixture back into the pan and stir gently. Cook for another 2 to 5 minutes until the filling thickens.
Once thick, remove the pan from heat and stir in 2 tablespoons of butter. Let the filling cool for 15 minutes before pouring it into your Berry Pie crust. This helps prevent a soggy bottom and ensures the filling holds together after baking.
Crafting the Berry Pie Crust from Scratch
Ingredients and Tools Needed
To make a flaky, buttery crust from scratch, you’ll need just a few basics:
- All-purpose flour
- Cold butter (or shortening if you prefer)
- Ice water
- Salt
You’ll also need a rolling pin, parchment paper, and a 9-inch deep-dish pie pan. Keeping everything cold is key. Chill your butter and use ice water to keep the dough from becoming sticky.
Step-by-Step Crust Assembly
Start by preparing a double pie crust recipe, since you’ll need one for the base and one for the top (lattice or full). After mixing the dough, split it in two and chill each half for at least 30 minutes.
Roll one half of the dough on a floured surface or parchment paper until it’s 1 to 2 inches wider than your Berry Pie dish. Transfer the crust to the pie pan and press it gently into place. Trim the edges if needed.
Set this bottom crust aside while the berry filling cools. Keep the second half of the dough in the fridge until you’re ready to roll it out for the top layer.
Pro Tip: For easier rolling, place your parchment paper on a damp towel to keep it from sliding around.
Assembling and Styling Your Triple Berry Pie
Pouring and Spreading the Filling Evenly
Once your crust is in place and your berry filling has cooled for at least 15 minutes, it’s time to assemble the Berry Pie. Gently pour the thickened berry mixture into the bottom crust, spreading it out evenly. Be careful not to overfill—keep the filling level with the top edge of the crust to avoid overflow during baking.
This step is key to a well-structured pie. The filling should look glossy and slightly firm but still moist enough to settle as it bakes.
Creating a Lattice Top Like a Pro
With the bottom filled, roll out your second crust on a floured surface or parchment paper. Using a pizza cutter or knife, slice it into even strips—thick or thin, depending on your style.
Here’s how to build the lattice:
- Lay half the strips vertically across the pie.
- Fold back every other strip, then lay a horizontal strip across the middle.
- Unfold the vertical strips back over the horizontal one.
- Fold back the alternate vertical strips, add another horizontal strip, and repeat until the top is fully covered.
Once the lattice is done, trim any overhanging dough and pinch the edges together with the bottom crust. Crimp the edges with your fingers or a fork for a decorative finish.
Brush the top with a beaten egg white for a glossy shine, then sprinkle with a little sugar for sparkle and texture.
Baking the Pie to Golden Perfection
Best Temperature and Timing for Flaky Crust
Now that your Berry Pie is assembled, it’s time to bake it. Preheat your oven to 400°F (204°C). Place the pie on the center rack and bake for 40 to 45 minutes. This allows the crust to turn golden brown and the berry filling to bubble and set.
About 25 minutes into baking, check the top. If it’s browning too quickly, loosely place a piece of foil over it to prevent burning while the rest of the Berry Piefinishes baking. This simple trick keeps your crust perfectly golden without turning too dark.
Don’t rush the bake time. The filling needs to bubble and thicken fully for the pie to set correctly once cooled. If you take it out too soon, it may be runny when sliced.
Cooling and Setting Tips
After baking, remove the pie from the oven and place it on a wire cooling rack. Let it cool at room temperature for several hours. This resting period is crucial. It allows the filling to firm up, making clean slices possible.
If you’re not serving the pie the same day, cover it loosely and refrigerate overnight. Chilling helps the Berry Pie maintain its structure and enhances the flavor.
Pro Tip: For best results, slice the Berry Pie once it’s fully cooled. Cutting it while warm may cause the filling to spill out before it sets.
Storage, Make-Ahead, and Freezing Tips
How to Store Leftovers
Once your triple berry pie is baked and cooled, proper storage keeps it fresh and delicious. You can leave the pie at room temperature for up to 2 days, covered loosely with foil or plastic wrap. For longer freshness, store it in the refrigerator for up to 5 days.
When refrigerating, place the Berry Pie on a flat surface and cover it to avoid drying out the crust. To enjoy leftover slices warm, simply reheat in a 300°F oven for about 10 minutes.
Make-Ahead and Freezing Instructions
This Berry Pie is incredibly make-ahead friendly. You have two options:
- Make the entire pie a day in advance: Bake it fully, let it cool, then cover and refrigerate. The next day, it’s ready to serve cold or gently warmed.
- Prepare the filling up to 3 months ahead: After cooking and thickening, let the berry filling cool completely, then transfer it to a freezer-safe container. Thaw overnight in the fridge before pouring it into an unbaked crust.
You can also freeze the fully baked pie for up to 3 months. Wrap it tightly in plastic wrap, then foil, and freeze. When ready to serve, thaw in the refrigerator overnight and let it come to room temperature. You can warm it briefly in the oven if desired.
Pro Tip: Never freeze a pie with raw fruit and raw crust together. Always freeze after the filling is cooked or the whole pie is baked for best results.
Conclusion
A homemade triple berry pie recipe is more than just a dessert—it’s a celebration of fresh, tangy berries wrapped in a flaky, golden crust. Whether you use fresh or frozen fruit, mastering this recipe means you’ll always have a reliable go-to for summer gatherings, holiday dinners, or just a sweet weekend treat.
With its vibrant color, juicy filling, and buttery texture, this Berry Pie never fails to impress. Plus, it’s freezer-friendly, easy to prep in advance, and adaptable to your sweetness preferences. Just follow the steps, trust the process, and don’t forget to let it cool before slicing.
For More Delicious And Easy Recipes Follow Me In Facebook And Pinterest.
