A rainbow cupcake recipe creates vibrant, multi-colored cupcakes that are as fun to look at as they are to eat. These cupcakes feature distinct layers of brightly colored batter stacked in cupcake liners, baked to perfection, and topped with fluffy frosting. They’re a hit at parties, pride events, school functions, and anytime you want a treat that makes people smile.
Contents
- 1 Rainbow Cupcake Recipe
- 2 Ingredients Needed for the Perfect Rainbow Cupcake Recipe
- 3 Preparing Your Cupcake Batter Like a Pro
- 4 Step-by-Step Guide to Layering Batter in Liners
- 5 Baking the Rainbow Cupcakes to Perfection
- 6 Making the Creamiest Buttercream Frosting
- 7 Decorating Rainbow Cupcakes with Style
- 8 Special Twist: How to Make Double Rainbow Cupcakes
- 9 Storage, and Troubleshooting Rainbow Cupcakes
- 10 Conclusion: Final Thoughts on Creating the Best Rainbow Cupcake Recipe
- 11 FAQs About Rainbow Cupcakes
Why Rainbow Cupcakes Are So Popular
Rainbow cupcakes rose to fame through social media and baking blogs. They’re simple to make using white cake mix and food coloring but deliver a big visual impact. Home bakers love them because they allow creativity with minimal skill. Whether you’re using gel colors or natural alternatives, these cupcakes always bring a wow factor.
Print
Rainbow Cupcake Recipe
- Total Time: 40 minutes
- Yield: 18 cupcakes
Description
A vibrant and fun rainbow cupcake recipe made with white cake mix, colorful gel food coloring, and rich buttercream frosting. Perfect for parties, pride events, or anytime you want a dessert that wows.
Ingredients
1 white cake mix
2 eggs
1 cup sour cream
1/2 cup milk
1/3 cup vegetable oil
Gel food coloring (various colors)
Frosting:
3 sticks butter (1 ½ cups, room temperature)
6 cups powdered sugar
5 tablespoons milk
1/2 teaspoon vanilla extract
1/2 teaspoon coconut extract (or all vanilla extract)
Dash of salt
Optional:
Rainbow sprinkles
Airhead Extremes candy for rainbow toppers
Mini marshmallows
Instructions
1. Preheat oven to 350°F (175°C) and line a cupcake tray with paper liners.
2. Combine cake mix, eggs, sour cream, milk, and oil in a bowl. Beat on low for 30 seconds, then on medium-high for 3 minutes.
3. Divide batter evenly into 5 or 6 bowls and color each with gel food coloring.
4. Add 2 teaspoons of the first color into each cupcake liner. Spread gently with a wet fingertip.
5. Repeat with remaining colors in rainbow order, spreading each layer before adding the next.
6. Bake for 18–22 minutes, or until a toothpick inserted comes out clean.
7. Cool cupcakes completely on a wire rack.
8. To make the frosting, beat butter until fluffy. Gradually add powdered sugar and beat until smooth.
9. Add extracts, salt, and milk (1 tbsp at a time) until desired texture is reached. Beat for 2–3 minutes.
10. Pipe frosting using a ziplock or piping bag. Decorate with sprinkles or candy rainbows.
11. For double rainbow cupcakes, reserve 1/3 cup white frosting. Tint the rest blue, frost the top, then pipe white frosting clouds. Insert rainbow candy between clouds.
Notes
Store cupcakes in an airtight container at room temperature for up to 2 days.
Unfrosted cupcakes can be frozen for up to 2 months.
Always cool cupcakes before frosting to prevent melting.
- Prep Time: 10 minutes
- Cook Time: 30 minutes
- Category: Dessert
- Method: Baking
- Cuisine: American
Ingredients Needed for the Perfect Rainbow Cupcake Recipe
Essential Cupcake Base Ingredients
To make the best rainbow cupcake recipe, you don’t need anything fancy. A box of white cake mix is your best friend here. It gives a light base that takes on color beautifully and keeps the cupcakes soft and fluffy. Here’s your ingredient checklist for the cupcake batter:
- 1 box white cake mix
- 2 eggs
- 1 cup sour cream
- 1/2 cup milk
- 1/3 cup vegetable oil
These ingredients combine to form a thick, rich batter that holds color well. Sour cream is a secret weapon—it adds moisture and depth of flavor without making the batter too thin.
Best Food Coloring and Brands for Vibrant Colors
Color is what makes these cupcakes shine. You’ll divide your batter into bowls—usually five or six, depending on how many colors you want—and color each one separately. The type of food coloring you use matters a lot:
- Gel-based food coloring is the best choice. It delivers bold, bright hues without thinning out your batter.
- Recommended brand: Wilton Color Right or Wilton Icing Colors, available at Walmart, Michaels, or Amazon.
- Avoid water-based liquid food coloring it can dilute the batter and dull your colors.
Pro tip: Use a separate spoon or spatula for each color to avoid muddying your shades.
Preparing Your Cupcake Batter Like a Pro
How to Mix the Rainbow Cupcake Recipe Batter Correctly
Getting the texture right is key to nailing this rainbow cupcake recipe. Start by combining the white cake mix, eggs, sour cream, milk, and oil in a large mixing bowl. Beat the mixture on low for about 30 seconds to incorporate the ingredients, then scrape down the sides of the bowl. Beat again on medium-high speed for 3 minutes until the batter is thick and smooth.
You’re aiming for a batter that’s thick enough to hold its shape when layered but still light and airy once baked.
Tips for Evenly Dividing and Coloring Batter
After mixing the batter, divide it evenly into 5 or 6 small bowls—one for each color. If you’re using 5 colors, you’ll get just over 1 cup per bowl. Add a small amount of gel food coloring to each and stir well. The gel helps achieve bold, vibrant colors without making the batter too runny.
Smart Tip: Use a small measuring spoon to keep layers even. For 5 colors, 2 teaspoons of each color per cupcake is just right.
Pro Technique: The batter is thick, so it won’t spread naturally. Dip your fingertip in water, then gently press and spread the batter to cover the liner base. The water keeps it from sticking to your finger and helps you layer cleanly.
This method gives you perfect stripes of color every time, with no bleeding between layers.
Step-by-Step Guide to Layering Batter in Liners
Creating a visual rainbow inside each cupcake is where the magic of this rainbow cupcake recipe truly comes to life. Once you’ve prepared and colored your batter, you’ll begin layering each shade into the Rainbow Cupcake Recipe liners.
Here’s a complete walkthrough to ensure your colors stay crisp and beautifully stacked:
- Prepare your cupcake tray with liners ahead of time. This keeps the process smooth and mess-free.
- Start with your bottom color—typically blue or purple. Scoop 2 teaspoons of the colored batter into the bottom of each liner.
- Level it out using your finger dipped in a small bowl of water. The water prevents sticking and helps you spread the batter gently without lifting or mixing colors.
- Repeat the process with each color layer. Add 2 teaspoons of each, then flatten before moving on to the next.
- Work in rainbow order for consistency: purple, blue, green, yellow, orange, and red—though you can use fewer colors if preferred.
- Be careful not to overfill. Your total volume should reach no more than 3/4 of each liner to avoid overflow when baking.
This layering method gives you sharp lines and bold contrasts once the cupcakes are baked. Each bite will reveal a perfect rainbow stripe pattern.
Techniques to Prevent Mixing and Maintain Clean Lines
To keep the color layers from blending together or becoming muddy during baking, use these expert tips:
- Keep the batter thick: That’s why we use sour cream in this recipe. It helps create a dense yet soft texture that holds its shape and color.
- Avoid tapping the tray after layering. Unlike regular cupcakes, you don’t want the batter to settle too much or blend.
- Use separate spoons or piping bags for each color. Piping bags are great for precision. If using spoons, wipe them between colors.
- Spread with a light touch: Don’t press too hard while flattening each layer. A gentle touch preserves the boundaries between colors.
If you’re baking with kids, this is a fun part to let them help with. Just make sure to supervise the layering so that each color stays distinct.
Pro tip: Test how much batter fits in one cupcake liner by measuring with water first. For example, if one liner holds 10 teaspoons of water, and you’re using 5 colors, you’ll know to use 2 teaspoons per color—simple and effective.
Whether you’re going with a classic six-color rainbow or a custom pastel palette, this technique guarantees a wow-worthy result every time.
Baking the Rainbow Cupcakes to Perfection
Ideal Oven Temperatures and Baking Times
Once your Rainbow Cupcake Recipe liners are filled with vibrant, colorful layers, it’s time to let the oven do its job. For this rainbow cupcake recipe, bake according to the directions on the cake mix box. Typically, that means:
- Preheat oven to 350°F (175°C)
- Bake for 18 to 22 minutes
Every oven varies slightly, so start checking around the 18-minute mark. A toothpick inserted in the center should come out clean, with no wet batter attached.
The thick, colorful layers may take a minute or two longer than plain cupcakes, so keep an eye on them. Don’t open the oven door too early, though, as sudden temperature drops can cause the Rainbow Cupcake Recipe to deflate.
If you’re baking two trays at once, rotate them halfway through for even baking. You want every cupcake in the batch to come out light, fluffy, and perfectly cooked.
How to Test Doneness Without Overbaking
Overbaked cupcakes lose their moisture and softness—something you absolutely want to avoid. Here are a few foolproof ways to test doneness:
- Toothpick test: Insert a clean toothpick into the center of a cupcake. If it comes out dry or with just a few crumbs, they’re done. If you see wet batter, give them another 2 minutes.
- Touch test: Gently press the top of a cupcake with your finger. If it springs back, it’s baked through. If it leaves a dent, it needs more time.
- Color check: The tops should appear slightly golden but not browned. Because the batter is colored inside, avoid relying solely on visual cues. Always use the toothpick method as your main indicator.
Let the cupcakes cool in the tray for about 5 minutes, then transfer to a wire rack to cool completely before frosting. Warm cupcakes will melt the frosting, ruining your decorations.
Patience pays off. Cooled cupcakes are easier to handle and will hold frosting much better.
Making the Creamiest Buttercream Frosting
Ingredients and Instructions for Perfect Frosting
No rainbow cupcake recipe is complete without a rich, creamy frosting to crown those colorful layers. This easy homemade buttercream uses simple ingredients but delivers bakery-quality results.
Here’s what you’ll need:
- 3 sticks of unsalted butter (1 ½ cups), at room temperature
- 6 cups powdered sugar
- 5 tablespoons milk (adjust for desired consistency)
- 1/2 teaspoon vanilla extract
- 1/2 teaspoon coconut extract (or just use all vanilla if preferred)
- Dash of salt
How to make it:
- In a large mixing bowl, beat the butter until it’s light and fluffy—about 2 minutes.
- Gradually add in the powdered sugar, 1 cup at a time. Beat after each addition to incorporate fully.
- Add the vanilla extract, coconut extract, and salt. Mix well.
- Slowly add the milk, 1 tablespoon at a time, until you reach your desired texture.
- Beat the frosting for another 2 to 3 minutes until smooth, fluffy, and pipeable.
The result is a light yet stable frosting that spreads beautifully and holds its shape if piped.
Flavoring and Coloring Options for Frosting
This vanilla-coconut blend gives your frosting a sweet, creamy flavor that complements the colorful cupcakes without overpowering them. But you can customize it:
- All-vanilla version: Great if you’re unsure about coconut.
- Citrus twist: Add 1/4 teaspoon of lemon or orange zest for a bright, zesty flavor.
- Naturally colored frosting: Use beet juice (pink), turmeric (yellow), or matcha (green) for subtle hues.
Optional Decoration: Add rainbow-colored sprinkles to the top for extra flair.
Pro Tip: Use a piping bag or a zip-top bag with the corner snipped off to frost your cupcakes easily. This technique gives you bakery-style swirls with minimal effort.
Decorating Rainbow Cupcakes with Style
How to Use Ziplock Bags as Piping Tools
You don’t need fancy piping kits to make your rainbow cupcakes look professionally decorated. One of the simplest, most effective tools you can use is sitting in your kitchen drawer—a regular ziplock bag.
Here’s how to turn it into a DIY frosting bag:
- Fill the bag with your prepared buttercream frosting using a spatula. Don’t overfill—half full is perfect.
- Seal the top tightly to prevent the frosting from leaking.
- Snip a small triangle off one of the bottom corners. This will act as your piping tip.
- Pipe onto cooled cupcakes by squeezing from the top and guiding the bag in a swirl pattern.
This method gives you great control without the cost or cleanup of traditional piping tools. You can make tight rosettes, simple swirls, or a high dome of frosting depending on your technique.
Pro Tip: If you want a more polished look, place a piping tip (like a star tip) into the corner of the bag before filling. The ziplock bag molds right around it and gives your swirls that clean, textured finish.
Fun Topping Ideas: Sprinkles, Rainbows, and Clouds
Toppings add personality to your cupcakes and make them even more fun. Here are a few ways to decorate:
- Rainbow Sprinkles: Classic and cheerful, these add instant appeal and a bit of crunch.
- Mini Marshmallows: Cut them in half and place them around the frosting swirl to mimic fluffy clouds.
- Edible Glitter: Adds sparkle and catches light beautifully, especially for party presentations.
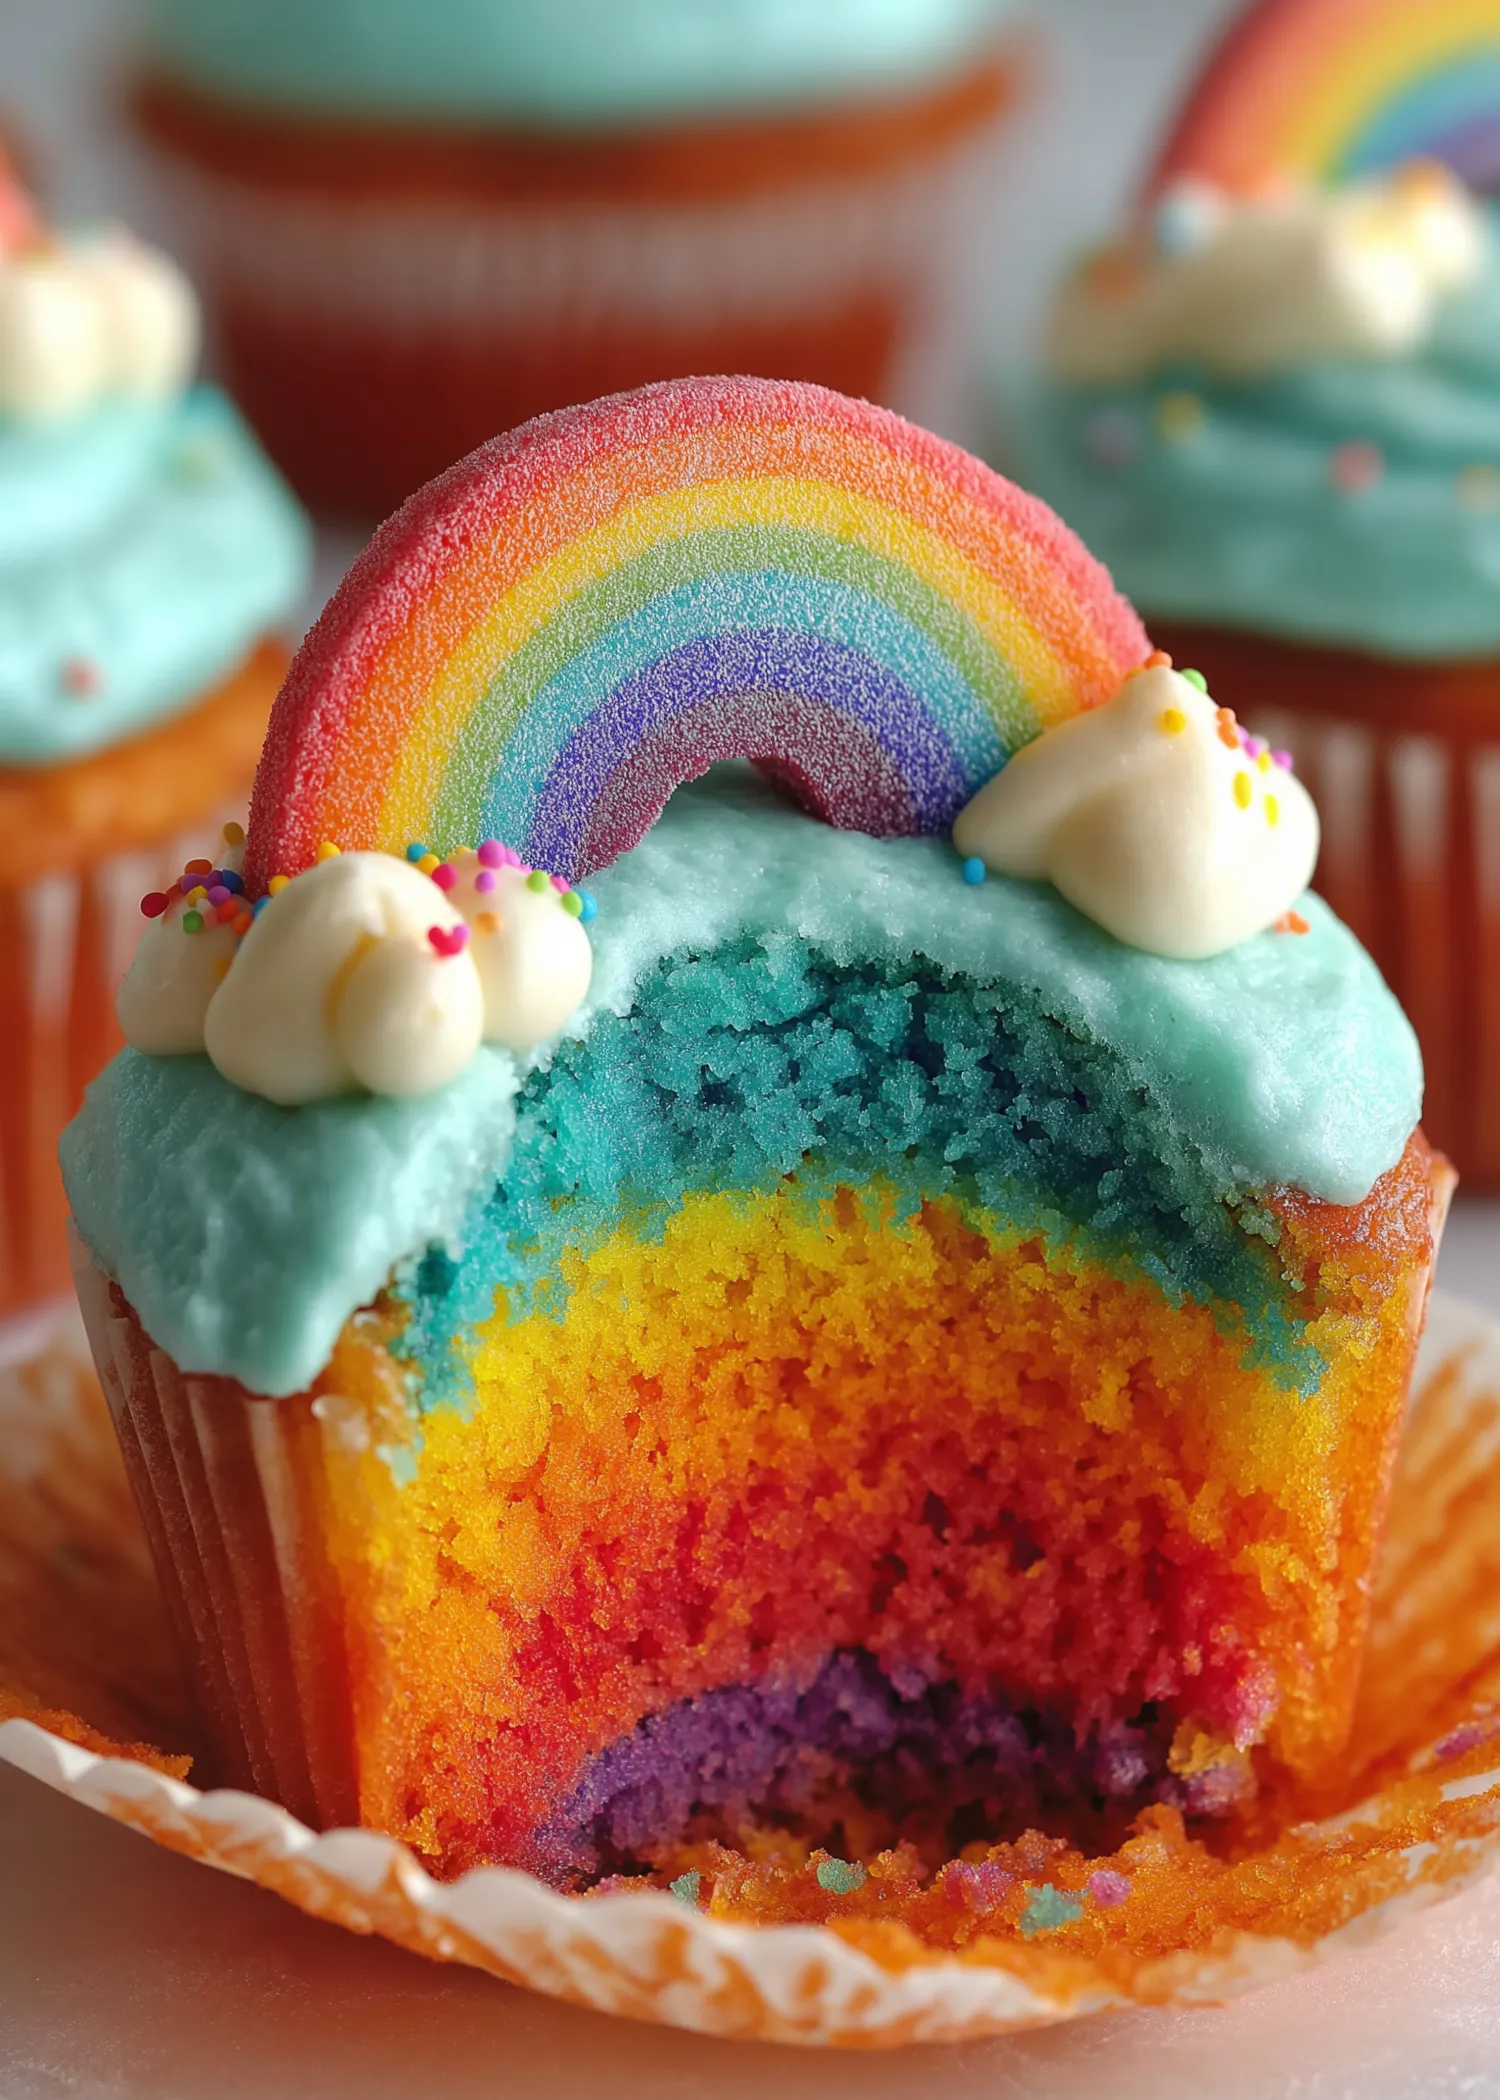
- Airhead Extremes or Rainbow Belts: Cut these chewy rainbow strips in half and bend them into an arc shape. Place the ends into two frosting clouds for an instant double rainbow cupcake.
Want to create the Double Rainbow Cupcake? Here’s how:
- Reserve about 1/3 cup of white frosting.
- Tint the remaining frosting sky blue with a drop of gel color.
- Frost each cupcake with the blue icing.
- Pipe two small “cloud” dollops of white frosting on top.
- Gently bend an Airhead Extreme into a rainbow arc and press the ends into the clouds.
It’s a whimsical touch that kids (and adults) love, making your cupcakes both tasty and visually stunning.
Decorating is your chance to be playful, creative, and bold. Each cupcake becomes a mini canvas—and when you’re done, they’ll look like they came straight from a boutique bakery.
Special Twist: How to Make Double Rainbow Cupcakes
Creating Blue Frosting Skies and White Cloud Frosting
If you want to go beyond the standard rainbow cupcake recipe, Double Rainbow Cupcakes are your next-level upgrade. These cupcakes look like little skies with rainbows popping out of fluffy white clouds—right on top of the frosting.
Here’s how to do it:
- Set aside 1/3 cup of white frosting before coloring the rest. You’ll need this untouched frosting for the clouds.
- Tint the remaining frosting blue using a gel-based food color. Just a drop or two is enough. Mix well to get that sky-blue tone.
- Once your cupcakes are completely cool, frost the tops with the blue frosting, creating a smooth, sky-like surface.
- Fill a small zip-top bag with the reserved white frosting. Snip off the corner and pipe two “clouds” on the top surface of each cupcake. Make them fluffy and round—don’t worry about precision, clouds are naturally imperfect!
This creates the perfect scene for your edible rainbow.
Using Airhead Extremes for Rainbow Garnish
Now for the show-stopping feature: the rainbow candy topper.
Here’s how to do it step by step:
- Take an Airhead Extremes rainbow strip or similar candy belt and cut it in half to make it more manageable.
- Gently bend the candy into an arc shape, but don’t press too hard or it may break.
- Insert each end of the rainbow candy into the white “cloud” dollops you piped earlier. The clouds will hold the candy in place.
It’s simple, colorful, and gives your Rainbow Cupcake Recipe a delightful 3D effect that’s perfect for birthdays, Pride events, baby showers, or themed parties.
Optional Add-ons:
- Mini marshmallows for extra clouds
- Silver edible glitter for a sparkle-in-the-sky effect
- Tiny star sprinkles to give a nighttime feel
These Double Rainbow Cupcakes aren’t just a twist on the classic—they’re a visual and flavorful celebration that takes your baking creativity to the next level.
Storage, and Troubleshooting Rainbow Cupcakes
Storing Cupcakes for Freshness
Once your rainbow cupcakes are beautifully baked and decorated, the last thing you want is for them to dry out or lose their charm before serving. Here’s how to keep them fresh and moist:
- Room Temperature (Best for Short-Term): Store unfrosted or frosted cupcakes in an airtight container at room temperature for up to 2 days. Make sure they’re in a single layer to prevent squishing the frosting.
- Refrigeration (For Humid Climates or Dairy-Based Frosting): If it’s particularly warm or humid, store them in the fridge. Use an airtight container and bring them back to room temperature before serving—cold cupcakes can taste dense.
- Freezing (Long-Term Storage): Freeze unfrosted cupcakes for up to 2 months. Wrap each in plastic wrap and store in a freezer bag. To thaw, unwrap and let them sit at room temperature. You can also freeze frosting separately and re-whip after thawing.
Pro Tip: Don’t frost warm cupcakes. Always allow cupcakes to cool completely on a wire rack. This keeps your frosting from melting and sliding off.
Common Mistakes and How to Avoid Them
Even the most fun rainbow cupcake recipe can go sideways without a few precautions. Here are common issues bakers face and how to fix or avoid them:
| Problem | Cause | Fix |
|---|---|---|
| Colors bleeding together | Batter too thin | Use gel coloring and thick batter |
| Cupcakes doming too much | Oven too hot | Stick to 350°F, rotate tray mid-bake |
| Dry cupcakes | Overbaking | Check doneness early using toothpick |
| Frosting melts or slides | Cupcakes not fully cooled | Always cool cupcakes completely |
| Candy rainbows falling or sagging | Candy too soft or clouds too small | Use thick clouds and firm candy strips |
Extra Tips:
- Always use gel food coloring to keep colors bold and batter thick.
- Use the “wet finger” technique for evenly spread layers.
- Measure batter carefully to ensure consistent layering and size.
- Avoid overmixing once you add colors—this can deflate your batter.
Following these steps will keep your cupcakes moist, colorful, and party-ready, no matter when or where you serve them.
Conclusion: Final Thoughts on Creating the Best Rainbow Cupcake Recipe
Baking rainbow cupcakes is more than just making a dessert—it’s creating an experience. Whether you’re making them for a party, celebration, or just a fun weekend project, this rainbow cupcake recipe brings joy, color, and plenty of flavor to the table.
From carefully mixing a thick, moist batter to layering bold colors and crafting dreamy frosting swirls, every step is worth the payoff. And with simple tools like ziplock bags and a bit of patience, your results will look stunning and taste just as good.
For More Delicious And Easy Recipes Follow Me In Facebook And Pinterest.
FAQs About Rainbow Cupcakes
How many cupcakes do I need to make a rainbow?
To create a full visual rainbow display, you typically need at least 6 cupcakes, each representing a color of the rainbow (red, orange, yellow, green, blue, purple). However, for a traditional rainbow cupcake recipe, one cupcake includes all the rainbow layers inside, so the number depends on your event. A batch of 18 rainbow cupcakes is ideal for a small party or themed gathering.
Can you add food coloring to cupcakes?
Absolutely. Adding gel-based food coloring to your cupcake batter is the key to achieving vibrant, bold layers. Avoid water-based food coloring as it can thin out the batter and make the colors less vivid. Gel colors maintain the batter’s thickness and bake beautifully.
What is the secret to fluffy cupcakes?
The secret to fluffy cupcakes lies in a few simple techniques:
– Beat the batter for a full 3 minutes on medium-high to incorporate air.
– Use room temperature ingredients like eggs and sour cream.
– Don’t overmix once the batter is colored.
– Use cake flour or a soft cake mix for an airy texture.
Also, make sure not to overbake—the moment a toothpick comes out clean, they’re done.
How to make two-color cupcakes?
To make two-color cupcakes, divide your batter into two bowls and color each with your chosen shades.
– Spoon one color into the cupcake liner and spread it evenly.
– Then layer the second color on top and smooth it gently.
You can swirl the two layers slightly with a toothpick for a marbled effect or keep them separated for a bold dual-tone look. This is a great alternative if you want less prep than full rainbow layering.
