The Happiness Cake Recipe is more than just layers of cake—it’s layers of memory, love, and sweetness, straight from the heart of my kitchen.
My journey with baking began in my grandmother’s warm, cinnamon-scented kitchen, where I learned that food isn’t just eaten—it’s felt. Over the years, baking became my comfort, my creative outlet, and eventually, my family’s favorite tradition.
Through Wish-Cake.com, I now share the recipes that shaped me, in hopes they’ll bring joy into your kitchen too. This joyful dessert shows how just a handful of basic ingredients can come together to create a moment that lingers in memory and spirit.
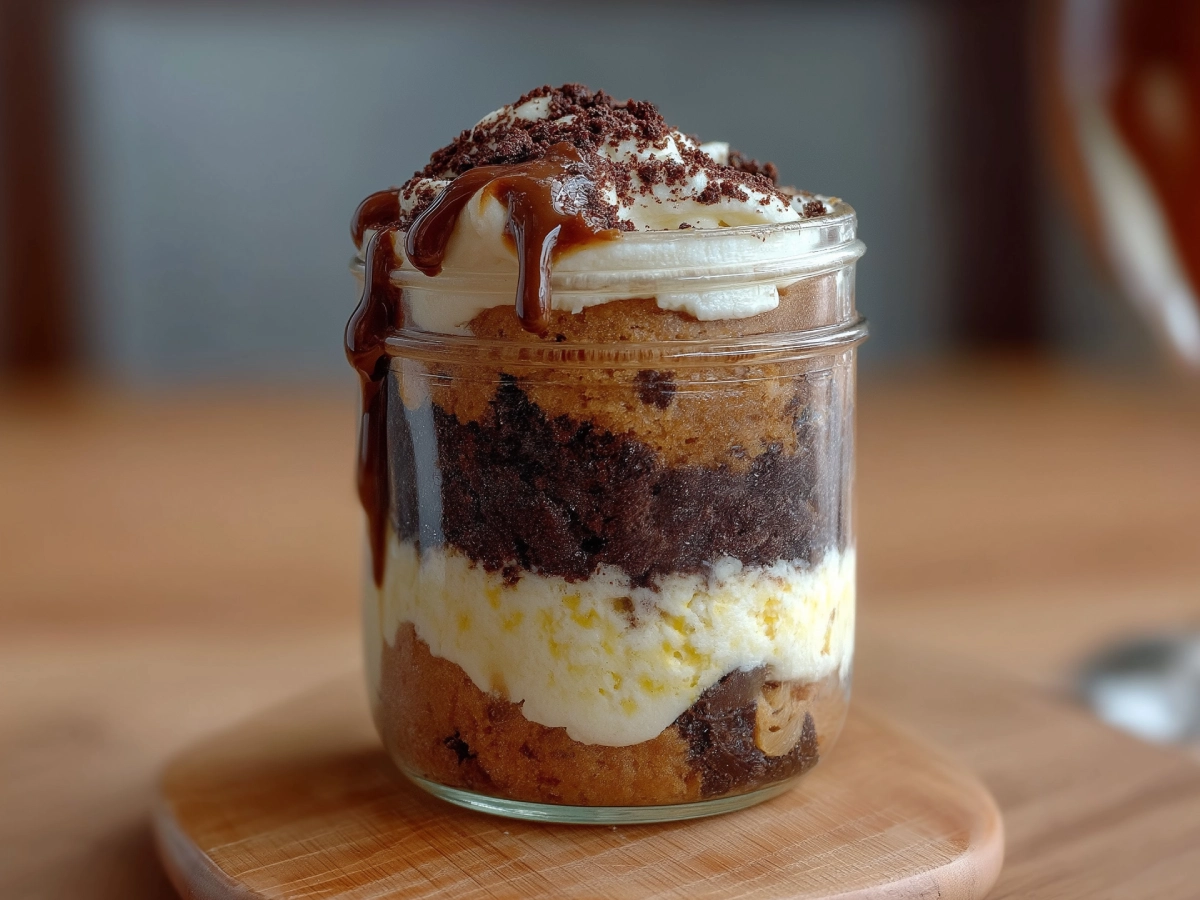
Inspired by the Momofuku Milk Bar’s chocolate chip layer cake, this version comes to life with moist chocolate chip cake, zesty passion fruit curd, crunchy chocolate crumbs, and rich coffee buttercream—all layered in adorable mason jars. It’s portable, freezer-friendly, and honestly, a spoonful of pure joy.
Contents
- 1 Key Ingredients of a True Happiness Cake Recipe
- 2 Happiness Cake Recipe
- 3 Baking the Chocolate Chip Layer Cake for the Happiness Cake Recipe
- 4 Making the Passion Fruit Curd from Scratch
- 5 Crunchy and Sweet – Chocolate Crumbs Preparation
- 6 Mastering the Coffee Frosting Technique
- 7 Step-by-Step Assembly of the Happiness Cake in Jars
- 8 Serving and Gifting Ideas for the Happiness Cake Recipe
- 9 Variations of the Happiness Cake Recipe
- 10 FAQs About the Happiness Cake Recipe
Key Ingredients of a True Happiness Cake Recipe
Overview of Essential Components
At the heart of every great Happiness Cake Recipe are four signature layers that work together to create an unforgettable dessert. This dessert features a mix of flavors and textures: a moist cake speckled with chocolate chips, a tangy passion fruit layer, crunchy bits of chocolate, and a smooth coffee-infused creamy topping. Each one brings a unique texture and flavor that makes this jar cake truly live up to its name.
Planning ahead is key—some parts need cooling, while others are best used fresh. Let’s break down each element so you can prep like a pro.
Chocolate Chip Butter Cake: The Base Layer
Soft, rich, and studded with mini chocolate chips, this layer brings that nostalgic cake texture everyone loves. This recipe uses fresh dairy, sweetener, and eggs for richness, while buttermilk adds a soft, tender bite. A touch of vanilla rounds it out with familiar, nostalgic flavor.
Quick Tips:
- Beat the butter and sugar together until the mixture looks lighter in color and feels soft and airy.
- Use cake flour for a tender crumb.
- Don’t overmix after adding the flour—just enough to combine.
- Cool completely before cutting to shape.
Once baked, you’ll cut circles of this Happiness Cake Recipe to layer into jars, forming a solid and flavorful foundation.
Passion Fruit Curd: A Tangy Twist
This bright, tropical curd brings a pop of citrusy flavor that balances out the sweetness of the Happiness Cake Recipe and frosting. It’s smooth, tart, and just sweet enough—exactly what this dessert needs to feel fresh and light.
Why It Works:
- Adds a vibrant contrast to the richer layers.
- Creates a smooth, custard-like texture between cake and crumbs.
- Elevates the overall flavor with a tropical note.
Prepare it in advance and let it cool completely—this helps it stay firm and glide on easily without losing its form.
Chocolate Crumbs: Crunch with Depth
Every bite needs texture, and these crunchy chocolate crumbs deliver. They’re rich, slightly salty, and packed with cocoa flavor. Baked until just crisp, they bring a deep, almost brownie-like flavor to the mix.
Bonus: Make extra—they’re great on ice cream, yogurt, or straight from the jar.
Coffee Buttercream Frosting: The Creamy Finish
This frosting brings it all together. Light, airy, and infused with a gentle coffee flavor, it adds a creamy element that finishes each jar on a high note. It’s made by slowly mixing coffee milk into whipped butter and powdered sugar until glossy and smooth.
Frosting Fixes:
- If it looks separated, keep mixing—it’ll come together.
- Adjust espresso powder for more or less intensity.
- Use immediately after whipping for best texture.
Each component of the Happiness Cake Recipe plays a role in creating contrast—soft and crunchy, sweet and tangy, rich and bright. In the next section, we’ll show you exactly how to bake the chocolate chip cake that starts it all.
Print
Happiness Cake Recipe
- Total Time: 1 hour 35 minutes
- Yield: 1 hour 35 minutes 1x
- Diet: Vegetarian
Description
A joyful, layered dessert in a jar featuring chocolate chip cake, tangy passion fruit curd, crunchy chocolate crumbs, and silky coffee frosting. Perfect for gifting, freezing, or treating yourself.
Ingredients
Cake Layer:
1/2 cup butter
1 1/4 cups sugar
1/4 cup light brown sugar
3 eggs
1/2 cup buttermilk
1/2 cup canola oil
1 tbsp vanilla extract
1 1/2 cups cake flour
1 tsp baking powder
1 tsp kosher salt
3/4 cup mini chocolate chips
Passion Fruit Curd:
1/2 cup passion fruit purée
1/3 cup sugar
2 eggs
1/2 tsp powdered gelatin
3/4 cup cold butter, cubed
1/2 tsp kosher salt
Chocolate Crumbs:
1/3 cup flour
1/4 cup sugar
1/3 cup cocoa powder
1/2 tsp kosher salt
1/2 tsp cornstarch
3 tbsp melted butter
Coffee Frosting:
1 cup butter (room temperature)
1/2 cup confectioners’ sugar
1/3 cup whole milk
1 1/2 tsp instant espresso powder
1/2 tsp salt
Instructions
Bake Cake: Prepare and bake chocolate chip cake in a 9×13-inch pan. Cool completely.
Make Curd: Blend purée, sugar, and eggs. Heat, then mix in gelatin and butter. Chill.
Prepare Crumbs: Mix dry ingredients, add butter, form clusters, and bake. Cool completely.
Make Frosting: Whip butter and sugar, slowly add coffee milk, beat until fluffy and glossy.
Assemble Jars: Layer cake, curd, crumbs, frosting. Repeat.
Freeze: Cover and freeze for at least 12 hours. Thaw before serving.
Notes
Nutrition values are approximate and may vary based on ingredient brands or substitutions.
- Prep Time: 1 hour
- Cook Time: 35 minutes
- Category: Cakes Recipes
- Method: Baking, Layering, Freezing (Jar Assembly)
- Cuisine: American
Nutrition
- Serving Size: 1 Cake
- Calories: 510
- Sugar: 38g
- Sodium: 270mg
- Fat: 30g
- Saturated Fat: 17g
- Unsaturated Fat: 11g
- Trans Fat: 0.3g
- Carbohydrates: 52g
- Fiber: 2g
- Protein: 5g
- Cholesterol: 105mg
Baking the Chocolate Chip Layer Cake for the Happiness Cake Recipe
Ingredients Breakdown and Mixing Tips
To start building the Happiness Cake Recipe, you’ll need a soft, fluffy chocolate chip cake that’s both rich and sturdy. This is the base layer of joy—the first bite that sets the tone for the whole dessert. The cake should be flavorful enough to stand on its own but balanced to complement the tangy curd and creamy frosting layered on top.
Here’s what you’ll need to prepare the chocolate chip layer for your Happiness Cake Recipe:
- 1/2 cup butter, room temperature
- 1 1/4 cups sugar
- 1/4 cup packed light brown sugar
- 3 eggs
- 1/2 cup buttermilk
- 1/2 cup canola oil
- 1 tablespoon vanilla extract
- 1 1/2 cups cake flour
- 1 teaspoon baking powder
- 1 teaspoon kosher salt
- 3/4 cup mini chocolate chips
- Nonstick spray and parchment paper
Each of these ingredients plays a key role in building structure and flavor. Let’s mix them the right way.
Step-by-Step Instructions for the Cake Layer
1. Preheat and Prepare Your Pan
Preheat your oven to 350°F. Lightly grease a 9×13-inch baking pan with nonstick spray and line it with parchment paper. This makes sure your chocolate chip layer comes out clean and easy to cut—perfect for layering into jars for the Happiness Cake Recipe.
2. Cream Butter and Sugars
In a stand mixer fitted with the paddle attachment, cream the butter, sugar, and brown sugar together until light and fluffy. This adds air, which is crucial for a soft cake.
3. Mix in Eggs
Crack in an egg, mix it thoroughly until smooth, then repeat for each remaining egg to ensure a silky blend. This helps bind the batter and adds richness.
4. Combine Wet Ingredients
Slowly stream in the buttermilk, canola oil, and vanilla extract. Once fully combined, beat on medium-high for about 4 to 6 minutes. You want a smooth, homogenous batter—a key foundation for a successful Happiness Cake Recipe.
5. Add Dry Ingredients
Turn the mixer down to its lowest setting and slowly fold in the flour, leavening, and salt. Mix just until the batter absorbs the dry bits—don’t overdo it.
6. Fold in Chocolate Chips
Use a spatula to gently fold the mini chocolate chips through the batter, making sure they’re evenly scattered. This ensures chocolate in every bite of your Happiness Cake Recipe.
7. Bake the Cake
Spread the batter evenly in the pan. Place in the oven and cook for about 30 to 35 minutes, or until lightly pressed in the center and it bounces back with ease. Avoid overbaking to keep the cake moist.
8. Cool Completely
Cool the cake fully before assembly. For quicker chilling, place it in the fridge. A cold cake is easier to cut clean circles from when building your Happiness Cake Recipe jars.
Tips for Moist and Perfect Cake Texture
- Use room-temperature butter and eggs to help the batter emulsify properly.
- Don’t skip the oil—it adds lasting moisture to your chocolate chip cake layer.
- If in doubt, check the cake early. Overbaking dries out the base and throws off the balance of your Happiness Cake Recipe.
Once the cake is baked and cooled, it’s time to move on to the next layer: the passion fruit curd. This tropical touch brings brightness and a surprise twist that makes every jar of this Happiness Cake Recipe feel special.
Making the Passion Fruit Curd from Scratch
Why Passion Fruit Works Perfectly in the Happiness Cake Recipe
Every great Happiness Cake Recipe needs balance—and that’s exactly what the passion fruit curd brings. Sweet, tangy, and refreshingly bold, this curd slices through the richness of the chocolate chip cake and creamy coffee frosting, elevating every bite. Its bright color and flavor give the cake its signature “zing,” making it a standout in any dessert spread.
Passion fruit may seem exotic, but it’s easy to work with once you know how. Whether you’re using fresh purée or store-bought, this curd transforms the Happiness Cake Recipe from ordinary to unforgettable.
Ingredients You’ll Need
To prepare the curd for your Happiness Cake Recipe, gather the following:
- 1/2 cup passion fruit purée
- 1/3 cup sugar
- 2 eggs
- 1/2 teaspoon powdered gelatin
- 3/4 cup unsalted butter (cold, cut into cubes)
- 1/2 teaspoon kosher salt
- 2 tablespoons cold water (for blooming the gelatin)
How to Make Passion Fruit Curd
Step 1: Blend the Base
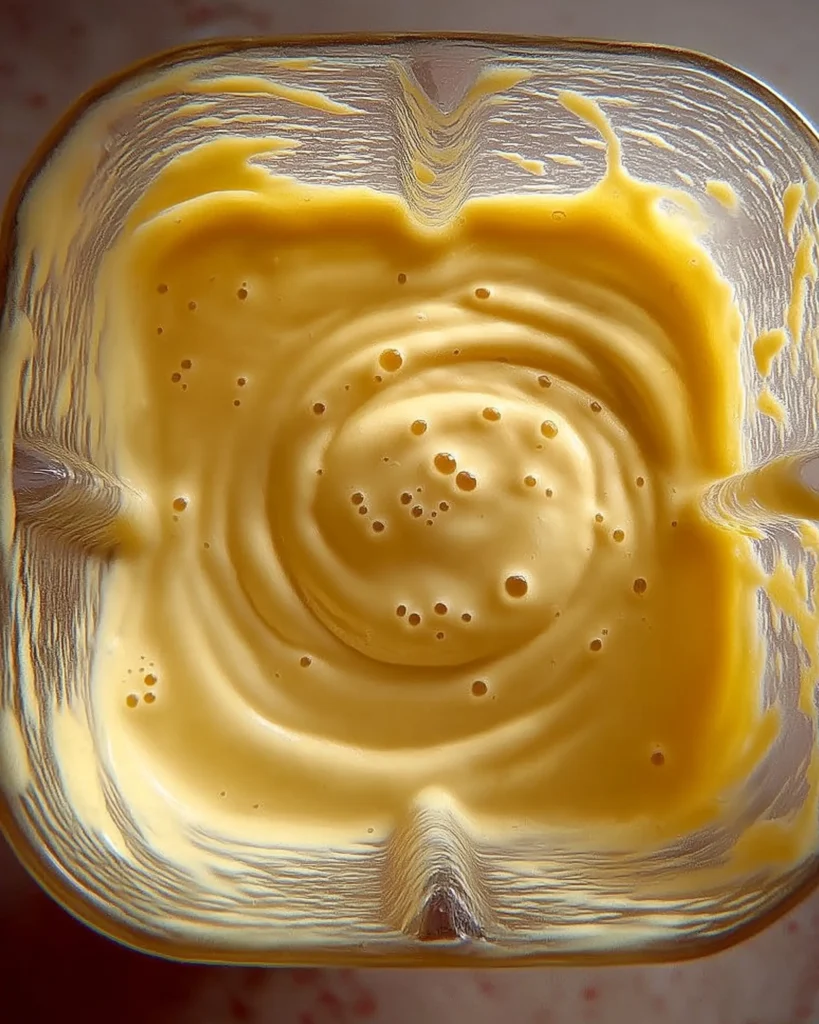
In a blender, combine the passion fruit purée and sugar. Blend on low until the sugar dissolves completely. Gently beat in the eggs, stirring until the mixture becomes smooth and unified in texture. You’ll end up with a vibrant yellow-orange mixture.
Step 2: Bloom the Gelatin
Place cold water (2 tablespoons) in a small dish, gently scatter the gelatin on top, and leave it undisturbed for 5 minutes so it can absorb and expand. This step is key to helping the curd set in your Happiness Cake Recipe jars.
Step 3: Cook the Mixture
Spoon the blended mixture into a cooking pot and slowly heat it using a low setting, keeping the temperature mild throughout. Whisk constantly while the mixture warms. Continue until it just starts to bubble and thicken slightly—this means the eggs are cooked, and the curd is ready for the next step.
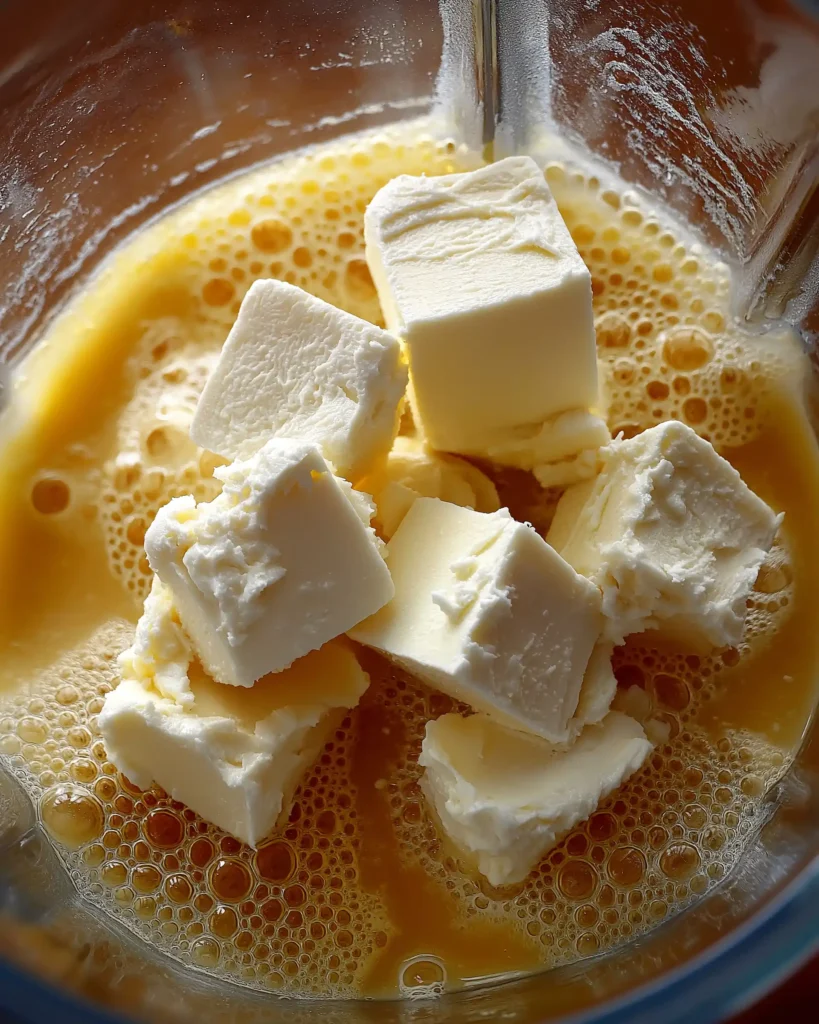
Step 4: Blend Again with Butter
Transfer the hot curd base back into your clean blender. Stir in the softened gelatin, small chunks of chilled butter, and a pinch of salt. Continue blending until everything melts into a thick, shiny, and silky mixture.
Step 5: Chill the Curd
Pour the curd into a heatproof container and refrigerate for at least 30 minutes, or until fully chilled. This will give you the ideal consistency for layering into your Happiness Cake Recipe jars.
Pro Tips for Perfect Passion Fruit Curd
- Use high-quality purée: Fresh or frozen works, but avoid juice blends with added sugar or preservatives.
- Don’t skip the gelatin: It ensures the curd holds its shape between layers.
- Blend twice: First for dissolving sugar, and again after cooking for a silky, smooth finish.
- Make ahead: Curd can be made up to a week in advance and stored in the fridge.
How Passion Fruit Curd Complements the Other Layers
In the overall Happiness Cake Recipe, the curd acts as the flavor pivot. The cake offers warmth and sweetness, the chocolate crumbs bring crunch, and the frosting adds creaminess—but it’s the curd that adds life. Its tang cuts through every bite, making sure the cake never feels too heavy or overly sweet.
Visually, it adds a pop of golden color between the darker layers. Flavor-wise, it brings contrast and depth. It’s the hidden gem that transforms each spoonful into a delightful surprise.
Crunchy and Sweet – Chocolate Crumbs Preparation
How Chocolate Crumbs Enhance the Happiness Cake Recipe
Every bite of the Happiness Cake Recipe is about contrast—soft and crunchy, rich and tart, creamy and bold. That’s where the chocolate crumbs come in. These little clusters of cocoa-flavored goodness bring just the right amount of texture and deep chocolate flavor to balance the cake’s softness and the curd’s brightness.
Without the crumbs, this dessert might feel one-note. With them, it becomes layered in both flavor and feel—each spoonful delivering a surprise crunch nestled between smooth frosting and tender cake. They’re essential for turning this from just another jar cake into a full sensory experience.
Ingredients You’ll Need for Chocolate Crumbs
To create this signature component for your Happiness Cake Recipe, you’ll need:
- 1/3 cup all-purpose flour
- 1/2 teaspoon cornstarch
- 1/4 cup sugar
- 1/3 cup cocoa powder (unsweetened)
- 1/2 teaspoon kosher salt
- 3 tablespoons unsalted butter, melted
This simple list delivers big flavor. The cocoa provides the rich base, cornstarch helps form clumps, and the butter binds it all together into crisp, chocolatey bites.
Step-by-Step Instructions to Make Chocolate Crumbs
Step 1: Preheat the Oven
Set your oven to 300°F (150°C). Line a baking sheet with parchment paper or a silicone baking mat.
Step 2: Mix Dry Ingredients
Place the dry ingredients—flour, cocoa, cornstarch, sugar, and salt—into a large bowl. If using a stand mixer, attach the flat beater before mixing them together at a low speed until well blended. Mix on low until the dry ingredients are fully blended.
Step 3: Add Butter and Form Clusters
Pour in the melted butter while mixing on low. Continue until small, moist clumps form. You’re not aiming for dough—it should look like crumbly clusters.
Step 4: Bake
Evenly distribute the blended mixture across a lined baking tray. Let it bake for 20 minutes, giving it a stir midway to help it crisp up evenly on all sides. When done, the crumbs will be slightly soft but will harden as they cool.
Step 5: Cool and Store
Let them cool completely. Once cooled, store in an airtight container at room temperature for up to a week, or in the fridge or freezer for longer storage. Now you’ve got the crunchiest layer of your Happiness Cake Recipe ready to go.
Tips for the Perfect Crunch
- Don’t overbake: If crumbs become too dry, they’ll lose their slightly chewy center.
- Use a fine cocoa powder: It blends better and creates a smooth flavor.
- Break them up gently: Some larger pieces are great for bite variation, but keep most clusters small enough to fit comfortably into your mason jars.
Other Uses for Extra Chocolate Crumbs
Made too much? Lucky you. These chocolate crumbs are versatile and addictive. Besides layering them into your Happiness Cake Recipe, try using extras to:
- Top ice cream or yogurt
- Add texture to milkshakes or smoothies
- Layer into trifles or parfaits
- Use as a garnish on frosted cupcakes
Why This Layer Matters
This element may be small, but it plays a big role in the overall Happiness Cake Recipe. The deep chocolate flavor connects with the chips in the cake and the bitterness in the coffee frosting. The crisp texture wakes up the bite. And the slight saltiness helps pull all the sweet and tart flavors together.
More than just a topping, the crumbs make this dessert multidimensional. They add that “something extra”—a textural surprise that keeps you going back for the next spoonful.
Mastering the Coffee Frosting Technique
What Makes Coffee Frosting Special in the Happiness Cake Recipe
Of all the layers in the Happiness Cake Recipe, the coffee frosting is perhaps the most unexpected—and the most indulgent. It’s not just a finishing touch; it’s the silky ribbon that wraps all the flavors together. Smooth, shiny, and full of espresso richness, this buttercream frosting is the balance point between the zingy passion fruit curd and the deep chocolate layers.
Unlike traditional frostings that lean overly sweet, this version is bold and sophisticated, with just enough caffeine kick to surprise your taste buds. And in every spoonful of the finished cake jar, it delivers that creamy, cloud-like texture that makes the Happiness Cake Recipe live up to its name.
Ingredients You’ll Need
To make a glossy, whipped coffee buttercream for your Happiness Cake Recipe, gather:
- 1 cup unsalted butter, at room temperature
- 1/2 cup confectioners’ sugar
- 1/3 cup whole milk
- 1 1/2 teaspoons instant espresso powder
- 1/2 teaspoon kosher salt
This minimalist mix results in maximum flavor and texture. The espresso cuts through the sweetness, and the milk helps create the smooth emulsion that makes this frosting spread like a dream.
Step-by-Step Instructions to Make Coffee Buttercream
Step 1: Cream Butter and Sugar
In a stand mixer with a paddle attachment, beat the butter and confectioners’ sugar together on medium-high speed for about 2–3 minutes. The mixture should be light, fluffy, and pale yellow—this sets the base for your Happiness Cake Recipe frosting.
Step 2: Make the Coffee Milk
In a separate dish, stir together the milk, fine espresso granules, and a touch of salt until everything blends seamlessly. You’ll end up with a smooth blend that gives off a deep coffee aroma and has a gentle, tan-colored appearance.
Step 3: Slowly Add Coffee Milk
Turn the mixer to low and slowly stream in the coffee milk, adding just a bit at a time. This is the tricky part—because you’re adding liquid to fat, the mixture may separate or curdle. Don’t panic. Just keep mixing slowly and let the butter reabsorb the liquid gradually.
Step 4: Beat Until Glossy and Fluffy
After pouring in the entire coffee milk mixture, turn the mixer up to a medium setting and continue blending it for another 3 to 5 minutes until it’s smooth and airy. The frosting will eventually come together into a smooth, shiny, whipped cream-like consistency.
If it doesn’t fully emulsify, don’t worry. You can remove excess liquid, continue to beat the butter mixture, and still end up with a rich, spreadable coffee frosting that works beautifully in the Happiness Cake Recipe.
Frosting Fixes and Pro Tips
- Too runny? Chill it for 10–15 minutes, then re-whip.
- Too strong? Use less espresso powder or add a tablespoon of cream to mellow it out.
- Splitting? Be patient. Slow mixing is key to bringing it back together.
This frosting is best used immediately after whipping, especially when layering into jars where texture and presentation both matter. Keep it chilled in the refrigerator if you’re saving it. When you want to use it again, allow it to warm up naturally on the counter, then give it a quick mix to bring back its original texture.
Why a Velvety Coffee Topping Turns an Ordinary Joy Cake into a Soul-Warming Delight
The Happiness Cake Recipe wouldn’t feel complete without this luxurious final layer. The frosting brings warmth and creaminess to balance the passion fruit’s tang, mirrors the cake’s sweetness, and contrasts the cocoa-rich crumbs.
It’s the layer that pulls everything together visually and flavor-wise. Spoon it in as the top layer of your cake jar, or use it as a smooth cushion between layers. It gives the entire dessert a sense of finish and flair—a final moment of indulgence.
Step-by-Step Assembly of the Happiness Cake in Jars
Cutting Perfect Circles for Cake Layers
Once all your components are prepped, it’s time to assemble your Happiness Cake Recipe. Start by cutting cake rounds to fit your jars. Use an empty 8 oz. jar or a cookie cutter as a guide. You’ll need two circles per jar. Chill the cake beforehand for cleaner cuts.
Any leftover scraps? Layer them into a bonus jar for snacking—no one’s judging.
Ideal Layering Order
Assembly is all about balance and texture. Here’s the recommended order for each jar:
- First Cake Layer
Press into the bottom of the jar. - Passion Fruit Curd
Spoon a layer evenly over the cake. - Chocolate Crumbs
Sprinkle on for crunch. - Coffee Frosting
Pipe or spread a smooth layer on top. - Repeat Layers
Add a second cake round, then curd, crumbs, and finish with more frosting.
Chill Before Serving
Cover each jar tightly and freeze for at least 12 hours. This step helps the layers set and flavors develop. When ready to serve, thaw in the fridge for about 3 hours. The Happiness Cake Recipe can stay frozen for up to 2 weeks—great for prepping ahead.
Why Jars Make It Better
Jars make this cake portable, freezer-friendly, and perfect for gifting. They also show off those gorgeous layers, giving this dessert a stunning visual appeal with zero extra effort.
Short on time or jars? Layer everything in a single dish or cup. The flavors still shine—it’s just a little less portable.
Serving and Gifting Ideas for the Happiness Cake Recipe
Serving Tips for Every Occasion
Once set, the Happiness Cake Recipe is ready to serve straight from the jar. Just grab a spoon and dig in. It’s simple, satisfying, and show-stopping with those beautiful layers on display.
Want to dress it up?
- Top with a swirl of whipped cream
- Sprinkle on crushed chocolate or espresso beans
- Lightly pour a ribbon of sweet chocolate or creamy caramel over the top for extra flavor
Whether casual or elegant, this cake adapts easily to any moment.
Perfect for Gifting
The Happiness Cake Recipe makes a thoughtful, homemade gift. The jars are portable, freezer-safe, and easy to personalize. Just tie on a tag with a ribbon and include a quick note like:
- “Defrost before serving”
- “Scoop with love”
- “Best eaten with a smile”
Perfect for celebrating a birthday, thanking a teacher, enjoying the holidays, or giving a sweet surprise anytime.
Small Tweaks, Big Impact
Customize your jars by:
- Swapping in vanilla or chocolate frosting
- Adding themed toppings or sprinkles
- Using mini jars for party favors
- Leaving out the coffee for a kid-friendly version
Variations of the Happiness Cake Recipe
Simple Ways to Switch It Up
The Happiness Cake Recipe is easy to customize. Whether you’re adjusting for preferences or just trying new flavors, small changes can keep it fresh and fun.
Try these flavor swaps:
- Curd: Replace passion fruit with lemon, raspberry, or mango.
- Frosting: Not a fan of coffee? Use vanilla, chocolate, or cream cheese frosting.
- Crumbs: Go with vanilla cookie crumbs or spiced streusel for a different crunch.
Other Formats to Explore
Love the concept but not the jars? No problem.
- Make it a sheet cake with layered toppings.
- Build mini trifles in cups for a party.
- Use cupcake liners for single-serving versions.
Every version keeps the heart of the Happiness Cake Recipe intact—layered, rich, and joyful.
Dietary-Friendly Options
Make it work for any diet:
- Gluten-free cake mix
- Dairy-free butters and milk
- Egg alternatives like applesauce or flaxseed
- Replacing “lower sugar” with “fewer carbs” to sidestep typical terminology
For More Delicious And Easy Recipes Follow Me In Facebook And Pinterest.
FAQs About the Happiness Cake Recipe
Why is it called depression cake?
Though not the same dessert, the term “depression cake” comes from the Great Depression era, where bakers made cakes without eggs, milk, or butter. The Happiness Cake Recipe, in contrast, is rich and indulgent—designed not from scarcity but to bring joy. Still, both cakes reflect how baking adapts to life’s circumstances, offering comfort in every slice or spoonful.
What kind of cake did Elvis like?
Elvis Presley was famously fond of banana and peanut butter flavors, often paired with bacon. You can easily adapt the Happiness Cake Recipe into an Elvis-style version by using banana cake as the base, peanut butter frosting, and crushed candied bacon as the crunchy layer. A fun, nostalgic twist for rock ’n’ roll fans!
What is a joy cake?
A “joy cake” usually refers to any dessert that brings happiness with each bite—just like this one. The Happiness Cake Recipe falls into that category with its layers of flavor, texture, and visual appeal. It’s not just about taste, but about the feeling it creates—something worth sharing.
What is the famous saying about cake?
A well-known quote is: “You can’t have your cake and eat it too.” But with the Happiness Cake Recipe, we say—why not? You can have it, eat it, and even freeze extra for later. This cake breaks the rules and delivers smiles, one jar at a time.
