You know those desserts that look like they came straight out of a fancy European bakery? The kind that makes your dinner guests say, “You made this?” That’s exactly what this black forest cake recipe delivers—without requiring a culinary degree or hours you don’t have.
I remember the first time I tackled a black forest cake. I was 34, had a toddler on my hip, a deadline looming, and about 37 tabs open on how to temper chocolate. But here’s the thing: once I found the right version of the recipe, it became my go-to. Turns out, making this iconic, chocolate-cherry dream cake is surprisingly manageable—and totally worth the (minimal) effort.
This isn’t just any black forest cake recipe. It’s rich, moist, and unapologetically indulgent. The layers are fluffy but bold in cocoa flavor, the cherry topping is both tart and sweet, and the whipped cream frosting? Oh honey, it’s the cloud-like finish we all deserve at the end of a long week.
Whether you’re baking to impress, to celebrate, or just to reward yourself for surviving another Monday, this recipe brings the drama—with none of the stress. So preheat that oven and roll up your sleeves (or don’t—we’re not here to judge flour on a blouse). Let’s get into this Black Forest Cake bliss.
Contents
- 1 Why You’ll Love This Black Forest Cake Recipe
- 2 Ingredients
- 3 Equipment You’ll Need
- 4 Step-by-Step Black Forest Cake Recipe
- 5 2. Cooking Tips & Tricks
- 6 Personal Anecdotes
- 7 Storage Tips: How to Keep Your Black Forest Cake Fresh and Fabulous
- 8 Nutrition Breakdown: What’s Inside a Slice of Joy
- 9 Baking Breakdown: Cooking Time & Serving Details
Why You’ll Love This Black Forest Cake Recipe
- It’s beginner-friendly. You don’t need to be the next Great British Bake-Off contestant.
- It tastes better than store-bought. And it looks like a showstopper.
- It’s make-ahead friendly. The flavors deepen if you prep it the day before.
- It uses real cherries. None of that neon-red maraschino stuff.
Ingredients
For the Black Forest Cake Layers:
- 2 ⅛ cups all-purpose flour
- 2 cups granulated sugar
- ¾ cup unsweetened cocoa powder
- 1 ½ teaspoons baking powder
- ¾ teaspoon baking soda
- ¾ teaspoon salt
- 3 large eggs
- 1 cup whole milk
- ½ cup vegetable oil
- 1 tablespoon pure vanilla extract
For the Cherry Filling:
- 2 cans (20 oz each) pitted sour cherries, drained (reserve the juice)
- 1 cup sugar
- ¼ cup cornstarch
- 1 teaspoon vanilla extract
For the Whipped Cream Frosting:
- 3 cups heavy whipping cream, well chilled
- ⅓ cup powdered sugar (confectioners’ sugar)
Equipment You’ll Need
Let’s keep it simple. No fancy gadgets, just solid basics:
- Two 9-inch round cake pans
- Large mixing bowls (at least two)
- Medium saucepan
- Rubber spatula
- Electric mixer or a strong whisk and ambition
- Measuring cups and spoons
- Cooling rack
- Serrated knife (for leveling the cakes, optional but helpful)
- Cake stand or plate for serving
- Offset spatula (a butter knife works in a pinch)
- Fine mesh sieve or sifter (for the flour and cocoa)
Step-by-Step Black Forest Cake Recipe
Step 1: Prep Like a Pro
Before diving into this black forest cake recipe, clear some space, pour yourself a cup of coffee, and crank up your favorite playlist. Then grease your two 9-inch pans and lightly dust them with flour. If you’ve got parchment paper, line the bottoms. You’ll thank yourself later when the cakes pop out effortlessly.
Preheat your oven to 350°F (175°C). This gives you a good head start and ensures your cakes bake evenly.
Step 2: Mix the Dry Ingredients
In a large mixing bowl, sift together:
- 2 ⅛ cups all-purpose flour
- 2 cups white sugar
- ¾ cup unsweetened cocoa powder
- 1 ½ teaspoons baking powder
- ¾ teaspoon baking soda
- ¾ teaspoon salt
Give it all a gentle whisk. You want everything evenly blended—no clumps, no surprises.
Step 3: Bring on the Wet Ingredients
In another bowl, beat together:
- 3 large eggs
- 1 cup milk
- ½ cup vegetable oil
- 1 tablespoon vanilla extract

Whisk until smooth and creamy. Now, slowly pour the wet ingredients into the dry mixture. Stir with a spatula or whisk—just until combined. No over-mixing here! You’re not making bread; we want a tender crumb.
Step 4: Into the Oven They Go
Divide your Black Forest Cake batter equally between the two pans. Smooth out the tops using your spatula. Slide the pans into your preheated oven, and bake for 30–35 minutes.
You’ll know they’re done when a toothpick inserted in the center comes out clean—or with a few moist crumbs. Let the cakes cool in their pans for about 10 minutes, then transfer them to a wire rack to cool completely.
Step 5: Make the Cherry Filling

While the cakes cool, it’s cherry time! In a medium saucepan over medium heat, combine:
- Juice from 2 cans (20 oz each) of pitted sour cherries
- 1 cup white sugar
- ¼ cup cornstarch
Stir constantly until the mixture thickens into a shiny, pudding-like consistency. Remove from heat and stir in:
- 1 teaspoon vanilla extract
- The drained sour cherries
Let this cool. It’ll thicken more as it sits, making it easier to spread between the layers.
The chocolate sponge layers are rich and moist, providing the perfect base for the cherry filling. If you’re looking for a gluten-free alternative, try these Gluten Free Chocolate Cupcakes for a similar rich and decadent taste.
Step 6: Whip It Good
In a chilled mixing bowl (trust me, cold helps), combine:
- 3 cups heavy whipping cream
- ⅓ cup confectioners’ sugar
Beat until soft peaks form. You’re aiming for light and fluffy—not stiff like meringue. This frosting doesn’t need to stand at attention; it should dance.
Step 7: Level and Layer
If your cakes domed on top (totally normal!), use a serrated knife to slice off the rounded tops. This makes stacking easier and more stable.
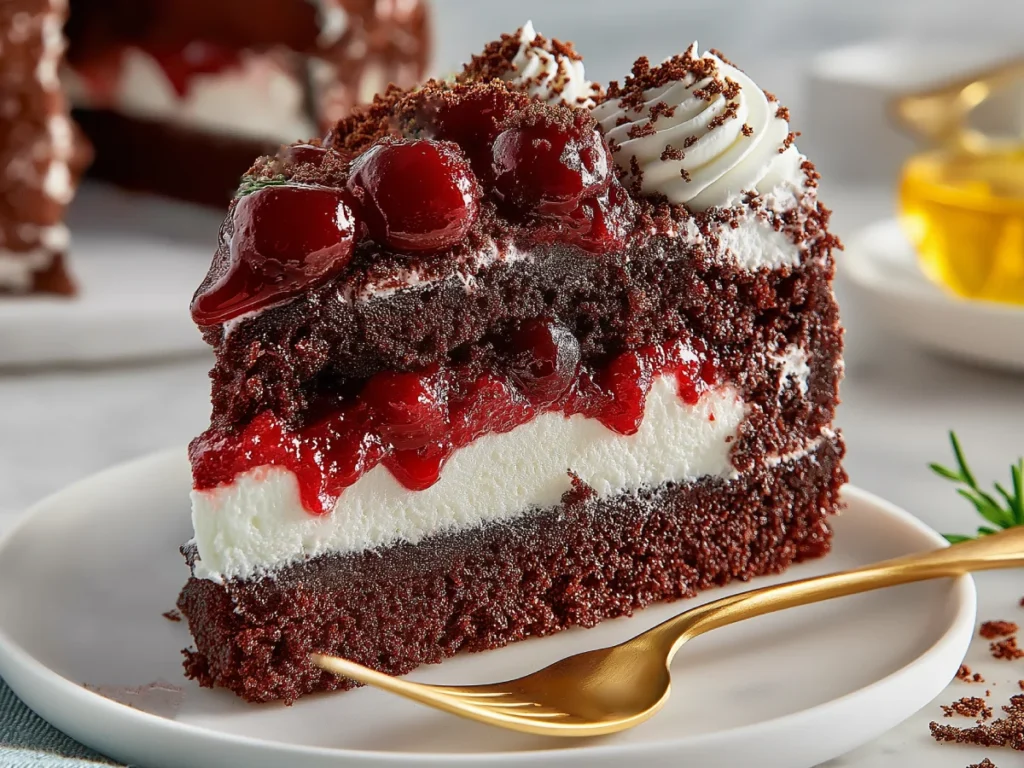
Place your first cake layer on your Black Forest Cake stand. Spread half the cherry mixture over the top, then gently spread a generous layer of whipped cream frosting. Add the second cake layer on top and repeat—cherries first, then whipped cream.
Now, frost the sides and top with the remaining whipped cream. Smooth it out with your offset spatula or butter knife.
Step 8: Decorate with Flair
Optional (but highly recommended):
- Sprinkle chocolate shavings or curls on top.
- Add a few whole cherries for drama.
- Pipe extra whipped cream around the edges if you’re feeling fancy.

Your black forest cake recipe is now a masterpiece. And it tastes even better than it looks.
2. Cooking Tips & Tricks
Whip It Right
Chilled tools make all the difference when it comes to whipped cream. Pop your bowl and beaters into the freezer for 10–15 minutes beforehand. It keeps your cream cold and fluffs it up beautifully. For more tips on achieving the perfect whipped cream, check out this guide on how to make whipped cream.
Cherry Wisdom
If you can’t find canned sour cherries, frozen will work. Just thaw and drain them well. Skip maraschinos unless you’re after a completely different (and neon) experience.
Make-Ahead Magic
This black forest cake recipe actually gets better after a little nap in the fridge. Make it a day ahead—the cherry flavors soak in, the whipped cream sets, and the layers become even more harmonious.
Baking Without Fancy Tools
No stand mixer? A handheld mixer or even a whisk with determination works. No cake stand? Flip over a dinner plate or turn a bowl upside-down and cover it with foil. The Black Forest Cake won’t mind.
Chocolate Shavings
Use a vegetable peeler on a chocolate bar. It’s oddly satisfying and way easier than grating.
Stabilize Your Whipped Cream
Add a teaspoon of cornstarch or unflavored gelatin (bloomed in water) to help your whipped cream hold its shape longer—especially in warm kitchens or if transporting the Black Forest Cake.
Slicing Tip
Use a warm knife (dip it in hot water and dry it off) for cleaner slices. Trust me—this trick makes you look like a pro.
Personal Anecdotes
I first made this cake on a dare. My husband’s colleague was retiring, and I overheard him say, “No one makes a black forest cake like my mom did in Berlin.” Challenge accepted.
I spent the week scouring recipes, watching tutorials, and testing cherry fillings on a cake that turned out… well, let’s just say version one was more “forest floor” than “Black Forest.”
But version two? Oh, it landed. His face lit up, and he asked for the recipe—twice. Since then, it’s become our family celebration cake, showing up at birthdays, anniversaries, and even just-because weekends when chocolate and cherries call my name.
This black forest cake recipe isn’t just a dessert. It’s a memory maker, a smile generator, and a showstopper that says, “Yes, I baked this. And yes, you can too.”
Storage Tips: How to Keep Your Black Forest Cake Fresh and Fabulous
You’ve gone through the effort of creating a beautiful, luscious cake—so let’s make sure every last bite stays as perfect as that first glorious forkful.
Short-Term Storage (1–3 Days)
If you’re planning to enjoy the cake within a couple of days, the refrigerator is your best friend. Because of the fresh whipped cream and cherry filling, this cake is perishable and should not be left at room temperature for more than two hours.
- Store it in an airtight cake container or cover it loosely with plastic wrap or foil.
- Keep it on a flat shelf, not the fridge door (too much jostling!).
- Pro tip: If your fridge tends to dry things out, lightly cover the Black Forest Cake in a layer of wax paper before wrapping.
Make-Ahead Storage
Yes, you can make your black forest cake ahead of time! It actually tastes better the next day. Just follow the short-term storage rules and let the flavors develop overnight.
Freezing the Black Forest Cake (Up to 2 Months)
If you need to freeze it, here’s the smart move:
- Freeze the layers separately without whipped cream or cherry filling.
- Protect each layer by tightly wrapping it in plastic, then reinforcing it with a layer of foil for extra insulation.
- Place them in a freezer-safe bag or container.
When ready to use:
- Let the layers thaw overnight in the refrigerator.
- Add the whipped cream and cherry filling after defrosting for the freshest flavor and texture.
Avoid freezing the fully assembled cake with whipped cream—it just doesn’t hold up well once thawed.
Nutrition Breakdown: What’s Inside a Slice of Joy
Let’s be real. This isn’t a salad—but this black forest cake recipe isn’t pretending to be guilt-free either. It’s here to delight your senses and satisfy your sweet tooth. Still, if you’re curious about what’s in each slice (and hey, knowledge is power), here’s the nutritional lowdown.
A typical serving—about 1/12 of the Black Forest Cake—offers a sweet balance of carbs, fats, and a bit of protein. It’s rich due to the heavy cream and chocolate, and while it’s definitely a treat, it also brings in some micronutrients from milk, eggs, and cherries. Think of it as indulgence with a sprinkle of nutritional charm.
If you’re watching your intake, enjoy a thinner slice—or pair it with a walk afterward. You’ll get your cake and feel good about it too.
Nutritional Information (Per Serving – 1 Slice out of 12)
| Nutrient | Amount per Serving |
|---|---|
| Serving Size | 1 slice (approx. 150g) |
| Calories | 430 kcal |
| Total Fat | 25 g |
| Saturated Fat | 14 g |
| Unsaturated Fat | 9 g |
| Trans Fat | 0.3 g |
| Cholesterol | 90 mg |
| Sodium | 190 mg |
| Total Carbohydrates | 49 g |
| Dietary Fiber | 2 g |
| Sugars | 32 g |
| Protein | 5 g |
| Calcium | 110 mg (8% DV) |
| Iron | 2.5 mg (14% DV) |
| Potassium | 220 mg (6% DV) |
| Vitamin A | 700 IU (14% DV) |
| Vitamin C | 1.5 mg (2% DV) |
| Magnesium | 30 mg (7% DV) |
DV = Daily Value, based on a 2,000-calorie diet.
This breakdown gives you a clearer view of what you’re enjoying. And remember: the joy a slice brings is also part of your overall well-being. Eat with intention—and maybe a cherry on top.
Baking Breakdown: Cooking Time & Serving Details
Let’s face it—time is precious, especially when cake is involved. Below is the full time breakdown so you know exactly what you’re getting into before the first egg is cracked. Whether you’re planning ahead or squeezing this bake into your Sunday afternoon, this guide keeps things simple and stress-free.
| Timing Detail | Duration |
|---|---|
| Prep Time | 25 minutes |
| Cook Time | 35 minutes |
| Cooling Time | 1 hour |
| Assembly Time | 20 minutes |
| Chilling Time | 2 hours (optional but recommended) |
| Total Time | 3 hours 20 minutes |
Tip: If you’re making the cake in stages (say, baking the night before), this timing becomes even more manageable.
Serving Details
| Detail | Value |
|---|---|
| Yield | 12 generous slices |
| Optional Yield | 16 smaller portions |
| Cuisine | German (Black Forest region) |
The original “Schwarzwälder Kirschtorte” comes from Germany’s Black Forest region, known for its lush landscape—and apparently, exceptional dessert game.
And just like that, you’ve got yourself a homemade masterpiece—a decadent, dreamy dessert that’s as satisfying to make as it is to eat. This black forest cake recipe is more than just layers of chocolate, cherries, and cream. It’s a celebration cake, a comfort food, a “just because” kind of indulgence. It brings together richness and lightness in a way that feels both nostalgic and new every single time.
Maybe it’s for your partner’s birthday, a girls’ brunch, or even just because Tuesday needed a glow-up—whatever the occasion, this Black Forest Cake rises to it (pun fully intended). And while it may look like it took hours of stress and sweat, only you have to know how surprisingly easy it was to pull off.
So go ahead, take that first bite with pride. Because what you’ve just created isn’t just a dessert—it’s a story, a mood, and a memory in the making. And honestly, with this black forest cake recipe in your back pocket, you might just become everyone’s favorite baker overnight.