


Introduction
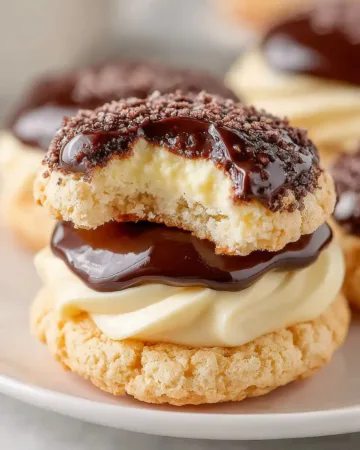
Boston Cream Cookies are a creative dessert that transforms the classic Boston cream pie flavors into soft, bakery style cookies with a rich vanilla center and smooth chocolate topping. This recipe delivers everything people love about Boston cream desserts, tender cookie bases, creamy filling, and a glossy chocolate finish, all in a handheld treat. Boston Cream Cookies are ideal for home bakers who want something impressive yet approachable, using simple ingredients and clear steps. In this guide, you will learn how to prepare the cookies, master the vanilla cream layer, assemble them beautifully, and store them properly so they stay fresh and delicious for days.
Equipment
Mixing bowl
Rubber spatula
Baking sheet
Whisk
Medium cookie scoop
Measuring cups and spoons
Parchment paper or baking mat
Cooling rack
Ingredients List
For the cookie base
2 cups all purpose flour, spooned and leveled
1 tablespoon cornstarch for a tender crumb
1 teaspoon baking powder for gentle lift
½ cup butter, softened fully at room temperature
¾ cup granular sugar alternative suitable for baking
¼ cup milk, whole or reduced fat both work well
1 teaspoon vanilla flavor such as Simply Organic Vanilla Flavor or Watkins Clear Vanilla Flavor
For the vanilla cream filling
1 packet sugar free vanilla pudding mix
1 cup milk, cold for best texture
4 ounces whipped topping with no added sugar
For the chocolate topping
Sugar free chocolate frosting, softened at room temperature
Part One: Preparing the Cookie Dough
Mixing the Dry Ingredients
Start by preheating your oven to 350 degrees and lining your baking sheet with parchment paper or a reusable baking mat. In a medium bowl, whisk together the flour, cornstarch, and baking powder until evenly combined. This step ensures that the leavening is distributed evenly, which helps the Boston Cream Cookies bake uniformly and develop a soft texture.
Creaming the Butter and Sweetener
In a large mixing bowl, add the softened butter and the granular sugar alternative. Use a spatula or mixer to cream them together until the mixture looks pale and fluffy. This process incorporates air into the dough, which contributes to a lighter cookie. Stir in the milk and vanilla flavor until smooth and fully blended.
Bringing the Dough Together
Gradually add the dry ingredient mixture to the wet ingredients. Stir gently just until a soft dough forms. Avoid overmixing at this stage, as that can make the cookies dense instead of tender. The dough should be soft but not sticky, easy to scoop and hold its shape.
Part Two: Baking and Shaping the Cookies
Scooping and Baking
Using a medium cookie scoop, portion the dough onto the prepared baking sheet. Space each scoop about one and a half to two inches apart to allow for spreading. Place the baking sheet in the oven and bake for about 12 minutes, or until the edges begin to turn lightly golden while the centers remain pale.
Creating the Signature Indent
As soon as the cookies come out of the oven, work quickly while they are still soft. Use the bottom of a small measuring cup or similar round object to gently press an indent into the center of each cookie. This creates space for the vanilla cream filling. Transfer the cookies to a cooling rack and let them cool completely so they set properly.
Part Three: Making the Vanilla Cream Filling
Mixing the Pudding Base
While the cookies are baking or cooling, prepare the vanilla cream. In a clean bowl, whisk together the sugar free pudding mix and one cup of cold milk. Continue whisking until the mixture thickens slightly and looks smooth, with no visible lumps.
Folding in the Whipped Topping
Using a rubber spatula, gently fold the whipped topping into the pudding mixture. Use slow, deliberate motions to keep the filling light and airy. Once fully combined, cover the bowl and refrigerate the vanilla cream for at least 30 minutes. This resting time allows the filling to firm up and makes it easier to spoon into the cookies.
Part Four: Assembling the Boston Cream Cookies
Filling the Cookies
Once the cookies are completely cool and the vanilla cream has set, it is time to assemble. Use a tablespoon to spoon the vanilla cream into the indent of each cookie. Fill generously but avoid overfilling so the cream stays neatly in place.
Adding the Chocolate Topping
Finish each cookie with a dollop of softened chocolate frosting, about one to two teaspoons per cookie. Spread it gently over the vanilla cream layer to mimic the classic Boston cream topping. Let the assembled cookies sit for a few minutes so the layers settle together before serving.
Tips and Tricks for Perfect Results
For the best Boston Cream Cookies, always start with butter that is fully softened. Cold butter will not cream properly and can lead to uneven texture. When choosing a sugar alternative, make sure it is labeled as suitable for baking and measures cup for cup like sugar. This ensures consistent sweetness and structure.
Do not overbake the cookies. They should look slightly underdone in the center when removed from the oven, as they will continue to firm up while cooling. This keeps the cookies soft and tender.
Chilling the vanilla cream is essential. If the filling is too loose, it can spill over the sides of the cookies. A well set cream creates clean layers and a professional appearance.
For a smoother chocolate topping, stir the frosting briefly before using it. This makes it easier to spread and gives the cookies a glossy finish.
Notes on Ingredients and Texture
The combination of cornstarch and baking powder is key to achieving a soft, cake like cookie that complements the creamy filling. Milk adds moisture and helps bind the dough without making it heavy.
Using a vanilla flavor instead of traditional extracts provides the classic taste without altering the texture of the cookies. The pudding based vanilla cream offers stability and sweetness without requiring additional sugar.
Chocolate frosting serves as a convenient topping that sets quickly and delivers the familiar Boston cream flavor profile. Softening it at room temperature ensures smooth application.
Always check labels on sugar free or alternative products to ensure they align with your dietary preferences, as formulations can vary between brands.
Storage and Make Ahead Tips
Boston Cream Cookies should be stored in an airtight container to maintain freshness. Place parchment paper between layers to prevent sticking. Store them in the refrigerator for up to three days, as the cream filling benefits from cooler temperatures.
If you want to make components ahead of time, the cookies can be baked and stored unfilled at room temperature for up to two days. The vanilla cream can be prepared a day in advance and kept refrigerated. Assemble the cookies shortly before serving for the best texture.
For longer storage, assembled cookies can be frozen for up to one month. Freeze them in a single layer until firm, then transfer to a sealed container. Thaw in the refrigerator before serving.
Variations to Try
You can customize Boston Cream Cookies in several ways. Add a tablespoon of cocoa powder to the cookie dough for a chocolate base. Swap the vanilla pudding for chocolate pudding to create a double chocolate version. For extra richness, sprinkle mini chocolate chips into the cookie dough before baking. Each variation keeps the essence of Boston Cream Cookies while offering a new twist.
Serving Suggestions
Serve Boston Cream Cookies chilled for a classic cream filled dessert experience, or let them sit at room temperature for a softer bite. They pair well with coffee, tea, or a cold glass of milk and make an elegant addition to dessert platters.
Conclusion
Boston Cream Cookies combine the nostalgic flavors of a beloved dessert with the convenience of a cookie. From the soft vanilla base to the creamy center and smooth chocolate topping, every layer works together beautifully. This recipe walks you through each step with clarity and practical tips, ensuring consistent results every time. Whether you are baking for family, friends, or yourself, Boston Cream Cookies are a satisfying treat that delivers bakery quality flavor from your own kitchen.
FAQs
What makes Boston Cream Cookies different from regular cookies
They feature a vanilla cream filling and chocolate topping inspired by Boston cream pie, creating layered flavor and texture.
Can I use regular sugar instead of a sugar alternative
Yes, regular granulated sugar can be used in the same amount if preferred.
Why do I need to press an indent into the cookies
The indent creates space for the vanilla cream filling and helps keep it in place.
Do these cookies need to be refrigerated
Yes, refrigeration helps preserve the cream filling and keeps the cookies fresh.
Can I make these cookies ahead of time
Yes, you can prepare the components separately and assemble them shortly before serving for best results.
Boston Cream Cookies
- Total Time: 32 minutes
- Yield: 18 cookies
Description
Boston Cream Cookies are soft bakery style cookies inspired by the classic Boston cream dessert. Each cookie features a tender vanilla flavored base with a smooth creamy center and a rich chocolate topping. This recipe delivers a balanced combination of textures and flavors that feel indulgent yet approachable for everyday baking.
Ingredients
All purpose flour measured carefully for structure
Cornstarch to create a soft tender crumb
Baking powder for gentle lift and even baking
Butter fully softened at room temperature
Granular sugar alternative suitable for baking
Milk for moisture and smooth dough texture
Simply Organic Vanilla Flavor or Watkins Clear Vanilla Flavor
Sugar free vanilla pudding mix
Cold milk for the cream filling
Whipped topping with no added sugar
Sugar free chocolate frosting softened before use
Instructions
1. Preheat the oven to the proper temperature and prepare baking sheets with parchment paper or a baking mat
2. Whisk together the flour cornstarch and baking powder until evenly combined
3. Cream the softened butter and sugar alternative until light and fluffy
4. Stir in the milk and vanilla flavor until smooth
5. Add the dry ingredients to the wet mixture and mix gently until a soft dough forms
6. Scoop the dough onto prepared baking sheets leaving space between portions
7. Bake until the edges are lightly golden and the centers remain soft
8. Press a gentle indent into each cookie immediately after baking
9. Allow the cookies to cool completely on a rack
10. Whisk together the pudding mix and cold milk until thickened
11. Fold the whipped topping into the pudding mixture until smooth
12. Chill the vanilla cream until set
13. Fill each cookie indent with vanilla cream
14. Top with a small dollop of chocolate frosting and smooth gently
Notes
Use fully softened butter to ensure proper creaming and texture
Avoid overmixing the dough to keep the cookies tender
The cookies should appear slightly soft when removed from the oven
Chilling the vanilla cream is essential for clean assembly
Stir the chocolate frosting briefly for a smooth glossy finish
Ingredient labels may vary so adjust based on personal preferences
- Prep Time: 20 minutes
- Cook Time: 12 minutes
- Category: Dessert
- Method: Baking
- Cuisine: American