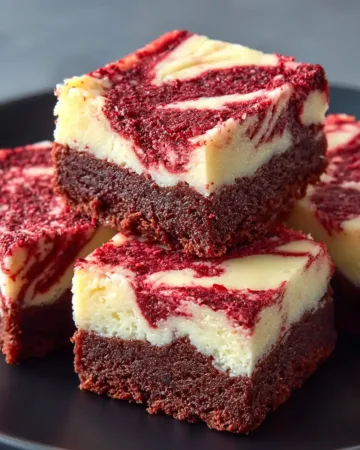


Red Velvet Cheesecake Bars are the kind of dessert that instantly feels special while still being approachable for home bakers. With their rich cocoa flavor, vibrant red color, and creamy cheesecake swirls, these bars combine two classic favorites into one irresistible treat.
Whether you are baking for family, friends, or simply to satisfy a personal craving, Red Velvet Cheesecake Bars deliver both visual appeal and indulgent taste. This recipe focuses on clear steps, reliable ingredients, and smart techniques to help you achieve bakery style results at home. By understanding each layer and following proven tips, you can create Red Velvet Cheesecake Bars that are moist, balanced, and perfectly set every time.
Step by Step Preparation
Preparing the Baking Setup
Start by preheating your oven to 350 degrees. Proper oven temperature is essential for Red Velvet Cheesecake Bars because it allows the cheesecake layer to cook gently while the red velvet base stays soft. Line an 8×8 baking dish with parchment paper, letting a bit hang over the sides for easy lifting later. Lightly coat the parchment with non stick spray so the bars release cleanly after baking.
Gather all equipment before you begin. You will need mixing bowls, a whisk or electric mixer, a spatula, and a microwave safe bowl. Having everything ready helps keep the batter smooth and prevents overmixing, which can affect texture.
Making the Red Velvet Layer
In a microwave safe bowl, add half a cup of salted butter and two ounces of semi sweet baking chocolate. Melt them together in 30 second intervals, stirring between each round, until fully melted and smooth. Set the mixture aside to cool slightly so it does not scramble the eggs when combined later.
In a larger mixing bowl, add one cup of white sugar and two large eggs. Beat until the mixture looks pale and slightly thickened. Add two teaspoons of Simply Organic Vanilla Flavor and beat again until fully incorporated. Stir in two teaspoons of red food coloring until the color is evenly distributed.
Pour the cooled chocolate butter mixture into the bowl and mix until smooth. Sprinkle two thirds cup of all purpose flour over the batter and gently fold it in using a spatula. Avoid aggressive stirring to keep the batter tender. Once combined, pour the red velvet batter into the prepared baking dish and smooth the top evenly.
Creating the Cheesecake Layer
In a separate bowl, add eight ounces of softened cream cheese. For best results, use Cabot Cream Cheese or Tillamook Cream Cheese, both known for smooth texture and consistent flavor. Add one large egg and one third cup of white sugar. Beat until creamy and lump free.
Add one teaspoon of Watkins Clear Vanilla Flavor and mix until combined. The cheesecake mixture should be smooth and pourable but not runny. Spoon dollops of the cheesecake mixture over the red velvet batter, spacing them evenly across the surface.
Use a spoon or knife to gently swirl the cheesecake into the red velvet base. Do not over swirl, as defined ribbons create a more attractive final look. Place the pan in the oven and bake for 35 to 40 minutes, or until a toothpick inserted into the center comes out mostly clean with a few moist crumbs.
Cooling and Slicing
Once baked, remove the pan from the oven and place it on a cooling rack. Allow the Red Velvet Cheesecake Bars to cool completely in the pan. This step is crucial, as slicing too early can cause the cheesecake layer to lose structure. After cooling, lift the bars out using the parchment overhang, then slice into nine even squares and serve.
Tips and Tricks for Perfect Bars
Achieving the Right Texture
One of the most important tips for Red Velvet Cheesecake Bars is ingredient temperature. Ensure the cream cheese and eggs are at room temperature before mixing. This prevents lumps and creates a silky cheesecake layer that blends smoothly with the red velvet base.
Mixing technique also matters. Overmixing the red velvet batter can lead to dense bars. Stir just until the flour disappears into the batter. For the cheesecake layer, beat only until smooth, avoiding excess air which can cause cracks.
Enhancing Flavor and Appearance
Using high quality cocoa based chocolate improves the depth of flavor in Red Velvet Cheesecake Bars. Semi sweet baking chocolate balances the sweetness of the sugar and complements the tangy cheesecake layer.
When swirling the cheesecake, less is more. Gentle swirls create a marbled effect without muddying the colors. For clean slices, wipe your knife with a damp cloth between cuts.
If you want a slightly firmer cheesecake layer, chill the bars in the refrigerator for 30 minutes after cooling. This step is optional but helpful if serving at gatherings.
Notes on Ingredients and Variations
Ingredient Quality Matters
The success of Red Velvet Cheesecake Bars depends heavily on ingredient choice. Use Cabot Cream Cheese or Tillamook Cream Cheese for consistent melting and flavor. For vanilla flavoring, Simply Organic Vanilla Flavor and Watkins Clear Vanilla Flavor provide a clean, sweet aroma without overpowering the dessert.
All purpose flour works best for structure. Avoid substituting cake flour, as it can make the bars too soft. Salted butter adds balance, but if using unsalted butter, add a small pinch of salt to the batter.
Simple Variations to Try
You can adapt Red Velvet Cheesecake Bars to your taste by adding chocolate chips to the red velvet layer for extra richness. White chocolate chips pair especially well with the cheesecake swirls.
For a lighter texture, reduce the sugar in the cheesecake layer by two tablespoons. This creates a more tangy contrast to the sweet red velvet base.
If you prefer thicker bars, double the recipe and bake in a 9×13 pan, adjusting baking time slightly and checking for doneness around the 45 minute mark.
Storage and Make Ahead Guidance
Storing for Freshness
Red Velvet Cheesecake Bars should be stored in an airtight container to maintain moisture and flavor. At room temperature, they stay fresh for up to one day. For longer storage, place them in the refrigerator where they will keep well for up to five days.
Always allow the bars to return to room temperature before serving if refrigerated. This enhances the flavor and softens the texture of the cheesecake layer.
Freezing Instructions
These bars freeze exceptionally well, making them ideal for make ahead desserts. Wrap individual squares tightly in plastic wrap, then place them in a freezer safe container or bag. They can be frozen for up to two months without losing quality.
To thaw, transfer the bars to the refrigerator overnight or let them sit at room temperature for about an hour. Avoid microwaving, as it can alter the cheesecake texture.
Conclusion
Red Velvet Cheesecake Bars are a perfect blend of visual appeal, rich flavor, and creamy texture. By following this step by step method, using reliable ingredients, and applying simple baking tips, you can confidently create bars that look and taste professional. From careful mixing to proper cooling and storage, each stage plays a role in achieving the best results. Whether enjoyed fresh, chilled, or made ahead, Red Velvet Cheesecake Bars remain a timeless dessert that always impresses while being simple enough for any home kitchen.
Print
Easy Red Velvet Cheesecake Bars
- Total Time: 55 minutes
- Yield: 9 bars
- Diet: Vegetarian
Description
Red Velvet Cheesecake Bars combine a rich cocoa flavored red velvet base with smooth, creamy cheesecake swirls baked into soft, sliceable bars. This dessert delivers a balanced sweetness, vibrant color, and a melt in your mouth texture that works perfectly for casual gatherings or make ahead treats. Each bite offers a contrast of fudgy red velvet and tangy cream cheese, making these bars both visually striking and deeply satisfying.
Ingredients
Salted butter
Semi sweet baking chocolate
White sugar
Large eggs
Simply Organic Vanilla Flavor
Red food coloring
All purpose flour
Cabot Cream Cheese or Tillamook Cream Cheese
Watkins Clear Vanilla Flavor
Non stick spray
Parchment paper
Instructions
1. Preheat the oven to three hundred fifty degrees and prepare an eight by eight baking dish with parchment paper and non stick spray
2. Melt the butter and baking chocolate together until smooth and allow it to cool slightly
3. Beat the sugar and eggs until pale and well combined then mix in vanilla flavor and red food coloring
4. Add the melted chocolate mixture and mix until smooth
5. Gently fold the flour into the batter until just combined
6. Spread the red velvet batter evenly into the prepared baking dish
7. Beat the cream cheese with sugar and egg until smooth then mix in vanilla flavor
8. Spoon the cheesecake mixture over the red velvet batter in small portions
9. Gently swirl the cheesecake mixture into the batter to create a marbled effect
10. Bake until the center is set and a toothpick comes out mostly clean
11. Allow the bars to cool completely in the pan before lifting out and slicing
Notes
For the smoothest cheesecake layer, ensure the cream cheese and egg are at room temperature before mixing
Avoid overmixing the red velvet batter to keep the bars soft and tender
Use gentle swirling motions to maintain clear red velvet and cheesecake patterns
For cleaner slices, chill the bars briefly after cooling and wipe the knife between cuts
Store leftovers in an airtight container to maintain moisture and flavor
- Prep Time: 15 minutes
- Cook Time: 40 minutes
- Category: Dessert
- Method: Baking
- Cuisine: American