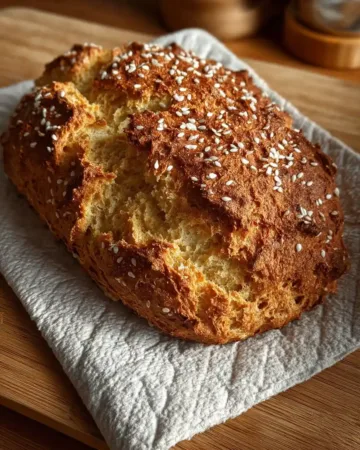


No yeast buttermilk bread is one of the easiest ways to enjoy a warm loaf with a tender crumb, mild tang, and a beautifully golden crust. This simple bread uses basic pantry staples and relies on baking powder and baking soda instead of yeast, making it ideal when you want homemade bread without waiting for dough to rise.
In this guide, you will learn how to prepare this loaf with clear steps and supportive tips. You will also find a fully refined recipe that avoids any questionable ingredients while staying delicious and familiar for home bakers.
Step by Step Guide to Making No Yeast Buttermilk Bread
Mixing the Dry Ingredients
Start by preparing your baking area so everything is easy to access. Preheat the oven to 400 degrees Fahrenheit and line a baking sheet with parchment paper. In a large bowl, combine two cups of all purpose flour, two teaspoons baking powder, one half teaspoon baking soda, three quarters teaspoon salt, and one tablespoon sugar.
Whisk these ingredients thoroughly to ensure even distribution, which helps the bread rise uniformly and prevents pockets of uneven flavor. The balance of baking powder and baking soda is important because the buttermilk will activate the leavening to create lift without yeast.
Preparing the Wet Ingredients
In a separate bowl, combine one cup of buttermilk and one third cup of sour cream. Both ingredients should be at a comfortable room temperature. If they are too cold, the dough will tighten and resist shaping. If they are too warm, the dough may become overly soft.
Stir the mixture until smooth. The buttermilk contributes acidity that reacts with baking soda, and the sour cream adds richness and moisture that helps create a soft crumb inside the finished loaf.
Combining Wet and Dry Mixtures
Pour the buttermilk mixture into the dry ingredients. Using a sturdy spatula or wooden spoon, fold the mixture together gently. The goal is to moisten all the flour without overmixing. Overworking the dough would make the bread dense because gluten begins to tighten.
Continue stirring until the dough comes together in a shaggy mass. It should feel soft and slightly sticky but still manageable. If the dough feels too dry, add a very small splash of buttermilk. If it feels too loose, sprinkle in a bit more flour.
Shaping the Dough
Scrape the dough onto the prepared parchment lined sheet. Lightly flour your hands if needed to shape it into a round or oval loaf. The shape affects how evenly it bakes, but both work well. Press the dough gently to smooth the top without deflating it.
Sprinkle two tablespoons of sesame seeds or any preferred topping. Pumpkin seeds or sunflower seeds also work well and add a pleasing crunch. Because this bread does not require kneading or rising time, it moves straight into the oven once shaped.
Baking for the Perfect Crust
Place the baking sheet into the preheated oven. Bake at 400 degrees Fahrenheit for the first ten minutes to create rapid steam inside the dough. This helps the bread develop structure. After ten minutes, reduce the heat to 350 degrees and continue baking for about twenty five minutes.
The loaf should turn golden brown with a firm exterior. The aroma will shift from tangy to warm and toasty. When the top feels crisp and the center springs back lightly when pressed, the bread is ready to cool. Let it rest for about five minutes before slicing so the crumb can settle.
Tips and Tricks for Better No Yeast Buttermilk Bread
Improve Texture and Rise
To create a soft interior, always measure ingredients accurately. Using too much flour makes the loaf dry while too little flour causes spreading. Scooping flour directly from the bag compacts it, so use the spoon and level method for best results.
Allow the buttermilk and sour cream to warm slightly at room temperature before mixing. This improves the reaction between the baking soda and the acidity, giving the bread a fuller rise.
Check your leavening freshness. Baking powder and baking soda lose strength over time. Fresh leavening ensures that your no yeast buttermilk bread expands properly and bakes with a lovely open crumb.
Flavor Building Techniques
Although this bread is simple, you can enhance depth of flavor with small adjustments. A pinch of extra sugar adds warmth while a tiny touch of butter brushed on top after baking adds richness. Try mixing seeds into the dough, such as sunflower or sesame, for extra texture throughout the loaf. A sprinkle of oats on top complements the rustic character.
If you prefer a denser slice for spreading or dipping, handle the dough just a little longer to strengthen the structure. For a softer slice, limit handling and keep folding to a minimum. The mild tang of buttermilk pairs well with salty butter, honey, or fruity jam.
Notes for the Best Results
How Dough Texture Should Look
The dough for no yeast buttermilk bread should be moist and slightly sticky. It is closer to biscuit dough than traditional yeast dough. Because there is no kneading, the texture comes mostly from careful mixing.
Do not expect it to feel elastic. Smooth the top lightly before baking but avoid pressing too firmly because this disrupts natural lift. If your kitchen is humid, the dough may feel softer. Add a teaspoon of flour at a time only if necessary.
Understanding the Baking Process
The first stage at 400 degrees Fahrenheit helps the loaf rise quickly. Dropping the temperature to 350 degrees ensures thorough cooking without burning the crust. Every oven behaves differently, so check the color near the end of baking.
You can tap the bottom of the loaf. A hollow sound indicates it is done. Allow the loaf to rest briefly before slicing. Cutting too soon lets steam escape and can make the interior seem underdone.
Storage
Keeping Your Bread Fresh
Store your no yeast buttermilk bread at room temperature once it has cooled. Wrap it in a clean cloth and place it in a loose fitting bag. This helps the crust stay firm while the interior remains soft. Avoid airtight plastic containers because they trap moisture and soften the crust too much.
If you need to keep the loaf longer than a day or two, refrigerate it to maintain freshness. When ready to serve, warm slices gently in a low oven to restore texture. This bread also freezes well.
Slice the loaf before freezing so you can thaw only what you need. Wrap slices in parchment and place them in a freezer safe bag. Defrost at room temperature or toast straight from the freezer.
Best Ways to Enjoy Leftovers
Use leftover bread for buttered toast, sandwiches, or as a side with soups. Because it has a tender crumb, it reheats beautifully in a skillet with a small amount of butter.
Cubes of this bread work well in savory stuffing or as homemade croutons when toasted with a touch of oil and seasoning. The mild flavor makes it versatile and suited to both sweet and savory dishes.
Conclusion
No yeast buttermilk bread is a dependable, flavorful option for quick homemade baking. With simple ingredients, a soft dough, and a straightforward process, you get a warm loaf with a pleasant tang and golden crust.
Following the steps, tips, and storage suggestions helps you create a loaf that stays tender and satisfying. Try making this bread whenever you want something easy, comforting, and ready in under an hour.
Print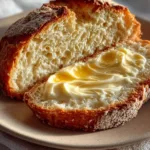
No Yeast Buttermilk Bread
- Total Time: 55 minutes
- Yield: 8 servings
Description
A quick no yeast buttermilk bread with a tender crumb and a golden crust. Ready in under an hour and made with simple pantry ingredients.
Ingredients
2 cups all purpose flour
2 teaspoons baking powder
1 half teaspoon baking soda
3 quarters teaspoon salt
1 tablespoon sugar
1 cup buttermilk
1 third cup sour cream
2 tablespoons sesame seeds or any seed topping
Instructions
1. Preheat oven to 400 degrees Fahrenheit and line a baking sheet with parchment paper.
2. Mix flour, baking powder, baking soda, salt, and sugar in a large bowl.
3. Stir buttermilk and sour cream together in another bowl.
4. Add the wet mixture to the dry mixture and stir until combined to form a soft dough.
5. Transfer dough onto the lined sheet and shape into a round or oval loaf.
6. Sprinkle seeds over the top.
7. Bake at 400 degrees Fahrenheit for ten minutes.
8. Reduce heat to 350 degrees and bake for twenty five minutes until golden and firm.
9. Cool for five minutes before slicing.
Notes
The dough should be slightly sticky and soft.
Avoid overmixing to prevent a dense texture.
Let the bread cool before cutting to maintain a structured crumb.
This bread freezes well and reheats nicely in the oven.
- Prep Time: 7 minutes
- Cook Time: 35 minutes
- Category: Bread
- Method: Baking
- Cuisine: American